
If you’re looking for a Halloween treat that’s as fun to make as it is to eat, you’re in for a real treat with this Witches Hat Cupcakes Recipe. I absolutely adore how these cupcakes turn out—moist chocolate chip filled cakes topped with vibrant green frosting and topped with adorable little witch hats that are almost too cute to eat! Whether you’re baking for a spooky party or just want to delight the kids, this recipe is not only delicious but also surprisingly easy. Trust me, you’ll want to stick around for every step.
Why You’ll Love This Recipe
- Fun and Festive Design: The witch’s hat toppers add a playful Halloween touch that kids and adults adore.
- Moist and Flavorful: Chocolate chips baked into every cupcake keep them soft, with a subtle chocolatey twist.
- Customizable Frosting: You control the green hue for the frosting, making these cupcakes perfect for your holiday color scheme.
- Make-Ahead Friendly: These cupcakes store well for at least a day, making party prep much easier.

Ingredients You’ll Need
The magic behind these Witches Hat Cupcakes lies in simple ingredients that you might already have on hand. Each one works together to create that perfect balance of fluffy cake, creamy frosting, and playful decoration. When shopping, pick the best quality butter and chocolate chips you can find — it really makes a difference!
- Unsalted butter: Using unsalted butter lets you control the salt level more precisely.
- Caster/white sugar: This gives the cupcakes a fine texture and sweet balance.
- Large eggs: Eggs bind the batter together and add richness to the cupcake.
- Vanilla extract: Adds a lovely warm flavor that’s more than just vanilla.
- Plain/all-purpose flour: The base for the cake; I always sift for even mixing.
- Baking powder: Essential for that perfect rise and fluffy texture.
- Salt: Just a pinch to enhance flavor depth.
- Milk chocolate chips: These melt within the cupcakes and add bursts of sweetness.
- Milk: Helps create a tender crumb; you’ll add a little extra to get the right batter consistency.
- Black food colouring: Use gel for vibrant color without thinning the batter.
- Icing/powdered sugar: For that soft, luscious frosting you’ll pipe on top.
- Green food colouring: Adjust to your preferred witchy green shade; gel works beautifully here, too.
- Black fondant icing: To make the witch’s hat cones – you want it pliable but firm.
- Oreos: Halved to form the hat brims — classic and tasty.
- Green fondant icing: For the hat bands; adds that final pop of color.
- Edible glue: A must-have to stick the fondant pieces together neatly.
Variations
One of the best things about the Witches Hat Cupcakes Recipe is how easy it is to tweak. I love experimenting with different frosting flavors and decorations depending on the season or party vibe. Feel free to make it your own!
- Chocolate or Vanilla Frosting: I once swapped the green buttercream for chocolate ganache to great effect; it gives a richer, more decadent twist.
- Dairy-free Version: You can replace butter with vegan margarine and milk with almond or oat milk, and it still works wonderfully.
- Different Hat Styles: Instead of Oreos and fondant, try edible wafer paper or shaped cookies for the hat base – adds a fun crunch!
How to Make Witches Hat Cupcakes Recipe
Step 1: Whip Up the Batter
Start by creaming the butter and sugar until it becomes light and fluffy—that’s key for moist cupcakes. I use a stand mixer on medium-high speed and usually set a timer for about 2 minutes so I don’t overdo it. Next, add eggs one at a time with vanilla, mixing thoroughly and scraping the bowl sides to keep everything uniform.
Step 2: Mix the Dry Ingredients and Add the Chocolate Chips
In a separate bowl, combine the flour, baking powder, salt, and chocolate chips. A trick I learned? Tossing the chocolate chips in flour helps them stay evenly distributed throughout the batter instead of sinking to the bottom during baking.
Step 3: Combine Wet and Dry Ingredients & Add Black Food Colouring
Slowly incorporate the flour mixture into the butter & egg mixture, mixing on low speed to avoid overworking the batter. Then add milk, blending just until smooth. Now comes the fun part: add black food coloring a little at a time—gel is best here. I usually use about a quarter of a small gel pot, mixing until the batter is a rich, even black. That’s the perfect spooky base for our witches’ hats!
Step 4: Bake and Cool the Cupcakes
Divide the batter evenly into cupcake liners, filling each about two-thirds full. I use a 2-tablespoon cookie scoop to keep portions consistent. Pop them into a preheated oven at 180°C (350°F) for 18-22 minutes. Don’t skip the skewer test to make sure they’re done. Once baked, cool them on a wire rack promptly, so the liners stick less—trust me, it makes a difference.
Step 5: Craft the Witch’s Hats
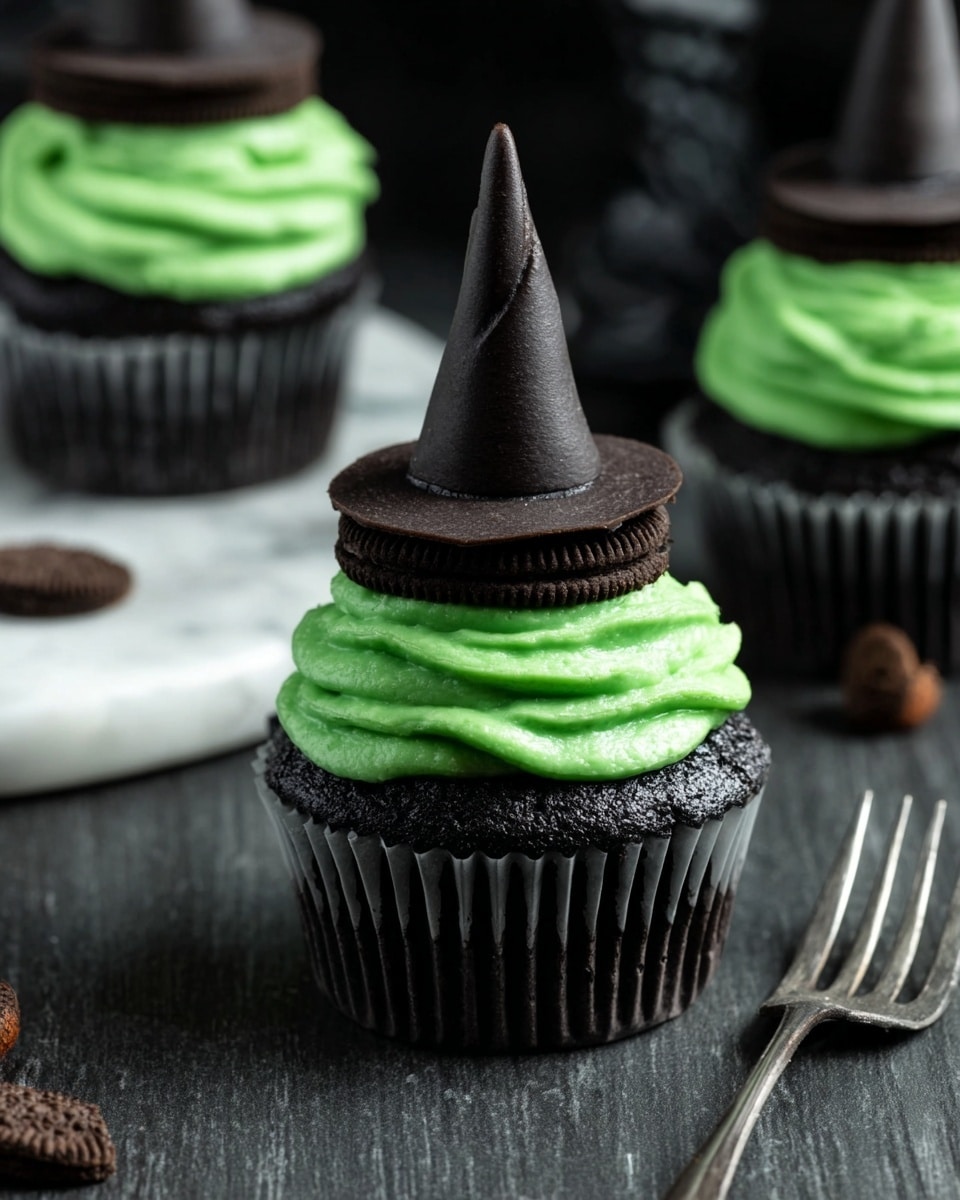
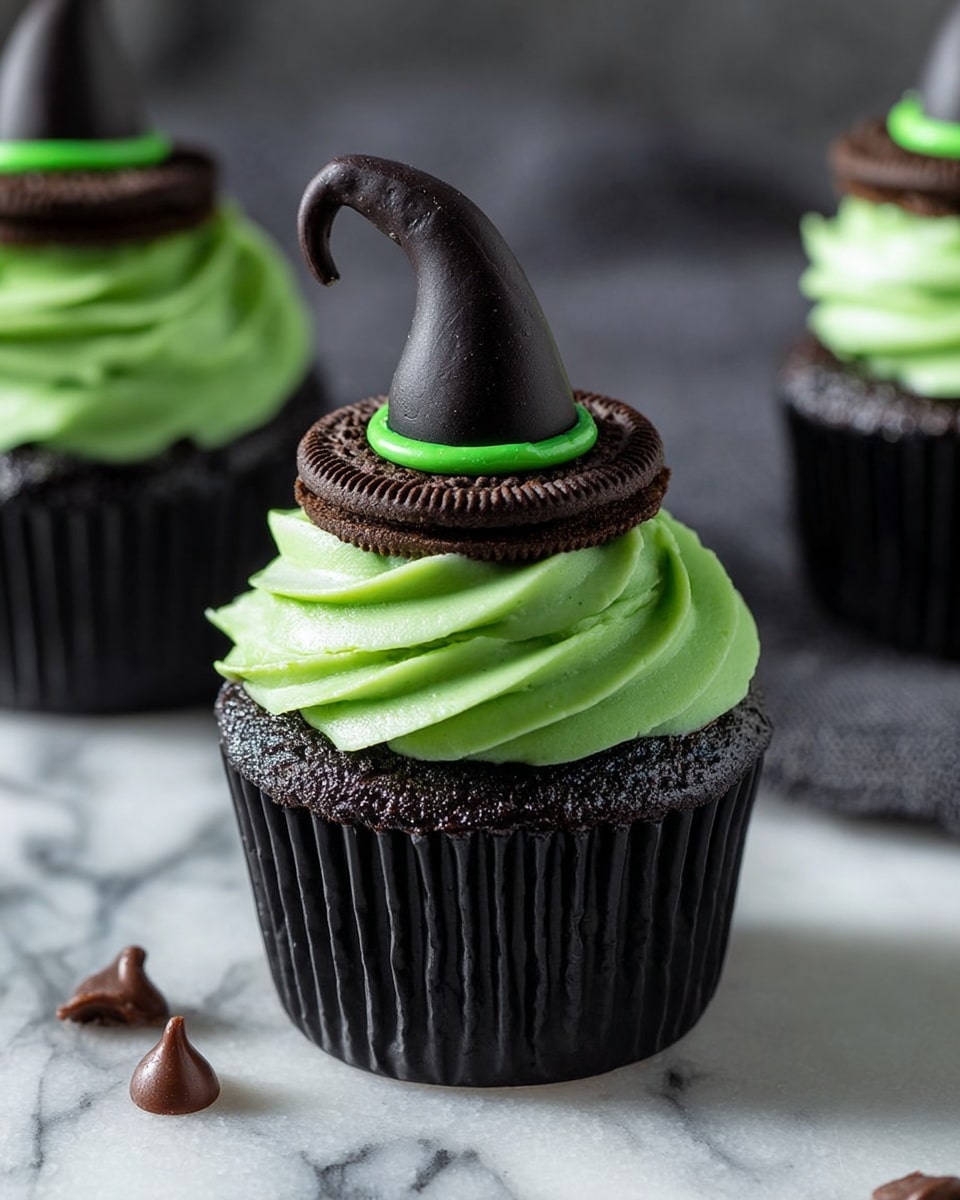
While the cupcakes cool, set up a clean work station for the hats. I love using a silicone pastry mat; it keeps things tidy. Place Oreo halves text-side up, then roll black fondant into little cones—the shape of a witch’s hat. Use edible glue to affix the hats to the Oreos. Cut thin green fondant strips to wrap around the hat base like a band. Pinch gently to seal and let the assembled hats sit for about 30 minutes to set.
Step 6: Make the Green Frosting
Cream together butter and icing sugar slowly at first, then crank the speed up to medium until it’s fluffy. Add milk and green food coloring little by little until the frosting reaches a vibrant, smooth consistency that pipes beautifully. Don’t rush here; the perfect frosting texture will hold its shape but remain light.
Step 7: Pipe Frosting and Top with Witch’s Hats
Fill your piping bag fitted with an open star nozzle halfway, then swirl the bright green frosting atop each cupcake. The final step? Gently place a witch’s hat on each swirl—straight up or tilted for character. I like mine standing tall; it makes the cupcakes extra photogenic!
Pro Tips for Making Witches Hat Cupcakes Recipe
- Use Gel Food Coloring Over Liquid: I learned gel gives a richer color without thinning the batter, so your cupcakes stay perfectly textured.
- Flour Coat the Chocolate Chips: Tossing chips in flour prevents them sinking and ensures every bite surprises you.
- Roll Fondant Between Your Hands: This warms it slightly, making shaping your witch hats smoother and easier.
- Cool Cupcakes Completely Before Frosting: Warm cupcakes will melt frosting and soften the Oreos, so give them at least 30 minutes to cool.
How to Serve Witches Hat Cupcakes Recipe
Garnishes
I like to keep garnishes simple so the witch hats shine. Sometimes I add a sprinkle of edible glitter or tiny chocolate stars on the frosting for an extra magical sparkle. You can also add a small candy spider near the hat for some creepy fun!
Side Dishes
These cupcakes pair wonderfully with a warm spiced apple cider or a creamy milkshake if you want to keep things kid-friendly. For adult gatherings, serve alongside coffee or a rich hot chocolate to complete your Halloween spread.
Creative Ways to Present
For parties, I love arranging the cupcakes on a tiered cake stand surrounded by autumn leaves and tiny pumpkins. Another hit is placing each cupcake inside little faux cauldron cups or black and orange cupcake wrappers to amp up the witchy theme.
Make Ahead and Storage
Storing Leftovers
I usually store leftovers in an airtight container in the fridge. The cupcakes stay moist and the frosting holds up well for about a day. Be aware the Oreo hats soften a bit if left too long, so I try to enjoy them within 24 hours of assembling.
Freezing
Freezing fully decorated Witches Hat Cupcakes isn’t my go-to because the fondant hats can lose their shape. Instead, I freeze the unfrosted cupcakes wrapped well in plastic and bake them fresh when needed. It saves time and keeps hat toppings looking fresh.
Reheating
If you’ve frozen cupcakes without frosting, just thaw at room temperature. For a warm treat, a quick 10-15 second zap in the microwave revives softness without drying them out. Then frost and decorate fresh before serving.
FAQs
-
Can I use regular food coloring instead of gel for this Witches Hat Cupcakes Recipe?
You can, but gel food coloring is recommended because it provides more vibrant colors without thinning out your cupcake batter or frosting. Using regular liquid coloring can make the batter or frosting too runny and affect texture.
-
How far in advance can I make these cupcakes?
You can bake and frost the cupcakes a few hours ahead of time, but I suggest assembling the witch hats just before serving to keep them firm and looking their best. If you make the hats early, store them separately in an airtight container.
-
What can I substitute if I don’t have fondant for the witch hats?
If fondant isn’t your thing, try making the hats from chocolate-dipped ice cream cones or using shaped cookies. Both are fun, edible alternatives that still look awesome and taste great.
-
Will the Oreo bases get soggy over time?
Yes, the Oreo halves soften slightly after sitting out for a day, especially if stored in the fridge with moist frosting nearby. For the best crunchy texture, assemble hats just before serving or store hats and cupcakes separately until needed.
Final Thoughts
This Witches Hat Cupcakes Recipe has genuinely become a favorite in my household every Halloween. They’re fun to make, irresistible to eat, and always a hit at parties. I love how it blends adorable presentation with delicious flavors, making the spooky season even sweeter. I’m excited for you to try this recipe and see just how easy it is to impress everyone with your witchy baking skills!
Print
Witches Hat Cupcakes Recipe
- Prep Time: 45 minutes
- Cook Time: 20 minutes
- Total Time: 1 hour 5 minutes
- Yield: 12 cupcakes 1x
- Category: Dessert
- Method: Baking
- Cuisine: American
Description
Witches Hat Cupcakes are a fun and festive treat perfect for Halloween or any spooky occasion. These chocolate chip cupcakes are tinted black with food coloring, topped with a fluffy green buttercream frosting, and adorned with handcrafted witches hats made from black and green fondant placed on Oreo cookie bases. The recipe combines creamy frosting with moist, chocolate-studded cupcakes for a deliciously spooky delight.
Ingredients
For the Cupcakes:
- 1 stick (113g) unsalted butter, at room temperature
- 1 cup (200g) caster/white sugar
- 2 large eggs
- 2 tsp vanilla extract
- 1 1/2 cups (210g) plain/all-purpose flour
- 2 tsp baking powder
- Pinch of salt
- 1 cup (175g) milk chocolate chips
- 1/3 cup + 2 tbsp (100ml) milk
- Black food colouring (Wilton gel recommended), as needed
For the Frosting:
- 2 sticks (226g) unsalted butter, at room temperature
- 2 1/2 cups (300g) icing/powdered sugar
- 1–2 tbsp milk
- Green food colouring (Wilton gel recommended), as needed
For the Witches Hat Decorations:
- 6 oz (175g) black fondant icing
- 6 Oreo cookies, halved and with filling scraped out
- 1.5 oz (42g) green fondant icing
- Edible glue
Instructions
- Preheat and Prepare: Preheat the oven to 180°C (350°F) and line a 12-hole cupcake tray with liners to prevent sticking.
- Make Cupcake Batter: In a large bowl or stand mixer, beat 1 stick of butter and sugar on medium-high speed until light and fluffy, about 2 minutes. Add eggs and vanilla extract, mixing for 1 minute until well combined.
- Mix Dry Ingredients: In a separate bowl, stir together flour, baking powder, salt, and chocolate chips to coat the chips with flour, preventing them from sinking in the batter.
- Combine Batter: Gradually add the dry mixture to the wet mixture and mix on low. Then add milk and continue mixing until combined. Add black food coloring gradually until the batter is evenly black and smooth.
- Fill Cupcake Liners and Bake: Divide the batter evenly among the liners, filling each about two-thirds full using a 2 tbsp cookie scoop for consistency. Bake for 18-22 minutes until the cupcakes rise and a skewer inserted comes out clean. Cool on a wire rack immediately to prevent liners from peeling.
- Create Witches Hat Decorations: While cupcakes cool, prepare the toppers. Place halved Oreos (text side up) on a silicone mat or flat surface. Divide black fondant into 12 small pieces. Roll each into a cone shape about 1/2 inch at the base, tapering to a point. Attach cones to Oreos with edible glue.
- Decorate Hat Bases: Cut green fondant into thin strips (~5mm thick), long enough to wrap around the base of each cone. Brush glue on cone bases and secure green strips around, pinching gently. Let set for 30 minutes.
- Make Frosting: Beat 2 sticks of butter and powdered sugar on low, then increase to medium until combined. Add 1/2 tbsp of milk and green food coloring bit by bit until desired vibrant green color is reached. Adjust milk to achieve light, fluffy, pipeable consistency.
- Pipe Frosting and Assemble: Fill a piping bag fitted with an open star nozzle halfway with frosting. Pipe swirls onto each cooled cupcake. Place a prepared witches hat decoration on top, either straight or at an angle.
- Serving and Storage: Serve immediately or store cupcakes in an airtight container in the fridge for up to 1 day. The Oreos soften after a day, but cupcakes will keep up to 3 days chilled.
Notes
- After attaching black fondant cones to Oreos, the tips can be kept straight or bent over to create different hat styles.
- Using gel-based food colouring is recommended for more vibrant and less watery coloring.
- Make sure to cool cupcakes completely before frosting to prevent melting.
- Use edible glue sparingly to ensure decorations adhere without excess moisture.
Nutrition
- Serving Size: 1 cupcake
- Calories: 350 kcal
- Sugar: 28 g
- Sodium: 150 mg
- Fat: 20 g
- Saturated Fat: 12 g
- Unsaturated Fat: 6 g
- Trans Fat: 0.3 g
- Carbohydrates: 40 g
- Fiber: 1 g
- Protein: 4 g
- Cholesterol: 70 mg

Your email address will not be published. Required fields are marked *