

If you’re hunting for the perfect spooky treat to impress your Halloween guests, look no further — this Vampire Donuts Recipe is fan-freaking-tastic. I absolutely love how these donuts turn out with their soft, fluffy texture, a rich cocoa glaze, and adorably eerie decorations that are perfect for getting everyone in the festive spirit. Stick around because I’ll share all my tips to make sure your Vampire Donuts come out flawless and fun every time!
Why You’ll Love This Recipe
- Gorgeous, Soft Texture: These donuts come out pillowy soft with every bite—a real crowd-pleaser.
- Fun and Festive: From candy eyes to red sanding sugar, the decorations bring Halloween vibes to life.
- Perfect Balance of Sweet & Cocoa: The glaze is just right — rich but not overpowering.
- Made from Scratch: No shortcuts here, so you get that homemade goodness that’s hard to beat.

Ingredients You’ll Need
These ingredients work together to create a magical donut experience — the yeast and warm liquids create a fluffy base, while the cocoa glaze adds that vampiric touch. Be sure to get fresh yeast and whole milk for the best results!
- Whole Milk: Using whole milk gives your donuts a rich, tender crumb.
- Granulated Sugar: Divided for activating yeast and sweetening the dough.
- Salt: Enhances all the flavors in the dough.
- Butter: Adds moisture and extra flavor to keep the donuts soft.
- Warm Water: Helps bloom the yeast perfectly; tap water warmed slightly works fine.
- Active Dry Yeast: The key leavening that makes your donuts light and fluffy.
- Eggs: Room temperature eggs help the dough bind and rise properly.
- All-Purpose Flour: The main structure builder; make sure to measure it properly for dough consistency.
- Vegetable Oil: For frying—choose a neutral oil with a high smoke point.
- Powdered Sugar: The base of your sweet cocoa glaze.
- Cocoa Powder: Unsweetened, for that rich chocolate flavor in the glaze.
- Milk or Water (for glaze): Use milk for a creamier glaze, water works if you want it lighter.
- Vanilla Extract: Adds warmth and depth to the glaze.
- Candy Eyes, Fall Leaf Sprinkles, Funfetti, Red Sanding Sugar: For decorating and making these donuts gloriously spooky.
Variations
I love mixing up this Vampire Donuts Recipe to keep things fresh and exciting. Once you’ve mastered the basics, feel free to switch up the toppings or even the glaze! Personalizing your donuts can be a blast, and I’ll share some of my favorite twists below.
- Spicy Chocolate Glaze: I once added a pinch of cayenne to the cocoa glaze, giving it a surprising warm kick that everyone loved.
- Pumpkin Spice Donuts: Swap some all-purpose flour with pumpkin puree and add cinnamon, nutmeg, and cloves for an autumnal twist.
- Vegan Version: Substitute butter for coconut oil, use plant-based milk, and an egg replacer like flaxseed meal – results are slightly different but still yummy!
- Extra Crunch: Try adding crushed nuts or cookie crumbs on top of the glaze for a fun texture contrast.
How to Make Vampire Donuts Recipe
Step 1: Prepare the milk mixture
Start by gently heating 1 ½ cups of whole milk in a medium saucepan over medium heat — watch it closely and remove it as soon as it begins to simmer. You don’t want to boil the milk, just warm it enough to melt the butter. Then stir in ½ cup granulated sugar, salt, and butter until everything melts smoothly. Set this aside while you bloom the yeast.
Step 2: Bloom the yeast
Pour warm water into a small bowl; add 1 tablespoon of granulated sugar and the yeast packets. Stir gently and leave it in a warm spot for about 5 minutes. You’ll see it foam up and create bubbles—that’s your yeast waking up and ready to work its magic.
Step 3: Combine and mix the dough
In your mixer bowl, pour the milk/butter mixture along with the activated yeast liquid. Then add the eggs and beat all together. Start mixing in 1 cup of flour with a dough hook attachment. Add the remaining flour a cup at a time until the dough starts coming together. Here’s my tip: don’t dump all the flour at once—you might end up with a dense dough!
Step 4: Knead and rise
Turn the dough onto a lightly floured surface and knead for about 5 minutes until it’s smooth and elastic. I love this part—it’s strangely therapeutic! Place the dough in a greased bowl, cover it with a kitchen towel, and let it rest in a warm place for about 60-90 minutes until it doubles in size.
Step 5: Punch down and second rise
After the first rise, punch the dough down gently to release the gases. Cover and let it rise again for about an hour. This second rise is what really builds that soft, fluffy texture we want.
Step 6: Cut your donuts
Roll the dough out on a floured surface to roughly 1-inch thickness. Use a donut or biscuit cutter to cut out your donuts, then use a smaller cutter to make the “hole” in the center. Place the cut donuts and holes on cookie sheets, ready for frying. It’s such a fun step because your kitchen starts to look like a Halloween bakery!
Step 7: Fry your vampire donuts
Heat vegetable oil in a deep fryer or large pot to 350°F. Using a metal spatula, carefully lower donuts in one or two at a time. Fry each side for about 1 minute—or until golden brown. Remove and drain on a wire rack set over a baking sheet. Don’t overcrowd the pot – it can cool your oil and leave your donuts greasy.
Step 8: Make the vampire glaze
Sift powdered sugar and cocoa powder together in a bowl. Slowly whisk in the milk and vanilla extract, little by little, until you get a smooth, pourable glaze. This glaze is what gives your Vampire Donuts their signature look and a hint of chocolate richness.
Step 9: Glaze and decorate
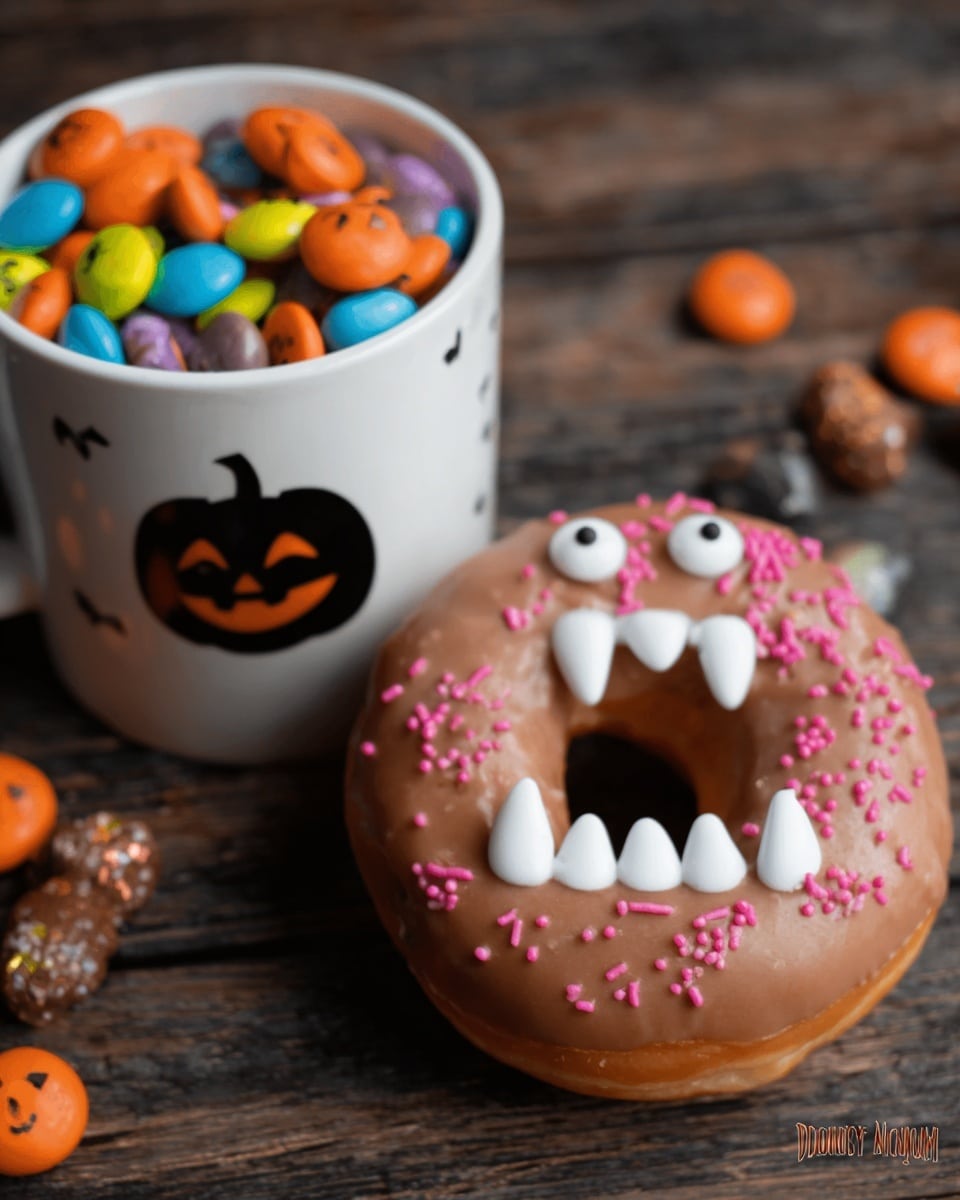
Dip each donut on one side into the glaze, then set on a wire rack to harden. Now for the fun part: sprinkle funfetti, red sanding sugar, and fall leaf sprinkles on top. Then fold plastic vampire fangs in half and carefully insert them in the donut holes to create that perfect creepy smile. Place candy eyes above, and you’ve got a donut that’s as adorable as it is spooky!
Pro Tips for Making Vampire Donuts Recipe
- Check Your Oil Temperature: I learned the hard way that oil that’s too hot burns the donuts outside while leaving them raw inside. Use a thermometer and keep it steady at 350°F.
- Don’t Overmix the Dough: Mix just until combined to keep the donuts tender, not tough from overdeveloped gluten.
- Use Fresh Yeast: Always check your yeast’s expiration, and bloom it in warm water to ensure your dough rises beautifully every time.
- Cool Properly Before Glazing: If the donuts are too hot, the glaze melts right off. Let them cool on a rack so the glaze sets perfectly.
How to Serve Vampire Donuts Recipe
Garnishes
I usually keep it classic with candy eyes and vampire fangs because it’s such a showstopper—but I also love adding edible glitter or a few edible fake spider web sprinkles for extra Halloween drama. The fall leaf sprinkles add a cozy vibe that I adore, especially if you’re serving these at an autumn party.
Side Dishes
These donuts pair perfectly with a warm cup of spiced cider or a creamy hot chocolate. I’ve also served them alongside pumpkin soup at a Halloween brunch, and the combo was a total hit—something about mixing sweet and savory made everyone ask for seconds.
Creative Ways to Present
For a Halloween party, I like arranging the Vampire Donuts on a black platter surrounded by fake cobwebs and plastic spiders. You can even serve each donut on little paper plates decorated like coffins or put cupcake liners underneath with themed prints. Making each donut look like a tiny vampire face with candy eyes and fangs never fails to get a laugh and some “ooohs.”
Make Ahead and Storage
Storing Leftovers
I store leftover Vampire Donuts in an airtight container at room temperature for up to 2 days. I’ve found that they stay best if the glaze is fully set before storing to prevent stickiness. After a day, the donuts soften up more but still taste delicious warm or at room temp.
Freezing
You can freeze the donuts after frying but before glazing. Freeze them flat on a baking sheet, then transfer to a freezer bag. When you’re ready, thaw at room temperature, then glaze just before serving. This has worked well for me when prepping for a party in advance.
Reheating
To reheat, I gently warm the donuts in a preheated 300°F oven for about 5-7 minutes. This revives their fresh-baked softness without melting the glaze too much. If glazed, keep an eye on them so you don’t accidentally soften your beautifully decorated treats.
FAQs
-
Can I make this Vampire Donuts Recipe without a stand mixer?
Absolutely! I’ve made this dough by hand many times. Just mix the wet ingredients with a whisk, then gradually add flour and knead on a floured surface until smooth and elastic. It takes a bit more elbow grease, but the results are just as tasty.
-
How do I know when the oil is hot enough for frying?
The best way is to use a deep-fry thermometer to maintain 350°F. Without one, try dropping a small piece of dough into the oil — it should sizzle immediately and rise to the surface without turning dark too fast. Keep adjusting the heat as needed.
-
Can I use a different kind of glaze for these donuts?
Definitely! While the cocoa glaze is my favorite for this recipe, you can use a simple vanilla glaze, cream cheese frosting, or even a raspberry glaze to switch things up and add your own twist.
-
What if my yeast doesn’t foam during blooming?
If your yeast doesn’t foam after 5-10 minutes, it’s likely inactive. This can happen if the yeast is old or the water temperature was too hot or cold. It’s best to start over with fresh yeast since good yeast activity is crucial for fluffy donuts.
-
How many donuts does this recipe yield?
You’ll get about 24 donuts from this recipe, depending on how thick you roll out the dough and the size of your cutters. Perfect for sharing at a Halloween party!
Final Thoughts
This Vampire Donuts Recipe has become such a special go-to for my family’s Halloween celebrations. There’s something so satisfying about creating something from scratch that looks and tastes amazing — plus, who can resist those silly vampire fangs and candy eyes? I hope you’ll try these donuts out and make your own spooky memories with them. Trust me, once you do, these might just become your new Halloween tradition!
Print
Vampire Donuts Recipe
- Prep Time: 30 minutes
- Cook Time: 3 minutes 2 seconds
- Total Time: 2 hours 33 minutes 2 seconds
- Yield: 24 donuts 1x
- Category: Dessert
- Method: Frying
- Cuisine: American
Description
These Vampire Donuts are a fun and spooky treat perfect for Halloween. Soft, fluffy yeast donuts are fried to golden perfection, then dipped in a chocolate glaze and decorated with candy eyes, fall leaf sprinkles, and funfetti for a festive touch. The addition of playful vampire fangs makes these donuts an entertaining centerpiece for any Halloween celebration.
Ingredients
Dough
- 2 cups whole milk, divided
- 1/2 cup plus 3 tablespoons granulated sugar, divided
- 1/2 tsp salt
- 1/2 cup butter
- 1 1/2 cups warm water (warm tap water is fine)
- 2 packages (.25 ounce each, .5 ounce total) dry active yeast
- 2 eggs, at room temperature
- 9 cups all-purpose flour, plus additional for kneading
Frying
- Vegetable oil for frying (enough to fill pot 2 inches deep)
Glaze and Decoration
- 3 cups powdered sugar
- 1/2 cup cocoa powder
- 1/4 cup milk or water
- 2 teaspoons vanilla extract
- Candy eyes
- Fall leaf sprinkles
- Funfetti, assorted bead-shaped
- Red sanding sugar
- Plastic vampire fangs (for decoration)
Instructions
- Prepare the milk mixture: In a medium saucepan, heat 1 ½ cups of whole milk over medium heat just until it begins to simmer. Remove from heat and stir in ½ cup granulated sugar, salt, and butter until melted. Set aside to cool slightly.
- Bloom the yeast: In a small bowl, combine warm water with 1 tablespoon granulated sugar and the yeast packets. Stir and let sit for 5 minutes until foamy and bubbly, indicating the yeast is active.
- Mix wet ingredients: In the stand mixer’s bowl, combine the yeast mixture and milk/butter mixture. Add the eggs and beat with an electric mixer until well blended.
- Add flour: Gradually add 1 cup of flour to the wet mixture, mixing with the dough hook attachment. Then add the remaining flour 1 cup at a time, mixing just until incorporated. Avoid overmixing.
- Knead the dough: Turn dough onto a floured surface and knead for about 5 minutes until smooth and elastic, adding flour as necessary to prevent sticking.
- First rise: Place the dough in a greased large bowl, cover with a kitchen towel, and leave in a warm place to rise until doubled in size, about 60-90 minutes.
- Second rise: Punch down the dough, cover again, and let it rise for an additional 60 minutes until puffy.
- Shape the donuts: Turn the dough out onto a clean surface and roll it to about 1-inch thick. Cut out donut shapes using a donut or biscuit cutter, then cut out the centers with a smaller cutter. Place cut donuts on cookie sheets.
- Prepare oil and fry: Heat vegetable oil in a large pot or deep fryer to 350°F (175°C). Carefully lower donuts one or two at a time into the hot oil using a metal spatula. Fry each side for about 1 minute or until golden brown.
- Drain and cool: Remove donuts from oil and place on a cooling rack with a baking sheet underneath to catch drips. Let cool slightly before glazing.
- Make the glaze: Sift powdered sugar and cocoa powder into a medium bowl. Slowly add milk (or water) and vanilla a little at a time, stirring until you achieve a smooth, pourable glaze.
- Glaze the donuts: Dip each donut on one side into the glaze, then place back on the wire rack to allow the glaze to set and harden.
- Decorate: Sprinkle funfetti, red sanding sugar, and fall leaf sprinkles over the glazed surface. Fold plastic vampire fangs in half and place one in the donut hole to resemble a vampire mouth. Add candy eyes above the mouth for a spooky effect.
Notes
- This recipe is perfect as a festive and easy Halloween treat, combining classic yeast donuts with fun, spooky decorations.
- Make sure the oil temperature stays consistent at 350°F for even frying and a golden finish.
- The glaze can be adjusted in thickness by adding more milk or powdered sugar to reach the desired consistency.
- Using stale or day-old flour can affect the dough’s texture; fresh all-purpose flour produces the best results.
- Allow donuts to cool slightly before glazing to prevent melting the glaze completely.
Nutrition
- Serving Size: 1 donut
- Calories: 300
- Sugar: 17 grams
- Sodium: 97 milligrams
- Fat: 6 grams
- Saturated Fat: 3 grams
- Unsaturated Fat: 2 grams
- Trans Fat: 0 grams
- Carbohydrates: 54 grams
- Fiber: 2 grams
- Protein: 7 grams
- Cholesterol: 28 milligrams

Your email address will not be published. Required fields are marked *