

If you’re craving a dessert that’s both refreshingly fruity and decadently creamy, then you’re absolutely going to adore this Strawberry Crunch Cheesecake Recipe. I first tried this one at a family gathering, and let me tell you, it was an instant hit. The way the crunchy cookie crust melds with the silky cheesecake and bursts of strawberry flavor is just fan-freaking-tastic. Stick around—I’ll walk you through every delicious detail so you can make this crowd-pleaser yourself!
Why You’ll Love This Recipe
- Perfect balance of textures: The smooth cheesecake base contrasts beautifully with the crunchy cookie toppings for a delightful bite every time.
- No-bake and easy to assemble: No oven required, just a little patience while it sets, which makes it a stress-free dessert.
- Strawberry infused flavor: The strawberry gelatin and wafer cookies add a fresh, fruity kick that’s irresistible.
- Crowd-pleaser with flair: It looks as fantastic as it tastes—your guests will be impressed!

Ingredients You’ll Need
The magic of this Strawberry Crunch Cheesecake Recipe lies in its simple, everyday ingredients that come together to create a flavor combo that’s anything but ordinary. Be sure to use quality cream cheese and fresh whipping cream for the creamiest filling.

- Vanilla cream cookies: These form the crunchy crust and topping—opt for a brand with a nice vanilla flavor.
- Butter: Melts easily into the cookie crumbs to bind your crust perfectly.
- Strawberry gelatin: Key for that vibrant strawberry taste and beautiful color.
- Boiling water: Needed to dissolve the gelatin thoroughly.
- Cream cheese: Make sure it’s softened to room temperature—this helps you get a silky smooth filling.
- Granulated sugar: Sweetens the cream cheese filling just right.
- Heavy whipping cream: Whipped to stiff peaks, it adds that lightness to the cheesecake layer.
- Powdered sugar: Keeps the whipped cream sweet and smooth without graininess.
- Strawberry wafer cookies: Crush them for a flavorful and colorful crunch topping.
- Whipped topping: For extra flair—pipe on just before serving.
Variations
I love how versatile this Strawberry Crunch Cheesecake Recipe is. Over the years, I’ve played around with a few versions depending on the season or our dietary needs, and I encourage you to make it your own too!
- Using fresh strawberries: You can replace or add to the strawberry gelatin with a layer of fresh strawberries for a juicy and more natural strawberry flavor—I did this last summer, and my guests loved the burst of freshness.
- Gluten-free version: Swap the vanilla cream cookies with gluten-free cookies; it worked well for my friend who’s celiac!
- Chocolate twist: Mix crushed chocolate wafers with the vanilla cookies in the topping for an unexpected flavor boost—yummy if you’re a chocolate fan like me.
- Reduced sugar option: Use a sugar substitute or reduce sugar amounts slightly; just be sure to taste as you go.
How to Make Strawberry Crunch Cheesecake Recipe
Step 1: Prep the Crunchy Cookie Crust
Grab about 26 of your vanilla cream cookies and toss them into a food processor. Pulse until you get fine crumbs—it should look a bit like sand. Then pour in the melted butter and pulse again until the mixture feels like damp sand, which means it will hold together when pressed. Press this evenly into the bottom of a greased 10-inch springform pan for a sturdy, flavorful crust. Pop the pan in the freezer for about 15 minutes to firm up before you start the filling. This chilling step helps the crust keep its shape later—trust me, it makes slicing so much cleaner!
Step 2: Make the Strawberry Gelatin Base
Boil one cup of water and stir in the strawberry gelatin powder for a full two minutes to make sure it dissolves completely. I’ve learned the hard way that skipping this step results in gritty bits in the final cheesecake, which is no fun. Let the mixture cool, but don’t refrigerate it because it can set too fast and ruin your layers.
Step 3: Whip the Cream Cheese Mixture
While the gelatin cools, beat the softened cream cheese with the granulated sugar until you get a smooth, fluffy mix. Separately, whip the heavy whipping cream and powdered sugar until stiff peaks form—that means when you lift your whisk, the peaks hold their shape without drooping. Divide your whipped cream in two bowls: fold half gently into the cream cheese mixture and the other half into the cooled gelatin. This dual combination keeps the cheesecake light but packed with strawberry flavor—such a neat trick I discovered after a few trials!
Step 4: Assemble Your Strawberry Crunch Cheesecake Recipe
Pour half of the strawberry gelatin mixture over your chilled cookie crust, spreading it carefully and putting the pan back into the freezer for another 15 minutes to set. This layering keeps your cheesecake from becoming a messy swirl and helps those distinct flavors shine through.
Once set, spread the creamy cream cheese mixture evenly over the gelatin layer, then top it with the rest of the strawberry mixture—this triple-layer magic is what makes this cheesecake so special!
Step 5: Add That Delicious Crunchy Topping
Grab the remaining vanilla cream cookies and strawberry wafer cookies and crush them coarsely—no need for fine crumbs here. I like to put them in a zip-top bag and gently roll a rolling pin over it. Sometimes, I get a bit playful and add a few drops of red or pink food coloring to give the topping a vibrant pop. Sprinkle this crunchy mix generously over the top of your cheesecake. Cover and refrigerate for at least 4 hours or overnight if you can—it needs time to set fully and develop flavor.
Step 6: Final Touches and Serving
Right before serving, pipe on some whipped topping with a star tip for that fancy look. It adds a smooth, fluffy contrast to the crunchy topping and a bit of extra sweetness. This step makes the cheesecake party-ready, and your guests will definitely notice the little details!
Pro Tips for Making Strawberry Crunch Cheesecake Recipe
- Softening Cream Cheese: Always leave your cream cheese out for at least 30 minutes before mixing—it makes blending so much easier and helps avoid lumps.
- Perfect Whipped Cream: Chill your bowl and beaters beforehand; cold equipment helps the cream whip to stiff peaks faster.
- Layering Patience: Don’t rush setting times in the freezer—they help set each layer so your cheesecake slices cleanly with sharp, pretty layers.
- Crunchy Topping Care: Crush your cookies coarsely for the perfect texture—too fine and it can become soggy; too big and it falls off.
How to Serve Strawberry Crunch Cheesecake Recipe

Garnishes
For me, fresh sliced strawberries are always the perfect finishing touch on top—besides the fun cookie crunch! You can also add a few mint leaves for color and a light herbal contrast to the sweetness. The whipped topping stars add an elegant look and extra creaminess, making every slice feel like a little celebration.
Side Dishes
I like pairing this cheesecake with a simple cup of freshly brewed coffee or berry-infused iced tea. If you’re serving it as part of a larger meal, a light fruit salad or crisp green salad with a vinaigrette balances the richness nicely.
Creative Ways to Present
For special occasions, I’ve layered this cheesecake in clear individual dessert cups and topped each with mini wafer cookies and fresh berries. It makes for a charming presentation and easy, mess-free serving. Another favorite is using edible flowers on top for a pretty spring or summer vibe—your guests will be wowed!
Make Ahead and Storage
Storing Leftovers
This cheesecake stays fresh in the fridge for up to 4 days. I keep it covered tightly with plastic wrap or a cake dome to protect it from absorbing other fridge smells. It’s perfect for preparing a day ahead for a party or simply enjoying leftovers without losing the creamy texture or crunchy top.
Freezing
You can freeze the Strawberry Crunch Cheesecake Recipe, though I recommend freezing before adding the crunchy topping for best texture. Wrap the whole cake tightly in plastic wrap and then foil. When you’re ready to serve, thaw it overnight in the fridge and add the cookie crunch last minute to maintain the crispy bite.
Reheating
Since this is a no-bake cheesecake, reheating isn’t really necessary. I usually just let leftovers sit at room temperature for about 10 minutes before slicing and serving again—this softens the filling slightly and makes for the best texture and flavor.
FAQs
-
Can I use other fruits besides strawberries in this recipe?
Absolutely! While strawberries are classic here, you can swap the strawberry gelatin and wafers for flavors like raspberry, blueberry, or cherry. Just match your cookie topping to complement the fruit flavor for the best results.
-
Do I need a springform pan for this cheesecake?
A springform pan is recommended because it makes removing the cheesecake much easier without damaging the delicate layers. If you don’t have one, you can use a regular cake pan lined with parchment paper, just be extra careful when releasing the cake.
-
How long does it take for the cheesecake to fully set?
After assembling, it’s best to chill the cheesecake in the refrigerator for at least 4 hours, but overnight is even better. This ensures all layers are firm and flavors meld nicely.
-
Can I make this cheesecake vegan or dairy-free?
You can try substituting the cream cheese and heavy cream with plant-based alternatives like vegan cream cheese and coconut cream. The gelatin can be replaced with agar-agar for a similar setting effect. I recommend experimenting with small batches first to get the texture right.
Final Thoughts
I absolutely love how this Strawberry Crunch Cheesecake Recipe brings bright strawberry flavor together with creamy cheesecake and that unforgettable cookie crunch. It’s one of those recipes I keep coming back to whenever I want to impress friends or treat my family to something special without too much fuss. Give it a try—I’m confident you’ll fall in love with it just like I did. And hey, if you make a fun twist or have your own tips, drop me a line—I always love hearing from fellow cheesecake fans!
Print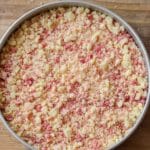
Strawberry Crunch Cheesecake Recipe
- Prep Time: 30 minutes
- Cook Time: 0 minutes
- Total Time: 4 hours 30 minutes (including chilling time)
- Yield: 12 servings 1x
- Category: Dessert
- Method: No-Cook
- Cuisine: American
Description
Strawberry Crunch Cheesecake is a no-bake, creamy dessert featuring a buttery vanilla cream cookie crust layered with smooth strawberry gelatin and cream cheese filling. Topped with a crunchy mix of crushed cookies and whipped topping, this refreshing dessert is perfect for summer gatherings or any festive occasion.
Ingredients
Crust Ingredients:
- 1 lb vanilla cream cookies (about 34 cookies), divided
- 6 tablespoons butter, melted
Filling Ingredients:
- 1 small box (3.3 oz) strawberry gelatin
- 1 cup boiling water
- 2 bricks (8 oz each) cream cheese, softened
- 3/4 cup granulated sugar
- 2 cups heavy whipping cream
- 1/2 cup powdered sugar
- 10 strawberry wafer cookies (about 4 oz)
Topping:
- About half a small tub of whipped topping, thawed and placed into a pastry bag with a star tip
Instructions
- Prepare the Crust: Place 26 vanilla cream cookies into a food processor and pulse until finely ground. Add melted butter and pulse again until mixture resembles wet sand. Press the crumb mixture evenly into the bottom of a greased 10-inch springform pan. Freeze for 15 minutes to set.
- Dissolve the Gelatin: In a bowl, combine the strawberry gelatin powder with 1 cup boiling water. Stir continuously for 2 minutes until completely dissolved. Allow the mixture to cool at room temperature, but do not refrigerate.
- Make the Cream Cheese Mixture: In a separate bowl, beat softened cream cheese with granulated sugar until creamy and smooth. Set aside.
- Whip the Cream: In another chilled bowl, beat heavy whipping cream with powdered sugar until stiff peaks form. Be sure to scrape down the sides of the bowl once to ensure even whipping.
- Combine Mixtures: Gently fold half of the whipped cream into the cream cheese mixture until smooth. Separately whisk the remaining whipped cream into the cooled gelatin until well combined.
- Assemble the Cheesecake: Pour half of the gelatin mixture over the chilled crust in the springform pan and freeze for 15 minutes until set. Remove from freezer, spread the cream cheese mixture evenly on top, then pour the remaining gelatin mixture over it.
- Prepare the Crunch Topping: Coarsely crush the remaining 8 vanilla cream cookies and the 10 strawberry wafer cookies using a tart shaper or by placing them in a sealed sandwich bag and crushing with a rolling pin. Optionally, add a few drops of food coloring to the crushed cookies and mix well to achieve a colored topping.
- Add the Topping and Chill: Sprinkle the crushed cookie mixture evenly over the assembled layers. Refrigerate the entire cheesecake for at least 4 hours or until thoroughly set and ready to serve.
- Serve: Just before serving, pipe the thawed whipped topping onto the cheesecake using a pastry bag fitted with a star tip for an attractive presentation.
Notes
- Serves 12 people.
- For best results, use fully softened cream cheese and chilled whipping cream.
- Do not refrigerate gelatin mixture before combining to prevent premature setting.
- Customize your topping colors with food coloring for added visual appeal.
- This cheesecake is a no-bake recipe, making it quick and easy to prepare.
Nutrition
- Serving Size: 1 slice (1/12 of cheesecake)
- Calories: 370 kcal
- Sugar: 28 g
- Sodium: 210 mg
- Fat: 25 g
- Saturated Fat: 15 g
- Unsaturated Fat: 8 g
- Trans Fat: 0 g
- Carbohydrates: 28 g
- Fiber: 1 g
- Protein: 5 g
- Cholesterol: 70 mg

Your email address will not be published. Required fields are marked *