

I’m so excited to share this insanely delicious Red Velvet Cheesecake with Oreo Crust Recipe with you! If you love the rich, creamy texture of cheesecake combined with the luscious flavors of red velvet cake, plus a chocolatey Oreo crust, then you’re in for a treat. This cheesecake has become one of my all-time favorites because it feels fancy yet is surprisingly easy to make at home. Trust me, once you try it, you’ll be hooked just like my family is!
Why You’ll Love This Recipe
- Rich, Creamy Texture: The cheesecake filling is silky smooth with just the right density—no cracks or dryness here!
- Decadent Oreo Crust: Using crushed Oreos adds chocolate crunch and perfectly complements the red velvet flavor.
- Showstopper Presentation: That vibrant red color and creamy frosting will wow everyone at your table.
- Make-Ahead Friendly: Prep in advance and chill overnight for easy entertaining or meal prep.

Ingredients You’ll Need
Each ingredient in this Red Velvet Cheesecake with Oreo Crust Recipe plays a vital role to build that perfect balance of flavors and textures. From the crunchy Oreo crust foundation to the smooth, tangy cream cheese filling and luscious frosting, every piece works harmoniously. When shopping, try to grab good-quality cream cheese and fresh eggs — your cheesecake will taste that much better!

- Oreo cookies: About 30 cookies crushed into fine crumbs for a sturdy, chocolatey crust.
- Unsalted butter: Melted to bind the crust crumbs — I find unsalted keeps the flavor more balanced.
- Cream cheese: The star for the creamy cheesecake filling and frosting; make sure it’s softened for easy mixing.
- Granulated sugar: Sweetens the cheesecake filling perfectly without overpowering.
- Dutch-processed cocoa powder: Adds subtle cocoa bitterness and depth to the red velvet flavor.
- Sour cream: Brings tang and moisture for that rich cheesecake texture.
- White vinegar: Enhances the red velvet cake flavor and helps with texture.
- Vanilla extract: Essential for that warm, sweet aroma throughout the cheesecake and frosting.
- Red food coloring: For that iconic bright red, I usually use about 1.5 ounces but start low and add more if needed.
- Large eggs: Room temperature and lightly beaten, eggs help bind the cheesecake filling.
- Confectioners’ sugar: For the frosting’s smooth sweetness.
- Unsalted butter (for frosting): Softened to blend effortlessly into the cream cheese for luscious frosting.
Variations
I love that this Red Velvet Cheesecake with Oreo Crust Recipe can be easily tweaked to suit different tastes or occasions. Don’t be shy about making it your own—whether it’s dialing back the food coloring, swapping out the crust, or adding seasonal flair.
- Crust alternatives: I once swapped the Oreo crust for a graham cracker crust to lighten the chocolate punch; it was still tasty but with a different vibe.
- Dairy-free version: Try vegan cream cheese and coconut cream if you’re avoiding dairy—just expect a slightly different flavor and texture.
- Extra chocolate: Fold in mini chocolate chips or swirl melted dark chocolate into the batter for chocolate lovers like me.
- Festive toppings: Sprinkle red velvet cake crumbs, crushed Oreos, or even edible glitter on top for celebrations.
How to Make Red Velvet Cheesecake with Oreo Crust Recipe
Step 1: Prep the Oreo Crust and Pan
Start by moving your oven rack to the lower third position and preheat your oven to 350°F. This positioning helps the crust bake evenly without burning. Grab a 9-inch springform pan, and make sure to wrap the outside bottom tightly with two layers of heavy-duty foil—this creates a leakproof barrier so water from the later water bath won’t seep in. Mix the crushed Oreo cookies with melted butter, then press this mixture into the bottom and about two inches up the sides of the pan. Baking the crust for 10 minutes sets it nicely. I find using the bottom of a glass cup makes pressing the crust very even and firm!
Step 2: Mix the Cheesecake Filling
Lower the oven temperature to 300°F. In a large mixer bowl, beat your softened cream cheese on medium-low speed until completely smooth and creamy—this takes about a minute, and it prevents lumps. Add granulated sugar and Dutch-processed cocoa powder and continue mixing until fully combined. Next, add sour cream, vinegar, vanilla extract, and the red food coloring (start with one ounce and gradually add more to reach your desired vibrancy). Keep mixing until the batter looks smooth and evenly colored. Now, using a spatula, fold in your lightly beaten eggs in batches. Be gentle here—overmixing at this stage can add too much air and cause cracks during baking.
Step 3: Bake Your Cheesecake in a Water Bath
Pour the cheesecake batter carefully over your cooled crust. Place the springform pan inside a large roasting pan on the oven rack. Carefully pour boiling water into the roasting pan until it comes halfway up the sides of your springform pan—this water bath keeps the cheesecake moist and helps prevent cracks. Bake for about an hour, or until the edges look set but the center still jiggles slightly. I always watch the cheesecake closely near the end—if the top looks dry too soon, it might need more water or slightly lower heat. Once time’s up, turn off the oven but leave the cake inside the water bath for another hour to finish setting perfectly without a rush. Remove from the bath and run a thin knife around the edges to loosen it before cooling completely. Cover and chill for 4 hours or overnight, which I highly recommend to develop flavor and firmness.
Step 4: Make the Cream Cheese Frosting
When your cheesecake is fully chilled, whip together the frosting. Beat softened cream cheese and butter on medium speed until super creamy with no lumps. Add confectioners’ sugar and vanilla, first mixing on low to avoid dust clouds, then bump up to medium until the frosting is smooth and spreadable. I like to give it a quick taste here—it should be sweet but balanced against the tang of the cheesecake. Then gently spread this frosting evenly over the top of the cheesecake. Keep it chilled until you’re ready to serve!
Pro Tips for Making Red Velvet Cheesecake with Oreo Crust Recipe
- Leakproof Water Bath: Wrapping your pan well in heavy-duty foil is a game-changer to avoid soggy crust or water intrusion.
- Egg Incorporation: Always fold in eggs gently with a spatula to prevent too much air—this helps keep the cheesecake creamier and crack-free.
- Color Control: Start with less red food coloring and add gradually to get that perfect red velvet hue without overpowering flavor.
- Baking Temperature: Baking at 300°F and letting the cake rest in the oven for an hour after cooking helps avoid cracks and ensures a smooth finish.
How to Serve Red Velvet Cheesecake with Oreo Crust Recipe

Garnishes
I love to keep garnishes simple so the cheesecake remains the star! A light dusting of cocoa powder or some crushed Oreo crumbs sprinkled on top adds subtle texture and looks beautiful. Sometimes, I add a few fresh raspberries or a sprig of mint for a pop of freshness and color contrast—it’s stunning and tasty. If I’m feeling festive, a drizzle of white chocolate ganache takes it over the top. Whatever you choose, the frosting is so luscious that you don’t need much else.
Side Dishes
This cheesecake is rich, so I usually pair it with light and fruity options like fresh mixed berries or a citrusy fruit salad to balance each bite. A scoop of vanilla bean ice cream is also a family favorite – the cold creaminess with the cheesecake’s density creates an indulgent combo that my kids go crazy for!
Creative Ways to Present
For special occasions, I’ve turned this cheesecake into mini individual cheesecakes in cupcake liners with Oreo crust bottoms—so fun for parties or gifts! Another trick is layering this cheesecake in a trifle dish with alternating layers of red velvet cake crumbs, cream cheese frosting, and whipped cream for an eye-catching parfait-style dessert. No matter the method, the vibrant red and deep chocolate crust always gets compliments.
Make Ahead and Storage
Storing Leftovers
I always store leftover Red Velvet Cheesecake with Oreo Crust in the refrigerator, tightly covered to prevent it from absorbing any fridge odors. Covered well, it tastes just as fresh after 3-4 days, although fair warning: it rarely lasts that long in my house! If you want easy slices ready for the week, this is perfect prep.
Freezing
I’ve frozen this cheesecake a few times with great results. After frosting, I tightly wrap it in plastic, then foil, and pop it in the freezer. When you’re ready to eat, thaw it in the refrigerator overnight—this retains the smooth texture surprisingly well. Just remember the frosting might shift a tiny bit, but it’s nothing a quick spread fixes.
Reheating
Cheesecake is best served cold, but if you prefer it slightly softer, I pop individual slices at room temperature for 10-15 minutes before serving. Avoid microwaving—you risk melting the frosting and ruining the texture. This way, you get a perfect slice every time.
FAQs
-
Can I use regular cookie crumbs instead of Oreos for the crust?
Absolutely! While Oreos add a rich chocolate flavor, you can substitute graham cracker crumbs, chocolate wafer cookies, or even chocolate chip cookies depending on your taste. Just make sure to crush them finely and mix well with melted butter to form a sturdy crust.
-
Why do we bake the cheesecake in a water bath?
The water bath creates gentle, even heat around the cheesecake during baking, which helps prevent cracks and keeps the texture creamy and smooth. It also adds moisture to the oven environment, stopping the cheesecake from drying out.
-
How much red food coloring should I use for the cheesecake?
I usually start with about 1 ounce of red food coloring and add up to 1.5 ounces depending on how vibrant you want your cheesecake. Remember, it’s easy to add more but impossible to take it out once mixed, so add gradually!
-
Can I make this cheesecake ahead of time?
Yes! This cheesecake is perfect for making the day before. Just cover tightly and refrigerate for at least 4 hours or overnight—the flavors deepen and texture firms up nicely. It also freezes well for longer storage.
Final Thoughts
I honestly can’t recommend this Red Velvet Cheesecake with Oreo Crust Recipe enough—it’s become my go-to dessert for birthdays, holidays, or whenever I want to impress without spending all day in the kitchen. The balance of textures and flavors feels so indulgent, yet it’s approachable enough for any home baker. Give it a try and you’ll see why my family keeps asking for seconds and thirds. Happy baking, friend!
Print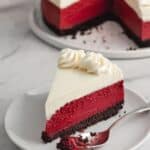
Red Velvet Cheesecake with Oreo Crust Recipe
- Prep Time: 1 hour 25 minutes
- Cook Time: 1 hour 17 minutes
- Total Time: 6 hours 42 minutes
- Yield: 12 servings 1x
- Category: Dessert
- Method: Baking
- Cuisine: American
Description
This decadent Red Velvet Cheesecake combines the rich, creamy texture of classic cheesecake with the deep cocoa flavor and signature red color of red velvet cake. Featuring a crunchy Oreo cookie crust, a smooth and velvety cocoa-infused cheesecake filling enhanced with sour cream and a touch of vinegar, and topped with a luscious cream cheese frosting, this dessert promises a perfect balance of flavors and textures ideal for special occasions or any indulgent treat.
Ingredients
For the crust
- 2 ½ cups (250 g) crushed Oreo cookies, about 30 cookies
- 5 tablespoons unsalted butter, melted
For the cheesecake
- 32 ounces (908 g) cream cheese, softened
- 1 ⅓ cups (267 g) granulated sugar
- ½ cup (42 g) Dutch-processed cocoa powder
- 1 cup (227 g) sour cream, room temperature
- 1 tablespoon white vinegar
- 1 tablespoon vanilla extract
- 1–2 ounces red food coloring
- 4 large eggs, room temperature, lightly beaten
For the frosting
- 4 ounces (113 g) cream cheese, softened
- ¼ cup (56 g) unsalted butter, softened
- 2 cups (260 g) confectioners’ sugar
- 1 teaspoon vanilla extract
Instructions
- Make the crust: Move the oven rack to the lower third position (just below the center) and preheat the oven to 350°F. Wrap the outside bottom of a 9-inch springform pan tightly with two layers of heavy-duty aluminum foil to prevent leaks. Combine the crushed Oreo cookies with melted butter until evenly mixed. Press this crumb mixture firmly into the bottom and up about 2 inches along the sides of the prepared pan. Bake the crust for 10 minutes, then set it aside to cool while preparing the filling.
- Prepare the cheesecake mixture: Reduce the oven temperature to 300°F. In a stand mixer fitted with the paddle attachment, or using a handheld electric mixer, beat the softened cream cheese on medium-low speed until smooth and creamy, approximately 1 minute. Add the granulated sugar and Dutch-processed cocoa powder, mixing again on medium-low speed until incorporated. Then, add the sour cream, white vinegar, vanilla extract, and red food coloring. Continue mixing on medium-low speed until the batter is smooth and evenly colored. Using a silicone spatula, gently fold in the lightly beaten eggs just until combined to avoid overmixing.
- Assemble and bake: Pour the cheesecake batter over the cooled Oreo crust in the springform pan. Place the pan inside a large roasting pan on the oven rack. Carefully pour boiling water into the roasting pan until it reaches halfway up the sides of the springform pan, creating a water bath to ensure even baking and prevent cracking. Bake for 1 hour or until the edges are set and the center is slightly jiggly. After baking, turn off the oven but leave the cheesecake inside the water bath for an additional hour to cool gradually.
- Cool and chill: Remove the cheesecake from the water bath and place it on a wire rack. Run a small knife around the edges to loosen the cake from the pan sides. Let cool completely at room temperature, then cover and refrigerate for at least 4 hours, preferably overnight, to set fully.
- Make the frosting: In a mixer, beat the cream cheese and softened butter together until smooth and creamy. Add the confectioners’ sugar and vanilla extract, beating first on low speed until just combined, then increasing to medium speed until the frosting is smooth and fluffy.
- Serve: Remove the sides of the springform pan carefully just before serving. Spread the cream cheese frosting evenly over the chilled cheesecake. Slice and enjoy.
Notes
- Food coloring: Start with 1 ounce of red food coloring, then add up to 1.5 ounces or more to achieve your preferred red hue.
- Springform pan prep: Lining the bottom of the pan with parchment paper or aluminum foil is optional but helps when transferring the cheesecake to a serving platter.
- Oven variation: Oven temperatures can vary; if after 1 hour the cheesecake’s edges are firm but the center doesn’t jiggle slightly, continue baking until this stage is reached before turning the oven off.
- Water bath: This cheesecake is baked in a water bath; ensure your pan is tightly wrapped and learn how to create a leakproof water bath to avoid water seeping into the cake.
- Make-ahead tips: The cheesecake will keep for up to 4 days stored refrigerated and covered. It freezes well for up to 3 months; thaw in the refrigerator overnight before serving.
Nutrition
- Serving Size: 1 slice (1/12 of cheesecake)
- Calories: 520 kcal
- Sugar: 35 g
- Sodium: 240 mg
- Fat: 38 g
- Saturated Fat: 22 g
- Unsaturated Fat: 14 g
- Trans Fat: 0 g
- Carbohydrates: 38 g
- Fiber: 2 g
- Protein: 8 g
- Cholesterol: 140 mg

Your email address will not be published. Required fields are marked *