
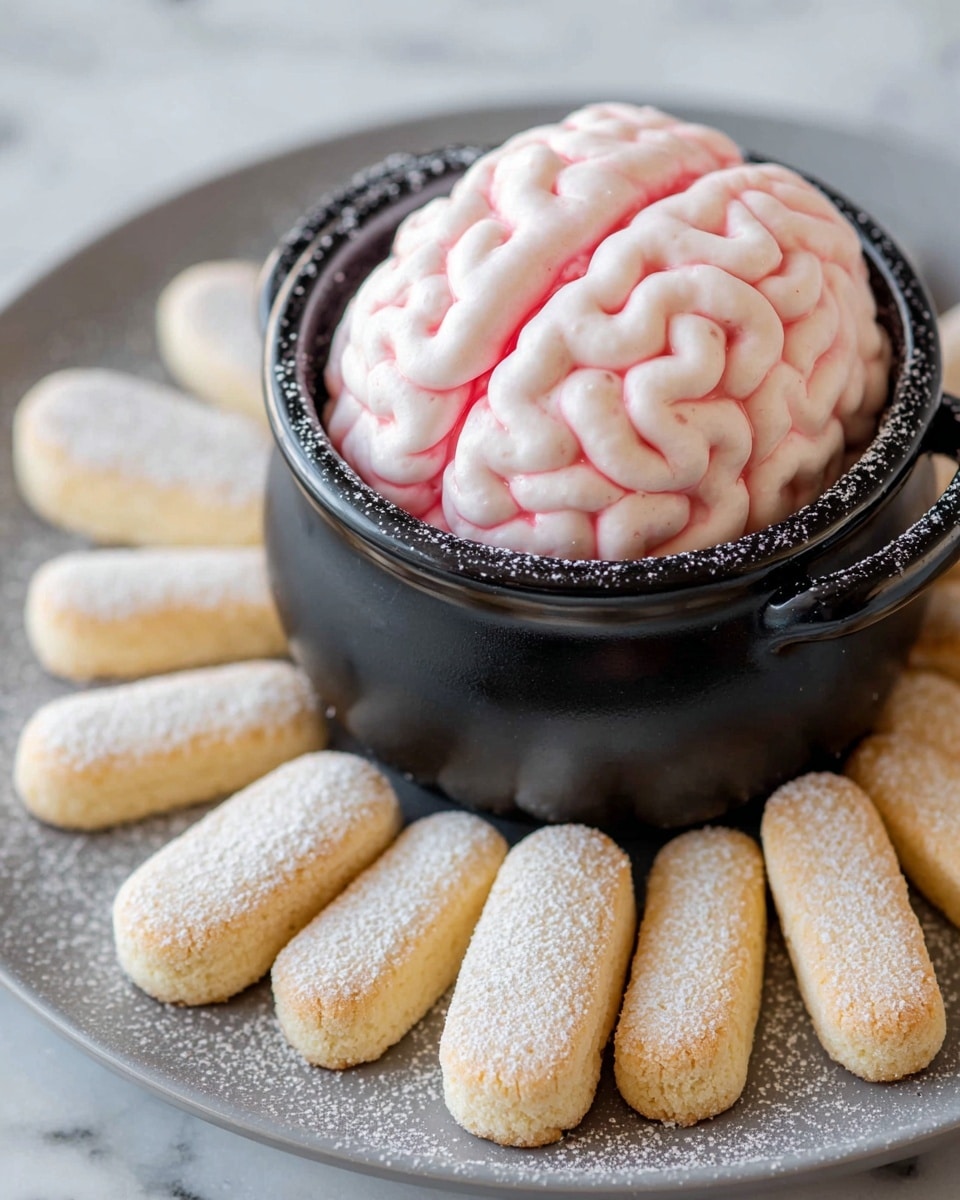
If you’re looking for a spooky and scrumptious treat that will have your guests talking (and maybe even a little horrified—in a good way!), let me tell you about this fan-freaking-tastic Red Velvet Brain Dip Recipe. I absolutely love how this dip combines the rich flavors of red velvet cake with that creamy, tangy brain-like frosting on top. It’s perfect for Halloween parties or any time you want an eye-catching dessert that’s as fun to make as it is to eat. Stick with me, and I’ll share all my tips to make sure your dip turns out perfectly creepy and delicious!
Why You’ll Love This Recipe
- Fun Presentation: The piped brain frosting always wows guests and makes your dip the centerpiece of any party.
- Easy to Make: Despite its impressive look, this dip comes together quickly with simple ingredients you probably already have.
- Deliciously Creamy: The combo of cream cheese and butter in both layers creates an irresistible creamy texture.
- Perfect for Dipping: Ladyfinger cookies bring the perfect crunch and soak up just the right amount of dip.

Ingredients You’ll Need
The magic of this Red Velvet Brain Dip Recipe lies in balancing rich, creamy textures with that signature sweet and slightly tangy red velvet flavor. I’ll walk you through the ingredients and share my favorite tips to get the best results.
- Unsalted Butter: Using softened butter helps the dip blend smoothly without lumps.
- Cream Cheese (two portions): Make sure it’s softened to room temp—it’s key for that creamy consistency.
- Vanilla Extract: Adds warmth and rounds out the sweetness perfectly.
- Powdered Sugar: It sweetens without making the texture gritty like granulated sugar might.
- Red Food Coloring & Red Gel Food Coloring: The gel version gives a more vibrant, lasting color for that scary red brain effect.
- Dry Red Velvet Cake Mix: This is the flavor star—go for your favorite brand for best taste and convenience.
- Light Brown Sugar: Offers a little depth and richness to the dip base.
- Salted Butter: The slight saltiness balances the sweetness and enhances all the flavors.
- Ladyfinger Cookies: They’re perfect dippers—crisp yet gentle, soaking up just the right amount of dip without breaking.
Variations
One of the things I love about the Red Velvet Brain Dip Recipe is how easy it is to make your own with a few tweaks. Whether you want it a little lighter, richer, or even dairy-free, you can customize it to suit your needs or the occasion.
- Dairy-Free Version: I once swapped cream cheese with vegan cream cheese and butter with coconut oil—it still looked creepy and tasted amazing.
- Flavor Twist: Adding a touch of espresso powder to the dip base gave it a mocha undertone that my family couldn’t get enough of.
- Color Variations: You can play with the food coloring—pink or purple red can look just as eerie and still tie into a Halloween theme.
- Sweetness Adjustment: If you prefer less sugary treats, cut down the powdered sugar a bit and add a splash of lemon juice for brightness.
How to Make Red Velvet Brain Dip Recipe
Step 1: Make the Red Velvet Dip Base
Start by beating together 8 ounces of softened cream cheese and 1/2 cup of salted butter until nice and smooth. This took me a good 2-3 minutes with my electric mixer to get that perfectly creamy texture. Then stir in the red velvet cake mix along with 1/2 cup powdered sugar, 2 tablespoons light brown sugar, 1/2 teaspoon vanilla extract, and a generous squeeze of red gel food coloring. Mix until combined and you have a vibrant, thick dip base. It’s important the cream cheese and butter are softened so the dip doesn’t get lumpy—trust me on this!
Step 2: Prepare the Brain Frosting
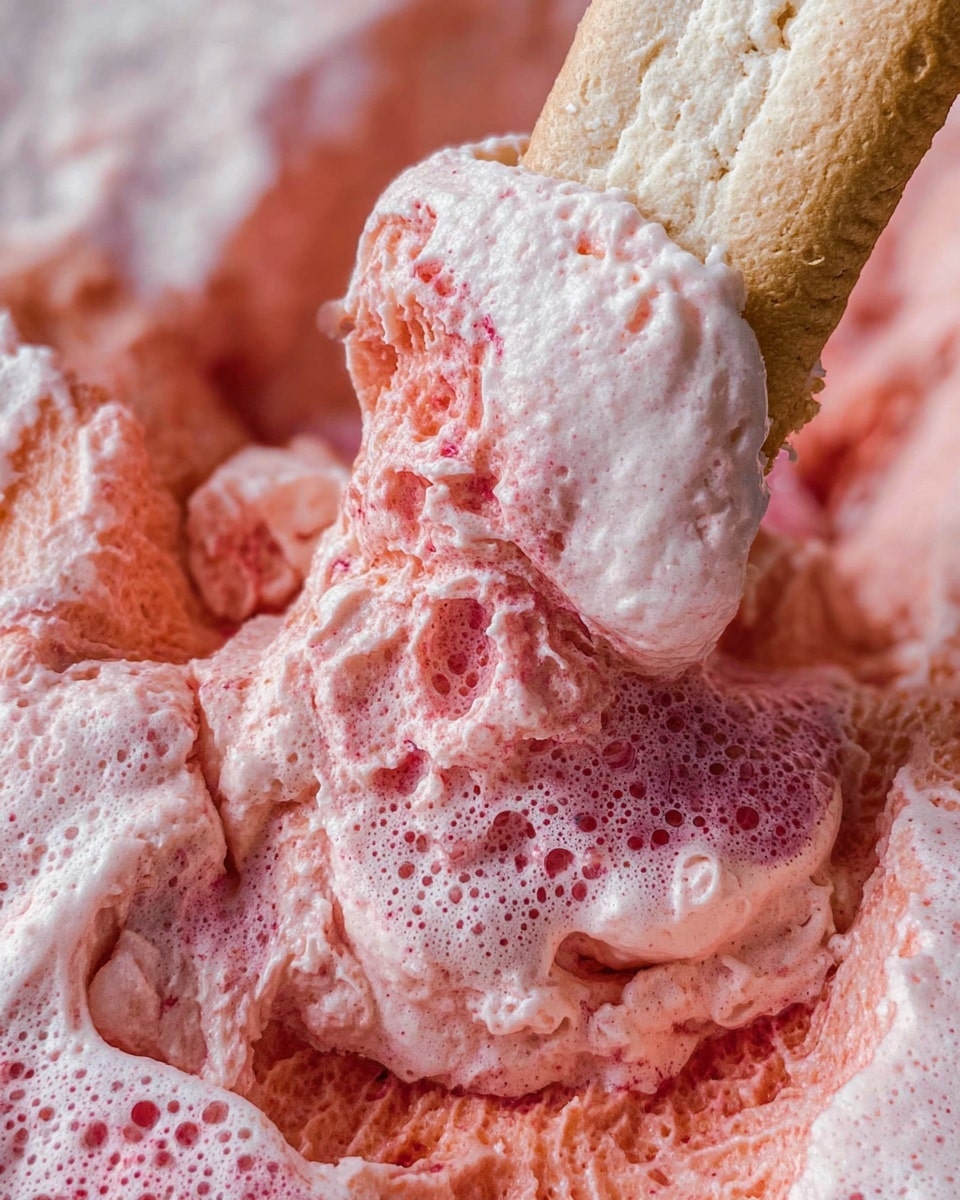
In a separate bowl, whip 3 ounces softened cream cheese with 1/2 cup unsalted butter, 1/2 tablespoon vanilla extract, and 1 1/2 cups powdered sugar until it’s fluffy. Add a few drops of red food coloring to get that creepy pinkish-reddish hue—this is the “brain” topping. When I first tried piping this, I learned that the consistency needs to be just right—not too stiff or runny—so it holds its shape and looks like those cool folds in a brain.
Step 3: Assemble and Pipe the Brain
Spoon your red velvet dip base into a shallow dish or bowl, smoothing it out a little. Then transfer the frosting into a piping bag fitted with a round tip. Starting from one side, pipe long squiggly lines back and forth all across the surface to mimic brain folds. This is my favorite part—it looks tricky, but once you get going, you’ll find you’re actually just drawing twists and turns. You can practice on parchment paper first if you want. Chill for at least 30 minutes before serving so it firms up beautifully.
Step 4: Serve with Ladyfingers
Line up a platter with ladyfinger cookies for dipping. Their delicate crunch complements the creamy, luscious dip perfectly. I like to keep extras on hand because once people start dipping, they just keep going! If you want, you can also throw in some fresh strawberries or pretzels for variety.
Pro Tips for Making Red Velvet Brain Dip Recipe
- Softening is Key: Soften your cream cheese and butter fully beforehand—it makes blending seamless and texture dreamy.
- Piping Pressure: Use steady but gentle pressure when piping the brain folds to avoid breaks or blobs.
- Chill Time: Don’t skip chilling; it helps everything set and makes slicing or scooping cleaner.
- Color Balance: Test your red food coloring in small amounts—you want a creepy red, not a bright cherry red unless that’s your vibe.
How to Serve Red Velvet Brain Dip Recipe
Garnishes
I like sprinkling a tiny pinch of edible glitter or red sugar crystals over the frosting to add a little sparkle and make the dip pop in photos. A few fresh mint leaves on the side can add a surprising fresh note, though I usually keep it simple so the focus stays on the brain itself.
Side Dishes
The Red Velvet Brain Dip pairs nicely with a light sparkling punch or even a cold glass of milk if you want to keep it classic. For something savory on the side, I like to throw out some roasted nuts or a cheese board with mild cheeses to balance the sweetness.
Creative Ways to Present
One Halloween, I served this dip inside a hollowed-out red bell pepper shaped like a skull for extra creepiness. You could also place it on a black platter with small plastic spiders around the edges for that perfect spooky vibe. Using a clear glass bowl lets the rich red color shine through, which is always a hit.
Make Ahead and Storage
Storing Leftovers
If you end up with extras (and let’s be honest, you probably will), cover the dip tightly with plastic wrap and refrigerate. I’ve kept it fresh for up to 3 days without losing that creamy texture or flavor. Just give it a gentle stir before serving again.
Freezing
Freezing this dip isn’t my first choice because the texture of cream cheese can change slightly, but if you do freeze it, make sure to thaw overnight in the fridge and then whip it a bit before serving to smooth it out.
Reheating
This dip is best served chilled, so reheating isn’t really recommended. If it stiffens too much in the fridge, let it sit at room temperature for 10-15 minutes, then stir gently to bring back some softness.
FAQs
-
Can I make the Red Velvet Brain Dip Recipe vegan?
Absolutely! Replace the cream cheese with your preferred vegan cream cheese and swap butter for a plant-based spread or coconut oil. Keep in mind the texture might be a bit different, but it’s still delicious and perfect for allergy-friendly gatherings.
-
What can I use instead of ladyfinger cookies for dipping?
If you can’t find ladyfingers, try graham crackers, vanilla wafers, or even pretzels for a sweet and salty combo. Fresh fruit slices like apples or strawberries also work really well and add a refreshing bite.
-
How do I get the brain frosting to look realistic?
Use a piping bag with a small round tip and steady, overlapping squiggles across your dip surface. Keep the pressure consistent and don’t rush—it’s like drawing the brain folds. Chilling before serving helps everything hold its shape.
-
Can I prepare this dip ahead of time?
Yes! I recommend making both dip layers separately and assembling and piping the brain frosting on the day you plan to serve. This keeps the frosting fresh and easier to pipe. You can prepare the base up to 2 days ahead and keep it refrigerated.
Final Thoughts
This Red Velvet Brain Dip Recipe has become my go-to for Halloween gatherings and anytime I want to impress with minimal fuss. It’s a perfect blend of show-stopping presentation and mouthwatering flavor. I’ve shared it with friends who were amazed at how easy it was to make yet so incredibly festive. Give it a try—you’re going to love the reactions and, more importantly, the taste. Trust me, once you nail this brain dip, it will be a seasonal staple for you too!
Print
Red Velvet Brain Dip Recipe
- Prep Time: 25 minutes
- Cook Time: 0 minutes
- Total Time: 55 minutes
- Yield: 8 servings 1x
- Category: Dessert Dip
- Method: No-Cook
- Cuisine: American
Description
This creepy Halloween Brain Dip features a rich and creamy red velvet cake base, perfectly sweetened and layered with a smooth cream cheese frosting that’s piped to resemble a wrinkly brain. Served with ladyfinger cookies for dipping, this festive dessert dip is both spooky and delicious, making it the perfect treat for Halloween parties or themed gatherings.
Ingredients
Red Velvet Cake Dip Base
- 8 ounces cream cheese, softened
- 1/2 cup salted butter, softened
- 1 1/2 cups dry red velvet cake mix
- 1/2 cup powdered sugar
- 2 tablespoons light brown sugar
- 1/2 teaspoon vanilla extract
- red gel food coloring
Cream Cheese Frosting Brain Topping
- 1/2 cup unsalted butter, softened
- 3 ounces cream cheese, softened
- 1/2 tablespoon vanilla extract
- 1 1/2 cups powdered sugar
- red food coloring
For Serving
- Ladyfinger cookies (for dipping)
Instructions
- Prepare the Red Velvet Cake Dip Base: In a mixing bowl, combine 8 ounces softened cream cheese and 1/2 cup softened salted butter. Beat together until smooth and creamy. Add 1 1/2 cups dry red velvet cake mix, 1/2 cup powdered sugar, 2 tablespoons light brown sugar, and 1/2 teaspoon vanilla extract. Mix until well combined. Add red gel food coloring a few drops at a time until you achieve a deep red velvet color. Mix thoroughly. Set this mixture aside.
- Make the Cream Cheese Frosting Brain Topping: In a separate bowl, beat together 1/2 cup softened unsalted butter and 3 ounces softened cream cheese until creamy and smooth. Add 1/2 tablespoon vanilla extract and gradually mix in 1 1/2 cups powdered sugar until the frosting is thick but still pipeable. Add red food coloring gradually to tint the frosting a bright red or pinkish brain color. Mix well.
- Assemble the Brain Dip: Transfer the red velvet cake dip base into a serving bowl, smoothing the top evenly. Fill a piping bag fitted with a small round or star tip with the cream cheese frosting. Pipe the frosting on top of the red velvet base in looping, curved patterns to simulate the folds and wrinkles of a brain. Cover the entire surface with the piped frosting for a realistic effect.
- Chill and Serve: Refrigerate the assembled brain dip for at least 30 minutes to set the frosting and allow flavors to meld. Serve chilled with ladyfinger cookies for dipping to enjoy the creamy texture with a crisp contrast.
Notes
- This dip is perfect for Halloween parties or themed events where a spooky dessert makes a great impression.
- Adjust the amount of red food coloring to get your desired brain color intensity.
- Ladyfinger cookies provide a delicate crunch ideal for dipping but graham crackers or thin vanilla wafers also work well.
- Ensure all ingredients like butter and cream cheese are softened for easier mixing and smoother texture.
- For best results, chill the dip before serving to firm up the frosting and enhance flavor.
Nutrition
- Serving Size: 1/8 of recipe (approx. 1/2 cup dip)
- Calories: 320
- Sugar: 28g
- Sodium: 210mg
- Fat: 21g
- Saturated Fat: 13g
- Unsaturated Fat: 7g
- Trans Fat: 0.3g
- Carbohydrates: 30g
- Fiber: 1g
- Protein: 4g
- Cholesterol: 55mg

Your email address will not be published. Required fields are marked *