
If you’re looking for a show-stopping dessert that’s as fun to eat as it is beautiful to serve, you’ve come to the right place. I’m so excited to share this Pull Apart Pavlova Wreath Recipe with you — it’s light, airy, and bursting with fresh fruit, and honestly, it’s become a holiday staple in my kitchen. You’ll find that this dessert is both impressive and surprisingly easy to put together, making it perfect for gatherings where everyone can dig in and share. Read on, because this recipe is fan-freaking-tastic.
Why You’ll Love This Recipe
- Delightful Presentation: The wreath shape is not just festive but invites everyone to pull apart and enjoy.
- Light and Airy Texture: The meringues are crisp outside and marshmallowy inside for the perfect bite.
- Customizable Toppings: Fresh fruit and mint add vibrant color and can be swapped seasonally.
- Make-Ahead Friendly: You can prepare the meringues in advance and assemble just before serving.

Ingredients You’ll Need
To nail this Pull Apart Pavlova Wreath Recipe, you’ll want quality ingredients that blend beautifully to create that signature light sweetness. Pro tip: make sure your egg whites are at room temperature to get that perfect volume when whipping.

- Extra-large egg whites: Room temperature whites whip up fluffier and more stable meringue peaks.
- Icing sugar / powdered sugar: Sifted to avoid lumps, sugar adds sweet structure to your meringue.
- Cornstarch: This little addition stabilizes the meringue, keeping it crisp on the outside and marshmallowy inside.
- Vanilla extract: Brings warmth and delicate flavor—the kind that makes everyone smile.
- Heavy cream / whipping cream: Use cold cream for the fluffiest whipped topping.
- Fresh fruit (berries): I like strawberries, blueberries, and raspberries for their color and tartness.
- Fresh mint: Adds a refreshing pop and beautiful greenery that brightens the wreath.
Variations
I love that this Pull Apart Pavlova Wreath Recipe is so versatile. Over time, I’ve played with different fruits, creams, and even flavors to make it my own—and I encourage you to tweak it too! This is not just a recipe; it’s a canvas for creativity.
- Citrus Twist: Swap vanilla for lemon or orange zest in both meringue and cream for a bright, zesty flavor that feels fresh and summery.
- Dairy-Free: Use coconut cream for whipping to make it vegan-friendly without losing that satisfying creaminess.
- Chocolate Drizzle: Add a bit of melted dark chocolate over the wreath for an extra indulgence—my family goes crazy for it!
- Seasonal Fruit: In winter, pomegranate seeds and kiwi slices make the wreath festive; in summer, go wild with stone fruits.
How to Make Pull Apart Pavlova Wreath Recipe
Step 1: Whip Your Meringue to Perfection
Start by preheating your oven to 90°C (195°F) and lining two baking sheets with parchment paper—that low, slow bake is key for the texture. In a clean, dry bowl fitted with your whisk, beat those egg whites until foamy. Then slowly add your sifted icing sugar, continuing to beat until the mixture turns bright white, glossy, and forms stiff peaks. This can take up to 8 minutes, so be patient! I discovered that using a stand mixer really makes this step easier, and always make sure your bowl and whisk are grease-free; even a tiny bit can ruin your peaks.
Step 2: Add Cornstarch and Vanilla
Once your meringue is fluffy and stiff, gently fold in cornstarch and vanilla extract. This step stabilizes your meringues and adds a subtle depth of flavor. Be gentle to maintain that airy texture—you want smooth, not deflated.
Step 3: Shape Your Mini Pavlovas
Using a piping bag or spoon, dollop small mounds of meringue about 5cm wide onto your parchment paper-lined trays, spacing them at least 5cm apart. Here’s a little trick I learned: after placing each mound, use a teaspoon to gently press a small dent in the center—this little nook will hold the cream and fruit perfectly later.
Step 4: Bake Low and Slow, Then Cool Completely
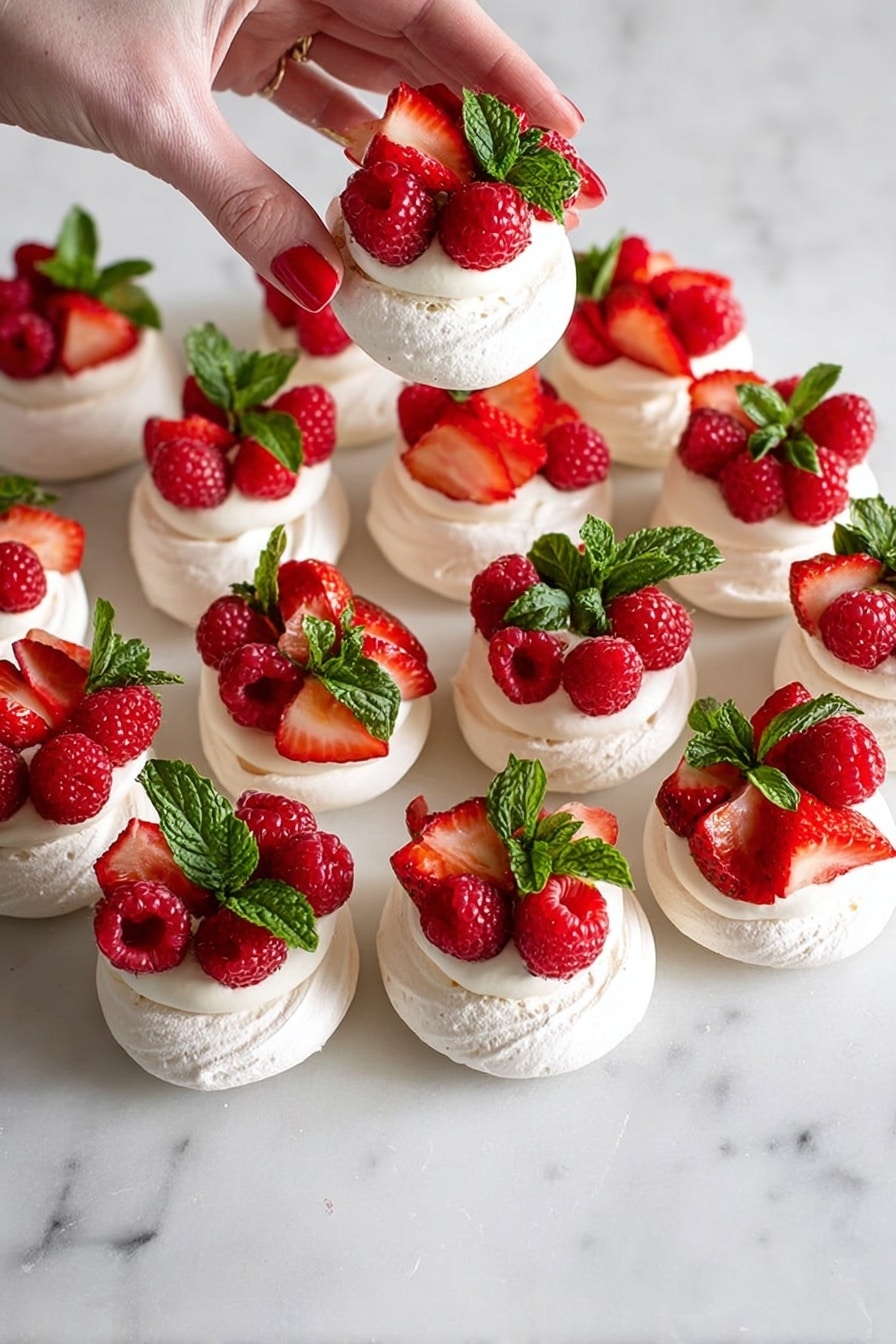
Bake your meringues for about 60 minutes at that low temperature, then turn the oven off and leave them inside to cool for approximately 2 hours. This slow cooling helps prevent cracking and keeps them crisp on the outside while soft inside. Trust me, this patience pays off every time. Once cool, carefully peel the pavlovas off the paper and arrange them in a circular wreath shape on a large serving board or platter—a moment when this dessert really starts to wow.
Step 5: Whip and Dollop the Cream
Whip your heavy cream with icing sugar and vanilla until medium-stiff peaks form. Be careful not to overbeat—this will keep the cream silky and pipe-friendly. Spoon or pipe dollops onto each meringue, filling those little dents you made earlier. It’s oh-so-satisfying to watch the wreath come together at this point.
Step 6: Garnish and Serve Immediately
Finish by decorating with a generous scattering of fresh berries and sprigs of mint. I love how the colors pop against the white meringue and cream—it’s just stunning. Serve right away, and watch your guests dive in with big smiles.
Pro Tips for Making Pull Apart Pavlova Wreath Recipe
- Use Room Temperature Egg Whites: They whisk up more voluminous and stable, giving your meringue extra lift.
- Sift Your Sugar Thoroughly: It prevents gritty textures and ensures smooth, glossy meringue peaks every time.
- Slow Cool in Oven: Leaving the pavlova in the switched-off oven prevents cracks and keeps the inside soft and chewy.
- Gentle Folding: When adding cornstarch and vanilla, fold carefully to keep air in the meringue and avoid deflation.
How to Serve Pull Apart Pavlova Wreath Recipe

Garnishes
I’m all about fresh, seasonal garnishes here. I usually stick with a mix of strawberries, blueberries, and raspberries—they add a natural sweetness that balances the meringue’s sugar. A few sprigs of fresh mint give it a lovely aromatic punch and a pop of green that just makes the whole thing look festive and fresh.
Side Dishes
Since this dessert is naturally light and fruity, I like to keep the sides simple. It pairs wonderfully with a classic cup of tea or a sparkling wine for celebrations. For something more indulgent, a scoop of vanilla bean ice cream alongside works perfectly—my guests always ask for seconds!
Creative Ways to Present
I’ve served the Pull Apart Pavlova Wreath Recipe on a rustic wooden board for a casual brunch vibe, and for holiday dinners, I love using a large white porcelain platter that makes the colors sing. One year, I added edible flowers for a garden party feel—talk about wow-factor! Also, layering fruit in small bowls next to the wreath lets guests customize their bites, which is both fun and interactive.
Make Ahead and Storage
Storing Leftovers
Because pavlova loves to soak up moisture, I don’t recommend storing it fully assembled. Instead, keep the baked meringue shells in an airtight container at room temperature for up to 3 days—they’ll remain crisp. Store whipped cream and fruit separately in the fridge and assemble just before serving.
Freezing
I’ve frozen meringue shells with success by placing them in a single layer on parchment paper, freezing until solid, then storing in a freezer-safe bag. They thaw quickly and keep their texture well. Avoid freezing the whipped cream or fruit—they don’t freeze well and get watery.
Reheating
If your meringues soften a bit in storage, a quick 10-minute warm-up in a low oven (about 90°C/195°F) can help crisp them back up. Just watch carefully so they don’t brown or burn. Then let them cool before assembling again.
FAQs
-
Can I use regular sugar instead of icing sugar for the meringue?
It’s best to use sifted icing (powdered) sugar for this recipe because it dissolves quickly and creates that smooth, glossy texture in the meringue. Granulated sugar can result in a grainy texture and might not whip up as well.
-
How long can I keep the meringue shells before assembling the wreath?
You can store baked meringue shells at room temperature in an airtight container for up to 3 days. Just keep them away from moisture and humidity to prevent them from becoming chewy.
-
Can I make the Pull Apart Pavlova Wreath Recipe vegan?
Traditional pavlova relies on egg whites, so making it vegan is tricky. However, you could experiment with aquafaba (the liquid from canned chickpeas) as a substitute for egg whites, though results may vary. For the cream, coconut cream is a great vegan alternative.
-
Do I need a stand mixer to make this recipe?
A stand mixer makes whipping egg whites much easier and more consistent, but you can use a hand mixer or whisk by hand if you’re prepared for a little arm workout. Just ensure your equipment is clean and free of grease.
-
Can I prepare the wreath ahead of time?
I recommend assembling just before serving for the best texture, since the cream and fruit can make the meringue soften. But the meringues can be baked and stored in advance, making party prep much easier.
Final Thoughts
This Pull Apart Pavlova Wreath Recipe holds a special place in my heart because it brings people together—literally and figuratively. It’s the kind of dessert where everyone grabs a piece, shares a moment, and feels a little festive joy. When I first made this, I was amazed at how simple ingredients could turn into something so elegant and fun. So if you want to impress without stress, give this recipe a go. I promise you’ll love how it turns out, and your friends and family will be asking for it again—and again.
Print
Pull Apart Pavlova Wreath Recipe
- Prep Time: 25 minutes
- Cook Time: 1 hour
- Total Time: 3 hours 25 minutes
- Yield: Makes approximately 30 mini pavlovas, serving 15-30 people 1x
- Category: Dessert
- Method: Baking
- Cuisine: Australian/New Zealand
- Diet: Gluten Free
Description
This Pull Apart Pavlova Wreath is a stunning and elegant dessert featuring crisp and airy meringue nests baked to perfection, topped with whipped cream, fresh berries, and mint. Perfect for festive occasions or casual gatherings, this recipe offers a delightful combination of light sweetness and fresh fruit flavors that can easily serve 15-30 people.
Ingredients
For the Meringue
- 6 extra-large egg whites
- 2 cups icing sugar (powdered sugar), sifted
- 2 tbsp cornstarch
- 1 tsp vanilla extract
For the Pavlova Wreath
- 3 cups heavy cream (whipping cream)
- 1 cup icing sugar (powdered sugar), sifted
- 1 tsp vanilla extract
- Fresh fruit such as berries (strawberries, blueberries, raspberries)
- Fresh mint leaves for garnish
Instructions
- Preheat the Oven: Preheat your oven to 90°C (195°F) and line two baking sheets with parchment paper to prepare for baking the meringue.
- Beat the Egg Whites: In a stand mixer fitted with the whisk attachment, beat the 6 egg whites until they become foamy and start to increase in volume.
- Add Sugar and Beat to Stiff Peaks: Gradually add the sifted icing sugar while continuing to beat the egg whites. Beat until the mixture is bright white, voluminous, and forms stiff peaks when the beaters are lifted. This can take up to 8 minutes.
- Incorporate Cornstarch and Vanilla: Gently fold in the cornstarch and vanilla extract into the stiff meringue mixture until fully combined without deflating the mixture.
- Pipe or Spoon Meringue: Pipe or spoon small mounds of meringue about 5cm in diameter onto the prepared baking sheets, leaving roughly 5cm of space between each mound for even cooking. Use a teaspoon to create a small dent in the center of each pavlova for holding the cream later.
- Bake and Cool: Place the baking sheets in the oven and bake for 60 minutes. After baking, turn off the oven and allow the meringues to cool completely inside for approximately 2 hours. This slow cooling helps the pavlovas dry out and maintain their texture.
- Arrange the Wreath: Once cool, carefully remove the meringues from the parchment paper and arrange them in a wreath shape on a large serving platter or board.
- Whip the Cream: In a chilled bowl, whip the heavy cream with the sifted icing sugar and vanilla extract until medium-stiff peaks form, which will hold shape but remain soft and smooth.
- Assemble and Decorate: Spoon or pipe the whipped cream onto each pavlova nest. Decorate generously with fresh berries and sprigs of fresh mint leaves to add freshness and color.
- Serve: Serve immediately for best texture and taste, allowing guests to pull apart the wreath pieces to enjoy individual pavlovas.
Notes
- Make sure the mixing bowl and beaters are clean and free of any fat or grease to achieve perfectly stiff egg whites.
- Sifting the icing sugar ensures a smooth meringue without lumps.
- Slowly cooling the pavlovas in the turned-off oven prevents cracking and maintains the crisp exterior.
- You can customize the fresh fruit toppings according to seasonal availability or preference.
- This dessert is best consumed on the day it’s assembled to retain the crispness of the meringue.
Nutrition
- Serving Size: 1 mini pavlova (approximate)
- Calories: 150 kcal
- Sugar: 15 g
- Sodium: 10 mg
- Fat: 7 g
- Saturated Fat: 4.5 g
- Unsaturated Fat: 2 g
- Trans Fat: 0 g
- Carbohydrates: 18 g
- Fiber: 1 g
- Protein: 1.5 g
- Cholesterol: 40 mg

Your email address will not be published. Required fields are marked *