
If you’re looking for a fun and irresistible treat that’s as cute as it is delicious, you’re going to adore this Polar Bear Cookie Treats Recipe. I absolutely love how these cookies come together with simple ingredients but deliver big on charm — they’re perfect for parties, school snacks, or when you just want to indulge in something playful and sweet. Stick around, because I’ll walk you through every little tip and trick so your Polar Bear Cookie Treats turn out just as dreamy as mine do every time!
Why You’ll Love This Recipe
- Delightfully Cute: These cookies look like adorable polar bears and are sure to bring smiles.
- Simple Ingredients: You probably already have most of what you need in your pantry.
- Fun for All Ages: Kids love helping to assemble, making it a great activity.
- No-Bake Dipping: Melting candy melts is easy and makes the cookies extra luscious without an oven.

Ingredients You’ll Need
This Polar Bear Cookie Treats Recipe balances creamy white candy melts with crunchy sandwich cookies and colorful candy details that bring the bears to life. Choosing good quality white candy melts helps create a smooth, glossy coating that hardens nicely, while bright candies add personality without any fuss.

- Double Stuffed Sandwich Cookies: These cookies create the perfect “bear face” base because of their creamy filling.
- Candy Coated Chocolates: Pick lighter shades for the polar bear ears and mix bright colors for noses to add cheerful contrast.
- White Candy Melts: This melts beautifully for dipping and allows the candy pieces to stick securely.
- Black Icing: Use this for precise, tiny details like eyes—essential for bringing your bears to life.
Variations
I love how versatile this Polar Bear Cookie Treats Recipe is. Whether you want to make it more seasonal or add a little fun twist, there’s room to personalize it your way. Experimenting with colors or even flavors makes it super fun to tailor to any occasion.
- Chocolate Coating: I once swapped white candy melts for milk or dark chocolate melts for a deeper flavor – a surprisingly tasty twist!
- Nut Allergies: Use allergy-safe sandwich cookies and ensure candy melts are processed in a safe facility.
- Festive Colors: Around holidays, I like using themed candy-coated chocolates (think red and green for Christmas or pastel hues for Easter).
- Mini Cookies: Trying with smaller sandwich cookies makes for bite-size treats, perfect for parties.
How to Make Polar Bear Cookie Treats Recipe
Step 1: Prep Your Workspace and Candies
Start by laying out parchment or wax paper on your counter — this is where your dipped cookies will cool and harden, so make sure it’s wide enough for all your bears! Sort your candy-coated chocolates: pick lighter colors for the ears because you want them to stand out gently, and pick brighter colors like blue, brown, red, or purple for the noses to give each bear a little character. Set aside 12 white candy melts for the muzzles, and melt the rest according to package directions — microwave in short intervals and stir well to get that glossy, velvety texture.
Step 2: Assemble the Ears and Dip the Cookies
This is the fun part! Carefully slide a pair of “ear” candies into the filling of each sandwich cookie—this anchors them perfectly before dipping. Then dip each cookie into the melted white candy, using a fork to fully coat it. Lift it out and gently tap the fork on the bowl’s edge to shake off any extra coating; you want a smooth layer without drips. Place each cookie on your parchment paper to set.
Step 3: Add the Muzzle and Nose Details
Before the white candy coating hardens, nestle one reserved white candy melt gently onto the center of the cookie for the muzzle. Press it just enough to create a little ridge around it — this adds dimension. Use a small paintbrush or toothpick dipped in melted white candy to “glue” your brightly colored candy piece as the nose on the upper part of the muzzle. This layering really brings the polar bear face to life!
Step 4: Finish with Eyes Using Black Icing
Once the dipped cookies are completely dry and set, use your black icing tube to dot two tiny eyes above the muzzle. It’s best to keep your hand steady here or use a toothpick for more control. Let everything dry thoroughly before moving or storing — this step is key to keeping your bears looking perfect.
Pro Tips for Making Polar Bear Cookie Treats Recipe
- Choosing Candy Colors: Use lighter pastel candies for ears so they don’t overpower the white candy melt coating — I learned this the hard way when darker colors made the ears disappear!
- Melting Candy Melts: Microwave your melts in 20-second bursts, stirring well each time — this prevents scorching and keeps the melts silky smooth.
- Removing Excess Candy Coating: Tapping the fork on the bowl’s edge works wonders to avoid thick clumps that can crack as they dry.
- Applying Eyes: Use a toothpick dipped in black icing if you need precision; a steady hand makes all the difference.
How to Serve Polar Bear Cookie Treats Recipe

Garnishes
I like to sprinkle a little edible glitter or snowflake sugar crystals on the white candy coating before it dries — it makes the treats shimmer like real arctic snow! Sometimes a tiny fresh mint leaf beside each cookie adds a pop of green that pairs nicely with the white, making the display all the more festive.
Side Dishes
These Polar Bear Cookie Treats shine on their own but pair beautifully with a cold glass of milk, hot chocolate, or even a scoop of vanilla ice cream. For parties, I like setting them out alongside fruit skewers or carrot “sticks” — the crisp veggies offer a refreshing contrast to all that sweet goodness.
Creative Ways to Present
Presenting these cookies on a platter lined with shredded coconut instantly creates a snowy scene that’s just adorable. For winter holidays, add some faux pine branches or sprinkle powdered sugar around for extra effect. Sometimes, I stack a few cookies in a clear jar tied with a ribbon — makes a charming homemade gift!
Make Ahead and Storage
Storing Leftovers
I always store these treats in an airtight container layered between parchment paper to prevent sticking. They stay fresh at room temperature for up to a week — so you can prep them ahead of time for events or just to enjoy gradually over several days.
Freezing
Freezing Polar Bear Cookie Treats works well if you need to make them way ahead. Place them in a single layer on a baking sheet to freeze initially, then transfer to a sealed freezer bag or container. Thaw overnight at room temperature. They keep their shape and texture perfectly!
Reheating
Because there’s no actual baking after assembly, you don’t need to reheat these cookies. If you want the candy coating a little less firm, let them sit in a warm room before serving or give them a quick 5–10 second zap in the microwave—but be careful to avoid melting the details.
FAQs
-
Can I use regular chocolate instead of white candy melts for the coating?
Yes, you can substitute regular white chocolate, but keep in mind it behaves a bit differently when melting—it’s easier to scorch and may not harden as smoothly as candy melts. Candy melts are designed to melt evenly and set with a nice gloss, making them the ideal choice for this Polar Bear Cookie Treats Recipe.
-
What’s the best way to attach the candy ears so they don’t fall off?
Sliding the candy-coated chocolates into the filling between the sandwich cookies before dipping is the secret. The filling acts like glue, holding the ears steady while you dip the cookies in melted candy. Be gentle but firm when inserting, and avoid over-handling once dipped to keep them secure.
-
How long do these Polar Bear Cookie Treats last?
Stored in an airtight container at room temperature, they last about 5–7 days. The coating helps keep the cookies fresh, but the sooner you enjoy them, the better they taste—freshly made, they’re simply delightful!
-
Can kids help with this recipe?
Absolutely! Kids love inserting the candy ears and noses, dipping the cookies, and decorating with the icing eyes—just supervise when handling the melted candy. It’s a perfect hands-on treat making project for little hands.
Final Thoughts
Honestly, this Polar Bear Cookie Treats Recipe is one of those joyful little projects I adore making because it’s simple but creates these whimsical, smile-inducing results. Every time I serve them, whether it’s just for family snacks or at a party, people ask how I made such cute and tasty treats. I hope you enjoy making and sharing them just as much as I do—it’s really a recipe that brings a bit of fun and sweetness into the everyday, perfect for making memories in your own kitchen.
Print
Polar Bear Cookie Treats Recipe
- Prep Time: 30 minutes
- Cook Time: 0 minutes
- Total Time: 30 minutes
- Yield: 12 cookies 1x
- Category: Dessert
- Method: No-Cook
- Cuisine: American
Description
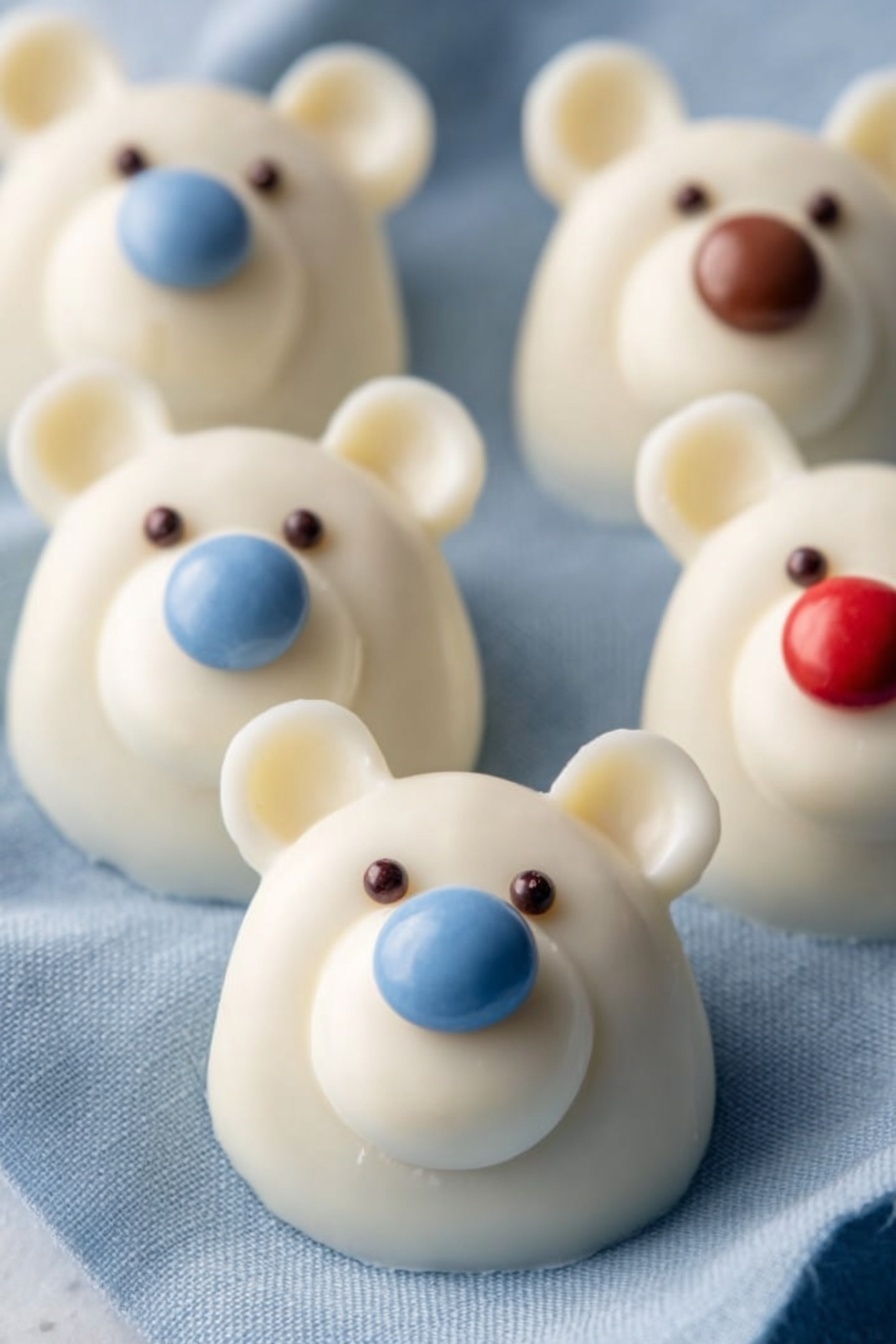
These adorable Polar Bear Cookies are a fun and creative treat featuring double stuffed sandwich cookies dipped in white candy melts, decorated with colorful candy-coated chocolates to create cute bear faces. Perfect for winter parties or holiday gatherings, they combine simple ingredients with a playful design for a delicious and festive dessert.
Ingredients
Base
- 12 double stuffed sandwich cookies
Decorations
- 36 different coloured candy coated chocolates (lighter colors for ears; bright blues, browns, reds, and purples for noses)
- 12 oz. bag white candy melts
- 1 tube black icing
Instructions
- Prepare Workspace: Lay out a sheet of parchment or wax paper to place the dipped cookies on for drying.
- Select Candy Colors: Choose lighter coloured candy coated chocolates to serve as the ears, and brighter colors like blue, brown, red, and purple for the noses.
- Set Aside Muzzles: Pick 12 nice-looking white candy melts to use as the muzzles and set them aside. Melt the rest of the white candy melts in a microwave-safe bowl according to package instructions until smooth.
- Assemble Ears and Dip Cookies: Slide the lighter colored candy-coated chocolates into the cookie filling to create ears, placing them between the cookie halves. Then dip each cookie into the melted white candy melts, fully coating it. Use a fork to lift the cookie out and gently tap the side of the bowl to remove excess candy coating.
- Attach Muzzle and Nose: Place the reserved white candy melt onto the dipped cookie as the muzzle. Press it gently to form a ridge around the muzzle shape. Apply a small amount of melted white candy melt onto one of the bright colored candy chocolates and place it higher up on the muzzle to form the nose.
- Add Facial Details: Allow the cookies to dry fully. Once dried, use the black icing to dot on the eyes, giving the polar bear faces their final detail.
- Dry and Store: Let the cookies dry completely before storing them in a sealed container to maintain freshness.
Notes
- Use parchment or wax paper to prevent the cookies from sticking while drying.
- Be gentle when pressing the candy melts and noses to avoid cracking the candy coating.
- If the candy melts become too thick during dipping, reheat briefly to smooth.
- Store the finished cookies in an airtight container at room temperature to keep them fresh for several days.
- Feel free to customize the colors of the candy-coated chocolates to match your festive theme.
Nutrition
- Serving Size: 1 cookie
- Calories: 180
- Sugar: 20g
- Sodium: 90mg
- Fat: 8g
- Saturated Fat: 5g
- Unsaturated Fat: 2g
- Trans Fat: 0g
- Carbohydrates: 25g
- Fiber: 1g
- Protein: 1g
- Cholesterol: 5mg

Your email address will not be published. Required fields are marked *