
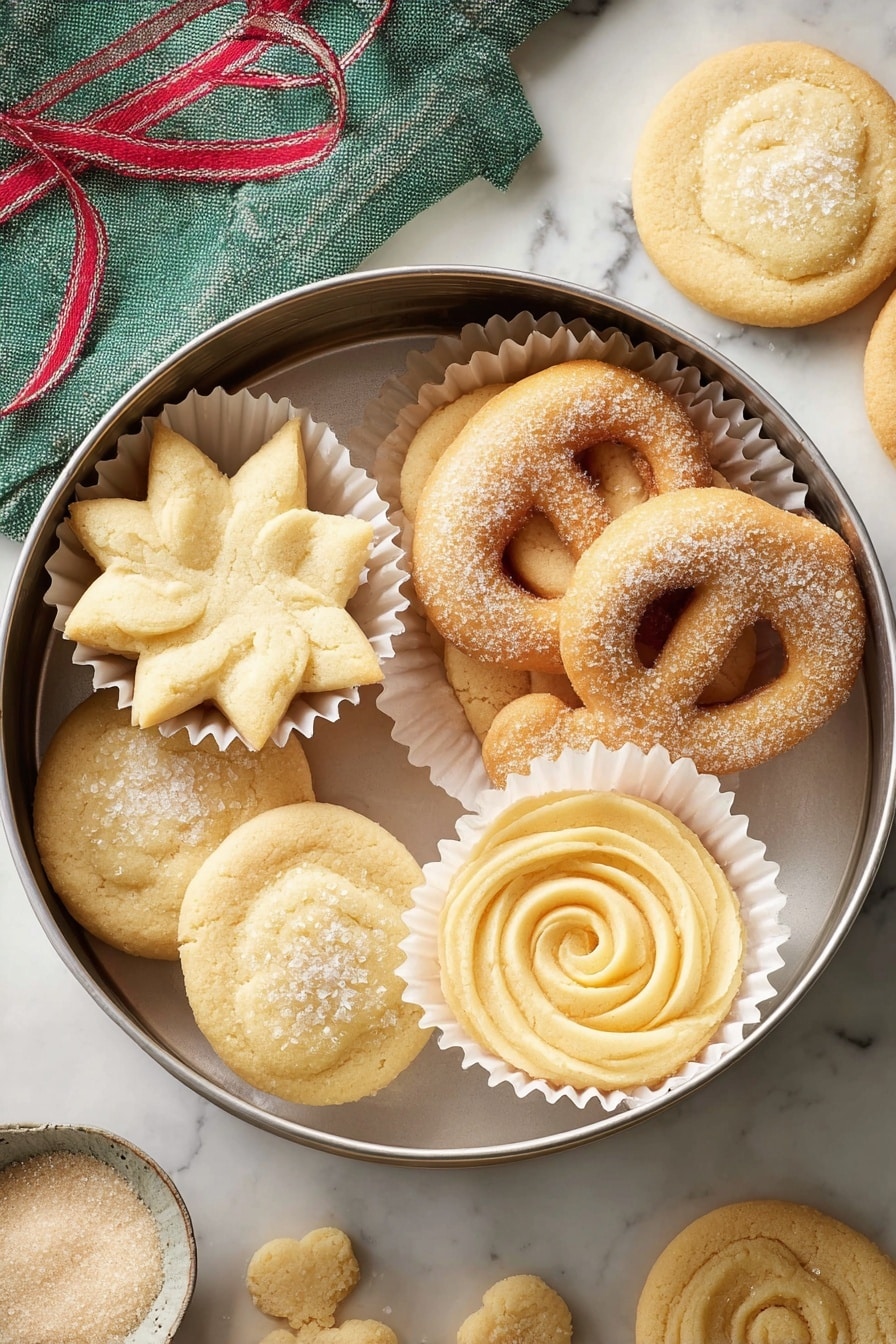
If you’re on the lookout for the perfect buttery, delicate cookie that practically melts on your tongue, I have a treat for you. This Melt-in-Your-Mouth Danish Butter Cookies Recipe is one of my all-time favorites—it’s buttery, tender, and effortlessly elegant. You’ll find that these cookies are not only simple to make but also deliver that luxurious texture that keeps everyone coming back for more. Trust me, once you try this recipe, these cookies will become your new go-to for celebrations, gift-giving, or just a sweet everyday indulgence.
Why You’ll Love This Recipe
- Luxuriously Buttery: Made with European butter, the cookies have an incredibly rich flavor and tender crumb.
- Perfect Texture: The blend of all-purpose and cake flour creates that signature crisp outside with a melt-in-your-mouth inside.
- Simple Technique: No fancy tools needed—just a piping bag and basic ingredients you probably already have.
- Versatile & Fun: Customize with sprinkles, coarse sugar, or piping shapes to make them yours for holidays or everyday treats.

Ingredients You’ll Need
These cookies rely on classic, straightforward ingredients that work beautifully together. I always recommend European-style butter if you can get it, because it’s creamier and really elevates the flavor. Plus, the mix of flours helps with the delicate crisp texture you want in Danish butter cookies.
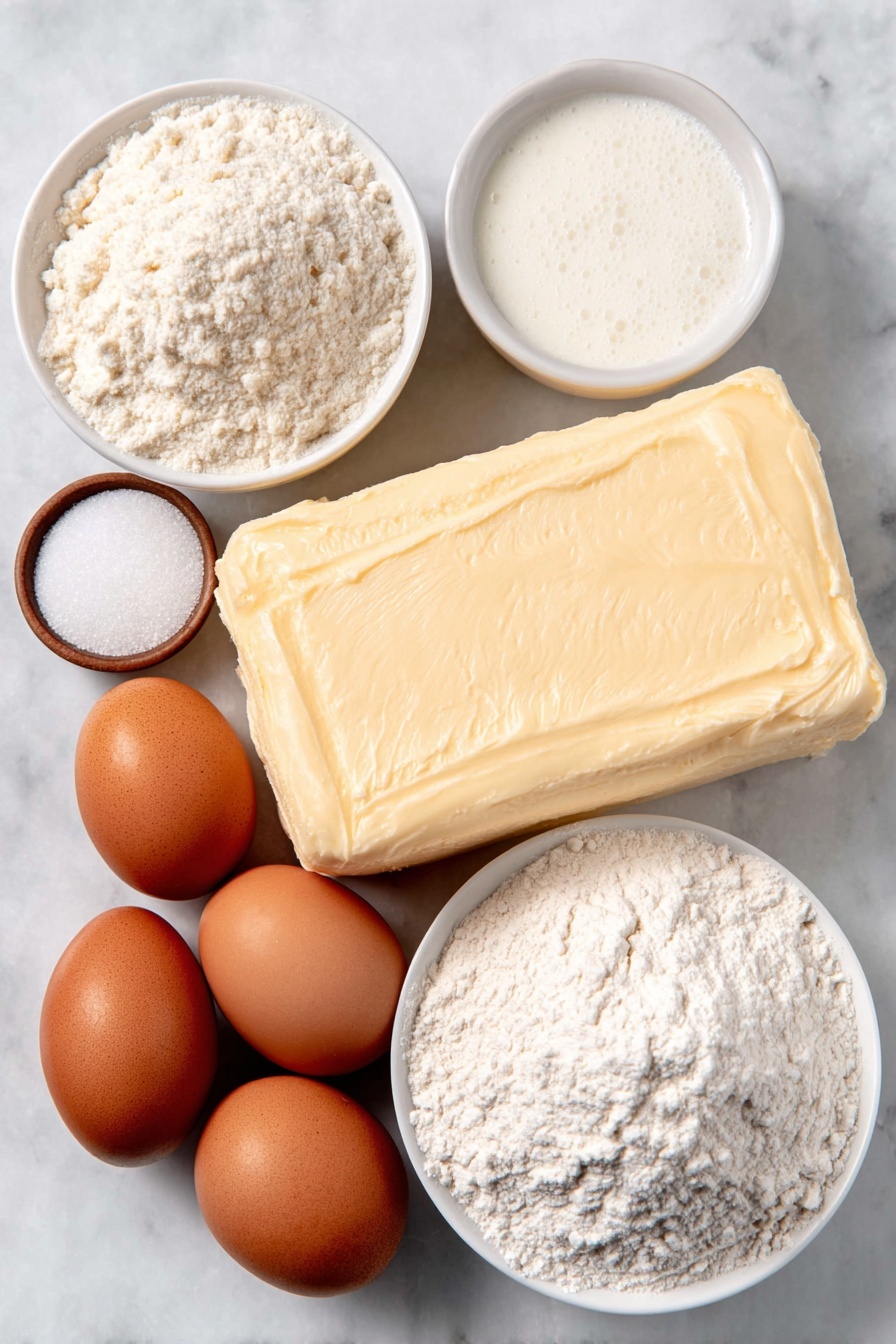
- European salted butter: Using salted adds a beautiful depth, but you can use unsalted with a pinch of salt if preferred.
- Granulated sugar: Adds just the right sweetness and helps with that slight crisp.
- Salt: Balances the sweetness and butter richness perfectly.
- Egg yolks: These add richness and help bind the dough.
- Vanilla extract: For that warm, classic flavor note.
- Whole milk: Just enough to soften the dough for easy piping.
- All-purpose flour: Provides structure without making cookies tough.
- Cake flour: Gives an airy, tender texture that’s key to the “melt-in-your-mouth” effect.
- Coarse sugar: Optional, but adds a delightful crunchy finish if sprinkled on top.
Variations
One of the things I love about this Melt-in-Your-Mouth Danish Butter Cookies Recipe is how easy it is to make it your own. Whether you want to try a twist with flavors or cater to dietary needs, this recipe is a flexible canvas. Feel free to experiment and find your favorite spin!
- Chocolate-dipped: After baking and cooling, dip half of each cookie in melted dark or white chocolate for an irresistible treat—my family goes crazy for these!
- Spiced variation: Add a pinch of cinnamon or cardamom to the flour mixture to warm up the flavor, especially cozy for fall.
- Gluten-free: Substitute with a gluten-free flour blend that measures cup-for-cup for all-purpose flour—results vary, so adjust as needed.
- Lemon zest: Add finely grated lemon zest to the dough for a bright, fresh twist I like serving in spring.
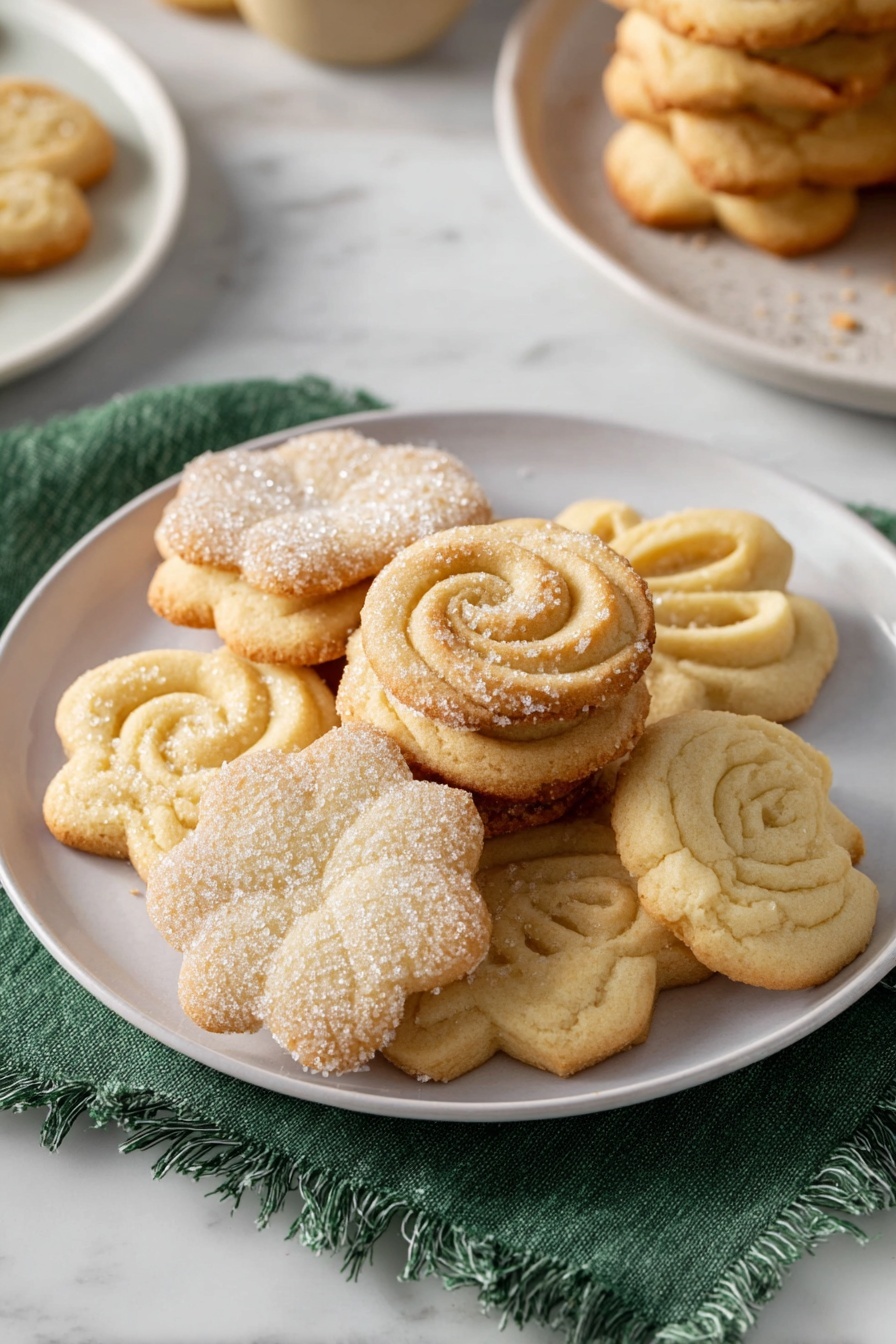
- Shape your mood: Use different piping tips to create rosettes, pretzels, or simple rounds—piping is half the fun!
How to Make Melt-in-Your-Mouth Danish Butter Cookies Recipe
Step 1: Prep Your Workspace
Before you dive in, clear some fridge space to chill your cookies later. Line two baking sheets with parchment paper or silicone mats. This chilling step is critical—it prevents the cookies from spreading too much when they bake, keeping those pretty shapes intact.
Step 2: Cream the Butter and Sugar
Using a stand mixer with a paddle attachment (or a hand mixer if you don’t have one), cream your European salted butter on medium speed until smooth—this usually takes 2-3 minutes. Then, while the mixer’s running low, slowly stream in sugar and salt. Keep beating it until the mix looks light and fluffy—that’s where the magic starts! I learned that patience here really helps the cookies turn out tender.
Step 3: Mix in Egg Yolks, Vanilla & Milk
Next up, add the egg yolks, vanilla extract, and whole milk straight into the bowl. Continue mixing on medium speed until everything is fully combined. Don’t forget to scrape down the sides occasionally—that ensures no hidden pockets of flour or butter sneak in unblended.
Step 4: Add Flour and Get the Dough Just Right
In a separate bowl, whisk together your all-purpose and cake flour. Add the flour mixture to the wet ingredients in two batches, mixing on low speed to avoid overworking the dough. Over mixing develops gluten, which can toughen these delicate cookies. If your dough feels too stiff to pipe, add another tablespoon of milk to soften it—a little adjustment goes a long way here.
Step 5: Pipe Your Cookies and Chill
Fit a large piping bag with a ½-inch open star tip and fill it with your dough. Pipe 2-inch cookies directly onto your lined baking sheets—roses, pretzels, circles, squares, whatever you fancy! Leave about 2 inches between each so they don’t crowd each other. For some extra sparkle, sprinkle coarse sugar on top before chilling in the refrigerator for 20-30 minutes. This step makes a huge difference in texture, so don’t skip it.
Step 6: Bake and Cool
Preheat your oven to 350°F (175°C) with the rack in the middle. Bake your cookies for 10-15 minutes or until the edges turn just a hint golden. Keep a close eye during the last few minutes—baking times can vary depending on your shapes and oven. Once out, let them cool on the baking sheet for 5 minutes so they firm up, then transfer to a wire rack to cool completely. That’s when they really shine.
Pro Tips for Making Melt-in-Your-Mouth Danish Butter Cookies Recipe
- Use Room Temperature Butter: Let your butter sit out for about 45 minutes, so it’s soft but still cool—this is the sweet spot for creaming.
- Avoid Overmixing: I learned the hard way that too much mixing makes tough cookies, so stick to just enough to combine ingredients.
- Don’t Skip Chilling: Chilling before baking keeps your cookies from spreading too much—definitely a game-changer for clean shapes.
- Watch Your Oven Closely: Depending on your cookie shapes and your oven’s quirks, baking time varies—start checking around 10 minutes.
How to Serve Melt-in-Your-Mouth Danish Butter Cookies Recipe
Garnishes
I usually keep things simple and elegant with a sprinkle of coarse sugar for that perfect little crunch on the top. For special occasions, I love adding festive sprinkles or dipping the cookies halfway in melted chocolate—such a crowd-pleaser! Fresh berries on the side add a lovely tart contrast too.
Side Dishes
These cookies are divine alongside a hot cup of tea or coffee. I also enjoy serving them with a scoop of vanilla ice cream or alongside a mild cheese platter for a sweet and savory combo that never fails to impress guests.
Creative Ways to Present
For holiday parties, I like arranging the cookies in a pretty tin lined with wax paper and tied with a festive ribbon—gifting upgraded! Laying them out on a tiered dessert stand adds an elegant touch. You could also pipe them onto parchment paper in themed shapes like stars or hearts for birthdays or Valentine’s Day.
Make Ahead and Storage
Storing Leftovers
Leftover Danish butter cookies keep beautifully in an airtight container at room temperature for about 5 days. I store mine in a metal tin or glass jar because they stay crisp but don’t dry out too quickly—perfect for nibbling days later.
Freezing
These cookies freeze wonderfully. I like to freeze the unbaked piped dough on the baking sheet and then transfer to a zip-top bag for up to 3 months. When you’re ready to bake, no need to thaw—just pop them into the oven and bake a few minutes longer than usual. This trick saves so much time during busy seasons.
Reheating
If you have cookies that have softened a little after storing, refresh them by warming in a 300°F oven for 5 minutes. This revives their crispness without drying them out—just be sure to watch closely so they don’t brown too much.
FAQs
-
Can I use unsalted butter for this Melt-in-Your-Mouth Danish Butter Cookies Recipe?
Absolutely! If you use unsalted butter, simply add ¼ teaspoon of kosher salt to the recipe to balance out the flavors. I typically prefer European salted butter for convenience and flavor, but this adjustment works just as well.
-
Why do I need to chill the cookies before baking?
Chilling the piped dough helps solidify the butter, so the cookies hold their shape better during baking. Without chilling, the cookies tend to spread out too much and lose their pretty detail. Trust me, this step makes a huge difference!
-
Can I substitute cake flour with all-purpose flour?
You can, but the texture will be slightly different. Cake flour provides a softer, lighter crumb which is part of what makes these cookies so delicate. If you don’t have cake flour, just use 260 grams of all-purpose flour instead and expect a slightly less tender bite.
-
How long do these cookies last?
When stored properly in an airtight container, these cookies keep fresh at room temperature for up to 5 days. For longer storage, freezing is your best bet—and they maintain flavor and texture well in the freezer for up to 3 months.
-
Can I make these cookies ahead of time?
Definitely! You can shape and pipe the cookies, then chill them in the fridge for up to 2 days before baking. For even longer storage, freeze the unbaked shaped dough for 2-3 months and bake straight from frozen, adding a couple of extra minutes to the bake time.
Final Thoughts
I absolutely love how these Melt-in-Your-Mouth Danish Butter Cookies Recipe turn out every single time. They remind me of cozy afternoons spent baking with my family, filling the house with the most comforting aroma. I’m so excited for you to try this recipe because it’s one you can feel confident about, whether you’re an experienced baker or just starting out. Go ahead, make a batch, share with those you love, and savor that perfect buttery melt-in-your-mouth moment—it’s a simple pleasure that truly never gets old!
Print
Melt-in-Your-Mouth Danish Butter Cookies Recipe
- Prep Time: 15 minutes
- Cook Time: 15 minutes
- Total Time: 1 hour 30 minutes
- Yield: 24 cookies 1x
- Category: Dessert, Cookies
- Method: Baking
- Cuisine: Danish
Description
Classic Danish Butter Cookies that melt in your mouth with a crisp, buttery texture. These cookies are piped into charming shapes and lightly golden baked to perfection, making them perfect for festive occasions or a delightful treat any time.
Ingredients
Wet Ingredients
- 1 cup (227 g) European salted butter, room temperature
- 2 egg yolks
- 2 teaspoons (10 g) vanilla extract
- 1 tablespoon (15 g) whole milk, plus more to soften as needed
Dry Ingredients
- ½ cup (100 g) granulated sugar
- ⅛ teaspoon salt
- 2 cups (220 g) all-purpose flour
- ½ cup (50 g) cake flour
For Decorating
- Coarse sugar for decorating (optional)
Instructions
- Prep the Refrigerator and Baking Mats: Clear space in your refrigerator for a baking sheet and line two baking sheets with parchment paper or silicone mats. This ensures you can chill the shaped cookies immediately, preventing them from spreading too much during baking.
- Cream Butter, Sugar, and Salt: In a stand mixer fitted with a paddle attachment, cream the room temperature butter on medium speed until smooth. Slowly add granulated sugar and salt while mixing on low, then increase to medium speed until light and fluffy.
- Add Egg Yolks, Vanilla, and Milk: With the mixer running on medium speed, slowly add egg yolks, vanilla extract, and milk. Mix until well combined, scraping the bowl sides to ensure even mixing.
- Incorporate Dry Ingredients: Whisk together the all-purpose flour and cake flour in a separate bowl. Add to the mixer in two batches, mixing on low speed just until the flour disappears and dough is smooth. Add an extra tablespoon of milk if the dough is too thick to pipe.
- Pipe the Cookies: Transfer dough to a large piping bag fitted with a ½-inch open star tip. Pipe 2-inch shapes (rosettes, pretzels, circles, squares) spaced at least 2 inches apart on the prepared baking sheets. Sprinkle with coarse sugar or festive sprinkles if desired.
- Chill the Cookies: Refrigerate the piped cookies for 20-30 minutes to prevent spreading during baking.
- Preheat the Oven: Set oven rack to the middle position and preheat oven to 350°F (175°C).
- Bake: Bake cookies for 10-15 minutes until the edges are just lightly golden brown. Remove from oven and cool on baking sheets for 5 minutes before transferring to a wire rack to cool to room temperature.
Notes
- Use room temperature butter for easy mixing; it should be around 67°F (19°C) and soft enough to leave an indentation.
- Room temperature eggs ensure even baking; warm cold eggs in slightly warm water for 5 minutes if needed.
- Don’t overmix the dough to avoid tough cookies caused by gluten development.
- Keep an eye on baking times; these can vary depending on cookie size and shape.
- The combination of all-purpose and cake flour provides a crisp yet melt-in-your-mouth texture, but you can substitute with 260 grams of all-purpose flour alone if preferred.
- Measure flour accurately, ideally with a kitchen scale, to prevent excess flour which can toughen cookies.
- If using unsalted butter, add ¼ teaspoon kosher salt to the dough.
- Store cookies in an airtight container at room temperature for up to 5 days or freeze for up to 3 months.
- You can chill shaped cookies up to 2 days before baking; cover if chilling longer than 30 minutes.
- Unbaked shaped dough can be frozen for 2-3 months; bake from frozen adding a couple extra minutes to the baking time.
Nutrition
- Serving Size: 1 cookie
- Calories: 110
- Sugar: 6g
- Sodium: 60mg
- Fat: 7g
- Saturated Fat: 4.5g
- Unsaturated Fat: 2g
- Trans Fat: 0g
- Carbohydrates: 11g
- Fiber: 0.3g
- Protein: 1.2g
- Cholesterol: 30mg

Your email address will not be published. Required fields are marked *