

If you’re on the hunt for a soft, slightly sweet, and utterly irresistible bread to accompany your dinners or holiday feasts, you’ve just found it. This Honey-Squash Dinner Rolls Recipe is hands down one of my favorite go-to bread recipes, and I can’t wait to share why it’s so special. Picture warm, pillowy rolls with a tender crumb, just the right touch of honey sweetness, and subtle hints of nutmeg that make every bite feel like a cozy hug. Stick with me, and soon you’ll be making these at home, too!
Why You’ll Love This Recipe
- Soft & Fluffy Texture: Thanks to the mashed winter squash and honey, these rolls stay tender and moist, making every bite a joy.
- Subtle Sweetness: The honey adds just enough sweetness without overpowering, balancing perfectly with nutmeg’s warmth.
- Versatile & Crowd-Pleasing: I’ve served these at casual dinners and holiday tables with equal success — everyone asks for seconds!
- Simple Yet Special Ingredients: Using common pantry staples alongside nutritious winter squash makes this an easy but impressive bake.

Ingredients You’ll Need
Every ingredient in this Honey-Squash Dinner Rolls Recipe plays its role, working harmoniously to give you that tender crumb, subtle sweetness, and inviting aroma. I’ll share a few personal tips as we go!
- Active Dry Yeast: Make sure your yeast is fresh — it’s what gives your rolls their lovely rise and softness.
- Salt: Balances the sweetness and enhances the dough’s flavor.
- Ground Nutmeg: Adds a gentle warmth; a little goes a long way here!
- All-Purpose Flour: The backbone of your dough; be sure to measure it correctly by spooning it into your measuring cup for best results.
- 2% Milk: Warmed just right to activate yeast without killing it.
- Butter: Cubed and melted into the warm milk for richness and softness.
- Honey: I love using raw or wildflower honey when possible for added depth of flavor.
- Frozen Mashed Winter Squash: Thawed and ready — this is the secret to the rolls’ moist, tender texture and subtle veggie goodness.
- Large Egg: Brushed on top for a shiny golden finish that helps seeds stick.
- Seeds (Poppy, Pumpkin, Sesame): These add a fun crunch and an eye-catching finish you’ll want to customize.
Variations
One of the best things about this Honey-Squash Dinner Rolls Recipe is how easy it is to make your own. I often switch up the seeds or add in a little extra spice depending on the season!
- Swap the Seeds: Sometimes I sprinkle everything bagel seasoning on top instead of pumpkin or sesame seeds — it adds a savory punch my family loves.
- Make it Gluten-Free: I’ve experimented with gluten-free flour blends; just note the texture will be a bit denser but still delicious.
- Use Fresh Squash: When winter squash is in season, try roasting and mashing fresh squash for even richer flavor.
- Spice it Up: Add a pinch of cinnamon or ginger for a warm twist that works beautifully in fall or winter.
How to Make Honey-Squash Dinner Rolls Recipe
Step 1: Mix the Dry and Wet Ingredients
Start by combining both packages of yeast with the salt, ground nutmeg, and 3 cups of the flour in a big mixing bowl. In a small saucepan, gently heat the milk, cubed butter, and honey until it’s warm to the touch — around 120°-130°F is perfect. Pour the warm mixture into the dry bowl ingredients and beat on medium speed for about 2 minutes. Then add in your thawed mashed winter squash and beat it again, this time on high for 2 minutes. This method ensures everything blends perfectly and activates the yeast nicely.
Step 2: Knead the Dough to Perfection
Once your mixture is combined, start stirring in the remaining flour — a little at a time — until you have a soft but sticky dough. You’ll want to turn the dough onto a floured surface and knead it by hand for 6 to 8 minutes until it’s smooth and elastic. Don’t worry if it’s sticky at first; patience here is key. After kneading, place the dough in a greased bowl, turning once so the entire dough is coated with oil to prevent drying. Cover it with a towel and set it somewhere warm to double in size, about 1 hour.
Step 3: Shape and Let Rise Again
When your dough doubles, punch it down gently to release the air. Turn it out again onto a lightly floured surface and divide it into 24 equal pieces — I usually use a kitchen scale to keep them consistent. Shape each piece into a smooth ball and arrange them evenly between two greased 9-inch cast-iron skillets or round baking pans. Cover them with kitchen towels and allow to rise again until doubled, approximately 45 minutes. This second rise is what gives the rolls their beautiful fluff.
Step 4: Bake to Golden Perfection
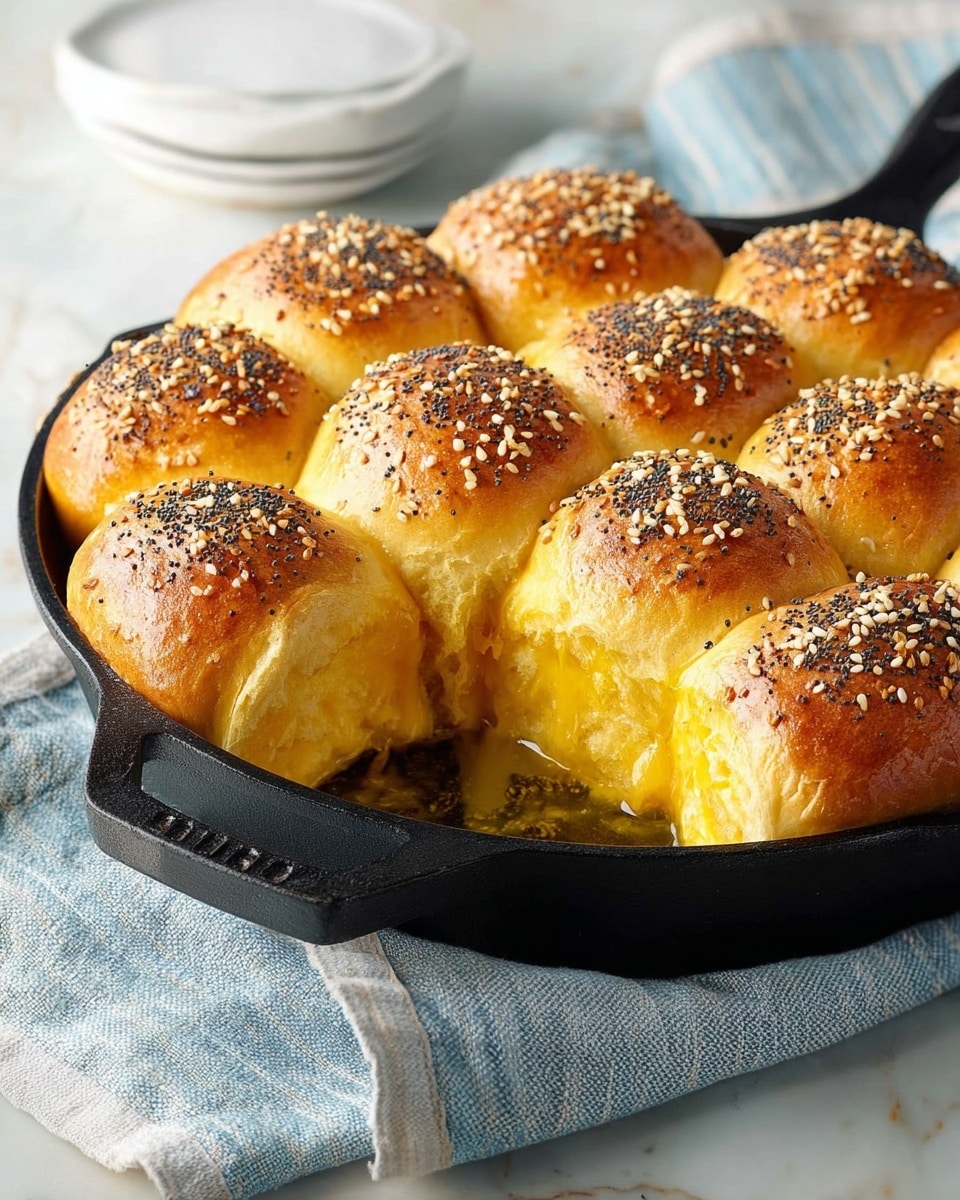
Preheat your oven to 375°F. Just before baking, brush the tops of the rolls with the lightly beaten egg — this helps them get that irresistible shiny, golden top and lets the seeds stick nicely. Sprinkle your choice of poppy seeds, salted pumpkin seeds (pepitas), sesame seeds, or a mix on top. Bake for 20 to 25 minutes until the rolls are deep golden brown. If you notice they’re browning too quickly, tent them loosely with foil for the last 5 to 7 minutes. Once done, let them cool for a bit on wire racks and enjoy while warm!
Pro Tips for Making Honey-Squash Dinner Rolls Recipe
- Temperature Awareness: I learned early on that warming your milk mixture too hot kills the yeast — always test with a thermometer or touch before mixing.
- Kneading Is Key: Don’t rush the kneading process. When the dough gets smooth and springs back when poked, you know it’s ready.
- Second Rise Pays Off: That extra rising time after shaping is a game-changer for softness and volume.
- Tenting With Foil: Covering the rolls loosely if browning too fast prevents burnt tops and keeps them looking gorgeous.
How to Serve Honey-Squash Dinner Rolls Recipe
Garnishes
I usually keep it classic with a generous sprinkle of salted pumpkin seeds or sesame seeds on top — they add a nice texture contrast and a subtle nuttiness. Sometimes I go wild with poppy seeds or a blend, especially when serving to guests. If you’re bringing these rolls to a festive table, a light brush of melted honey over warm rolls right before serving makes them extra glossy and mildly sweet.
Side Dishes
These rolls are pure magic alongside soups, stews, or roast dinners. My family especially loves them with honey-glazed ham, roasted turkey, or a cozy bowl of butternut squash soup. They soak up gravy beautifully, making every meal feel a little more special.
Creative Ways to Present
For holidays or special occasions, I like arranging the rolls in a circular pattern on a large platter, garnished with fresh rosemary sprigs or thyme. Another idea that’s a hit: serve the rolls warm in a cast-iron skillet right from the oven, so guests can pull them apart family-style. It adds that homemade, welcoming vibe everyone appreciates.
Make Ahead and Storage
Storing Leftovers
I usually keep leftover rolls in an airtight container at room temperature for up to 2 days. After that, they start to dry out, so I find it best to freeze if I know I won’t finish them soon. Just be sure to store them well to keep their softness intact.
Freezing
Freezing works wonderfully with this Honey-Squash Dinner Rolls Recipe. After baking, cool them completely, then wrap tightly in plastic wrap followed by foil or place them in a freezer-safe bag. When you’re ready, thaw overnight in the fridge or at room temperature for a couple of hours. I’ve done this many times when prepping ahead for big dinners, and they taste just as good.
Reheating
To bring back that fresh-baked warmth, I pop the rolls in a 350°F oven for 8-10 minutes, sometimes covering them with foil to prevent drying out. For a quick fix, you can microwave them for 15-20 seconds wrapped in a damp paper towel, but the oven method gives the best texture.
FAQs
-
Can I use fresh winter squash instead of frozen mashed squash?
Absolutely! Roasting and mashing fresh winter squash like butternut or acorn squash works really well and often adds even better flavor. Just make sure it’s fully cooked, cooled, and mashed smooth before adding it into the dough.
-
What if my dough is too sticky to handle?
Sticky dough is normal with this recipe due to the squash and honey. Use lightly floured hands and surfaces to manage it, but avoid adding too much extra flour as it can make the rolls dry. Kneading will also help the dough develop and become easier to handle.
-
Can I substitute honey with another sweetener?
You can try maple syrup or agave nectar, but keep in mind that honey contributes unique flavor and moisture that’s hard to replicate exactly. If using liquid sweeteners, the dough consistency might differ slightly.
-
How do I know when the rolls are fully baked?
They should be a rich golden brown on top and sound hollow when tapped. The internal temperature should ideally reach 190°F if you want to be precise. If they brown too quickly, tent with foil to avoid burning.
Final Thoughts
This Honey-Squash Dinner Rolls Recipe has become such a staple in my kitchen because it’s both comforting and a bit unique — that cozy squash flavor and gentle honey sweetness really set it apart from typical dinner rolls. I hope you enjoy making these as much as I do, whether you’re feeding a family weekday dinner or entertaining guests. Trust me, sharing a warm basket of these rolls will bring smiles and happy bellies every time. Give them a try, and let me know how they turn out!
Print
Honey-Squash Dinner Rolls Recipe
- Prep Time: 40 minutes plus 1 hour rising plus 45 minutes second rising
- Cook Time: 20-25 minutes
- Total Time: About 2 hours 45 minutes
- Yield: 24 rolls (2 dozen) 1x
- Category: Bread
- Method: Baking
- Cuisine: American
Description
These Honey-Squash Dinner Rolls are soft, slightly sweetened yeast rolls enhanced with nutritious winter squash and a touch of honey. Perfectly golden and topped with a choice of seeds, they bring a delightful twist to traditional dinner rolls, ideal for holiday meals or everyday dinners.
Ingredients
Dry Ingredients
- 2 packages (1/4 ounce each) active dry yeast
- 2 teaspoons salt
- 1/4 teaspoon ground nutmeg
- 6 to 6-1/2 cups all-purpose flour
Wet Ingredients
- 1–1/4 cups 2% milk
- 1/2 cup butter, cubed
- 1/2 cup honey
- 1 package (12 ounces) frozen mashed winter squash, thawed (about 1–1/3 cups)
- 1 large egg, lightly beaten
Topping
- Poppy seeds, salted pumpkin seeds or pepitas, and sesame seeds (as desired)
Instructions
- Prepare Dry Mixture: In a large bowl, combine the active dry yeast, salt, ground nutmeg, and 3 cups of all-purpose flour. Mix well to evenly distribute the ingredients.
- Heat Wet Ingredients: In a small saucepan, heat the 2% milk, cubed butter, and honey until the mixture reaches 120°-130°F (warm, not hot). This activates the yeast without killing it.
- Mix Dough: Pour the warm milk mixture into the dry ingredients. Beat on medium speed for 2 minutes to combine. Add the thawed mashed winter squash and beat on high speed for an additional 2 minutes. Gradually stir in enough of the remaining flour to form a soft dough; it will be sticky.
- Knead Dough: Turn the dough onto a floured surface and knead until it becomes smooth and elastic, about 6 to 8 minutes. This develops the gluten structure for a good rise.
- First Rise: Place the kneaded dough into a greased bowl, turning once to grease the top. Cover the bowl and let the dough rise in a warm place until doubled in size, approximately 1 hour.
- Shape Rolls: Punch down the dough to release air. Turn onto a lightly floured surface and divide the dough into 24 equal pieces. Shape each into a ball and arrange evenly between two greased 9-inch cast-iron skillets or round baking pans.
- Second Rise: Cover the dough balls with kitchen towels and let them rise in a warm place until doubled, about 45 minutes.
- Preheat Oven and Prepare Topping: Preheat the oven to 375°F. Brush the tops of the risen rolls with the lightly beaten egg, then sprinkle generously with your choice of poppy seeds, salted pumpkin seeds or pepitas, and sesame seeds.
- Bake Rolls: Bake the rolls for 20 to 25 minutes until they turn a dark golden brown. If the rolls begin to overbrown during the last 5 to 7 minutes, cover them loosely with foil to prevent burning.
- Cool and Serve: Remove rolls from pans and transfer to wire racks to cool slightly. Serve warm for best flavor and texture.
Notes
- Use a thermometer to ensure milk mixture is at the right temperature (120°-130°F) to activate yeast properly.
- The dough will be sticky but adding flour gradually will help achieve the right consistency.
- Cover with foil toward the end of baking if rolls brown too quickly.
- Frozen mashed winter squash can be substituted with fresh cooked and mashed squash if available.
- Use cast-iron skillets for even baking and a nice crust, but any round baking pans will work.
Nutrition
- Serving Size: 1 roll
- Calories: 160
- Sugar: 5g
- Sodium: 210mg
- Fat: 4.5g
- Saturated Fat: 2.7g
- Unsaturated Fat: 1.6g
- Trans Fat: 0g
- Carbohydrates: 27g
- Fiber: 1.5g
- Protein: 4g
- Cholesterol: 25mg

Your email address will not be published. Required fields are marked *