

If you’re searching for a quick, delicious breakfast that feels a little fancy but comes together with almost no effort, I’ve got you covered with this Ham and Egg Cups Recipe. These little bites are packed with savory ham, melty cheddar, and perfectly baked eggs that you can customize just how you like them. Seriously, whenever I make these, my family goes crazy—and I love how fuss-free they are on hectic mornings. Stick around because I’m going to share all my tips so you nail them every single time!
Why You’ll Love This Recipe
- Super Quick and Easy: You’ll have breakfast ready in just about 20 minutes from start to finish—perfect for busy mornings.
- Customizable Flavor: Whether you like runny yolks or firm, smoky ham or honey ham, you can tailor these cups to your liking.
- Minimal Cleanup: Everything cooks right in a muffin pan, so you only dirty one dish—love that, don’t you?
- Kid and Crowd Friendly: These cups are perfect for feeding a family or serving guests with effortless elegance.

Ingredients You’ll Need
The ingredients for this Ham and Egg Cups Recipe come together like a dream. A few simple staples that you probably have in your fridge already, plus some shredded cheddar to add that gorgeous melted cheese punch. Here are the essentials you’ll want to keep handy.
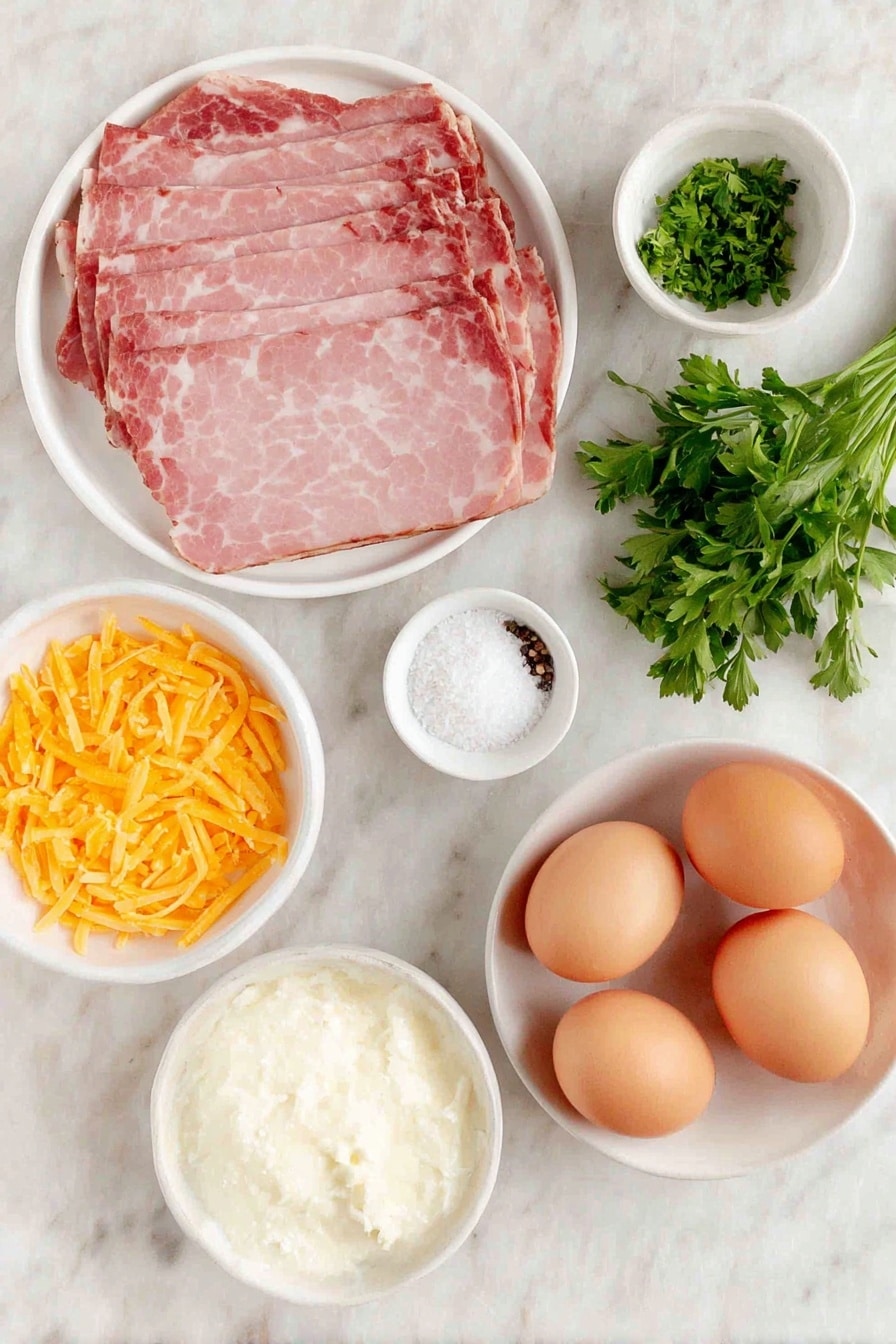
- Cooking spray: Essential for greasing those muffin cups so the ham and egg don’t stick; it’s a small step that makes cleanup way easier.
- Ham slices: I prefer standard thickness deli ham—thick enough to hold its shape in the pan, but not so thick that it overwhelms the eggs.
- Shredded cheddar cheese: Freshly shredded gives the best melt and flavor; avoid pre-shredded for creaminess reasons.
- Large eggs: The star of the show, cracked right into the ham cups—fresh eggs make a big difference in texture and taste.
- Kosher salt and freshly ground pepper: Simple seasoning to make every bite pop.
- Chopped fresh parsley: A sprinkle of green freshness that brightens up the rich eggs and cheese.
Variations
One of the things I adore about this Ham and Egg Cups Recipe is how easy it is to make your own. Over time, I’ve played around with different cheeses, added veggies, and even swapped ham for other proteins to keep it exciting.
- Try different cheeses: I’ve had guests rave when I swapped cheddar for pepper jack or smoked gouda—adds a whole new kick.
- Add veggies: Sautéed spinach, chopped bell peppers, or mushrooms folded in with the cheese can sneak in some greens without complicating the process.
- Swap the ham: Turkey slices or cooked bacon work great, too, especially if you want a change-up or need a leaner option.
- Make it dairy-free: Use a dairy-free cheese or skip the cheese altogether for a lighter version that still tastes fantastic.
How to Make Ham and Egg Cups Recipe
Step 1: Prep Your Muffin Pan with Ham
Start by preheating your oven to 400 degrees Fahrenheit. Then give your 12-cup muffin pan a good spray with cooking spray—this step is critical, trust me. Line each muffin cup with one slice of your ham, trimming the edges if needed to fit neatly. The ham acts like a natural “cup” for holding the egg and cheese, creating that perfect bite-sized breakfast. I learned early on that skipping the spray turns unmolding these cups into a frustrating ordeal, so don’t skip it!
Step 2: Add Cheese and Crack the Eggs
Next, sprinkle about a tablespoon of shredded cheddar cheese into each ham-lined cup. This little layer of cheese melts around the edges, adding creaminess and flavor as the eggs bake. Then, carefully crack one large egg into each cup—try to avoid breaking the yolk unless that’s your thing. Season each with a pinch of kosher salt and a few cracks of freshly ground black pepper. This helps bring out the flavors without overpowering the dish.
Step 3: Bake to Your Perfect Yolk
Pop the muffin pan in the oven and bake for 12 to 15 minutes. This is where you get to play with your yolk’s texture. I love 12 minutes for a soft, runny center—perfect if you like dipping toast soldiers. But if you prefer a firmer yolk that’s closer to hard boiled, 15 minutes is your sweet spot. One trick I discovered is to start checking at 12 minutes so you don’t accidentally overcook them. When done, remove the pan and sprinkle chopped fresh parsley on top to brighten things up.
Step 4: Serve and Enjoy
Use a large spoon to gently remove each ham and egg cup from the pan. They should slide out easily if you prepped the pan correctly. Serve warm and watch your family’s faces light up. Honestly, these are as pretty as they are tasty, and they make breakfast feel special without any stress.
Pro Tips for Making Ham and Egg Cups Recipe
- Always Grease the Pan Well: This is the key step so your ham and eggs don’t stick—cooking spray works wonders, but butter or oil also does the trick.
- Don’t Overcrowd Your Ham: Trim the slices to fit just right; too much ham can make it tricky to fold nicely and hold the egg.
- Check Early for Runny Yolks: I like to peek at my cups around 12 minutes to catch that perfectly soft yolk stage.
- Use Fresh Eggs for Best Texture: Fresh eggs hold together better and give a smoother finish, so try to avoid older eggs if possible.
How to Serve Ham and Egg Cups Recipe

Garnishes
I’m a big fan of keeping garnishes simple and fresh. A sprinkle of chopped parsley really lifts the flavors here and adds a pop of color. Sometimes I toss on a little cracked black pepper again or even some red pepper flakes if we want a hint of heat. A tiny dab of hot sauce on the side also pairs beautifully!
Side Dishes
These ham and egg cups stand well on their own but pair wonderfully with simple sides. I often serve them alongside crispy roasted potatoes or a light mixed green salad to balance the richness. Fresh fruit or avocado slices add freshness too—perfect for a balanced breakfast or brunch spread.
Creative Ways to Present
For a brunch party, I like to arrange these cups on a large platter with colorful garnishes like edible flowers, sliced cherry tomatoes, and fresh herbs. You can also pop individual cups into small ramekins lined with a little lettuce leaf for a fancier look. They make great finger foods, so setting up a self-serve station with sauces and toppings lets guests customize their own.
Make Ahead and Storage
Storing Leftovers
I like to store any leftovers in an airtight container in the fridge, and they’ll stay good for about 3 days. Just be sure to cool them completely before popping into storage to keep them fresh and tasty.
Freezing
Freezing this recipe works surprisingly well! I let the cups cool fully, then place them in a single layer on a baking sheet to freeze. Once frozen, pop them into a freezer-safe bag or container. They keep for up to a month and defrost quickly when you’re ready.
Reheating
To reheat, I usually microwave a cup on medium power for about 40 seconds to 1 minute, which warms it through without drying it out. You can also reheat in a 350°F oven for 10 minutes if you want a crisper edge. Avoid overcooking to keep the yolks from getting chalky.
FAQs
-
Can I use other types of cheese in the Ham and Egg Cups Recipe?
Absolutely! While cheddar gives a classic sharpness, you can swap in gouda, pepper jack, mozzarella, or even feta for different flavor profiles. Just be sure the cheese melts well and complements the ham.
-
How do I prevent the eggs from sticking to the muffin pan?
Greasing the pan thoroughly with cooking spray or butter is key. The ham helps create a barrier, but the pan still needs to be well coated to ensure the cups release easily after baking.
-
Can I make Ham and Egg Cups Recipe ahead of time?
Yes! You can prepare them ahead, store refrigerated, and reheat when ready. You can also freeze for longer storage—just thaw before reheating to maintain the best texture.
-
What if I want runny yolks—how do I know when to take them out?
Baking for about 12 minutes usually results in soft, runny yolks. I recommend checking at the 12-minute mark and adjust based on how your oven bakes, as timing can vary slightly.
-
Is this recipe suitable for meal prepping?
Yes! These Ham and Egg Cups are great for meal prep because you can make a batch ahead, store them safely, and grab a protein-packed breakfast anytime—perfect for busy weekdays.
Final Thoughts
This Ham and Egg Cups Recipe has become one of my go-to breakfast solutions—it’s simple enough to whip up on a weekday, yet special enough that you feel like you’re treating yourself. The way the ham holds the egg and cheese neatly, combined with the customizable yolk texture, makes it feel like a little bit of a breakfast party every time. I can’t recommend it enough, especially if you want to up your morning game without the hassle. Give it a try—you might just find a new favorite way to start your day!
Print
Ham and Egg Cups Recipe
- Prep Time: 5 minutes
- Cook Time: 15 minutes
- Total Time: 20 minutes
- Yield: 12 servings 1x
- Category: Breakfast
- Method: Baking
- Cuisine: American
- Diet: Low Carb
Description
These Super Easy Ham and Egg Cups are a convenient and delicious breakfast option, combining savory ham, melted cheddar cheese, and perfectly baked eggs all in individual muffin-sized portions. Ideal for busy mornings or meal prepping, they offer a satisfying start to your day with customizable yolk consistency.
Ingredients
Ingredients
- Cooking spray
- 12 slices of ham (standard thickness sliced deli ham, trimmed if needed)
- 1 ½ cups shredded cheddar cheese (preferably freshly grated)
- 12 large eggs
- Kosher salt, to taste
- Freshly ground black pepper, to taste
- Chopped fresh parsley, for garnish
Instructions
- Preheat Oven: Preheat your oven to 400 degrees Fahrenheit to ensure it reaches the right temperature for baking the ham and egg cups evenly.
- Prepare Muffin Pan: Spray the cups of a 12-cup muffin pan generously with cooking spray to prevent sticking and make unmolding easier.
- Line with Ham: Line each muffin cup with one slice of ham, trimming the slices if they are too large to fit snugly inside the cups, creating a ham “cup” to hold the ingredients.
- Add Cheese: Place about 1 tablespoon of shredded cheddar cheese on top of the ham in each cup, which will melt during baking and blend with the egg.
- Add Eggs: Crack one large egg into each ham-lined cup over the cheese, taking care not to break the yolk unless desired.
- Season: Season each egg with kosher salt and freshly ground black pepper according to your taste preferences.
- Bake: Bake the cups in the preheated oven for 12 to 15 minutes. Baking for 12 minutes yields runny yolks, while closer to 15 minutes results in fully set, harder yolks.
- Finish and Serve: Remove the muffin pan from the oven carefully. Sprinkle the baked ham and egg cups with freshly chopped parsley for color and freshness. Use a large spoon to gently remove each cup from the pan and serve warm.
Notes
- A standard 12-cup muffin pan is essential for easy assembly and uniform baking of these ham and egg cups.
- Do not skip greasing the muffin pan; cooking spray or alternatives like butter, olive oil, canola oil, or coconut oil will prevent sticking and ensure easy removal.
- Use standard thickness sliced deli ham rather than thinly sliced, which might not hold the ingredients well. Choose your favorite flavor, such as smoky tavern ham, baked, or honey ham.
- Freshly grated cheese is preferable to packaged grated cheese, as it melts creamier and adds better flavor and texture.
- Adjust baking time depending on preferred yolk consistency: 12 minutes for runny yolks or up to 15 minutes for firm yolks similar to hard-boiled eggs.
Nutrition
- Serving Size: 1 ham and egg cup
- Calories: 130
- Sugar: 0.5g
- Sodium: 520mg
- Fat: 9g
- Saturated Fat: 4g
- Unsaturated Fat: 4g
- Trans Fat: 0g
- Carbohydrates: 1g
- Fiber: 0g
- Protein: 11g
- Cholesterol: 185mg

Your email address will not be published. Required fields are marked *