
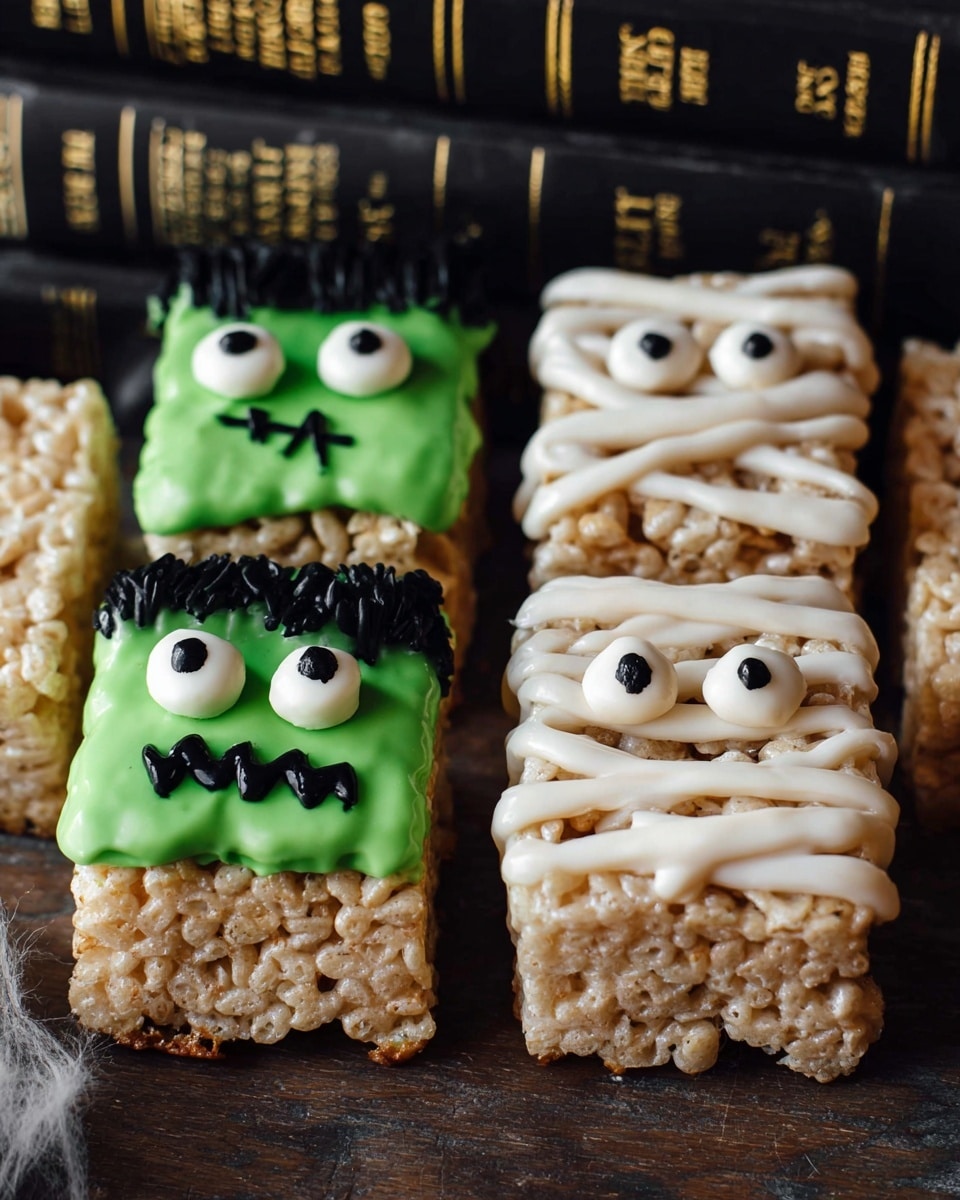
If you’re hunting for a fun, spooky treat that everyone will rave about, you’ve got to try this Halloween Rice Krispie Treats Recipe. I absolutely love how these sweet, crispy squares come together quickly and taste insanely delicious with that perfect marshmallowy gooeyness. Not only are they super simple to whip up, but decorating them with candy eyes and colorful melts makes them the ultimate festive snack your family and friends won’t stop talking about. Stick with me, and I’ll show you how to nail these treats every single time!
Why You’ll Love This Recipe
- Super Quick to Make: From start to finish, this recipe takes only about 15 minutes, perfect for last-minute Halloween fun.
- Kid-Friendly and Fun: The candy melts and candy eyes turn an ordinary treat into a monsterous delight for little hands (and big kids too!).
- Customizable Decor: You can swap colors, eyes, or frosting to fit your vibe—go wild with your spooky imagination!
- Perfect Texture Every Time: I learned how to press and cool them just right so they cut cleanly without crumbling.

Ingredients You’ll Need
The key to perfect Halloween Rice Krispie Treats Recipe lies in balancing chewy marshmallows with crispy cereal, plus those vibrant candy melts add that unbeatable pop of color. Having quality mini marshmallows and fresh puffed rice cereal ensures each bite is light and luscious.
- Butter: Unsalted works best so you can control saltiness; melting it gently helps the marshmallows melt evenly.
- Mini marshmallows: Mini ones melt faster and smoother than large marshmallows for that perfect sticky texture.
- Salt: Just a pinch to balance the sweetness—it’s a sneaky trick to elevate the flavor.
- Vanilla extract: Adds a warm, cozy depth that makes these treats extra special.
- Puffed rice cereal: Classic Rice Krispies cereal gives that iconic crunch we all expect.
- Bright/light green candy melts: These give a fun Halloween green color, perfect for ghosts, monsters, or witches.
- Bright white candy melts: For contrast and to craft little spooky eyeballs or details.
- Refined coconut oil or shortening: Helps smooth out and thin the candy melts for easy drizzling and decorating.
- Candy eyes: The fun finishing touch that brings personality and spooky charm.
- Black buttercream frosting: Optional for expressive details or outlines—I’ll share my easy way to make it later!
Variations
I love how versatile this Halloween Rice Krispie Treats Recipe is—you can tweak the colors, add mix-ins, or even swap marshmallows for allergy-friendly options. Make it yours and watch it become a family favorite.
- Ghostly Treats: I like using white candy melts with black frosting eyes to create cute little ghosts—super quick and always a hit with kids.
- Spooky Sprinkles: Add Halloween-themed sprinkles stirred into the melted marshmallow mix for extra texture and fun shapes throughout.
- Vegan Version: You can substitute vegan butter and vegan marshmallows to make this recipe plant-based without losing crunch or flavor.
- Peanut Butter Swirl: For a rich twist, swirl in some peanut butter before pressing into the pan; my family goes crazy for this combo.
How to Make Halloween Rice Krispie Treats Recipe
Step 1: Prep Your Pan and Ingredients
Start by lining a baking sheet with parchment paper—this helps when decorating your treats later. Then grease a 9×13 baking dish with butter or non-stick spray; this is where you’ll press the Rice Krispies mixture. Having everything prepped saves you from scrambling once the marshmallows start melting.
Step 2: Melt Butter and Marshmallows
In a medium stockpot over medium-low heat, gently melt the butter. Once melted, add your mini marshmallows along with salt and vanilla. Stir constantly to prevent scorching, and keep going until the marshmallows are completely smooth and glossy—this is what makes the treats sticky and soft. I discovered that low heat is key to avoid burning the marshmallows and producing a bitter taste.
Step 3: Stir in the Cereal and Press
Remove the pot from heat, then fold in your puffed rice cereal until every bit is coated. Here’s what I learned: use a sturdy spatula, and mix thoroughly but gently so the cereal stays crisp. Transfer the gooey mixture into your prepared baking dish. Use a buttered spatula or wax paper to press it evenly and firmly—that helps your treats hold shape and slice cleanly later.
Step 4: Cool and Cut
Let your Rice Krispies cool completely at room temperature—resisting the urge to dig in makes cutting easier and less crumbly. Once set, slice into 24 fun-sized squares using a sharp kitchen knife. I usually wipe my knife with a warm, damp cloth between cuts; it prevents sticky mess and keeps edges neat.
Step 5: Decorate with Candy Melts and Eyes
Melt your green and white candy melts with a bit of refined coconut oil in separate bowls. This thinning helps you drizzle or pipe with precision—perfect for making eyeballs or monster details. Press on candy eyes while the melts are still tacky, and outline or add creepy accents with black buttercream frosting if you like. I discovered that letting the treats chill briefly in the fridge speeds up the candy melt setting.
Pro Tips for Making Halloween Rice Krispie Treats Recipe
- Low and Slow Melting: Always melt butter and marshmallows over medium-low heat to avoid burning and get that perfect creamy texture.
- Grease Your Tools: Butter your spatula and knife when pressing and cutting to keep the mixture from sticking.
- Refined Coconut Oil Helps Melt Smoothly: Adding a bit to candy melts thins them out nicely, making decorating so much easier.
- Don’t Skip Cooling: Let your treats fully set before decorating or cutting to maintain shape and keep everything looking sharp.
How to Serve Halloween Rice Krispie Treats Recipe
Garnishes
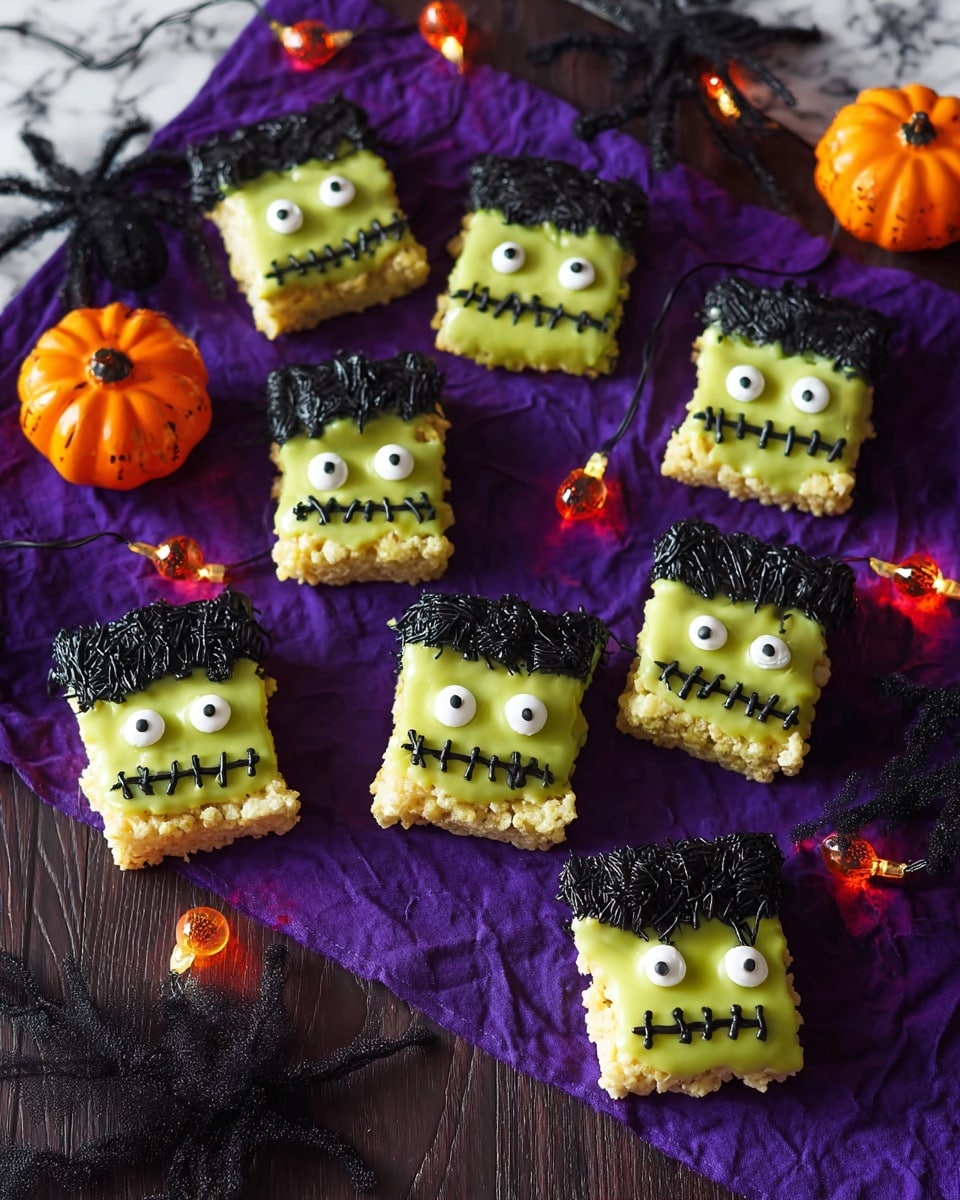
I like to go all out with candy eyes—they instantly give these treats personality. Sprinkling edible glitter or using spooky sprinkles around the edges adds a magical sparkle. When I want to get fancy, a drizzle of black or green buttercream frosting makes these treats look like little monsters ready to party.
Side Dishes
These treats pair perfectly with a classic hot cocoa or pumpkin spice latte. If you’re serving at a party, I recommend some fresh fruit skewers to balance all the sweetness and a few savory finger foods like cheese sticks or mini sandwiches to round out the spread.
Creative Ways to Present
One year, I presented the treats on a tiered cake stand dressed with faux spiderwebs and plastic spiders—it was a huge hit! Wrapping individual squares in clear cellophane tied with orange and black ribbons also makes adorable party favors. You can even use Halloween-themed cupcake liners inside a tray to add extra charm and color.
Make Ahead and Storage
Storing Leftovers
I store leftover treats in an airtight container at room temperature. They stay fresh and chewy for up to 3 days, though they rarely last that long in my house! If the candy melts start softening in a warm kitchen, a cool place helps maintain the texture.
Freezing
I’ve frozen these treats wrapped tightly in plastic wrap and placed inside a freezer bag. They keep well for about a month. When you’re ready to enjoy, just thaw at room temperature for an hour or two—decorations stay intact, and they taste almost as fresh as the day you made them.
Reheating
Reheating isn’t usually needed, but if you want that soft marshmallow gooeyness back, pop a treat in the microwave for 8-10 seconds. Be careful not to overheat, or they’ll get too sticky and hard to handle. I learned that a quick zap is enough to bring them back to life without melting the candy details.
FAQs
-
Can I use regular-sized marshmallows instead of mini?
Yes, you can, but mini marshmallows melt faster and more evenly, making the texture smoother. If using regular ones, chop them into smaller pieces to help them melt quicker and prevent clumping.
-
What can I use if I can’t find candy melts?
You can substitute white chocolate chips or colored white chocolate for candy melts. Just melt gently with a bit of coconut oil to thin, and be mindful that chocolate is a bit softer than candy melts, so it might set differently.
-
How do I make black buttercream frosting?
Mix unsalted butter with powdered sugar and a small amount of black gel food coloring until you get a smooth, deep black frosting. Use gel coloring in small amounts to avoid thinning the frosting too much.
-
Can these treats be made ahead for a party?
Absolutely! You can make them a day or two before your event and store tightly covered. Just wait to decorate with candy eyes and frosting the day of or the night before, so everything stays fresh and vibrant.
Final Thoughts
This Halloween Rice Krispie Treats Recipe has truly become a staple in my seasonal celebrations because it’s easy, fun, and always impresses. Whether you’re making them with your kids or bringing them to a party, you’ll appreciate how straightforward it is and how delighted everyone gets when they see these cute, spooky squares. Give it a try, and I promise these treats will become your go-to for a quick, festive snack that’s just bursting with Halloween spirit!
Print
Halloween Rice Krispie Treats Recipe
- Prep Time: 5 minutes
- Cook Time: 10 minutes
- Total Time: 15 minutes
- Yield: 24 treats 1x
- Category: Dessert, Snack
- Method: Stovetop
- Cuisine: American
Description
These Halloween Rice Krispie Treats are a delightful and festive twist on the classic marshmallow rice cereal snack. Featuring bright green and white candy melts, candy eyes, and black buttercream frosting for decoration, they are perfect for spooky-season parties, bake sales, or quick holiday treats that are fun to make and eat.
Ingredients
Base Ingredients
- 4 tablespoons butter
- 7 cups mini marshmallows
- 1/4 teaspoon salt
- 1/4 teaspoon vanilla extract
- 6 cups puffed rice cereal
Decoration Ingredients
- 12 ounces bright/light green candy melts
- 6 ounces bright white candy melts
- 2–4 tablespoons refined coconut oil (or shortening)
- Candy eyes
- Black buttercream frosting (see notes on how to make or substitutions)
Instructions
- Prepare baking surface: Line a baking sheet with parchment paper and set aside. Butter or spray a 9×13 inch baking dish with non-stick cooking spray and set aside for pressing the treats.
- Melt marshmallow mixture: In a medium stock pot over medium-low heat, melt 4 tablespoons of butter. Add 7 cups of mini marshmallows, 1/4 teaspoon salt, and 1/4 teaspoon vanilla extract, stirring continuously until the marshmallows are completely melted and smooth.
- Combine with cereal: Remove the pot from heat. Stir in 6 cups of puffed rice cereal until all the cereal is fully coated with the marshmallow mixture.
- Press into baking dish: Transfer the mixture into the prepared 9×13 inch baking dish. Use a buttered spatula or lightly buttered hands to press the mixture evenly and firmly into the dish. Allow it to cool and set completely.
- Cut and decorate: Once set and cooled, cut into 24 squares. Use the bright green and white candy melts, melted with 2-4 tablespoons of refined coconut oil or shortening, to drizzle or coat the treats. Add candy eyes and pipe or spread black buttercream frosting to create spooky Halloween designs.
Notes
- These treats are festive and fun to make, ideal for Halloween parties or bake sales.
- The black buttercream frosting can be made by coloring a classic buttercream with black gel food coloring or substituted with store-bought frosting.
- Use refined coconut oil or shortening to thin candy melts for smooth drizzling or coating.
- Pressing the mixture firmly into the dish ensures the treats hold together well when cutting.
Nutrition
- Serving Size: 1 treat
- Calories: 81 kcal
- Sugar: 8 g
- Sodium: 53 mg
- Fat: 2 g
- Saturated Fat: 1 g
- Unsaturated Fat: 1 g
- Trans Fat: 0 g
- Carbohydrates: 16 g
- Fiber: 1 g
- Protein: 1 g
- Cholesterol: 5 mg

Your email address will not be published. Required fields are marked *