

If you’re looking for a fun, festive treat that’s as delightful to make as it is to eat, you’ve gotta try this Halloween Cake Pops Recipe. These bite-sized goodies are perfect for parties, school events, or just an everyday dose of spooky sweetness. What I love most is how they combine moist white cake with creamy frosting and a snappy chocolate coating that you can customize with fun Halloween designs. Trust me, once you try these, your family and friends will go crazy for them!
Why You’ll Love This Recipe
- Quick and Simple: The cake mix shortcut means you’re ready to decorate in under an hour.
- Kid-Friendly Fun: Decorating these pops lets your little helpers unleash creativity with pumpkins, mummies, or sprinkles.
- Perfect bite-sized treats: These cake pops make portion control easy and are great for sharing.
- Versatile Flavors and Colors: Using different melting wafers lets you tailor the look and flavor to your Halloween theme.

Ingredients You’ll Need
For this Halloween Cake Pops Recipe, I stick to a mix of classic ingredients that come together effortlessly and taste just like a bakery treat. You won’t need fancy stuff, but choosing good quality melting wafers can really elevate the final look and texture.
- White cake mix: Using a box mix is my go-to for a perfectly moist base without fuss.
- Chocolate melting wafers: These help create a smooth, shiny coating that hardens nicely for dipping.
- White chocolate melting wafers: I prefer Ghirardelli for that rich, velvety chocolate flavor.
- Salted butter: Softened butter adds creaminess and balances the sweetness.
- Powdered sugar: This sweetens and thickens the frosting for binding the cake crumbs.
- Vanilla extract: A splash makes the frosting extra flavorful.
- Heavy cream or milk: Moistens the frosting, so it’s easy to mix but not too runny.
- Orange melting wafers: Perfect for decorating pumpkins with a bright Halloween vibe.
- Green frosting: Adds a fresh pop of color for pumpkin stems and accents.
- Black edible ink pen: This is a must-have for drawing spooky faces and details.
Variations
One of the most fun things about this Halloween Cake Pops Recipe is how easy it is to switch things up. I’ve tried all kinds of customizations depending on the occasion, and you can too! Feel free to make it your own.
- Flavor swaps: I’ve swapped the white cake for chocolate or red velvet cake mix for more dramatic color and taste, and it never disappoints.
- Dairy-free option: Using dairy-free butter and milk alternatives lets everyone enjoy these treats without missing out.
- Decoration themes: Besides pumpkins and mummies, I like dressing them as ghosts with white chocolate and edible eyes for a simple yet spooky vibe.
- Sprinkle toppings: Adding Halloween-themed sprinkles before the chocolate hardens gives a cute texture and visual pop.
How to Make Halloween Cake Pops Recipe
Step 1: Bake and Cool Your Cake
Start by preparing the white cake mix according to the package instructions and baking it in a 9×13″ pan. When I first made these, I learned the hard way not to rush the cooling — make sure your cake is completely cool before crumbling it to avoid a soggy mess. I usually let it cool for at least an hour, or pop it in the fridge to speed things up.
Step 2: Mix the Cake Crumbs and Frosting
Once the cake is cooled, crumble it into fine, even crumbs — this is where the magic starts. Mix together the softened salted butter, powdered sugar, vanilla extract, and heavy cream or milk to create a smooth frosting. Slowly combine the crumbs and frosting until the mixture holds together but isn’t too sticky. If it feels dry, add a splash more cream. This step makes all the difference in shaping your pops without them falling apart.
Step 3: Form and Chill the Cake Balls
Roll the mixture into small, even balls—about 1 to 1.5 inches across works great. Place them on a baking sheet lined with parchment paper. Here’s my trick: pop these in the freezer for about 15-20 minutes before dipping. It firms them up nicely and keeps them from crumbling when you coat them in chocolate.
Step 4: Dip and Decorate Your Pops
Melt your chocolate melting wafers in separate bowls – keep the orange wafers for pumpkin designs and white chocolate wafers for a base or mummy wraps. Dip each cake ball into the melted chocolate and gently tap off excess. Use green frosting to add pumpkin stems, and the black edible ink pen to draw faces once the coating has set. I love this part because you can really get creative with designs—my kids think they’re little edible works of art!
Pro Tips for Making Halloween Cake Pops Recipe
- Chill Properly: Freezing the cake balls before dipping makes them easier to coat and reduces falling apart.
- Use Candy Melts Carefully: Melt wafers gently using short bursts in the microwave and stir well to avoid burning or graininess.
- Stick Stability: Dip the lollipop stick partway into melted chocolate before inserting into cake ball for a strong hold.
- Allow to Set Upright: Use a styrofoam block or cake pop stand to keep your pops upright while drying to prevent smudging.
How to Serve Halloween Cake Pops Recipe
Garnishes
I usually keep the garnishes simple but festive—orange and green colored melting wafers paired with a black edible pen let you craft the cutest pumpkins and spooky faces. Sometimes I add Halloween sprinkles or edible glitter for an extra touch of fun sparkle. These pops are as much about the presentation as they are about taste!
Side Dishes
Pair these cake pops with a cold glass of milk or a spooky-themed drink like apple cider or a creamy pumpkin latte. For parties, I like to set up a candy corner with other bite-sized treats like mini cupcakes, cookies, and caramel apples so guests have plenty of options.
Creative Ways to Present
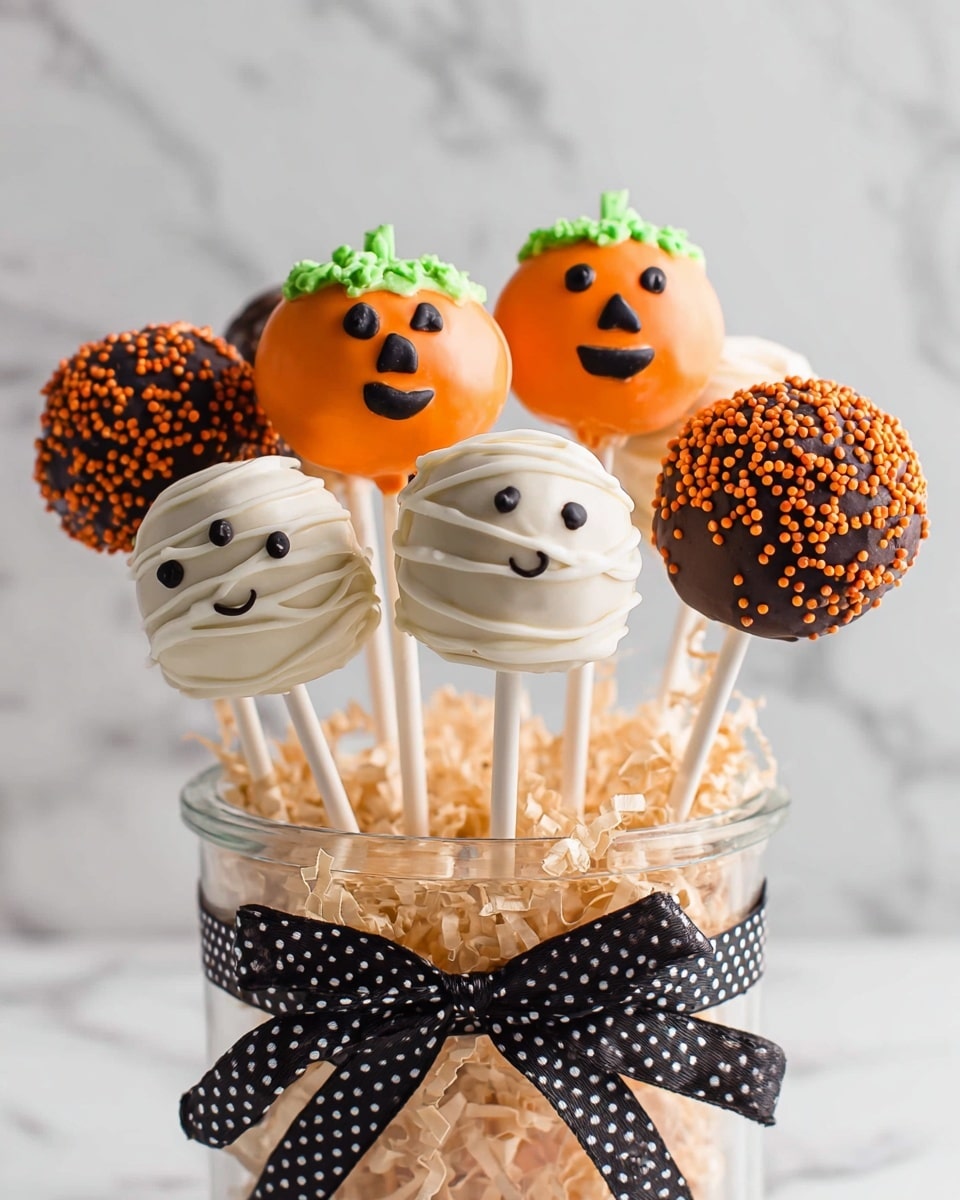
For a party, I’ve placed cake pops in small mason jars filled with colored sand or candy corn to keep them upright and make a festive centerpiece. Another fun idea is wrapping each pop individually in clear cellophane tied with Halloween ribbon — these make adorable party favors or classroom treats!
Make Ahead and Storage
Storing Leftovers
If you have any leftovers (very rare in my house!), store the cake pops in an airtight container in the refrigerator. They stay good for up to 4 days without losing flavor or texture. Just be sure to keep them away from any strong-smelling foods that might alter their taste.
Freezing
I’ve successfully frozen these cake pops for up to a month. Simply place them on a tray to freeze individually, then transfer to a freezer-safe bag. When ready to enjoy, thaw in the fridge overnight so the chocolate doesn’t sweat and the cake stays moist.
Reheating
Since these are best enjoyed cold or at room temperature, I don’t recommend reheating. Letting them sit out for about 15 minutes before serving allows the flavors and texture to come through beautifully.
FAQs
-
Can I use a homemade cake instead of box mix for this Halloween Cake Pops Recipe?
Absolutely! Homemade cake works wonderfully and adds a personal touch. Just make sure your cake is dense enough to hold together well when crumbled. Moist cakes like pound cake or butter cake usually work best.
-
What if I don’t have melting wafers? Can I use regular chocolate?
Regular chocolate can be used but it requires tempering to avoid bloom and cracking when it hardens. Melting wafers are designed to melt smoothly and harden with a nice sheen without tempering, which makes them perfect for cake pops.
-
How do I avoid cracks or crumbling when dipping cake pops?
Chilling the cake balls in the freezer before dipping helps them stay firm. Also, dipping quickly and tapping off excess coating gently will prevent cracks. Using candy melts designed for dipping improves the coating’s adherence and flexibility.
-
Can I make these Halloween cake pops ahead of time?
Yes! These cake pops can be made a day or two in advance and stored in the fridge. Just make sure they’re kept in an airtight container to maintain freshness.
Final Thoughts
This Halloween Cake Pops Recipe holds a special place in my heart because it brings such joy and creativity into my kitchen every year. I love how easy it is to get the whole family involved, from mixing to decorating, and those smiles when tasting the finished pops are priceless. Give this recipe a try—you’ll find it’s not just a dessert, but a happy tradition in the making.
Print
Halloween Cake Pops Recipe
- Prep Time: 40 min
- Cook Time: 20 min
- Total Time: 60 min
- Yield: 24 cake pops 1x
- Category: Dessert
- Method: Baking
- Cuisine: American
Description
These Halloween Cake Pops are delightful bite-sized treats made from moist white cake mixed with creamy buttercream frosting, dipped in vibrant chocolate coatings, and decorated festively as pumpkins, mummies, or with colorful sprinkles—perfect for a spooky celebration or party.
Ingredients
Cake
- 15 ounce box white cake mix (prepare according to package directions in a 9×13″ pan)
Frosting & Coating
- 1 stick salted butter, softened
- 2 to 2 1/2 cups powdered sugar
- 1 teaspoon vanilla extract
- 1 Tablespoon heavy cream or milk
- 5 ounce chocolate melting wafers
- 10 ounce white chocolate melting wafers (preferably Ghiradelli)
- 10 ounces orange melting wafers
- Green frosting
- Black edible ink pen
Instructions
- Prepare the Cake: Follow the instructions on the white cake mix box to bake the cake in a 9×13″ pan. Once baked, let it cool completely before proceeding.
- Make the Buttercream Frosting: In a mixing bowl, beat the softened butter until creamy. Gradually add 2 to 2 1/2 cups powdered sugar, vanilla extract, and heavy cream or milk, mixing until smooth and spreadable.
- Crumble and Mix: Crumble the cooled cake into fine crumbs. Combine the cake crumbs with the buttercream frosting evenly until the mixture can hold its shape when rolled.
- Form Cake Balls: Scoop and roll the mixture into approximately 24 small balls. Place them on a parchment-lined tray and chill in the refrigerator until firm, about 30 minutes.
- Melt Coatings: Melt the chocolate melting wafers and white chocolate melting wafers in separate bowls according to package instructions, typically via microwave or double boiler.
- Dip Cake Pops: Using a fork or dipping tool, coat each cake ball evenly with melted white or chocolate wafers. Allow excess coating to drip off and set on parchment paper.
- Decorate: For a Halloween theme, dip some cake balls in orange melting wafers to create pumpkin-look cake pops. Use green frosting to pipe stems or leaves. Use the black edible ink pen for drawing faces or mummy details. Optionally, add festive sprinkles for extra flair.
- Set and Serve: Let the cake pops rest until the coatings harden completely. Serve chilled or at room temperature as a festive, bite-sized treat.
Notes
- These cake pops combine moist cake with creamy buttercream for a perfect texture.
- You can customize decorations to represent pumpkins, mummies, or use seasonal sprinkles.
- Adjust powdered sugar quantity for preferred frosting consistency.
- Store cake pops in an airtight container in the refrigerator to keep fresh.
- Allow cake pops to come to room temperature before serving for best flavor.
Nutrition
- Serving Size: 1 cake pop
- Calories: 110
- Sugar: 15 g
- Sodium: 36 mg
- Fat: 6 g
- Saturated Fat: 4 g
- Unsaturated Fat: 2 g
- Trans Fat: 0 g
- Carbohydrates: 15 g
- Fiber: 0 g
- Protein: 1 g
- Cholesterol: 9 mg

Your email address will not be published. Required fields are marked *