

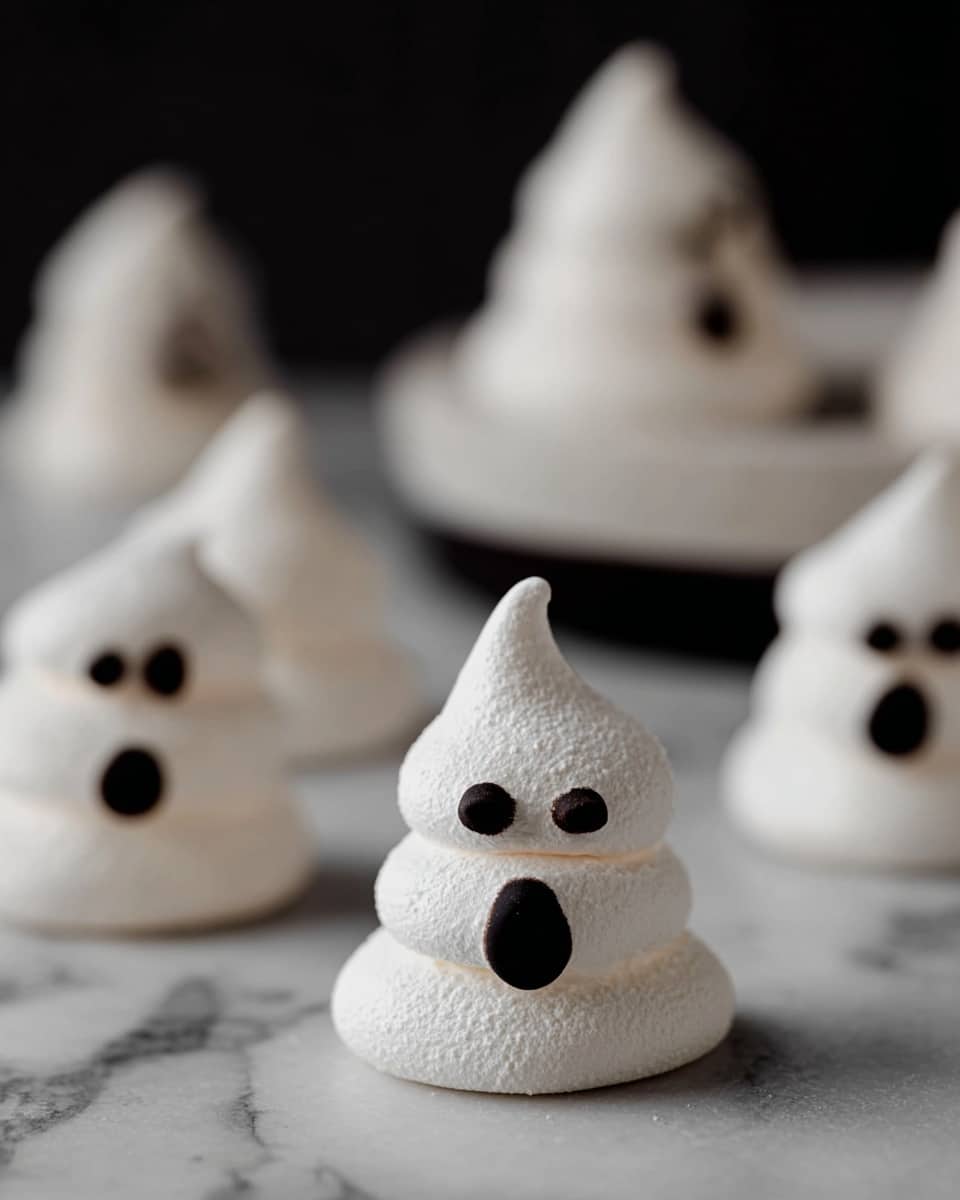
If you’re looking for a fun and festive treat that’s as charming as it is delicious, you’re going to adore this Ghost Meringues Recipe. These little Halloween-themed clouds are crunchy on the outside with a soft, pillowy center that literally melt in your mouth. When I first tried this recipe, I was amazed at how simple it was to turn basic ingredients into these adorable, spooky delights that get everyone smiling. Stick around, because I’ll walk you through every step so your ghosts come out perfectly every time!
Why You’ll Love This Recipe
- Cute & Festive: These ghost-shaped meringues bring instant Halloween charm to your dessert table.
- Simple Ingredients: Just a handful of pantry staples to make something truly special.
- Textural Delight: Crunchy exterior meets a soft, marshmallow-like center—your taste buds will thank you!
- Great for Parties: They hold up well for a crowd and are easy to transport without losing their shape.

Ingredients You’ll Need
Let me tell you, the magic here really comes from simple ingredients, all doing their job perfectly to create these ghostly meringues. I recommend using room temperature egg whites for whipping—they just reach those fluffy peaks faster and with more volume.
- Egg Whites: Using fresh, room temperature whites makes whipping easier and yields a better texture.
- Cream of Tartar: This little acid helps stabilize the egg whites and keep your meringue stiff and shiny.
- Granulated Sugar: Add slowly to create smooth, glossy peaks without gritty sugar.
- Vanilla Bean Paste: I love this over extract because the flecks look beautiful and the flavor is richer.
- Dark Chocolate: Melted for painting spooky faces—use whatever dark chocolate you prefer, just melt it gently!
Variations
I love making this Ghost Meringues Recipe my own by switching up little things here and there. It’s such a versatile base to get creative with—so don’t hesitate to try your own spin!
- Chocolate Ghosts: Once I tried folding in a bit of cocoa powder with the sugar, and it gave the meringues a subtle chocolate flavor and a ghostly gray color—super fun for Halloween!
- Flavored Faces: You can swap dark chocolate for colored candy melts if you want bright, whimsical ghost faces that pop.
- Vegan Version: If you’re vegan, aquafaba (the liquid from canned chickpeas) whips up almost like egg whites and is worth a try for this recipe.
- Spicy Twist: Adding a pinch of cinnamon or pumpkin pie spice to the sugar lets you create warm, seasonal flavors that my family loves in autumn.
How to Make Ghost Meringues Recipe
Step 1: Prep Your Workspace and Oven
Start by preheating your oven to 200°F (yes, nice and low!) and lining a baking sheet with parchment paper or a silicone liner. This low temp is key for drying the meringues gently so they don’t brown or crack. I learned this the hard way after speeding up baking and ending up with toasted “ghosts.”
Step 2: Whip Those Egg Whites
In a clean, dry mixing bowl, add your room temperature egg whites and cream of tartar. Whisk on medium speed until you see the whites get frothy. Then, slowly add your sugar one tablespoon at a time while increasing speed to medium-high. Keep whipping until soft peaks form—this usually takes about 5 to 6 minutes. When you add the vanilla bean paste, your meringue will smell amazing and look glossy and luscious.
Step 3: Pipe Your Ghosts
Fit a piping bag with a large round tip and fill it with your meringue. Holding the bag perpendicular to your prepared baking sheet, pipe about 2-inch tall mounds. You’ll want to space them roughly an inch apart since they won’t spread much during baking. I enjoy picturing little ghost shapes at this point—it makes the whole process feel festive and fun!
Step 4: Bake and Dry
Bake at that gentle 200°F for 1 hour, then turn the oven off and leave your ghost meringues inside for another 1 to 2 hours. This drying-out step is essential for that perfect texture. The meringues will be crunchy on the outside but still soft inside, which is exactly what you want. Resist the urge to open the oven too often during drying—you want to keep that warm, dry environment intact.
Step 5: Add Faces and Serve
Once completely cool, melt your dark chocolate and use a small food-safe paintbrush to paint spooky or silly faces on those adorable ghosts. I find this is where the recipe really comes to life and makes everyone smile. Plus, it’s a great way to get kids involved!
Pro Tips for Making Ghost Meringues Recipe
- Perfect Peaks: Make sure your bowl and whisk are spotless and completely dry—any grease or moisture will stop your egg whites from whipping properly.
- Slow Sugar Addition: Adding the sugar gradually prevents gritty meringue and helps dissolve the sugar completely for a shiny finish.
- Keep the Oven Closed: Resist opening the oven during baking and drying—it can cause cracks or sticky spots on your meringues.
- Cooling Time: Let the meringues cool entirely on the tray to preserve their shape and texture before decorating or storing.
How to Serve Ghost Meringues Recipe
Garnishes
I like to keep it simple—just the dark chocolate faces really bring the ghosts to life. But you could get creative with edible glitter, candy eyes, or even a light dusting of cocoa powder or colored sugar for extra flair. They also look adorable with a drizzle of raspberry sauce if you’re serving more of a dessert.
Side Dishes
Ghost meringues pair beautifully with a cup of hot mulled cider or spiced tea—perfect for a cozy fall gathering. You can also serve them alongside pumpkin-flavored desserts or fresh fruit for a balanced spread that everyone loves.
Creative Ways to Present
For a Halloween party, I love arranging these ghosts on a black platter surrounded by candy corns and mini pumpkins. Another time, I placed them atop a layered pumpkin mousse cake as cute toppers. They also make darling individual treats placed inside clear cellophane bags tied with orange or black ribbons—instant party favors!
Make Ahead and Storage
Storing Leftovers
I store leftover ghost meringues in an airtight container at room temperature. They keep their crispness beautifully for up to a week. I learned that humidity is the enemy here, so keep them away from steam or fridge condensation.
Freezing
Freezing meringues is totally doable and works great if you want to prep ahead. Just pop them in a sealed freezer bag or container. When you’re ready to enjoy, let them thaw at room temperature—they should still be light and airy after thawing.
Reheating
The best way to revive a slightly stale meringue is to place it in a low oven (around 200°F) for 5-10 minutes to crisp it up again. Just watch closely so it doesn’t brown or melt—this trick has saved many of mine after a day or two on the counter!
FAQs
-
Can I use regular vanilla extract instead of vanilla bean paste?
Absolutely! While vanilla bean paste adds those pretty little specks and a slightly richer flavor, regular vanilla extract works just fine and won’t affect the structure of the meringues. Just substitute it in equal amounts.
-
What if my meringue is runny or doesn’t hold peaks?
This usually means there’s either some grease or moisture in your bowl or eggs were too cold. Make sure everything is clean and dry, and use room-temperature egg whites. Also, beat the whites enough until you achieve stiff peaks but stop before it looks dry or grainy.
-
How do I make the ghost faces if I don’t have a paintbrush?
If you don’t have a small paintbrush, you can use a toothpick or the tip of a clean knife dipped in melted chocolate to carefully dot or draw the faces. Take your time, and practice on parchment paper first if needed.
-
Can I make ghost meringues larger or smaller?
Definitely! Just keep in mind that larger meringues will need longer drying times in the oven, while smaller ones might bake faster. Keep an eye on them and adjust time as needed to maintain that crisp outside with a soft center.
-
Is it okay if I don’t use cream of tartar?
You can skip it, but your meringues might be less stable and not hold peaks as well. If you don’t have cream of tartar, a small squeeze of lemon juice or white vinegar can sometimes help stabilize the egg whites.
Final Thoughts
This Ghost Meringues Recipe is one of those little kitchen treasures I keep coming back to every Halloween season. It’s approachable, playful, and genuinely delicious, plus it lends itself to all kinds of creative fun. Whether you’re baking with kids, hosting a spooky party, or just craving a sweet treat with personality, these ghosts won’t disappoint. Give the recipe a try—I promise you’ll love how charming and tasty your homemade ghosts turn out!
Print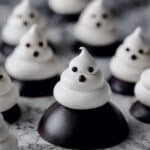
Ghost Meringues Recipe
- Prep Time: 15 minutes
- Cook Time: 60 minutes
- Total Time: 195 minutes
- Yield: 24 meringues 1x
- Category: Dessert
- Method: Baking
- Cuisine: American
- Diet: Vegetarian
Description
Delightfully spooky and sweet, these Ghost Meringues are perfect for Halloween parties. Crisp on the outside with a soft, pillowy center, they are made from simple ingredients and finished with playful chocolate faces.
Ingredients
Ghost Meringues
- 3 large egg whites (room temperature)
- 1/4 teaspoon cream of tartar
- 3/4 cup granulated sugar
- 1/4 teaspoon vanilla bean paste
- 1/2 ounce dark chocolate (melted)
Instructions
- Preheat Oven and Prepare Baking Sheet: Preheat your oven to 200°F (93°C) and line a baking sheet with parchment paper or a silicone liner to prevent sticking.
- Whisk Egg Whites and Cream of Tartar: In the bowl of a stand mixer fitted with the whisk attachment, combine the egg whites and cream of tartar. Whisk on medium speed until frothy, signaling the egg whites are beginning to aerate.
- Add Sugar Gradually and Beat: Slowly add granulated sugar one tablespoon at a time while increasing the mixer speed to medium-high. Continue beating until the mixture forms soft peaks, which should take about 5-6 minutes.
- Add Vanilla Bean Paste: Incorporate the vanilla bean paste into the meringue mixture and keep beating until stiff peaks form, ensuring the meringue is stable and glossy.
- Pipe Meringue Ghosts: Transfer the meringue into a piping bag fitted with a large round tip. Hold the bag perpendicular to the baking sheet and pipe about two-inch-high mounds spaced one inch apart. These shapes will resemble ghost figures and they will not spread during baking.
- Bake and Dry Meringues: Bake the piped meringues at 200°F for 1 hour. Afterward, turn off the oven and leave the meringues inside to dry for an additional 1-2 hours, which will help them achieve a crisp exterior and soft interior.
- Cool Completely: Remove the meringues from the oven and allow them to cool at room temperature until fully set and dry to touch.
- Decorate with Melted Chocolate: Using a small food-safe paintbrush, paint faces onto each ghost with the melted dark chocolate, adding personality and charm to your Halloween treats.
Notes
- These ghost meringues are easy to make, combining simplicity with festive fun.
- They have a crunchy exterior and a softly chewy center for perfect texture contrast.
- Use room temperature egg whites to achieve the best volume and consistency in your meringue.
- Allowing the meringues to dry in the turned-off oven is key to preventing moisture and achieving ideal crispness.
- Melted dark chocolate pairs wonderfully for decorating and adds a rich flavor contrast.
- Store the meringues in an airtight container to keep them crisp for several days.
Nutrition
- Serving Size: 1 meringue
- Calories: 27 kcal
- Sugar: 6 g
- Sodium: 7 mg
- Fat: 1 g
- Saturated Fat: 0.6 g
- Unsaturated Fat: 0.4 g
- Trans Fat: 0 g
- Carbohydrates: 6 g
- Fiber: 0 g
- Protein: 1 g
- Cholesterol: 0 mg

Your email address will not be published. Required fields are marked *