

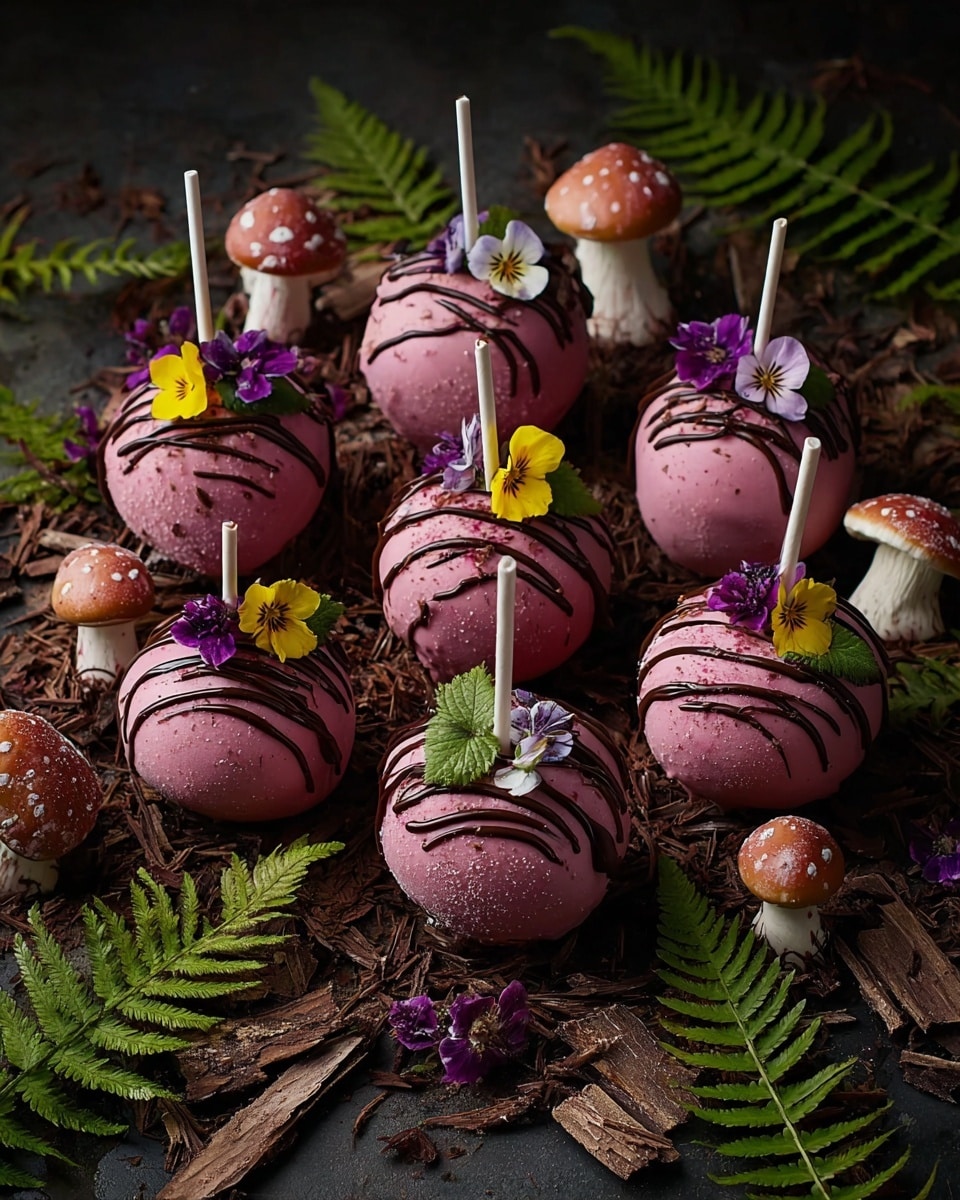
If you’re anything like me, you love a dessert that’s fun, easy to eat, and absolutely bursting with flavor. That’s why this Forbidden Forest Blackberry Cheesecake Pops Recipe has quickly become one of my absolute favorites. Imagine creamy, dreamy cheesecake swirled with a tangy blackberry compote, then coated in rich dark chocolate with a little sparkle on top. It’s like magic for your taste buds and perfect for parties, snacks, or whenever you want a little sweet escape. Trust me, once you try these, you’ll be hooked!
Why You’ll Love This Recipe
- Easy to Make: You don’t need a fancy oven or complicated tools—just a freezer and simple mixing.
- Crowd-Pleaser: My family goes crazy for these, and they’re always a hit at gatherings or just snack time.
- Beautiful Presentation: The glossy chocolate coating with shimmering edible glitter creates dessert magic every time.
- Customizable & Versatile: You can tweak the sweetness, switch berries, or go dairy-free with ease.

Ingredients You’ll Need
The ingredients for this Forbidden Forest Blackberry Cheesecake Pops Recipe work together to create a creamy cheesecake with an exciting blackberry swirl, all wrapped in chocolate. I always recommend fresh blackberries when possible for the best flavor, but frozen works just fine if you thaw them first.
- Cream Cheese: Use softened full-fat cream cheese for that rich, smooth cheesecake texture.
- Granulated Sugar: Just enough to balance the tartness of the blackberries without overpowering the cheesecake.
- Vanilla Extract: Adds a lovely depth of flavor to the cheesecake base.
- Whipped Topping: I like using thawed Cool Whip to lighten up the mixture and keep it fluffy.
- Graham Cracker Crumbs: Adds a subtle crunch and classic cheesecake note—this is where I discovered crushed nuts make a great optional alternative!
- Blackberries: Fresh or frozen, they bring a natural tartness that pairs perfectly with creamy cheesecake.
- Lemon Juice: Just a touch to brighten the blackberry compote and contrast the sweetness.
- Dark Chocolate Melting Wafers: Melts smoothly for a perfect coating that hardens beautifully.
- Edible Glitter or Luster Dust: For that enchanting forest vibe—green, gold, or silver all look stunning.
- Optional Decorations: Crushed graham crackers, chopped nuts, or cute candy eyes make these pops even more fun.
Variations
One of the things I love about this Forbidden Forest Blackberry Cheesecake Pops Recipe is how flexible it is. I encourage you to tweak it to suit your tastes or experiment with what you’ve got on hand. Here are some of my favorite variations I’ve tried over the years.
- Berry Swap: I once made these with raspberries instead of blackberries for a slightly different tart note, and they were just as delightful.
- Gluten-Free Version: Switching to gluten-free graham crackers lets everyone enjoy the pops without missing a beat.
- Vegan Adaptation: Using plant-based cream cheese and dairy-free chocolate offers a dairy-free treat that’s just as rich and indulgent.
- Popsicle Stick Fun: Adding themed candy eyes or sprinkles turns them into perfect party treats, especially for Halloweens or themed events.
How to Make Forbidden Forest Blackberry Cheesecake Pops Recipe
Step 1: Make the Blackberry Compote
Start by combining the blackberries, sugar, and lemon juice in a small saucepan over medium heat. Stir frequently as the berries soften and release their juices, cooking about 5 to 7 minutes. You’ll notice the mixture thickening as it reduces—this is your magic swirl! For a smoother texture, I usually strain the compote through a fine mesh sieve to remove seeds, but it’s totally optional if you like a bit more texture. Set it aside to cool completely while you move to the next step.
Step 2: Whip Up the Cheesecake Mixture
In a large mixing bowl, beat the softened cream cheese together with sugar until you get a silky smooth consistency—this usually takes a couple of minutes. Then, mix in the vanilla extract and whipped topping (Cool Whip works great here). The whipped topping lightens the cheesecake, making these pops delightfully airy. Gently fold in the graham cracker crumbs to add that classic crunch. Finally, carefully fold half of your cooled blackberry compote into the cheesecake mixture; this gives that gorgeous swirled effect you’ll see in the finished pops. Save the rest of the compote for drizzling.
Step 3: Shape and Freeze the Pops
Line a baking sheet with parchment paper—this saves you a lot of cleanup later. Scoop out tablespoon-sized portions of the cheesecake mixture and roll each into a ball using your hands. If your hands stick a bit, wetting them slightly helps. Place each ball on the prepared sheet and gently insert a lollipop stick into the center. Transfer the sheet to the freezer and allow the pops to firm up for at least 1 hour; this step is crucial so the coating sticks perfectly later on.
Step 4: Coat and Decorate Your Pops
While the pops are chilling, melt your dark chocolate wafers according to package directions—usually low heat in a microwave or double boiler works best. Once the pops are frozen solid, dip each one fully into the melted chocolate, tapping off any extra gently. Then place them back onto the parchment paper and sprinkle with edible glitter, crushed graham crackers, or candy eyes for that enchanted forest look. Drizzling the remaining blackberry compote over the top adds a stunning, magical swirl effect. Pop the decorated cheesecake pops into the fridge for about 15 to 20 minutes to let the chocolate harden perfectly.
Pro Tips for Making Forbidden Forest Blackberry Cheesecake Pops Recipe
- Softened Cream Cheese is Key: I learned the hard way that using cold cream cheese makes the batter lumpy, so let it sit out for at least 30 minutes before mixing.
- Keep Pops Frozen Until Coating: Dipping partially frozen pops can cause the chocolate to slide off, so patience here pays off!
- Use Parchment Paper for Easy Cleanup: Trust me, your life is easier when you don’t stick the pops directly on the tray.
- Decorate Quickly: Chocolate sets fast, so have your sprinkles and toppings ready to go before dipping.
How to Serve Forbidden Forest Blackberry Cheesecake Pops Recipe
Garnishes
I love adding edible green or gold glitter—it really takes the look to another level and fits the “Forbidden Forest” theme perfectly. Using candy eyes gives them a playful, whimsical vibe, especially if you’re making these for kids or Halloween parties. Sprinkle on some crushed graham crackers or finely chopped nuts if you want a bit of texture contrast that’s subtle but tasty.
Side Dishes
These pops are usually a star on their own, but if you’re serving them at a party, I like to have a fresh fruit platter alongside for a refreshing contrast. Light mint tea or sparkling lemonade pairs wonderfully too, balancing that rich cheesecake flavor with something bright.
Creative Ways to Present
For a spookier vibe, I’ve placed the pops upright in black sand or edible dirt made from crushed Oreos in a decorative container—perfect for Halloween dessert tables. Another favorite is arranging them in a wooden box lined with moss and twinkling fairy lights, making for a mystical presentation that always wows guests.
Make Ahead and Storage
Storing Leftovers
I keep leftover pops in an airtight container in the fridge, nestled between parchment paper layers so they don’t stick together or lose their shape. They stay fresh and creamy for up to 3 days, but honestly, they rarely last that long around here!
Freezing
If you want to prep in advance or save extras, I freeze cheesecake balls without the chocolate coating. Freeze them on a tray until firm, then transfer to a freezer bag. When ready to serve, coat them in melted chocolate and decorate fresh. This method keeps everything tasting as fresh as the first time.
Reheating
Since these are best enjoyed chilled, I don’t recommend reheating. If the chocolate gets too hard in the fridge, just let the pop sit at room temperature for a few minutes to soften slightly before enjoying that creamy center.
FAQs
-
Can I use frozen blackberries for this recipe?
Absolutely! Just make sure to thaw them completely and drain any excess juice before cooking the compote to avoid a watery mixture.
-
How long can I store these cheesecake pops?
Stored in an airtight container in the fridge, they stay fresh for about 3 days. For longer storage, freeze them without the chocolate coating for up to a month.
-
Can I make these dairy-free or vegan?
Yes! Substitute plant-based cream cheese, whipped topping, and dark chocolate to create a delicious vegan version of this Forbidden Forest Blackberry Cheesecake Pops Recipe.
-
Can I prepare the cheesecake mixture ahead of time?
You can prepare the cheesecake mixture a day in advance and keep it refrigerated. Just give it a good stir before shaping the pops.
Final Thoughts
I absolutely love how this Forbidden Forest Blackberry Cheesecake Pops Recipe turns out every single time—creamy, rich, and just a little bit wickedly fun with all those sparkly toppings. When I first tried making cheesecake pops, I struggled with the coating peeling off, but once I got that freezing step right, it was game over—in a good way! Whether you’re making a batch for yourself or impressing friends at a party, these pops bring that little extra touch of magic and are super easy to share. I can’t wait for you to try making them and create some delicious memories!
Print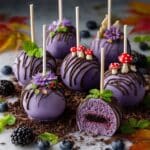
Forbidden Forest Blackberry Cheesecake Pops Recipe
- Prep Time: 25 minutes
- Cook Time: 10 minutes
- Total Time: 2 hours 5 minutes
- Yield: 12–15 cheesecake pops 1x
- Category: Dessert
- Method: No-Cook
- Cuisine: American
- Diet: Vegetarian
Description
Delight in these Forbidden Forest Blackberry Cheesecake Pops, a whimsical treat featuring creamy cheesecake swirled with fresh blackberry compote, coated in rich dark chocolate, and adorned with sparkling edible glitter and charming candy decorations. Perfect for parties or magical-themed gatherings, these no-bake pops combine luscious textures and enchanting flavors for a memorable dessert experience.
Ingredients
For the Cheesecake Base:
- 16 oz cream cheese (softened)
- 1/2 cup granulated sugar
- 1 tsp vanilla extract
- 8 oz whipped topping (such as Cool Whip, thawed)
- 1 cup graham cracker crumbs
For the Blackberry Swirl:
- 1 cup fresh or frozen blackberries
- 2 tbsp granulated sugar
- 1 tsp lemon juice
For Coating and Decoration:
- 12 oz dark chocolate melting wafers
- Edible glitter or luster dust (green, gold, or silver)
- Crushed graham crackers or chopped nuts (optional)
- Candy eyes or small edible decorations (optional)
Instructions
- Making the Blackberry Compote: In a small saucepan over medium heat, combine blackberries, sugar, and lemon juice. Cook until the berries break down and the mixture thickens slightly, about 5 to 7 minutes. Optionally strain through a fine mesh sieve to remove seeds. Allow the compote to cool completely before using.
- Preparing the Cheesecake Mixture: In a mixing bowl, beat the softened cream cheese and sugar until smooth and creamy. Blend in the vanilla extract and whipped topping until fully incorporated. Stir in the graham cracker crumbs for texture. Gently fold in half of the cooled blackberry compote, reserving the rest for decoration.
- Shaping the Cheesecake Pops: Line a baking sheet with parchment paper. Scoop out tablespoon-sized portions of the cheesecake mixture and roll each into smooth balls. Place the balls on the prepared sheet and insert a lollipop stick into each one. Freeze the pops for at least 1 hour or until firm.
- Coating and Decorating: Melt the dark chocolate wafers according to package instructions. Dip each frozen cheesecake pop into the melted chocolate, ensuring full coverage. Tap off excess chocolate and return the pops to the parchment paper. While the coating is still wet, immediately sprinkle with edible glitter, crushed graham crackers, or add candy eyes for a magical appearance. Drizzle the remaining blackberry compote over the pops for a beautiful swirl effect. Chill the pops in the refrigerator for 15 to 20 minutes to set the chocolate.
Notes
- For a gluten-free version, use gluten-free graham crackers or omit them entirely from the recipe.
- To make the recipe vegan, substitute plant-based cream cheese, a dairy-free whipped topping, and dairy-free chocolate wafers.
- Store assembled cheesecake pops in an airtight container in the refrigerator for up to 3 days. For longer storage, freeze the cheesecake balls before coating with chocolate.
Nutrition
- Serving Size: 1 pop
- Calories: 230
- Sugar: 16g
- Sodium: 150mg
- Fat: 15g
- Saturated Fat: 9g
- Unsaturated Fat: 5g
- Trans Fat: 0g
- Carbohydrates: 18g
- Fiber: 2g
- Protein: 3g
- Cholesterol: 35mg

Your email address will not be published. Required fields are marked *