

If you’re looking for a quick, eye-catching holiday treat that everyone will adore, you’ve got to try this Festive Green Oreo Christmas Trees Recipe. It’s one of those easy but utterly festive desserts I keep going back to every year because it’s simple, fun, and the kids just can’t get enough of it. Plus, it’s a perfect mix of crunchy Oreos coated in that creamy white and green chocolate—so festive and delicious!
Why You’ll Love This Recipe
- Super Simple Prep: Takes just about 15 minutes, so you can whip these up last-minute and still impress.
- Kid-friendly Fun: Decorating the green chocolate Christmas trees is a delight for little hands and adults alike.
- Customizable & Creative: You can easily switch up toppings and colors to suit your holiday vibe.
- Perfect Party Treat: These cookies not only look gorgeous but also disappear fast, guaranteed!

Ingredients You’ll Need
Getting the right ingredients here is a breeze, and they all work together to make those little Oreo Christmas trees really pop with flavor and cuteness. Look for good-quality melting wafers for that smooth finish, and if you want your trees to look extra festive, some pretty candy stars are a must.
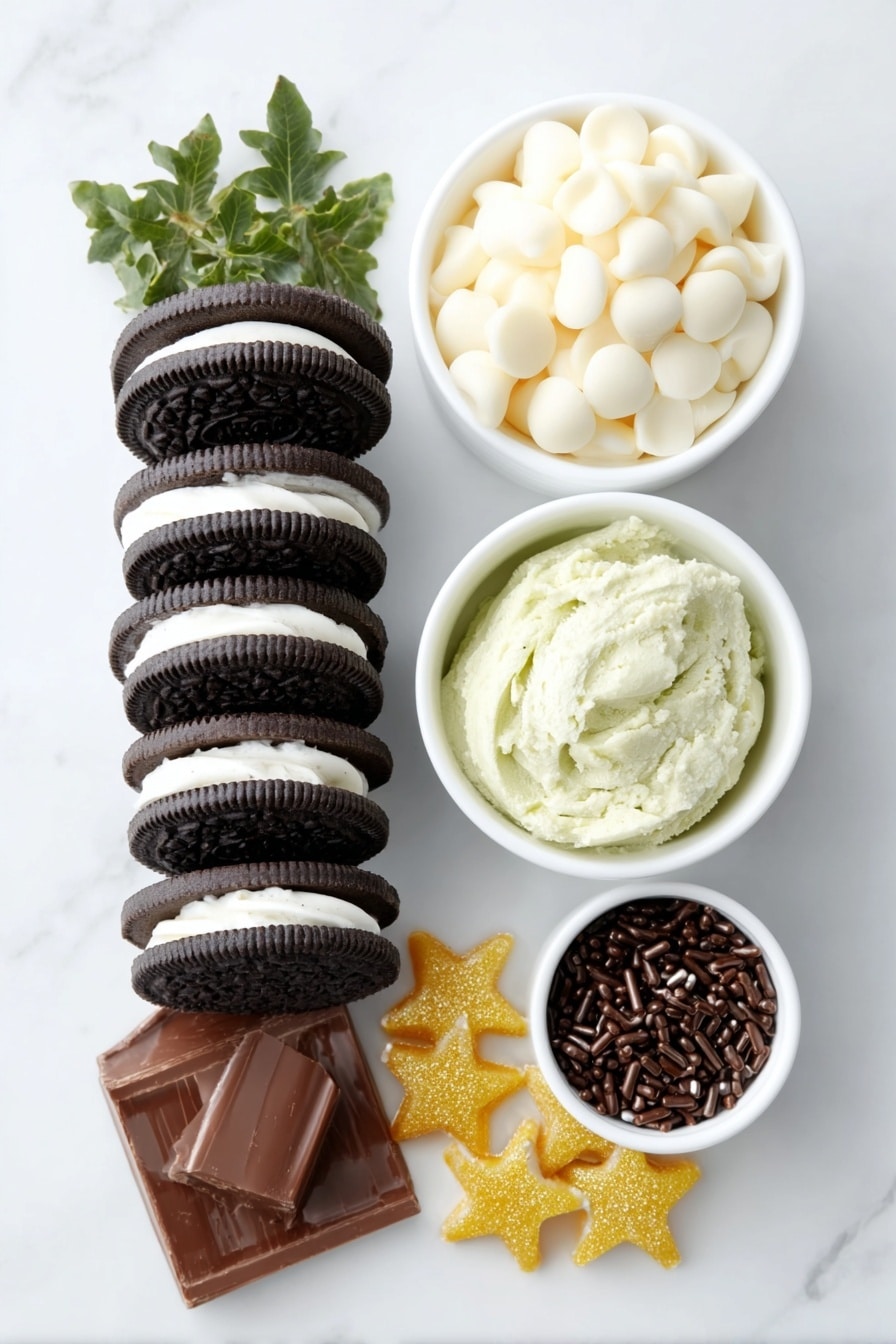
- Oreo Cookies: The base of our trees—classic, crunchy, and creamy, they hold the chocolate perfectly.
- White Melting Chips: Smooth and perfect for dipping; I love how they dry hard to make a nice shell.
- Green Melting Wafers: These bring the Christmas tree color to life; easy to melt and pipe.
- Candy Stars Tree Toppers: Adds that adorable star on top that just finishes the look beautifully.
- Chocolate Jimmies (optional): These work magic for the tree trunk and bring texture contrast.
Variations
One of the things I love most about the Festive Green Oreo Christmas Trees Recipe is how easy it is to make it your own. Whether you’re swapping colors, toppings, or even making it gluten-free, there’s a way to add your personal touch.
- Use Colored Melting Chocolate: I sometimes mix in red or silver edible glitter for a bit of sparkle—I love how it catches the light under holiday lighting!
- Dip Fully or Partially: If you want a bold look, dip the whole Oreo in white chocolate before decorating; my family goes crazy for this thicker chocolate coating.
- For a Nutty Twist: Sprinkle crushed pistachios or chopped nuts on the wet white chocolate for some extra crunch and festive green hues.
- Dairy-Free Option: Substitute your melting chocolates for dairy-free versions; they melt just as smoothly and taste just as good!
How to Make Festive Green Oreo Christmas Trees Recipe
Step 1: Prep Your Workspace and Cookies
Start by lining a baking sheet or pan with parchment paper—that way, your cookies won’t stick and cleanup is a breeze. Grab your Oreos and have them set out at room temperature so the chocolate adheres better without cracking.
Step 2: Melt Your White Chocolate
Pop your white melting chips into a microwave-safe bowl. Heat for 30 seconds, then stir. Repeat this a few times in short bursts until you have a glossy, smooth melted chocolate. Patience here pays off—overheating can make it grainy, so stirring between sessions is key.
Step 3: Dip Each Oreo Halfway in White Chocolate
One by one, dip each Oreo halfway into the white chocolate. This creates a snowy “snowcap” effect on your cookies. Place them on your parchment-lined tray and let them set just enough so the white chocolate firms up slightly before you move on.
Step 4: Melt the Green Wafers and Prepare for Piping
In a clean microwave-safe bowl, melt the green melting wafers the same way you did with the white. Once smooth, transfer the green chocolate to a piping bag or resealable plastic bag, cutting a tiny corner off to create a fine tip—this is your “paintbrush” for the trees.
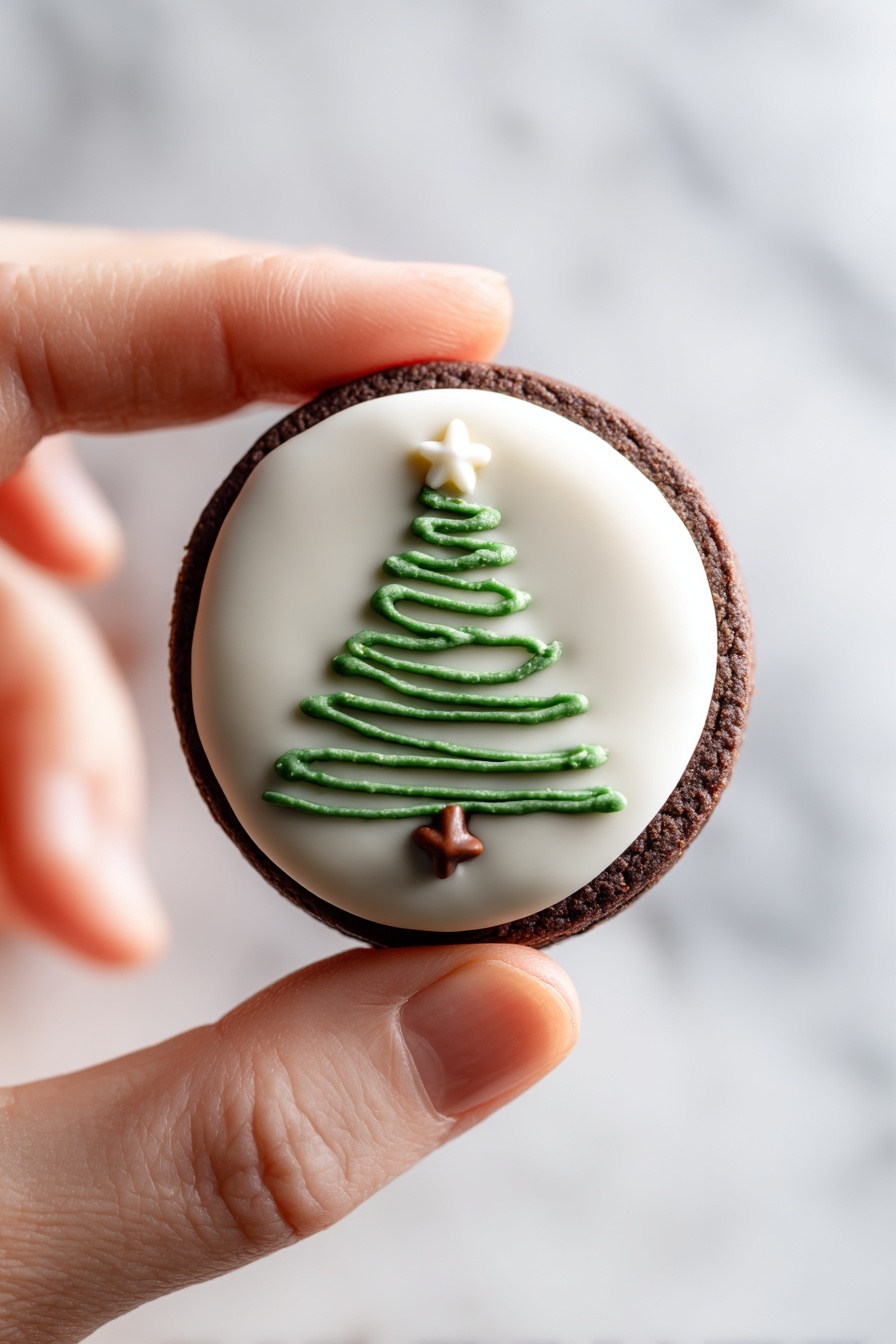
Step 5: Decorate Your Green Oreo Christmas Trees
Using short back-and-forth strokes, pipe your “tree” shapes onto the white chocolate half of each Oreo. It’s like drawing a little Christmas tree on every cookie. If your hand feels shaky at first, don’t worry—it just adds charm! Top each tree with a candy star and dot some chocolate jimmies below for the trunk. Easy festive magic.
Pro Tips for Making Festive Green Oreo Christmas Trees Recipe
- Use Room Temperature Oreos: Cold cookies can cause your melted chocolate to seize or crack—letting them warm up prevents that.
- Thin Your Chocolate If Needed: If the melting chocolate gets too thick, add a small pinch of shortening to keep it smooth and easier to pipe.
- Be Patient with Decorating: Let the white chocolate barely set before piping the tree designs; it helps your green chocolate stick better without slipping.
- Store in a Cool Place: Avoid humidity and warmth during storage to keep your cookies looking pristine and prevent melting or sweating.
How to Serve Festive Green Oreo Christmas Trees Recipe
Garnishes
I usually keep it simple with candy stars on top because they’re charming and so festive—but sometimes I sprinkle a few silver dragees or edible glitter to jazz it up for parties. It’s these little details that make your dessert table sparkle!
Side Dishes
These cookies are the perfect sweet bite alongside a rich hot chocolate or a cup of spiced cider—trust me, I’ve paired them both ways, and they complement each other beautifully for any holiday gathering.
Creative Ways to Present
Try arranging these Festive Green Oreo Christmas Trees vertically on a wooden board framed with pine branches and fairy lights for an Instagram-worthy dessert display. Or stick a toothpick in the cookie’s base and present them like edible Christmas tree lollipops—so fun for kids!
Make Ahead and Storage
Storing Leftovers
I keep leftover cookies in an airtight container at room temperature, away from heat and humidity. They stay fresh and crisp for several days—just be sure not to stack them too much to avoid breaking the delicate decoration.
Freezing
If you want to make these ahead of time, I’ve found freezing works well. Place them flat in a single layer inside a freezer-safe container with parchment paper in between layers to keep the decorations intact. When you’re ready, thaw at room temp and they taste just as fresh.
Reheating
These cookies are best enjoyed chilled or at room temperature, so no reheating is needed. If your chocolate loses a bit of its snap, just let them sit out for a few minutes before serving to regain that perfect texture.
FAQs
-
Can I use regular white chocolate instead of melting chips for this Festive Green Oreo Christmas Trees Recipe?
You can, but regular white chocolate can be tricky because it contains cocoa butter and can seize easily when melted. If you do use it, try adding a teaspoon of shortening to help keep it smooth and easy to dip. Melting wafers or chips are formulated to melt easier and set up nicely, making the process much simpler.
-
What can I use if I can’t find green melting wafers for the tree design?
If you can’t find green melting wafers, you can dye white melting chocolate or white chocolate chips with oil-based green food coloring. Avoid water-based colors because they cause the chocolate to seize. Another workaround is using colored royal icing or piping gel, but the finish won’t be quite the same.
-
How long will these Festive Green Oreo Christmas Trees last?
Stored properly in an airtight container at room temperature, these cookies will stay fresh for about 5 days. Just be sure to keep them in a cool, dry place to prevent the chocolate from melting or sweating.
-
Can I prepare these cookies a day ahead of time?
Absolutely! You can make the entire batch the day before your event, store them in an airtight container, and they’ll still look and taste fantastic. Just avoid stacking them too heavily to keep your tree designs safe.
Final Thoughts
This Festive Green Oreo Christmas Trees Recipe has become one of my absolute favorite holiday traditions because it’s so simple yet still makes a showstopping statement on the cookie tray. I love how you get that perfect balance of creamy chocolate, crunchy cookie, and festive flair with the green trees and stars. If you’re after an easy holiday treat to make with your kids or a quick dessert that wows your guests, this is it—I promise you’ll want to make it year after year!
Print
Festive Green Oreo Christmas Trees Recipe
- Prep Time: 10 minutes
- Cook Time: 5 minutes
- Total Time: 15 minutes
- Yield: 15 cookies 1x
- Category: Dessert
- Method: No-Cook
- Cuisine: American
Description
These festive Christmas Oreos are a delightful holiday treat featuring Oreo cookies dipped in white chocolate and decorated with green chocolate to resemble Christmas trees, topped with candy stars and optional chocolate jimmies for the tree trunks. Perfect for parties or gifting, these easy-to-make cookies combine the classic Oreo flavor with a fun seasonal twist.
Ingredients
Cookies
- 15 Oreo Cookies
Chocolate Coating
- 6 oz White Melting Chips
- 3 oz Green Melting Wafers
Decorations
- 15 Candy Stars tree toppers
- 1/4 cup Chocolate Jimmies (optional) for tree trunk
Instructions
- Prepare your workspace: Line a pan with parchment paper and set it aside to cool the decorated Oreos later.
- Melt the white chocolate: Place 6 oz of white melting chips in a microwave-safe bowl. Heat for 30 seconds, then stir. Repeat heating in 15-20 second intervals and stirring until fully melted and smooth.
- Dip the Oreos: Dip each Oreo cookie halfway into the melted white chocolate, ensuring a smooth coating. Place the dipped cookies onto the prepared parchment paper to set.
- Melt the green wafers: In a separate microwave-safe bowl, melt the 3 oz of green melting wafers. Heat for 30 seconds, stir, then continue heating in 15-second bursts while stirring until completely melted and smooth.
- Decorate with green chocolate: Transfer the melted green chocolate into a piping bag or resealable plastic bag. Cut a very small tip from one corner.
- Draw Christmas trees: Using a back-and-forth motion, pipe green Christmas tree shapes on the white chocolate half of each Oreo cookie.
- Add festive toppings: Place a candy star at the top of each tree and use chocolate jimmies to form the tree trunk beneath the green chocolate decoration.
Notes
- If using white chocolate chips for dipping and decorating instead of melting wafers, add a teaspoon of shortening to make the chocolate smoother. This will take longer to harden.
- You can add green food coloring to white chocolate if green melting wafers are unavailable.
- Get creative with the tree designs—try different shapes and sizes for added variety.
- You may choose to fully dip the Oreos in melted chocolate instead of a half dip for a richer treat.
- If melted chocolate is too thick, add a small amount of shortening to thin it out for easier dipping and piping.
- Using a piping bag or a resealable plastic bag with a small cut corner provides the best control for decorating.
Nutrition
- Serving Size: 1 cookie
- Calories: 150 kcal
- Sugar: 14 g
- Sodium: 95 mg
- Fat: 8 g
- Saturated Fat: 5 g
- Unsaturated Fat: 2 g
- Trans Fat: 0 g
- Carbohydrates: 19 g
- Fiber: 1 g
- Protein: 1 g
- Cholesterol: 0 mg

Your email address will not be published. Required fields are marked *