

If you’re craving something that perfectly blends creamy cheesecake with cozy fall flavors, I’ve got you covered with this **Classic Apple Crisp Recipe** that’s a total winner every time. I absolutely love how the mix of crisp apples and buttery topping hits all the right notes—and I think you’re going to feel the same once you try it. Keep reading, because I’m sharing all my tips and tricks to make sure your apple crisp comes out perfectly golden, bubbly, and oh-so-delicious.
Why You’ll Love This Recipe
- Simple Ingredients: Everything you need is probably already in your pantry—no fancy shopping required.
- Perfect Texture: You’ll get tender, juicy apples underneath a crisp, buttery topping every single time.
- Versatile Dessert: Amazing on its own or topped with vanilla ice cream for an instant crowd-pleaser.
- Family Favorite: Trust me, my family goes crazy for this—and yours will too!

Ingredients You’ll Need
Every ingredient in this Classic Apple Crisp Recipe plays a starring role—crisp apples for that juicy base, warm spices to bring the cozy vibes, and a crunchy oat topping that’s pure comfort. I always recommend using fresh, tart apples and good quality butter for the best flavor.
- Apples: Go for firm, tart ones like Granny Smith or Honeycrisp so they hold up nicely while baking.
- Brown Sugar: Adds rich sweetness and a hint of caramel to your topping.
- Rolled Oats: Not instant—these give your crisp that perfect chewy crunch I love.
- All-Purpose Flour: Helps bind the topping so it bakes to a nice crisp.
- Ground Cinnamon: Warming spice that pairs beautifully with apples.
- Nutmeg: Just a pinch to layer in complexity and warmth.
- Salt: Balances out the sweetness and enhances flavor.
- Unsalted Butter: Use cold, cubed butter for mixing into the topping to create those glorious crumbs.
- Lemon Juice: Keeps the apples bright and prevents browning.
Variations
I love how customizable this Classic Apple Crisp Recipe is—you can easily swap spices, add nuts, or even mix in other fruits. Play around with what you love or what you have on hand; trust me, it still turns out fantastic.
- Add Nuts: Toss in chopped walnuts or pecans for extra crunch; I once added toasted pecans, and it took this apple crisp to the next level.
- Spice it Up: Mix in a pinch of ground ginger or cardamom for a fresh twist on the classic spices.
- Fruit Mix: Combine apples with pears or berries for a fruity medley; my family enjoyed the apple-pear combo on a chilly evening!
- Gluten-Free: Use gluten-free oats and gluten-free flour blend to make it suitable for dietary needs.
- Vegan Version: Replace butter with coconut oil and use a sugar substitute like maple syrup.
How to Make Classic Apple Crisp Recipe
Step 1: Prepare and Toss Your Apples
Start by peeling, coring, and slicing your apples evenly—about 1/4-inch thick slices work best. Toss them with lemon juice, cinnamon, a little nutmeg, some sugar, and flour to help thicken their juices as they bake. This step is key because it ensures the apples soften just right without turning to mush or leaving watery puddles.
Step 2: Make the Crunchy Topping
Mix your oats, brown sugar, flour, cinnamon, and salt in a bowl. Then use your fingers (or a pastry cutter if you prefer) to cut in cold cubed butter until the mixture resembles coarse crumbs. You’ll want some bigger chunks for that perfect crisp. Don’t rush this step—it’s the topping magic!
Step 3: Assemble the Crisp and Bake
Spread the apple mixture evenly in a buttered baking dish, then sprinkle the oat topping on generously. Bake at 350°F for about 40-45 minutes until the apples are bubbling and the topping is golden brown. Use the middle rack of your oven for even cooking. You’ll know it’s done when you see those bubbles rising through the topping—my family always runs to the kitchen at that point.
Pro Tips for Making Classic Apple Crisp Recipe
- Uniform Apple Slices: Cutting your apples evenly helps them cook at the same rate and gives you that perfect texture every bite.
- Cold Butter for Topping: Using cold, cubed butter means the topping bakes into crispy, buttery chunks—warm butter won’t give you that texture.
- Let It Rest: I learned that letting the apple crisp cool for 15 minutes before serving helps all the juices thicken up beautifully.
- Avoid Soggy Bottoms: Use a shallow baking dish so your topping crisps up nicely, and don’t cover it while baking.
How to Serve Classic Apple Crisp Recipe
Garnishes
I’m a big fan of serving this apple crisp with a scoop of creamy vanilla ice cream—there’s just something magical about the hot-and-cold contrast. Sometimes, I drizzle a bit of caramel sauce on top for an extra indulgence. Fresh whipped cream or a sprinkle of chopped toasted nuts also make for lovely garnishes if you want to keep it simple but still fancy.
Side Dishes
This dessert pairs beautifully with a cozy cup of chai tea or freshly brewed coffee. For a special holiday meal, I like serving it alongside roasted turkey or pork—it’s the perfect sweet finish that’s not too heavy.
Creative Ways to Present
For a fun twist, try serving your Classic Apple Crisp Recipe in individual ramekins—makes guests feel extra special and helps with portion control! You can also layer apple slices and topping in mason jars for a cute take-home gift or party treat. I once added a sprinkle of edible gold dust for a festive touch at Thanksgiving, and my guests loved it.
Make Ahead and Storage
Storing Leftovers
Apple crisp actually tastes even better the next day once the flavors have melded. I store leftovers covered tightly with foil or in an airtight container in the fridge for up to 3-4 days. Just be sure to warm it up gently to bring back that crispy topping.
Freezing
If you want to prep ahead, you can freeze the unbaked apple crisp in your dish. Wrap it tightly with plastic wrap and foil, then bake it from frozen (add 15-20 minutes to your bake time). This trick saved me on holiday weekends when time was tight.
Reheating
To reheat, I recommend using a 325°F oven for about 15 minutes, uncovered, to re-crisp the topping without drying out the apples. Microwaving works in a pinch but makes the topping a bit soft—so oven reheating is my go-to.
FAQs
-
Can I use frozen apples for this Classic Apple Crisp Recipe?
Yes, but I recommend thawing and draining them well first to avoid excess liquid, which can make your crisp soggy. Toss the thawed apples with a bit of flour to help absorb moisture before baking.
-
What’s the best type of apple for apple crisp?
Firm, tart apples like Granny Smith or Honeycrisp work best because they hold their shape and balance the sweet topping perfectly.
-
Can I double the recipe for a larger crowd?
Absolutely! Just use a larger baking dish and keep an eye on baking time—it may need about 10 extra minutes. The key is watching for bubbling and a golden topping.
-
Is it okay to make this dessert ahead of time?
Definitely. You can prep it the night before and refrigerate or freeze it unbaked. Baking it fresh later locks in that wonderful texture and flavor.
Final Thoughts
This Classic Apple Crisp Recipe has been a go-to in my kitchen for years, especially when I want a dessert that’s straightforward but feels like a warm hug on a plate. It’s forgiving, flavorful, and brings my family together around the table every time. I can’t wait for you to try it—you’re going to enjoy every crunchy, gooey bite as much as I do. Happy baking!
Print
Classic Apple Crisp Recipe
- Prep Time: 25 min
- Cook Time: 50 min
- Total Time: 5 hr 15 min
- Yield: 18 bars 1x
- Category: Dessert
- Method: Baking
- Cuisine: American
Description
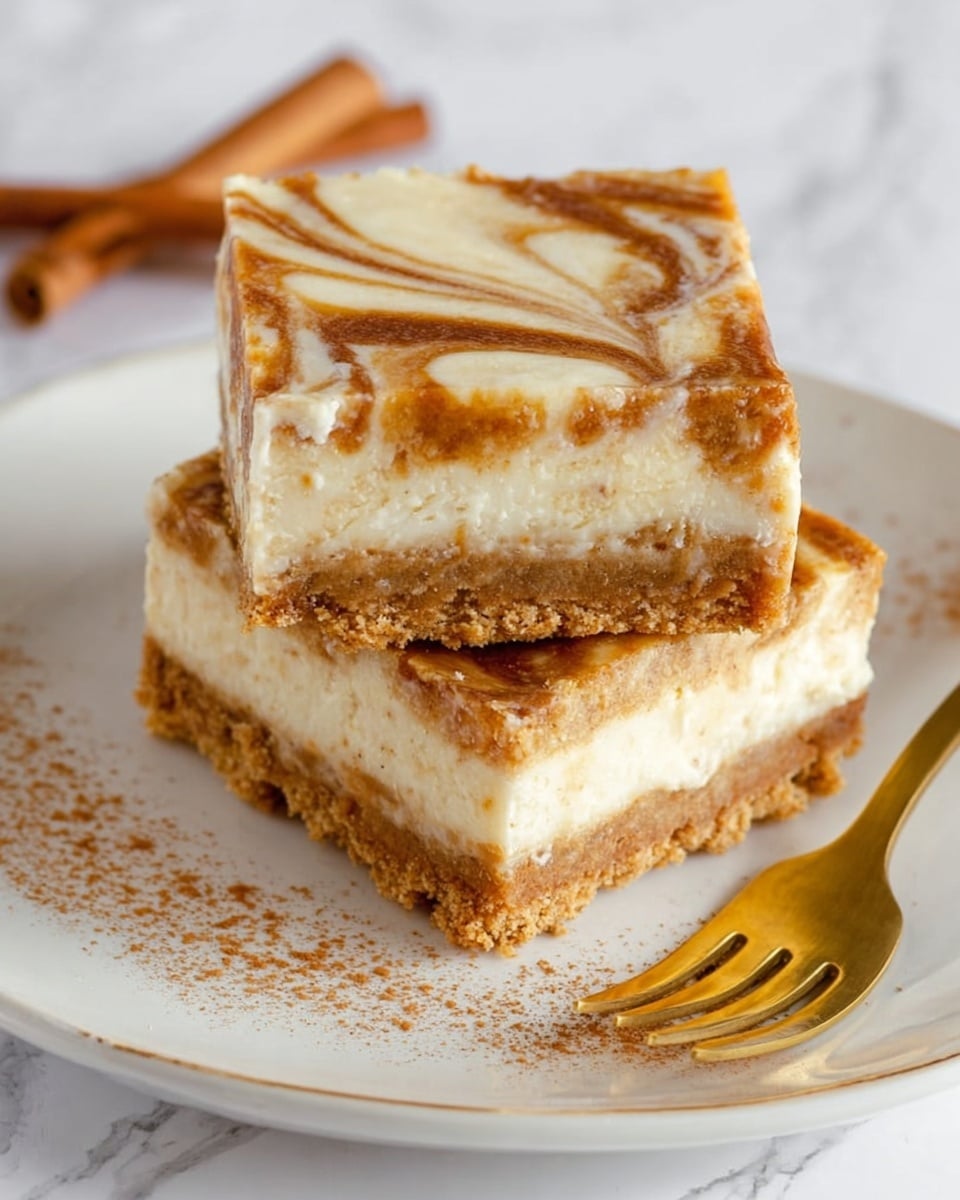
Delight in these rich Pumpkin Cheesecake Bars that perfectly combine the creamy texture of classic cheesecake with the warm spices of pumpkin pie, all elevated by a crunchy graham cracker crust. Ideal for autumn gatherings, these bars offer a luscious treat that’s both festive and satisfying.
Ingredients
Crust
- 15 whole rectangular graham crackers
- 1/4 cup granulated sugar
- 8 tablespoons unsalted butter, melted
Filling
- 1–1/4 cups pumpkin puree
- 1–1/2 teaspoons pumpkin pie spice
- 1–1/2 teaspoons ground cinnamon
- 1 tablespoon all-purpose flour
- Three 8-oz packages full fat cream cheese, at room temperature
- 1–2/3 cup granulated sugar
- 1–1/2 teaspoons pure vanilla extract
- 1/2 cup full fat sour cream
- 1/8 teaspoon salt
- 3 large eggs, at room temperature
Instructions
- Preheat and Prepare Pan: Preheat your oven to 350°F (175°C). Line a 9×13 inch baking pan with foil, ensuring there is an overhang for easy removal later, and lightly grease the foil with butter or non-stick spray. A metal pan is preferred, but a glass pan will also work—just expect a slightly longer bake time.
- Make the Crust: Crush the graham crackers into fine crumbs using a food processor or by placing them in a sealed bag and crushing with a rolling pin. Combine the graham cracker crumbs with 1/4 cup sugar and melted butter until the mixture resembles wet sand. Press this mixture firmly and evenly into the bottom of the prepared pan to form the crust.
- Prepare Pumpkin Mixture: In a medium bowl, mix together pumpkin puree, pumpkin pie spice, ground cinnamon, and all-purpose flour until well combined. Set aside.
- Create the Cheesecake Filling: In a large mixing bowl, beat the cream cheese with an electric mixer until smooth and creamy, about 2-3 minutes. Gradually add 1-2/3 cup sugar and continue beating until light and fluffy. Mix in vanilla extract, sour cream, and salt until incorporated. Add eggs one at a time, beating just until blended after each addition. Avoid overmixing to prevent cracks.
- Combine and Swirl: Pour half of the cheesecake batter over the prepared crust, spreading evenly. Dollop half of the pumpkin mixture over this layer. Use a knife or skewer to gently swirl the pumpkin mixture into the cheesecake batter to create a marbled effect. Repeat layering and swirling with the remaining cheesecake batter and pumpkin mixture.
- Bake: Place the pan in the preheated oven. Bake for about 50 minutes or until the edges are set and the center slightly jiggles when you gently shake the pan. Avoid overbaking to keep the bars creamy.
- Cool and Chill: Remove the pan from the oven and allow it to cool completely on a wire rack. Once cooled, cover and refrigerate for at least 4 hours or overnight to allow the bars to fully set and flavors to develop.
- Serve: Use the foil overhang to lift the cheesecake from the pan. Cut into 18 bars and serve chilled. Store any leftovers in the refrigerator.
Notes
- These swirled Pumpkin Cheesecake Bars beautifully merge the iconic flavors of pumpkin pie with creamy cheesecake on a crunchy graham cracker crust.
- Using room temperature ingredients ensures a smooth, lump-free filling.
- For a festive touch, top bars with whipped cream or a sprinkle of cinnamon before serving.
- You can substitute pumpkin pie spice with equal parts ground cinnamon, nutmeg, ginger, and cloves if unavailable.
- A metal baking pan is recommended for even baking; glass pans may require additional bake time.
Nutrition
- Serving Size: 1 bar
- Calories: 294
- Sugar: 21 g
- Sodium: 200 mg
- Fat: 20 g
- Saturated Fat: 11 g
- Unsaturated Fat: 6 g
- Trans Fat: 1 g
- Carbohydrates: 26 g
- Fiber: 1 g
- Protein: 4 g
- Cholesterol: 84 mg

Your email address will not be published. Required fields are marked *