
If you’re looking for a dessert that captures the festive spirit while delighting every sweet tooth at your holiday table, I’ve got just the thing. This Christmas Red Velvet Lasagna Dessert Recipe is my go-to for parties, potlucks, or just some cozy nights with loved ones—it’s insanely easy but looks and tastes like a showstopper. Imagine layers of rich red velvet cake, creamy cheesecake, festive green pudding, and fluffy Cool Whip all coming together in one glorious dish. Trust me, you’re going to want to make this a new holiday tradition.
Why You’ll Love This Recipe
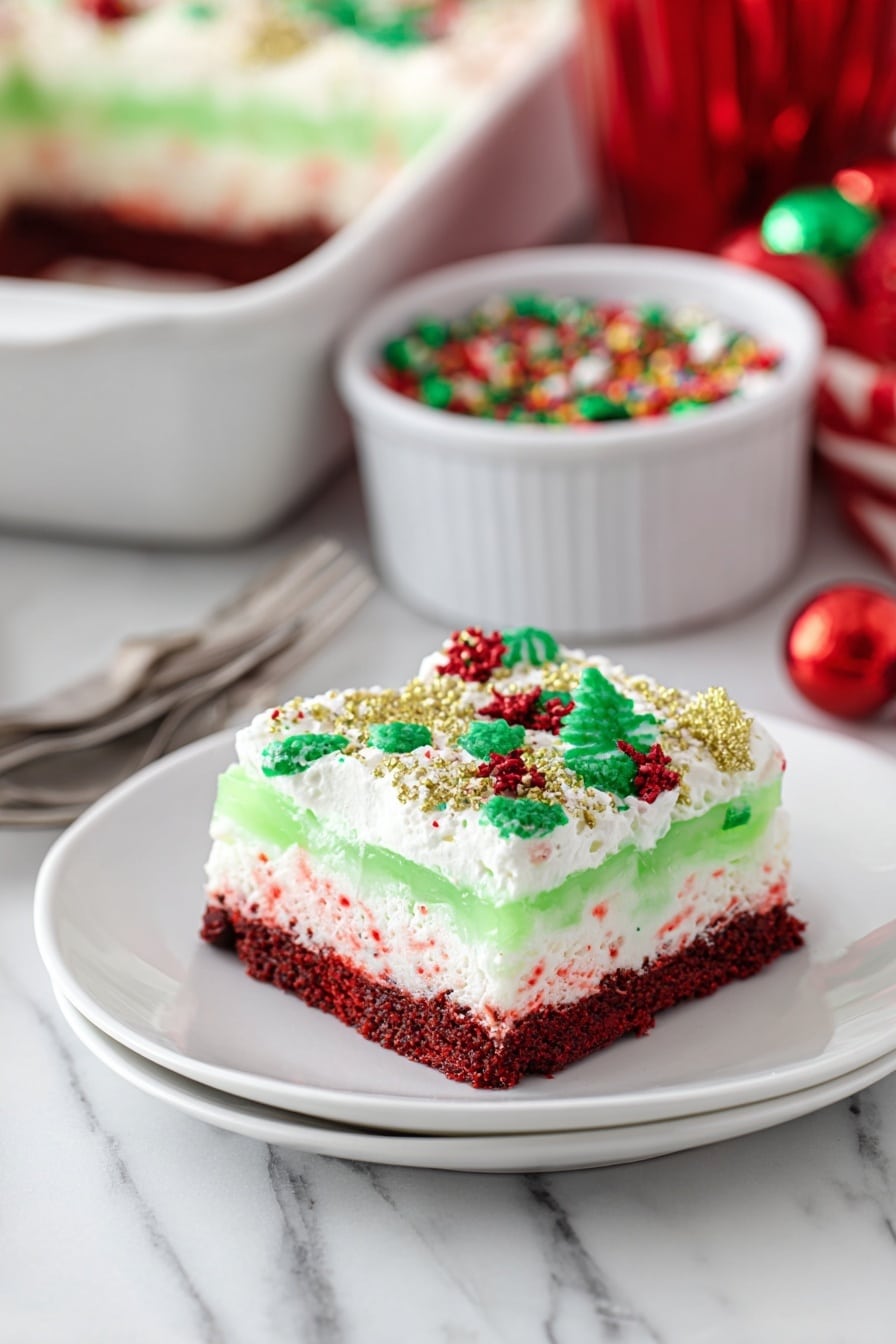
- Festive & Eye-Catching: The vibrant red and green layers make this dessert a Christmas showstopper that’s as pretty as it is delicious.
- No Fancy Baking Skills Needed: Using a box mix and instant pudding keeps this recipe super approachable and quick.
- Loved by All Ages: From kids to grandparents, my family can’t get enough of the creamy, crunchy candy cane crunch in every bite.
- Versatile & Adaptable: Whether you serve it as a traditional lasagna or try it as a fun trifle, it always shines on the holiday table.

Ingredients You’ll Need
Each ingredient in this Christmas Red Velvet Lasagna Dessert Recipe plays a special role, creating layers that contrast perfectly in texture and flavor. I always recommend grabbing good-quality cream cheese and fresh Cool Whip to keep that creamy layer smooth and luscious.

- Red velvet cake mix: Your base for that beautiful ruby red layer; using a box mix saves so much time!
- Butter: Melted butter adds richness to the cake batter and helps the texture hold.
- Egg: Binds your cake ingredients together for the perfect structure.
- Cream cheese: For that decadent cheesecake layer—you want it softened for easy mixing.
- Confectioners sugar: Adds sweetness and a silky finish to the cream cheese layer.
- Crushed candy canes: Gives a festive peppermint crunch; fresh canes crushed just before use taste best.
- Milk: Divided—used for both the cream cheese and pudding layers to get the right consistency.
- Cool Whip: Used twice for lightness in layers; fresh tubs make for the fluffiest texture.
- Vanilla instant pudding: Gives the green layer structure and sweetness.
- Green gel food coloring: Choose a vibrant green to get that iconic Christmas look, like the Grinch green I always aim for.
- Christmas sprinkles and additional crushed candy canes: For the finishing touch—adds sparkle and extra festive crunch!
Variations
While I adore the classic layers in this Christmas Red Velvet Lasagna Dessert Recipe, sometimes I like to switch things up a bit to suit different tastes or dietary needs. Don’t hesitate to get creative and make it your own!
- Trifle Version: I often cut the baked red velvet cake into chunks and layer it in glass dishes with the cream cheese and pudding layers—super fun for individual servings and a pretty way to serve guests.
- Dairy-Free Alternative: Swap cream cheese and Cool Whip for dairy-free versions; I tried this once for a friend, and it turned out wonderfully creamy.
- Mint Chocolate Twist: Add mini chocolate chips to the cream cheese layer or sprinkle crushed peppermint bark on top for an extra festive crunch my family loved!
- Berry Version: Replace candy canes with fresh raspberries or strawberries to give a fresh fruit twist with a pop of red flavor.
How to Make Christmas Red Velvet Lasagna Dessert Recipe
Step 1: Whip Up the Red Velvet Cake Layer
Start by preheating your oven to 350°F and greasing a 13×9 pan—this helps your cake layer come out cleanly. In a large bowl, mix the red velvet cake mix with melted butter and one egg until smooth. Spread this evenly into your greased pan. Bake for 15-18 minutes, checking for doneness with a toothpick (it should come out clean). Then, very important, let the cake cool completely before moving on so your next layers won’t melt or slide around.
Step 2: Prepare the Cream Cheese Layer
While the cake cools, beat softened cream cheese and confectioners sugar together until smooth. Add a quarter cup of milk and continue beating for silky consistency. Gently fold in one container of Cool Whip along with the crushed candy canes for that amazing peppermint surprise. Spread this creamy layer evenly over your cooled red velvet cake. Pop it in the fridge while you get the pudding layer ready.
Step 3: Mix and Add the Green Pudding Layer
In a large mixing bowl, whisk together the vanilla instant pudding mixes with the rest of the milk. Now here’s the fun part: add green gel food coloring drop by drop, stirring until you get that perfect Grinch green shade—bright and festive! Pour this pudding layer gently over the cream cheese layer and return your lasagna to the fridge. At this stage, it needs to chill for at least 4 hours so the pudding sets firm and those layers sing in harmony.
Step 4: Finish with Cool Whip and Garnishes
Once the pudding layer is set, spread the second container of Cool Whip evenly on top. Then, sprinkle your favorite Christmas sprinkles and crushed candy canes over that fluffy top—it’s the perfect seasonal sprinkle party! Chill for a bit longer or serve immediately. When I first made this dessert, the colorful garnishes took it from yum to WOW with family and friends.
Pro Tips for Making Christmas Red Velvet Lasagna Dessert Recipe
- Cool the Cake Completely: I always wait until the red velvet layer is fully cool before adding the cream cheese—otherwise, you’ll end up with a soggy mess.
- Softened Cream Cheese is a Must: I learned this the hard way; if your cream cheese isn’t fully softened, you’ll get lumps that ruin the smooth texture.
- Add Green Food Coloring Slowly: A little goes a long way, so build up your color carefully to avoid an unnatural hue.
- Use Fresh Candy Canes: Crushing candy canes fresh before layering ensures that peppermint crunch stays crisp and delicious.
How to Serve Christmas Red Velvet Lasagna Dessert Recipe

Garnishes
For garnishes, I’m a sucker for a mix of festive sprinkles and crushed candy canes—it adds a little sparkle and a perfect peppermint nip that sets off the dessert beautifully. Sometimes, I toss on a few fresh cranberries or edible glitter when I’m feeling extra fancy for Christmas Eve.
Side Dishes
This dessert is so rich and flavorful, I usually serve it on its own, but it pairs wonderfully with a light cup of hot cocoa or peppermint coffee to keep the Christmas vibes going. If you want a full meal, it also goes well after a savory Christmas dinner like roast turkey or glazed ham.
Creative Ways to Present
Once, I layered this dessert in clear glass trifle bowls—it looked stunning with all those red and green layers glowing through. It’s also perfect for individual servings in small mason jars or parfait glasses, which is a cute way to serve kids or bring to holiday parties.
Make Ahead and Storage
Storing Leftovers
I keep leftovers covered tightly with plastic wrap in the fridge. Because of the pudding and cream cheese layers, it’s best eaten within 3-4 days for the best texture and flavor. The candy cane crunch softens a bit over time, but the flavors just deepen beautifully.
Freezing
Freezing this dessert is a bit tricky because of the pudding and whipped topping, which don’t freeze well separately. I’d recommend freezing only the baked red velvet cake layer if you want to prep ahead, and then assemble everything fresh before serving. I’ve tried freezing the full dessert, and it got watery upon thawing.
Reheating
This dessert is best served cold straight from the fridge. If you have leftovers, just take it out 10-15 minutes before serving so it softens slightly. Since it’s layered with pudding and Cool Whip, reheating isn’t really necessary or recommended.
FAQs
-
Can I make this Christmas Red Velvet Lasagna Dessert Recipe gluten-free?
Absolutely! Look for a gluten-free red velvet cake mix and gluten-free instant pudding. As long as those are gluten-free, your dessert will be safe to enjoy while maintaining the same delicious layers and texture.
-
How far ahead can I make the dessert?
You can assemble the dessert up to a day or two before your event. Just cover it well and keep it refrigerated. The flavors even get better as it sits, so it’s great for holiday parties when you want to prep ahead.
-
What if I don’t have green food coloring?
No worries! You can omit the food coloring and your dessert will still taste fantastic. The green color just adds a fun festive touch, but the vanilla pudding layer will work fine as a neutral color.
-
Can I use homemade cake instead of box mix?
Sure thing! If you prefer homemade red velvet cake, just bake it thinly in your pan and proceed with the layering. However, the box mix keeps this easy and consistent, which I love especially during busy holidays.
Final Thoughts
This Christmas Red Velvet Lasagna Dessert Recipe is one of those special dishes I’m always excited to pull out when the holidays roll around. It’s like a festive flavor party in every bite—and the fact that it comes together so easily means you’ll actually enjoy making it! Whether you stick to the classic layers or personalize it with your own twist, I promise it’ll be a crowd-pleaser that gets compliments all season long. So go ahead, whip this up for your next holiday gathering—you and your guests will thank me!
Print
Christmas Red Velvet Lasagna Dessert Recipe
- Prep Time: 15 minutes
- Cook Time: 15 minutes
- Total Time: 4 hours 30 minutes
- Yield: 18 servings 1x
- Category: Dessert
- Method: Baking
- Cuisine: American
Description
Celebrate the holidays with this festive Christmas Lasagna Dessert featuring layers of red velvet cake, creamy cheesecake frosting, green vanilla pudding, and whipped topping, all garnished with colorful sprinkles and crushed candy canes for a delightful treat perfect for holiday gatherings.
Ingredients
Red Velvet Cake Layer
- 1 box red velvet cake mix
- 1/2 cup butter, melted
- 1 egg
Cream Cheese Layer
- 16 ounces cream cheese, softened
- 1/2 cup confectioners sugar
- 1/4 cup crushed candy canes
- 1/4 cup milk
- 16 ounces Cool Whip (one container)
Vanilla Pudding Layer
- 2 3.4 ounce packages vanilla instant pudding
- 2 3/4 cups milk, divided
- Green gel food coloring (to desired shade)
Topping and Garnish
- 16 ounces Cool Whip (second container)
- Christmas sprinkles and crushed candy canes for garnish
Instructions
- Preheat and Prepare Pan: Preheat your oven to 350 degrees Fahrenheit and grease a 13×9 inch baking pan to prevent sticking.
- Mix Cake Batter: In a large mixing bowl, combine the red velvet cake mix, melted butter, and egg until well mixed and smooth.
- Bake Cake Layer: Spread the red velvet cake batter evenly into the prepared pan. Bake for 15 to 18 minutes or until a toothpick inserted in the center comes out clean. Let cool completely.
- Prepare Cream Cheese Layer: While the cake cools, beat the softened cream cheese and confectioners sugar together until smooth. Add 1/4 cup milk and mix until fully incorporated and creamy.
- Fold in Cool Whip and Candy Canes: Gently fold one container (16 ounces) of Cool Whip and the crushed candy canes into the cream cheese mixture. Spread this evenly over the cooled red velvet cake layer. Refrigerate to set.
- Make Pudding Layer: In a large bowl, whisk together the vanilla instant pudding mixes with 2 3/4 cups milk until it starts to thicken. Add green gel food coloring gradually until reaching a vibrant ‘Grinch green’ color.
- Assemble Pudding Layer: Pour the green pudding evenly over the cream cheese layer. Return the dish to the refrigerator and chill for at least 4 hours to allow layers to set properly.
- Add Final Topping: After the pudding layer has set, spread the second container (16 ounces) of Cool Whip evenly over the top.
- Garnish and Serve: Decorate the dessert with Christmas sprinkles and crushed candy canes for a festive finish. Slice and serve chilled.
Notes
- For a fun variation, turn this dessert into a trifle by cutting the cake layer into chunks and layering them in a glass dish with the cream cheese mixture, pudding, and Cool Whip.
- Ensure the cake layer is completely cooled before adding cream cheese to prevent melting.
- The green gel food coloring can be adjusted to your preferred shade for a more subtle or vibrant green.
- Leftovers can be refrigerated for up to 3 days, but best enjoyed fresh.
Nutrition
- Serving Size: 1 slice (approx. 1/18th of recipe)
- Calories: 320
- Sugar: 30g
- Sodium: 210mg
- Fat: 18g
- Saturated Fat: 10g
- Unsaturated Fat: 7g
- Trans Fat: 0.2g
- Carbohydrates: 35g
- Fiber: 1g
- Protein: 3g
- Cholesterol: 40mg

Your email address will not be published. Required fields are marked *