

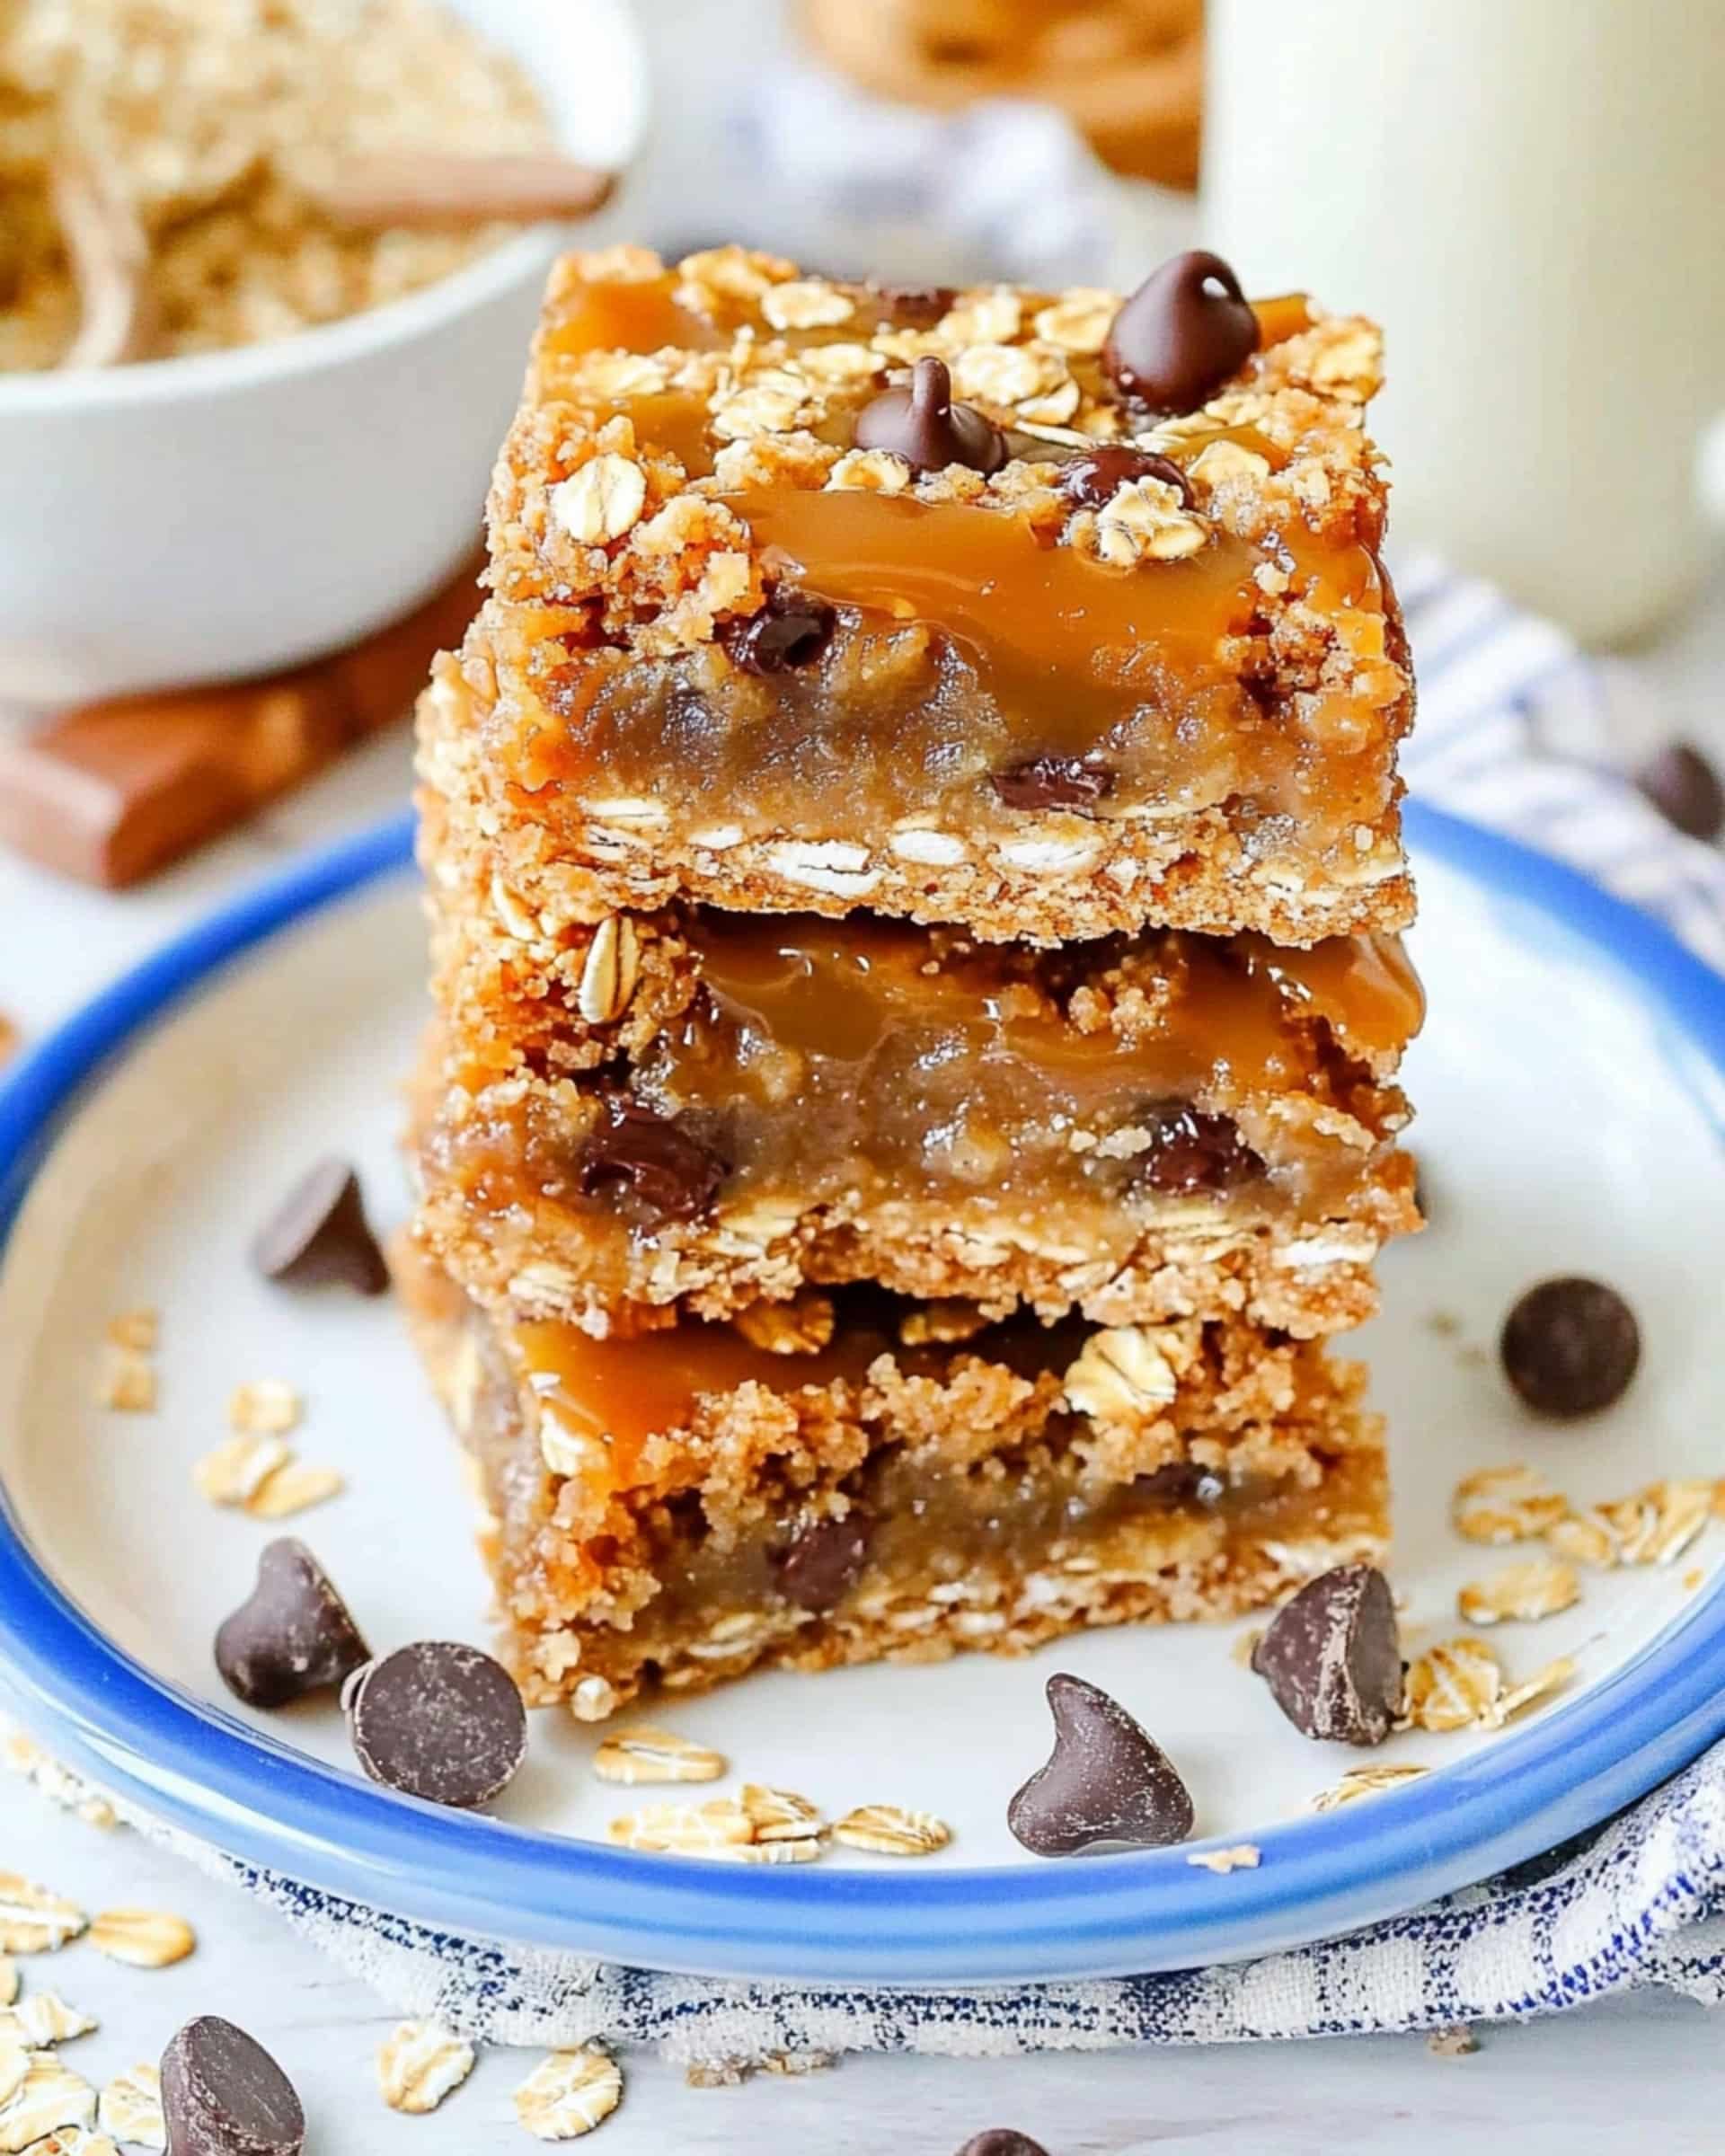
Carmelitas are pure dessert bliss! Imagine biting into a buttery, oat-filled crust, layered with melty chocolate and gooey caramel—all in a single, irresistible bar. This treat delivers both the fudgy chew of brownies and the crunchy comfort of an oatmeal cookie, making it perfect for those moments when you want something indulgent, but don’t have hours to spare. The best part? They’re so easy to throw together, you’ll wonder why you ever settled for store-bought desserts. These bars are ideal for busy weeknights, casual gatherings, or whenever you need a sweet pick-me-up that wows everyone at the table.
Why You’ll Love This Recipe
- Fast and Fuss-Free: No complicated steps—just mix, layer, and bake. It’s as simple as stirring, sprinkling, and waiting for pure magic to happen!
- Ridiculously Delicious: The combo of buttery oats, silky caramel, and melty chocolate is an absolute show-stopper. Every bite is gooey, chewy, and chocolatey in all the right ways.
- Perfect for Sharing (or Not): These bars travel well and slice neatly, making them a go-to for bake sales, potlucks, or late-night cravings.
- Easy to Tweak: Swap out ingredients or adjust to dietary needs—Carmelitas always deliver big flavor with minimal effort.

Ingredients You’ll Need
Here’s what you’ll gather to create these dreamy squares (with a few notes for foolproof results):
- Salted Butter: The base for that rich, buttery crust; salted butter adds depth, but you can use unsalted and adjust the salt as needed.
- Brown Sugar: Gives the bars a deep, molasses flavor and perfectly chewy texture.
- Vanilla Extract: It’s a must—brings out the best in the oats and caramel, adding warmth and aroma.
- All-Purpose Flour: Forms the structure of both the bottom and top layer for that wonderfully soft bite.
- Rolled Oats (Old Fashioned Oats): Stick with old fashioned—not quick oats—for the perfect chewy crunch.
- Baking Soda: Ensures the layers stay light rather than dense.
- Salt: Divided to balance flavor in both crust and caramel.
- Caramel Squares: The star! Use classic wrapped caramels for the thick, luscious filling.
- Heavy Cream: Melts with the caramels to create ultra-smooth, pourable caramel sauce.
- Semi-Sweet Chocolate Chips: Keeps the richness on point without becoming overwhelming. Milk or dark chocolate works if you prefer!
Note: Parchment paper is non-negotiable; this caramel is sticky!
Variations
Make these bars your own by switching things up:
- Nutty Twist: Add a layer of chopped pecans or walnuts right over the chocolate for crunch.
- Different Chocolate: Try milk or dark chocolate chips, or even white chocolate for a sweeter, creamier finish.
- Salted Caramel Lovers: Sprinkle flaky sea salt over the caramel before adding the top layer.
- Gluten-Free Option: Swap in a trusted 1-to-1 gluten-free flour blend and certified gluten-free oats.
- Add Dried Fruit: Chopped dried cherries or cranberries pair beautifully with the caramel and chocolate.
How to Make Carmelitas
Step 1: Prep Your Pan
Line an 8×8-inch pan with parchment paper and give it a light grease. Don’t skip this—the caramel gets sticky!
Step 2: Make the Oat Crust
Melt the butter in a large microwave-safe bowl. Whisk in the brown sugar and vanilla until smooth and glossy. Stir in the flour, oats, baking soda, and half of the salt. Use a pastry cutter or fork to work everything together into a crumbly dough.
Step 3: Bake the First Layer
Press half of the dough into your prepared pan and bake at 350°F for 10 minutes. This becomes your sturdy, golden base.
Step 4: Prepare the Caramel Layer
While the crust bakes, melt the unwrapped caramel squares with heavy cream and the remaining salt in a microwave-safe bowl. Heat in 1-minute increments, stirring until the mixture is smooth, creamy, and pourable.
Step 5: Layer it Up
As soon as the crust comes out of the oven, sprinkle chocolate chips evenly across. Pour the warm caramel sauce gently over the chocolate.
Step 6: Crumble and Bake
Sprinkle the remaining oat mixture evenly over the top—just crumble it with your hands and gently press it down. Bake for 15 minutes, until the top is lightly golden.
Step 7: Cool Completely
Patience pays off here! Cool in the pan on a rack, then refrigerate for at least 3 hours before slicing. Trying to cut too soon leads to caramel ooze (tempting, but messy!).
Pro Tips for Making the Recipe
- Don’t Skip Cooling: Letting the bars set properly is key to neat slices and thick, gooey layers.
- Microwave Wisdom: Caramel can seize if overheated; melt in short bursts and stir often.
- Use Old Fashioned Oats: Quick oats will leave you with a different, less satisfying texture.
- Parchment Paper is Essential: Cleanup and bar removal are a breeze, and you won’t risk ruining those gorgeous layers.
- Customize the Salt: If you love that salty-sweet punch, don’t be shy with a little extra sprinkle at the end.
How to Serve
Carmelitas are delicious all on their own, but serving ideas make them extra special:
- With Coffee or Milk: The rich, buttery bars are dreamy alongside a cup of strong coffee or an ice-cold glass of milk.
- Topped with Ice Cream: Slightly warm a square and top with a scoop of vanilla or salted caramel ice cream for the ultimate dessert.
- On a Dessert Platter: Cut into small squares and serve with other bars or cookies for a crowd-pleasing treat table.
- For Gifting: Wrap cooled squares in parchment and tie with twine for homemade gifts everyone will actually want to receive.
Make Ahead and Storage
Storing Leftovers
Store completely cooled Carmelitas in an airtight container at room temperature for up to 3 days, or in the fridge for up to a week. They keep beautifully and the flavor only improves as they rest.
Freezing
Freeze cooled bars in layers separated by parchment for up to 2 months. Thaw at room temperature or pop briefly in the fridge for a firmer bite.
Reheating
If you love your bars gooey, just microwave a square for 10-15 seconds to revive that fresh-baked magic.
FAQs
Can I use homemade caramel sauce instead of caramel squares?
Absolutely! Homemade caramel works perfectly. Just be sure it’s thick and not too runny, or the bars might not set properly.
What’s the best way to get clean slices?
Use a sharp knife, and for best results, chill the Carmelitas thoroughly before cutting. Wipe the blade clean between cuts to keep the layers looking beautiful.
Can I double the recipe for a bigger crowd?
Yes, just use a 9×13-inch pan and watch the baking times—depending on your oven and the thickness, you may need a few extra minutes.
Can I make these bars dairy-free?
You can substitute vegan butter, plant-based cream, and dairy-free chocolate chips. Use coconut cream for the caramel layer for the richest flavor.
Final Thoughts
If you’re searching for a blissfully easy treat that tastes like it came from a gourmet bakery, Carmelitas are calling your name. These bars hit the sweet spot between chewy, crunchy, and gooey—all thanks to a handful of simple ingredients and a little patience. So go ahead, whip up a batch and share the joy (or keep them all to yourself—I wouldn’t blame you one bit). Happy baking, and enjoy every gooey, chocolatey bite!
Print
Carmelitas Recipe
- Prep Time: 15 minutes
- Cook Time: 25 minutes
- Total Time: 3 hours 40 minutes (includes cooling)
- Yield: 16 squares 1x
- Category: Desserts
- Method: Baking
- Cuisine: American
- Diet: Vegetarian
Description
Carmelitas are decadent dessert bars featuring layers of buttery oat cookie crust, gooey caramel filling, and melted chocolate chips. These irresistible bars offer a delightful combination of textures—chewy, soft, and slightly crisp—making them a favorite for gatherings or special treats. Easy to prepare, they bring together pantry staples for a truly indulgent homemade dessert.
Ingredients
For the Crust and Topping
- 3/4 cup salted butter, melted
- 2/3 cup brown sugar, packed
- 1 Tablespoon vanilla extract
- 1 1/4 cup all-purpose flour
- 1 1/4 cup rolled oats or old fashioned oats
- 1 teaspoon baking soda
- 1/2 teaspoon salt, divided
For the Filling
- 40 caramel squares
- 1/3 cup heavy cream
For the Chocolate Layer
- 1 1/2 cup semi-sweet chocolate chips
Instructions
- Prepare the Pan: Preheat your oven to 350°F (177°C). Line and grease an 8×8 inch baking pan, ideally with parchment paper to prevent the caramel from sticking and to make removal easier.
- Make the Cookie Mixture: In a large microwave-safe bowl, melt the butter. Whisk in the brown sugar and vanilla extract until well combined.
- Combine Dry Ingredients: Add the flour, oats, baking soda, and 1/4 teaspoon of salt to the butter mixture. Use a pastry cutter or fork to mix until crumbly and fully incorporated.
- Form the Base: Press about half of this mixture evenly into the bottom of the prepared baking pan to form the crust. Bake for 10 minutes until slightly set.
- Prepare the Caramel Filling: While the crust bakes, place the caramel squares, heavy cream, and the remaining 1/4 teaspoon salt in a large microwave-safe bowl. Stir together and heat on high for 1 minute. Stir, then heat for another minute, and stir again until smooth. Only heat as much as needed until the mixture is melted and smooth to avoid seizing.
- Layer the Chocolate: Once the crust has finished baking, immediately sprinkle the chocolate chips evenly over the hot crust.
- Add the Caramel Layer: Pour the prepared caramel sauce evenly over the layer of chocolate chips.
- Top with Remaining Crust: Sprinkle the remaining oat mixture over the caramel, gently pressing or tapping down with your hand to form a topping.
- Bake the Bars: Return the pan to the oven and bake for another 15 minutes, or until the top is lightly browned and set.
- Cooling and Slicing: Remove the pan to a wire rack and let cool completely before slicing. For clean bars and to prevent the caramel from oozing out, let the pan set at room temperature overnight or chill in the fridge for at least 3 hours before cutting into squares.
Notes
- Ensure the bars are completely cooled before slicing to avoid the caramel running out.
- Parchment paper makes removal much easier and cleaner.
- The bars can be stored in the refrigerator for firmer texture or at room temperature for a softer bite.
- Old fashioned oats yield a chewier texture, but quick oats can be used in a pinch.
Nutrition
- Serving Size: 1 square
- Calories: 320
- Sugar: 24g
- Sodium: 230mg
- Fat: 16g
- Saturated Fat: 9g
- Unsaturated Fat: 6g
- Trans Fat: 0g
- Carbohydrates: 42g
- Fiber: 2g
- Protein: 3g
- Cholesterol: 30mg

Your email address will not be published. Required fields are marked *