I absolutely love this Caramel Apple Sheet Pan Pie Recipe because it brings all the cozy fall vibes into one easy, shareable dessert that everyone raves about. The combination of tart Granny Smith apples, buttery crust, and that rich caramel drizzle is just irresistible—and it’s perfect for holidays, potlucks, or even a weekend treat when you want something special without fuss.
When I first tried this recipe, I was blown away by how quickly it comes together and how impressive it looks. The sheet pan format means you get crispy edges and gooey filling all in one slice, so it’s a crowd-pleaser and a great way to feed a bunch of people without messing with individual pies. If you’re searching for a dessert that feels homemade but isn’t complicated, this Caramel Apple Sheet Pan Pie Recipe is totally worth your time.
Why You’ll Love This Recipe
- Simple Yet Stunning: A recipe that looks fancy but comes together quickly and easily.
- Perfect Fall Flavors: Tart apples, fragrant cinnamon, and luscious caramel make every bite unforgettable.
- Great for Sharing: The sheet pan format makes it easy to cut into lots of generous slices for friends and family.
- Customizable Crust: Use homemade or store-bought dough — both work beautifully with this recipe.
Ingredients You’ll Need
These ingredients create a superb balance between sweet and tart, soft and crispy. Grab fresh Granny Smith apples for that bright tanginess, and feel free to use pre-made pie crusts if you’re short on time.
- Unsalted butter: Adds richness and helps soften the apples as they cook.
- Granny Smith apples: Their tart flavor balances the sweetness beautifully and holds up well when baked.
- Lemon juice: Keeps the apples from browning and adds brightness.
- Granulated sugar: Sweetens the filling just right without overpowering.
- Cornstarch: Thickens the filling so it sets perfectly without running.
- Ground cinnamon: A warm spice that complements the apples and caramel perfectly.
- Caramel sauce: The star addition that brings gooey sweetness and depth.
- All butter pie crust: For a flaky, golden crust that melts in your mouth—homemade or store-bought both work.
- Egg wash and sanding sugar: Give the crust a beautiful shine and a bit of sparkle.
Variations
I love tweaking this Caramel Apple Sheet Pan Pie Recipe depending on the occasion or what I have around. Feel free to swap in different apple varieties or even add some chopped nuts for extra texture—you’ll find the recipe is super forgiving and fun to experiment with.
- Use Mixed Apples: Combining Granny Smith with Honeycrisp or Fuji adds a more complex flavor that my family enjoys.
- Add Walnuts or Pecans: Sprinkle chopped nuts on top before baking for a delicious crunch that pairs perfectly with the caramel.
- Dairy-Free Version: Substitute the butter with coconut oil and use a plant-based pie crust for a tasty vegan option.
- Extra Spice: Adding a pinch of nutmeg or ginger to the filling amps up the warmth and cozy feel in the pie.
How to Make Caramel Apple Sheet Pan Pie Recipe
Step 1: Prep Your Apples and Make the Filling
Start by peeling, coring, and slicing your Granny Smith apples into roughly ¼-inch pieces—this thickness lets them soften nicely without turning mushy. Melt the butter in a large skillet, then add the apples and cook them, stirring often, about 7 to 9 minutes until they just barely start to soften. This step is key to getting tender-firm apples in the final pie. Then, toss in the lemon juice, sugar, cornstarch, cinnamon, and caramel sauce. Stir everything so the apples are well coated, bring the mixture to a boil, and let it cook an extra couple of minutes until thickened. Finally, remove from heat and let your filling cool to room temperature, or ideally chill for a couple of hours—this helps the filling set nicely and makes it easier to work with when spreading it on the crust.
Step 2: Roll Out Your Crust and Assemble
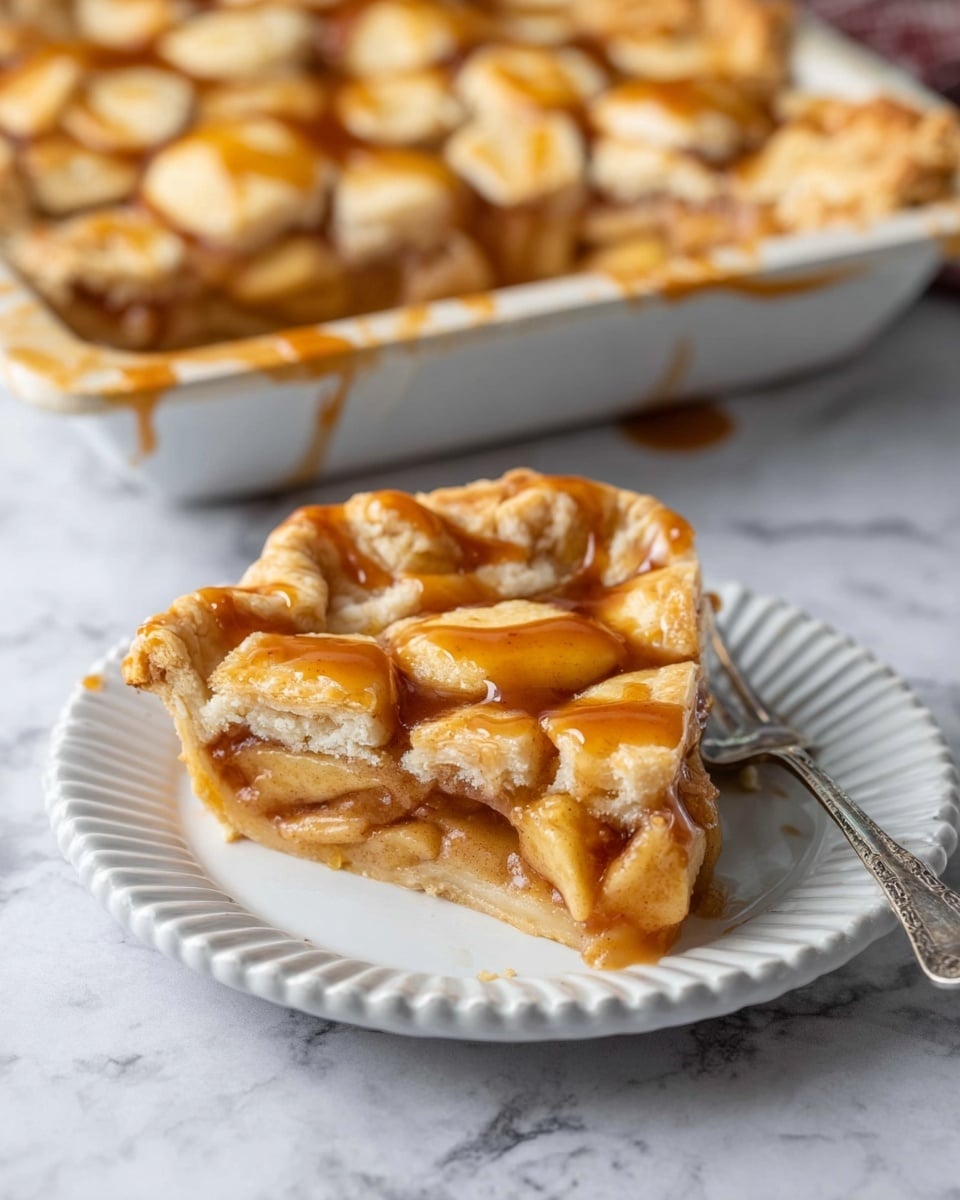
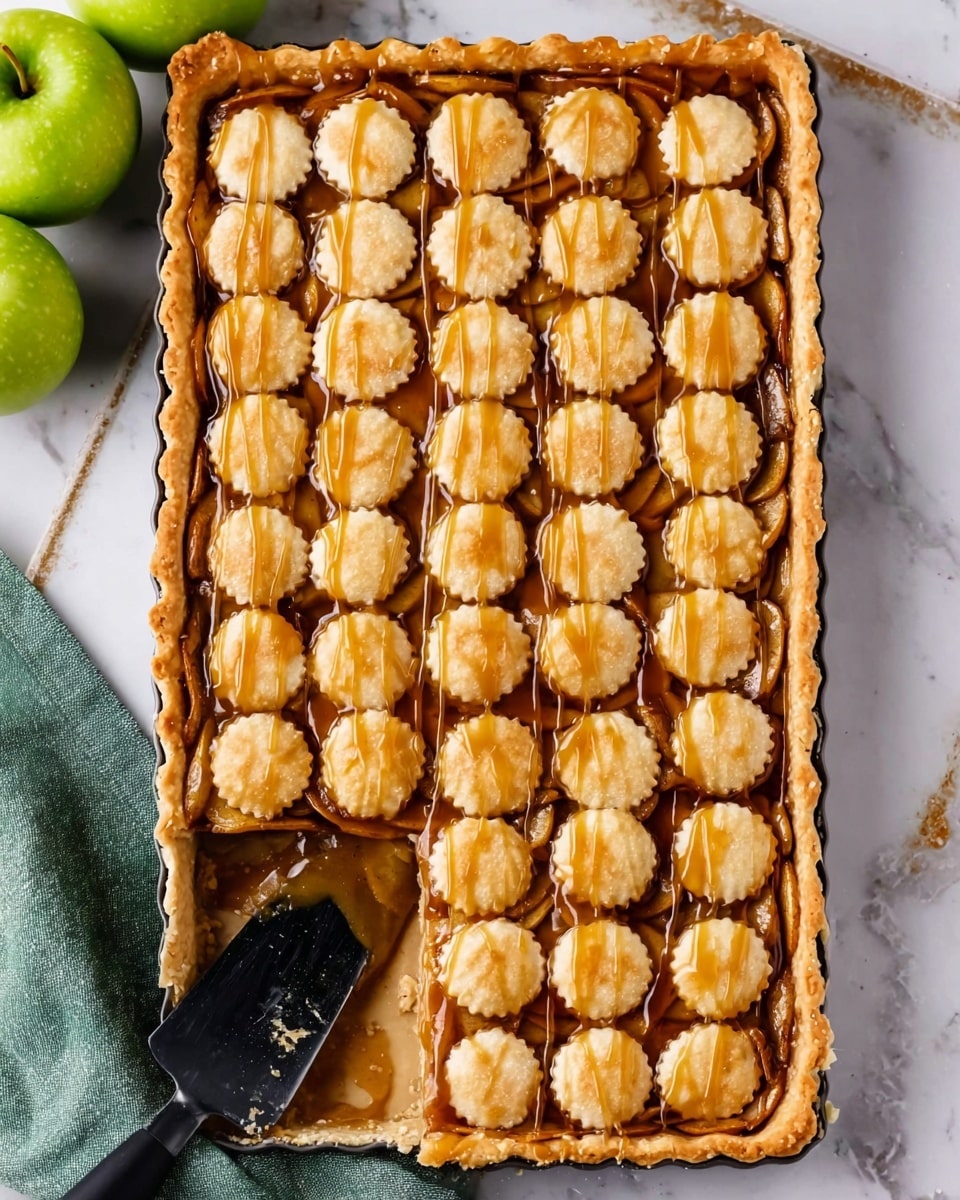
Preheat your oven to 425°F and prepare a 10×15-inch jelly roll pan by spraying it with nonstick cooking spray—this makes cleanup so much easier. Divide your pie crust into three pieces: roll two of them out into a 12×17-inch rectangle and press it gently onto the pan, letting some dough hang over the edges. The third piece is rolled out into a 12-inch circle, then cut into fun shapes using cookie cutters. I like using a 2½-inch round cutter for this recipe—it gives a charming look but you can get creative with shapes too! Once your crust is ready, spoon the cooled apple filling evenly over the bottom crust. Then, place the pie crust shapes on top, leaving a little space so the steam can escape while baking. Brush everything with an egg wash to get a beautiful golden shine and sprinkle with sanding sugar for that perfect sparkle.
Step 3: Bake and Cool to Perfection
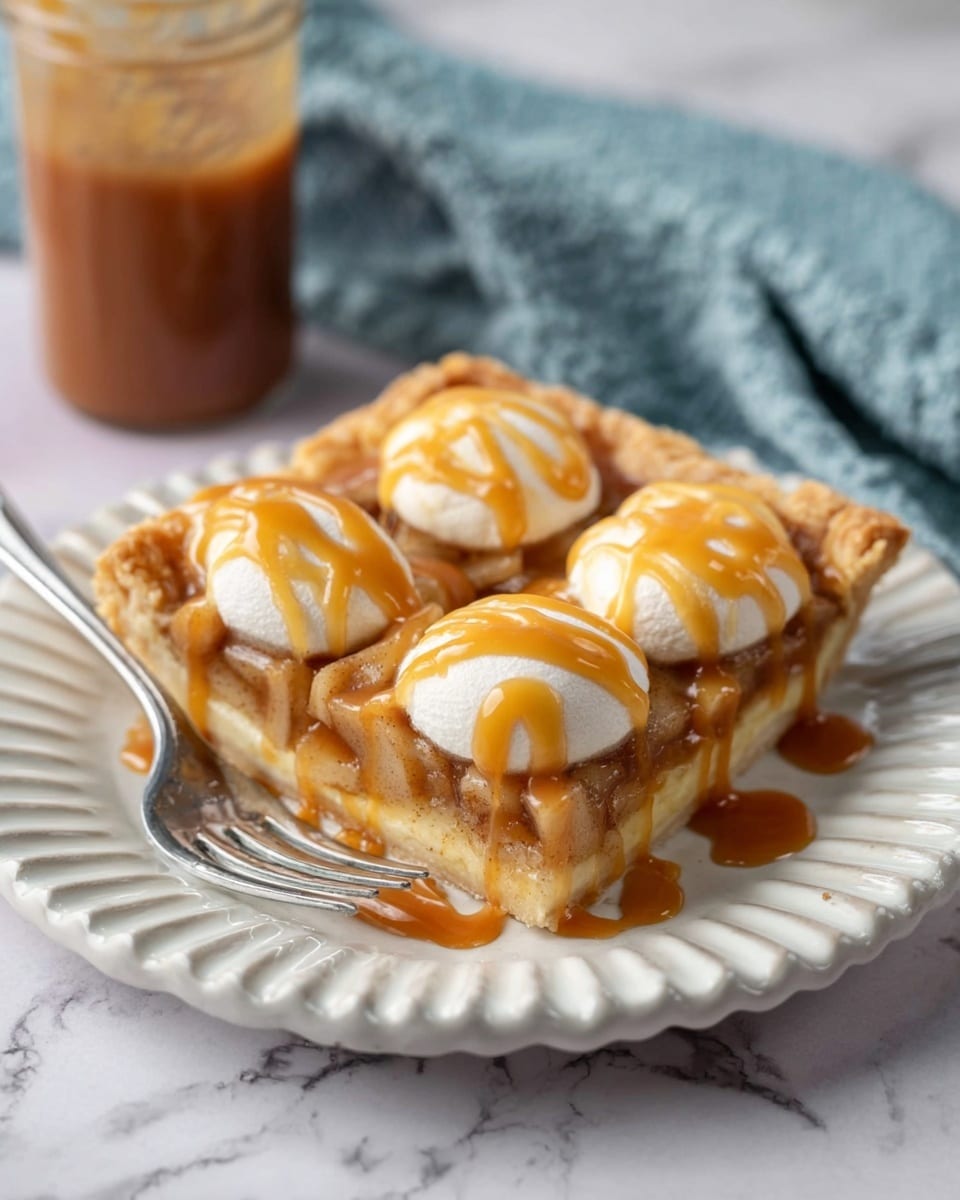
Bake the pie for about 35 to 45 minutes, until the filling is bubbly and the crust turns a lovely light golden brown. Resist the urge to cut in right away—letting the pie cool completely is important because the filling thickens up as it cools, making slicing much neater and keeping every piece intact. I usually let it rest for at least 2 hours before serving. When you serve, drizzle extra caramel sauce over the top or add a scoop of vanilla ice cream if you’re feeling indulgent.
Pro Tips for Making Caramel Apple Sheet Pan Pie Recipe
- Pick the Right Apples: Granny Smith apples hold up best during baking and provide the perfect balance of tartness to sweet caramel.
- Cool the Filling Thoroughly: Letting the filling cool completely before assembly prevents the crust from getting soggy—trust me, it makes a big difference.
- Use Egg Wash and Sugar: Brushing the top crust with egg wash and sanding sugar creates a beautiful, shiny, and slightly crunchy finish that’s soooo satisfying.
- Avoid Overbaking: Keep an eye on the crust color; once it’s golden and the filling is bubbly, it’s ready to come out to prevent dryness.
How to Serve Caramel Apple Sheet Pan Pie Recipe

Garnishes
I love keeping it simple with a generous drizzle of extra caramel sauce on each slice—that sweet drizzle ties all the flavors together so nicely. A scoop of vanilla ice cream or a dollop of whipped cream makes for a classic pairing that everyone enjoys. For a festive touch, I sometimes sprinkle chopped toasted pecans on top right before serving for a little crunch.
Side Dishes
This pie pairs beautifully with warm drinks like spiced cider or coffee, making it ideal for chilly evenings. If you want a fuller dessert spread, a simple cheese plate with aged cheddar and sharp gouda complements the apple’s sweetness perfectly and adds a savory balance.
Creative Ways to Present
For holidays or special occasions, I sometimes cut the pie into smaller, bite-sized squares and arrange them on a rustic wooden board with extra caramel in a dipping bowl—this makes for a fun and interactive dessert display. You can also use themed cookie cutters for the top crust shapes, like leaves or hearts, to give it an extra personalized touch that guests always notice and appreciate.
Make Ahead and Storage
Storing Leftovers
I store leftover caramel apple sheet pan pie tightly wrapped in the fridge, and it keeps well for up to 3 days. Just make sure you let it come to room temperature before serving again, so the flavors come alive and the crust isn’t too stiff.
Freezing
Freezing works great with this pie! I wrap it tightly in plastic wrap and then foil before popping it in the freezer for up to 3 months. When I’m ready to enjoy, I thaw it overnight in the fridge and reheat gently—this keeps the apples tender and the crust flaky.
Reheating
To reheat, I like warming slices in a preheated 350°F oven for about 10-15 minutes until just heated through. This helps the crust stay crisp instead of getting too soggy like a microwave would. If you want to get fancy, pop on a scoop of ice cream right after reheating to recreate that fresh-from-the-oven feeling.
FAQs
-
Can I use other types of apples for this Caramel Apple Sheet Pan Pie Recipe?
Absolutely! While Granny Smith apples are ideal because they hold their shape and provide tartness, you can mix in sweeter varieties like Honeycrisp or Fuji for added depth. Just make sure to slice them evenly and watch the filling as some apples soften faster than others.
-
Can I make this recipe ahead of time?
Yes, you can prepare the filling a day or two in advance and keep it refrigerated. Assemble the pie shortly before baking for the best crust texture. The pie itself also freezes well if you want to bake it ahead and reheat later.
-
Is it okay to use store-bought pie crust for this recipe?
Definitely! Store-bought all-butter pie crusts work wonderfully if you’re short on time or prefer convenience. Just be sure to follow the package instructions for thawing and rolling to avoid tearing or shrinking.
-
How do I prevent the bottom crust from getting soggy?
Letting the apple filling cool completely before adding it to the crust helps immensely. Also, pre-baking the bottom crust for a few minutes (blind baking) can help, though it’s not strictly necessary for this recipe since it bakes long enough. Using cornstarch to thicken the filling also reduces excess liquid that can cause sogginess.
-
Can I use homemade caramel sauce, and will it affect the recipe?
Yes, homemade caramel sauce works wonderfully and adds a lovely personal touch. Just make sure your caramel isn’t too runny to maintain the right filling consistency; a slightly thicker caramel blends best.
Final Thoughts
This Caramel Apple Sheet Pan Pie Recipe is one of my go-to desserts whenever I want something comforting, sweet, and effortlessly impressive. It’s a recipe that invites sharing and good conversation around the table, and I hope you’ll enjoy making it as much as I do. Whether it’s a family gathering or a cozy night in, this pie has a way of making moments taste a little sweeter—give it a try and watch it become a new favorite!
Print
Caramel Apple Sheet Pan Pie Recipe
- Prep Time: 45 minutes
- Cook Time: 45 minutes
- Total Time: 3 hours 30 minutes
- Yield: 15 servings 1x
- Category: Dessert
- Method: Baking
- Cuisine: American
Description
This Caramel Apple Sheet Pan Pie combines tender Granny Smith apples cooked in a buttery caramel-infused filling with a flaky all-butter pie crust baked in a jelly roll pan for easy slicing and serving. Perfectly spiced with cinnamon and finished with caramel sauce and sanding sugar, this dessert is ideal for autumn gatherings or any sweet occasion.
Ingredients
Filling:
- 2 tablespoons unsalted butter
- 3 pounds Granny Smith apples (about 8 apples)
- 1 tablespoon lemon juice
- 3/4 cup (150 g) granulated sugar
- 1/4 cup (32 g) cornstarch
- 2 teaspoons ground cinnamon
- 3/4 cup caramel sauce, plus more for serving
Crust:
- 3 recipes All butter pie crust
- Egg wash (1 egg beaten with 1 tablespoon water)
- Sanding sugar for sprinkling
Instructions
- Prepare the Filling: Peel, core, and slice the apples approximately ¼-inch thick. Melt butter in a very large skillet over medium heat. Add the sliced apples and cook, stirring often, until they just start to soften, about 7-9 minutes. Stir in lemon juice, sugar, cornstarch, cinnamon, and caramel sauce. Cook the mixture until it boils, then continue cooking for 2 more minutes until thickened. Remove from heat and let the filling cool completely to room temperature or at least 2 hours.
- Preheat the Oven and Prepare Pan: Preheat your oven to 425°F (220°C). Spray a 10×15-inch jelly roll pan with nonstick cooking spray to prevent sticking.
- Make the Pie Crust: Make three batches of all-butter pie crust. Set one batch aside, and roll out the other two into a rectangle approximately 12×17 inches. Place this rolled-out dough into the prepared pan, allowing some overhang on the edges.
- Create Top Crust Shapes: Roll out the third portion of pie dough into a 12-inch circle. Use cookie cutters (about 2 ½-inch round cutters recommended) to cut out shapes. Re-roll remaining scraps to use all dough.
- Assemble the Pie: Pour the cooled apple filling evenly over the crust in the pan. Arrange the dough shapes over the filling in a decorative pattern. Brush the shapes with egg wash and sprinkle with sanding sugar for a beautiful, shiny finish.
- Bake the Pie: Bake for 35-45 minutes, or until the filling is bubbly and the top crust is light golden brown. Remove from the oven and let cool completely before slicing; the filling will thicken as it cools.
- Serve: Serve slices warm or at room temperature, with additional caramel sauce and ice cream if desired.
- Storage: Store leftovers in the refrigerator for up to 3 days or freeze for up to 3 months, wrapped tightly to maintain freshness.
Notes
- Semi-Homemade Hack: Use refrigerated pie crusts to speed up the process! You’ll need 2 packages (each contains 2 crusts) to have the equivalent of 3 crusts required for this recipe.
- Allow the filling to cool completely before assembling the pie to prevent the crust from becoming soggy.
- For a decorative top crust, experiment with different cookie cutter shapes based on the season or occasion.
- Serve with vanilla ice cream or whipped cream for an extra indulgent dessert.
Nutrition
- Serving Size: 1 slice
- Calories: 302 kcal
- Sugar: 28 g
- Sodium: 179 mg
- Fat: 11 g
- Saturated Fat: 4 g
- Unsaturated Fat: 6 g
- Trans Fat: 0.1 g
- Carbohydrates: 51 g
- Fiber: 3 g
- Protein: 3 g
- Cholesterol: 4 mg


Your email address will not be published. Required fields are marked *