
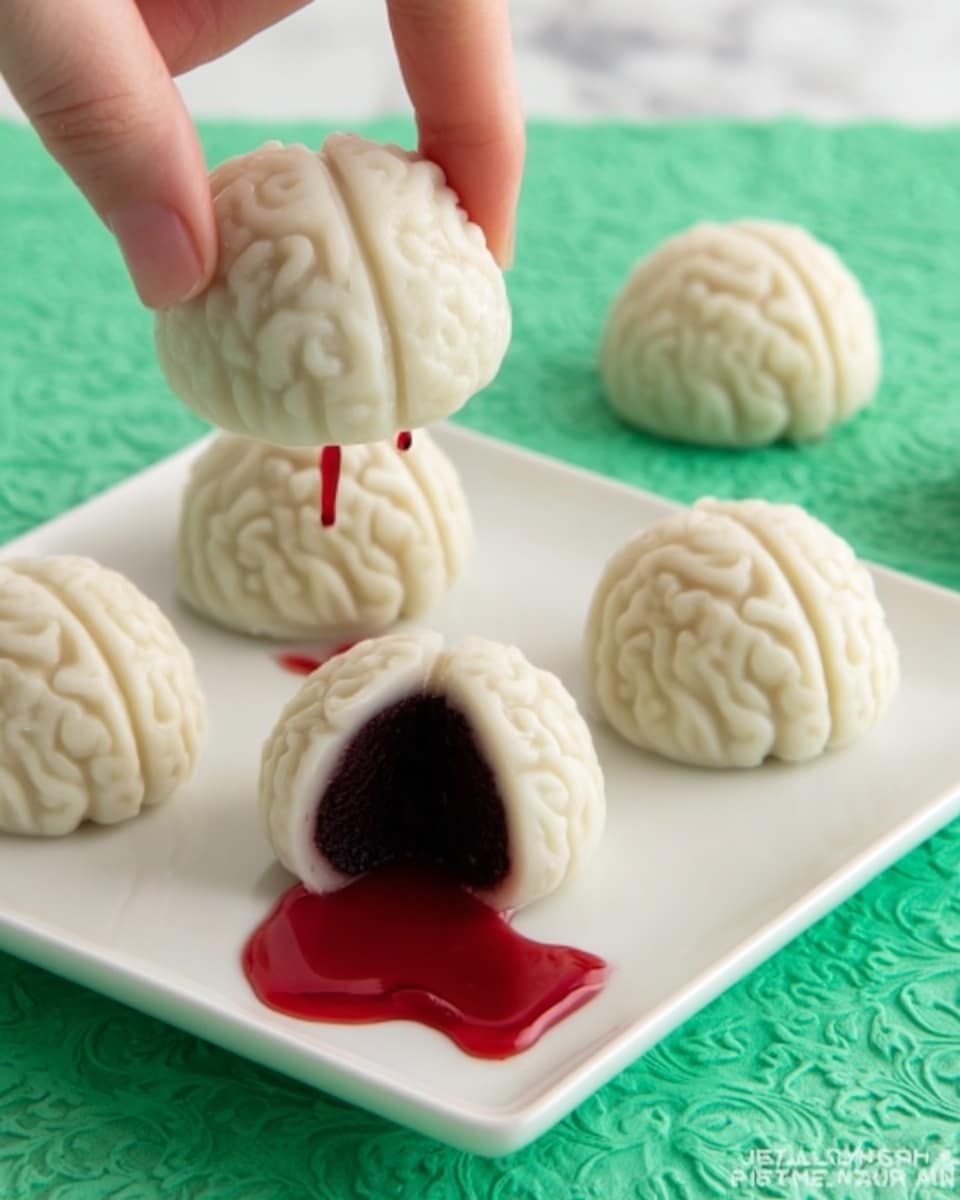
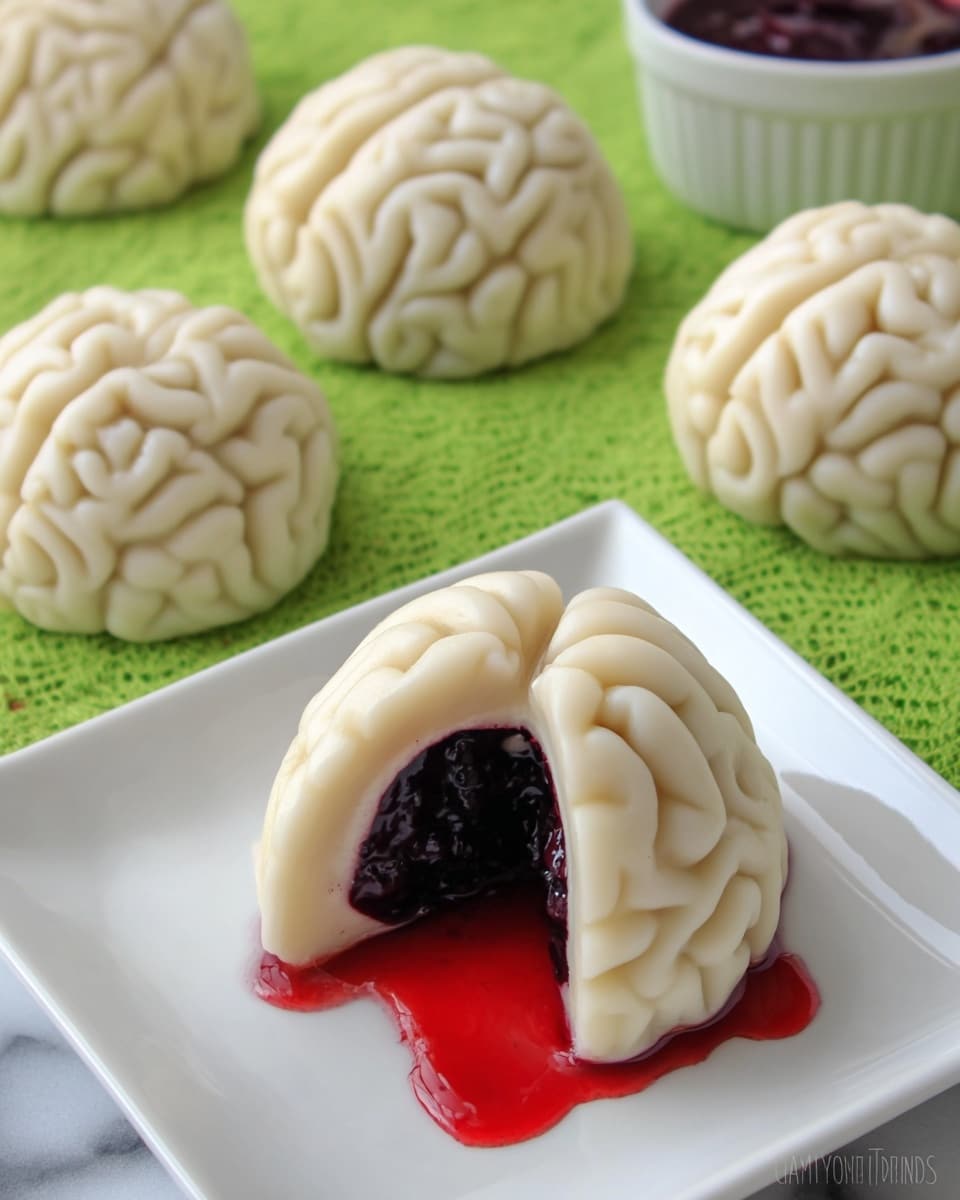
If you love Halloween treats that are as fun to make as they are to eat, you’re going to adore this Cake Ball Brains Recipe. I first tried making these as a quirky centerpiece for a spooky party, and honestly, they were such a hit that I had to share the secret with you. These little edible brains, made from moist chocolate cake and creamy frosting, are enveloped in a smooth white chocolate shell that you can tint and decorate any way you want. Stick with me, and you’ll see just how effortlessly creepy and delicious these are!
Why You’ll Love This Recipe
- Simple Ingredients: Uses everyday cake and frosting with a candy coating for an easy, crowd-pleasing dessert.
- Customizable Design: You can tint and fill the brains with your choice of preserves to match your spooky vibe perfectly.
- Fun and Interactive: Kids and adults alike love how these look and taste, making any party instantly festive.
- Make-Ahead Friendly: These store well so you can prep early and impress without last-minute stress.

Ingredients You’ll Need
Gathering your ingredients ahead of time makes the process smooth and fun. The blend of chocolate cake and vanilla frosting creates a luscious, soft center while the white candy coating lets you get creative with color. Here’s a quick rundown with my personal tips on what to look for.
- Chocolate cake: Use a moist, freshly baked cake (I prefer my homemade 9 x 13 sheet or two 8-inch rounds) – avoid dry cake as it won’t bind well with frosting.
- Vanilla frosting: A creamy vanilla frosting adds just the right sweetness and stickiness to hold the cake balls together; homemade or good-quality store-bought works great.
- White candy melts or pure white chocolate: Candy melts are easier to work with for coating; if using pure chocolate, temper it carefully for that perfect snap.
- Oil-based candy coloring: This is optional but fantastic for tinting your brains; water-based dyes won’t mix well with chocolate.
- Fruit preserves or dessert sauce: Cherry, raspberry, or strawberry preserves add a spooky “bloody” filling – strain to keep the texture smooth inside your brains.
- Red liquid food coloring: Used to turn your fruit preserves a deep eerie red that mimics real brain matter.
Variations
I love that this Cake Ball Brains Recipe is a blank canvas for your spooky creativity. Over time, I’ve played around with fillings and colors to fit different looks and flavors, and it’s so fun to switch things up.
- Filling swap: One year, I swapped the raspberry preserves for a thick cherry coulis and it was like biting into a deliciously gory surprise that everyone raved about.
- Dairy-free version: Use dairy-free frosting and vegan white chocolate for allergy-friendly treats that don’t skimp on flavor or fun.
- Color twist: I’ve colored the candy shells green or pink once for a mad science vibe, and it looked amazing on the Halloween dessert table.
- Mini brains: Try making mini cake ball brains for bite-size snacks that are perfect for kids or smaller gatherings.
How to Make Cake Ball Brains Recipe
Step 1: Prepping the Cake Base
Start by trimming off the edges of your chocolate cake—you want the soft, tender bits in the center for this. I usually find the edges a bit dry, so tossing them means your cake balls will be nice and moist. Crumble the remaining cake into a large mixing bowl or the bowl of your stand mixer. Add about ¼ cup of vanilla frosting and mix gently at first, then speed up as the cake absorbs the frosting. You’re aiming for soft, moldable dough that sticks together but isn’t too gooey—add a bit more frosting if needed. Once it all clumps into a ball, cover and set aside while you prepare the molds.
Step 2: Making the White Chocolate Brain Shells
If you want colored brains, add a few drops of oil-based candy coloring to your melted white candy coating now—this is my favorite time to unleash some creativity. Using your brain-shaped mold, spoon a small amount of melted chocolate into each cavity, then tilt and rotate the mold to evenly coat every nook and cranny with a thin shell. Wipe away any excess from the edges to keep everything neat. Pop the mold in the freezer for around 5 minutes if you’re using candy melts (they chill fast!), or 15 minutes if you’re working with tempered white chocolate. This firm shell forms the spooky exterior!
Step 3: Adding the Filling and Cake Core
While your shells chill, prepare the “brains” filling by stirring a few drops of red liquid food coloring into your fruit preserves. This boosts the bloody effect and makes the centers look irresistibly eerie. Strain out any seeds or chunks to keep the inside smooth. Using about ¾ teaspoon of filling per cavity, carefully spoon the preserves inside each chocolate shell. Next, pack scoops of your cake-frosting mixture on top of the filling but leave a little room at the top for the final coating layer. Press firmly but gently so everything stays put.
Step 4: Sealing Your Cake Ball Brains
Finish by covering each packed cavity with more melted white candy coating, smoothing it gently to seal in the filling and cake. Make sure to clean any coating around the edges to get a neat finish. Pop the mold back in the freezer for about 5 minutes or the fridge for 10 if using pure white chocolate. Once firm, carefully unmold your edible brains revealing creepy, glossy details that look totally stunning. It’s always a thrill to pull these out of the mold, and my family goes crazy for seeing their surprised reactions!
Pro Tips for Making Cake Ball Brains Recipe
- Don’t Skip Straining the Filling: I learned the hard way that seeds or fruit chunks can make it tricky to seal the brains neatly—strain for a smooth finish every time.
- Use Oil-Based Food Coloring: Water-based colors can cause your candy melts to seize up, so always opt for oil-based dyes when coloring chocolate.
- Adjust Frosting Amount: If your cake feels dry, adding a little extra frosting helps the mixture stick together without getting too sticky or heavy.
- Clean Mold Edges Thoroughly: Wiping off excess coating before chilling results in crisp edges and professional-looking results.
How to Serve Cake Ball Brains Recipe
Garnishes
I like to keep the garnishes simple but festive for my Cake Ball Brains. A drizzle of extra red candy melt or piping gel over the top adds fresh “blood” highlights that make them look even more realistic. Sometimes I sprinkle edible glitter or dust with a little cocoa powder for depth. If it’s a party, setting the brains on a bed of crushed Oreo “soil” gives a creepy graveyard effect that always draws smiles.
Side Dishes
For a full spooky spread, pair these cake ball brains with some dark chocolate bark shards, gummy worms, or ghost-shaped sugar cookies. A hot cup of spiced cider or mulled wine also pairs perfectly to balance the sweetness. If kids are involved, a green “witch’s brew” punch adds to the fun.
Creative Ways to Present
One Halloween, I carved a hollowed-out pumpkin into a creepy display bowl for my cake ball brains, placing them nest-like inside. It made for a dramatic centerpiece! Another time, I placed them on skewers with gummy “veins” wrapped around for a freaky finger food. I encourage you to think outside the box—these cake balls are so versatile and will wow guests no matter how you display them.
Make Ahead and Storage
Storing Leftovers
These Cake Ball Brains store beautifully in an airtight container in the fridge for up to a week. I wrap mine individually in parchment before stacking to keep them from sticking together. When you bring them out, just let them sit a few minutes at room temp for the best flavor and texture—cold white chocolate can dull the flavors a bit.
Freezing
I’ve frozen these successfully wrapped in plastic wrap and stored in airtight containers for up to a month. When you’re ready to enjoy them, thaw slowly in the refrigerator rather than at room temperature to prevent condensation that can dull the chocolate coating’s shine.
Reheating
These treats don’t need reheating, but if your white chocolate looks dull after chilling, warm briefly in your hands or under a soft warm light to bring back some sheen. Avoid using a microwave as it can melt the coating.
FAQs
-
Can I use store-bought cake and frosting for this Cake Ball Brains Recipe?
Absolutely! Store-bought cake and frosting work perfectly if you’re short on time or just want convenience. Just choose a moist cake and smooth frosting for the best results so your cake balls hold together well.
-
What kind of mold do I need to make these cake ball brains?
A silicone brain-shaped mold is ideal as it’s flexible and makes unmolding easy. You can find these online or at party supply stores. If you don’t have one, you could try shaping them by hand, but the molds take the stress out of getting perfect details.
-
Why do I need oil-based coloring for the candy coating?
Oil-based coloring blends seamlessly into chocolate without causing it to seize or become grainy. Water-based dyes can ruin the texture, so oil-based options are essential for tinting candy melts or tempered chocolate.
-
Can I make these Cake Ball Brains in advance?
Yes! They actually taste better after resting a day because the flavors meld. Keep them refrigerated in an airtight container, and bring to room temperature before serving for the best experience.
Final Thoughts
I absolutely love how this Cake Ball Brains Recipe turns out every time—it’s become a beloved tradition in my household for Halloween celebrations. Beyond its spooky appearance, the rich chocolate cake and sweet creamy centers make these irresistible treats. Whether you’re an experienced baker or trying your hand at something new, you’ll find the steps straightforward and the results impressively fun. Go ahead and give these brainy cake balls a try—I promise you’ll be smiling (and maybe a little creeped out) at how cool they look on your dessert table!
Print
Cake Ball Brains Recipe
- Prep Time: 1 hr
- Cook Time: 0 mins
- Total Time: 1 hr
- Yield: 32 brain-shaped cake balls 1x
- Category: No-Cook
- Method: No-Cook
- Cuisine: American
Description
Create spooky and delicious Cake Ball Brains using chocolate cake, vanilla frosting, and creamy white candy coating. These no-bake, fun-to-make treats feature a fruity filling and a smooth candy shell, perfect for Halloween or themed parties.
Ingredients
Cake Ball Mixture
- 1 baked chocolate cake (9 x 13-inch sheet cake or two 8-inch round cakes)
- 1/4 – 1/2 cup vanilla frosting
Candy Coating
- 30–38 ounces melted white candy melts or melted and tempered pure white chocolate
- Optional: black, pink, or green oil-based candy coloring
Filling
- 2/3 cup cherry, raspberry, or strawberry preserves or dessert sauce (approximately 3/4 teaspoon per brain)
- Red liquid food coloring
Instructions
- Prepare Cake Crumbs: Cut the edges off the chocolate cake and discard them. Break the center of the cake into small pieces and place them in a mixing bowl or the bowl of a stand mixer.
- Mix Cake and Frosting: Add ¼ cup of vanilla frosting to the cake crumbs. Mix thoroughly until the mixture holds together in a soft ball. Add more frosting if needed to achieve the right consistency. Set aside.
- Color White Chocolate (Optional): If desired, stir drops of oil-based candy coloring into the melted white candy coating to add color for your white chocolate brains.
- Create Candy Shell: Spoon some melted white chocolate into each cavity of the brain mold. Spread the chocolate evenly to create a thin, smooth shell coating inside each mold. Repeat for all cavities.
- Clean Mold Edges and Chill: Wipe off any excess candy coating from the edges of the mold to ensure a clean finish. Freeze the molds for 5 minutes if using candy melts or refrigerate for 15 minutes if using pure white chocolate.
- Prepare Fruit Filling: Stir a few drops of red liquid food coloring into the fruit preserves. Strain the mixture to remove any fruit pieces or seeds for a smooth filling.
- Fill Brain Cavities: Remove molds from the freezer or refrigerator. Spoon about ¾ teaspoon of the colored fruit filling into each brain cavity.
- Add Cake Ball Mixture: Scoop approximately 2 tablespoons of the cake ball mixture and press it firmly into each brain cavity over the fruit filling. Leave room on top for a candy coating layer.
- Seal with Candy Coating: Spoon more melted white candy coating over each filled cavity to cover the cake ball mixture and smooth out the surface. Wipe off any excess coating from mold edges.
- Final Chill: Freeze for 5 minutes if using candy melts, or refrigerate for about 10 minutes if using pure white chocolate, to set the coating completely.
- Unmold and Serve: Carefully remove the cake ball brains from the molds and place them on a serving tray. Store in an airtight container for up to one week.
Notes
- Use any favorite fruit preserves or dessert sauces; slightly thicker preserves help maintain shape better.
- Oil-based candy coloring is preferred for coloring chocolate as water-based colors may seize the coating.
- Ensure molds are clean from excess chocolate for neat edges and professional appearance.
- Store cake ball brains in an airtight container at room temperature for up to one week to maintain freshness.
- Freezing times may vary slightly depending on the candy coating brand used; adjust chilling time to ensure proper setting.
Nutrition
- Serving Size: 1 brain ball
- Calories: 150
- Sugar: 20g
- Sodium: 70mg
- Fat: 7g
- Saturated Fat: 4g
- Unsaturated Fat: 2g
- Trans Fat: 0g
- Carbohydrates: 22g
- Fiber: 1g
- Protein: 1g
- Cholesterol: 10mg

Your email address will not be published. Required fields are marked *