Description
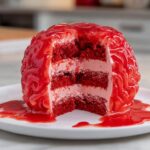
This Brain Cake is a spooky, delicious red velvet cake shaped and decorated to look like an eerie brain, perfect for Halloween or any creepy celebration. Layers of moist red velvet cake are stacked and carved into an oval brain shape, then frosted with creamy pink cream cheese buttercream and finished with a glossy edible fake blood made from raspberry jam for a ghoulishly realistic effect.
Ingredients
Units
Scale
Red Velvet Cake
- 2 1/2 cups cake flour (300g)
- 2 Tbsp unsweetened cocoa powder, sifted (10g)
- 1 tsp baking soda (6g)
- 1/2 tsp fine salt (3g)
- 1/2 cup (1 stick) unsalted butter, room temperature (113g)
- 1 3/4 cups granulated sugar (350g)
- 2 large eggs, room temperature (112g)
- 1 1/4 cups buttermilk, room temperature (300g)
- 1/2 cup vegetable or canola oil (120g)
- 2 tsp vanilla extract or vanilla bean paste (8g)
- 1 tsp white vinegar (4g)
- 1 tsp red gel food coloring or 1 Tbsp liquid food coloring
Cream Cheese Buttercream Frosting
- 1 1/2 cups (3 sticks) unsalted butter, room temperature (339g)
- 1 cup (8 oz) full-fat cream cheese, room temperature (226g)
- 1 Tbsp vanilla extract or vanilla bean paste (12g)
- 1 tsp fine salt (6g)
- 7 cups powdered sugar (904g) or a 2lb. bag
- 3 Tbsp heavy whipping cream, room temperature (45g)
- small squirt of red gel food coloring or 1 tsp liquid food coloring
Edible Fake Blood
- 1/2 cup seedless raspberry or strawberry jam
- 3 Tbsp water (45g)
- 1/4 tsp red gel food coloring or 1 tsp liquid food coloring (optional)
Instructions
- Prepare Cake Pans: Preheat your oven to 350°F (175°C). Grease three 8-inch or 7-inch cake pans with non-stick baking spray and line with parchment paper to ensure easy removal of cakes after baking.
- Mix Dry Ingredients: In a medium bowl, sift together cake flour, cocoa powder, baking soda, and salt. Set this mixture aside for later use.
- Cream Butter and Sugar: In a large bowl or stand mixer fitted with a whisk attachment, beat the butter and granulated sugar on medium-high speed for 1-2 minutes until the mixture lightens in color and is fluffy. Scrape down the sides as needed.
- Add Eggs: Beat in the eggs one at a time on medium speed until fully incorporated.
- Add Wet Ingredients and Coloring: Mix in buttermilk, vegetable oil, vanilla extract, white vinegar, and red gel food coloring on low speed. The mixture may appear separated but will come together when dry ingredients are added.
- Combine Dry and Wet Mixtures: Gradually add the dry ingredients to the wet ingredients in two additions, mixing on low speed until just combined and no flour streaks remain.
- Divide and Bake: Evenly divide the batter among the prepared pans (approximately 415g per pan). Bake for 24-28 minutes until a toothpick inserted in the center comes out with moist crumbs. Let cool in pans for 10 minutes.
- Cool and Remove Cakes: Run a spatula around the edges, then invert the cakes onto a wire rack to cool completely. The layers should be fairly flat, so leveling is optional.
- Shape the Cake: Stack the cooled layers and trim about 1 inch off two sides to create an oval/brain shape. Round off the top edges with a sharp knife. If the layers tear or crumble, chill them in the freezer for about 20 minutes before cutting. Layers can be wrapped and frozen at this point for future use.
- Make Buttercream Frosting: Beat the butter and cream cheese on medium speed until smooth, about 30 seconds, using a paddle attachment. Add vanilla and salt, mixing until combined. On low speed, gradually add powdered sugar and heavy cream, covering the mixer to prevent sugar dust. Adjust consistency by adding more cream or powdered sugar as needed. Add a small amount of red food coloring to color the frosting a light pink. Cover with plastic wrap.
- Prepare Edible Blood: In a small bowl, whisk together the seedless jam, water, and red food coloring until smooth and thin in consistency. Cover and set aside.
- Assemble and Frost Cake: Place the first cake layer on a greaseproof cake board, securing with a dab of frosting. Spread an even layer of frosting between each cake layer as you stack them. Trim the stacked cake as needed to enhance the brain shape. Apply a thin crumb coat of frosting all around the cake and smooth the surface with an offset spatula or acetate sheet. Chill the cake in the fridge for 20 minutes or freezer for 5 minutes until firm.
- Pipe Brain Details: Fill a piping bag fitted with a large round tip with the pink frosting. Draw a center line down the cake to separate hemispheres and pipe squiggly lines across both sides to mimic brain folds. Don’t worry about imperfections as the fake blood will cover these.
- Chill Again: Refrigerate the cake for 30 minutes or freeze for 10 minutes until the frosting is firm to the touch.
- Apply Fake Blood: Using a pastry brush, coat the frosted brain design thoroughly with the jam mixture, making sure to get into all the crevices and around the cake base to create a realistic bloody effect.
- Serve and Enjoy: Let the cake come to room temperature before serving for the best texture and flavor. Store leftovers in the fridge up to 1 week or freeze up to 1 month.
Notes
- The finished cake, after trimming, serves about 20 people.
- To make different sized or tiered brain cakes, use a cake batter calculator to adjust recipe quantities accordingly.
- For convenience, bake the cake layers ahead of time and freeze them; thaw layers before assembling.
- The buttercream frosting can also be made ahead and stored in airtight containers up to a month in the fridge or 3 months in the freezer; stir well when thawed.
- Properly measure flour using a kitchen scale or spoon and level method to ensure cake texture.
- Room temperature ingredients help create a smooth batter and frosting.
- Chilling layers before stacking makes cutting and shaping easier and cleaner.
- Use gel food coloring to preserve frosting and cake texture and avoid bitterness.
- For vegan or dairy-free versions, substitute dairy with plant-based alternatives and use an egg replacer.
- Leftover cake scraps can be repurposed into cake pops, snacks with frosting, or crumbled as ice cream topping; keep them airtight at room temperature for up to 3 days.
- Allow the cake to come to room temperature before slicing for best texture.
Nutrition
- Serving Size: 1 slice (1/20 of cake)
- Calories: 420
- Sugar: 50g
- Sodium: 350mg
- Fat: 20g
- Saturated Fat: 11g
- Unsaturated Fat: 7g
- Trans Fat: 0.5g
- Carbohydrates: 58g
- Fiber: 1g
- Protein: 4g
- Cholesterol: 75mg

