

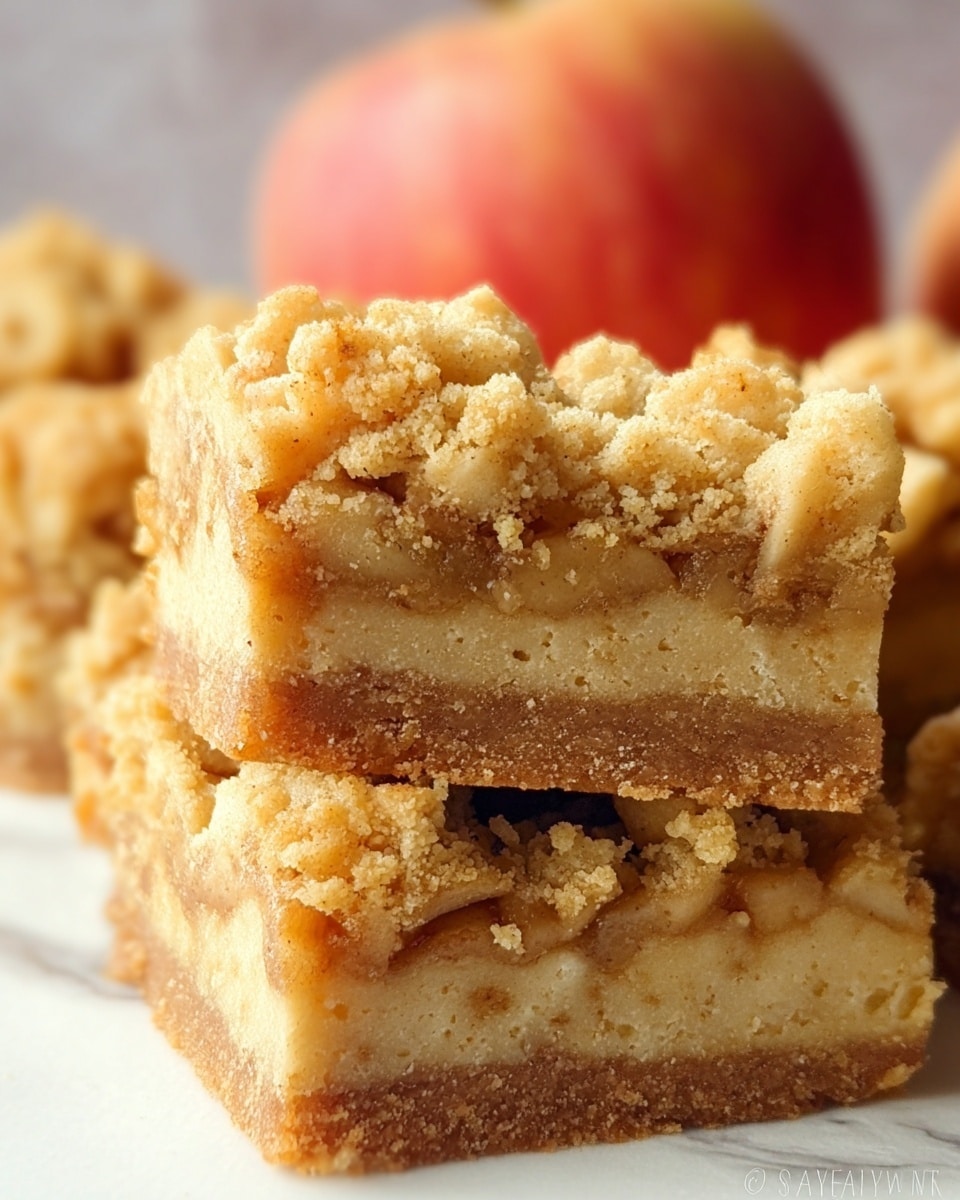
I absolutely love this Apple Pie Bars Recipe because it combines the best of two worlds: the cozy, familiar flavor of apple pie with the convenience of a handheld bar. When I first tried making these bars, I was blown away by how easy they were to pull together and how the buttery crumbly topping perfectly balanced the sweet, cinnamon-spiced apple filling. You’ll find that this recipe works wonderfully as a dessert, snack, or even a special treat to share at family gatherings or potlucks.
What makes this Apple Pie Bars Recipe truly special is how versatile and forgiving it is. You don’t need fancy equipment or complicated steps — just simple ingredients thoughtfully combined to deliver that warm, comforting pie flavor with a quick prep time. Plus, these bars travel well, making them a perfect choice for picnics or lunchboxes when you want a classic taste without the fuss of slicing and plating a traditional pie.
Why You’ll Love This Recipe
- Simple Ingredients: You probably already have everything in your pantry, making it easy to whip up anytime.
- Classic Flavors: The mix of cinnamon, nutmeg, and tender apples hits that nostalgic apple pie note perfectly.
- Perfect Texture: Buttery, crumbly crust meets juicy apple filling for a satisfying bite every time.
- Make-Ahead Friendly: These bars keep well in the fridge or freezer, so you can enjoy them anytime with minimal effort.

Ingredients You’ll Need
These ingredients come together to create that perfect balance between a crisp buttery crust and a warm, spiced apple filling. I recommend using fresh, firm apples for the best texture — Granny Smith or Honeycrisp always work great for this Apple Pie Bars Recipe.
- Apples: Choose firm, slightly tart apples to hold their shape and add brightness to the filling.
- Granulated Sugar: Sweetens both the crust and the apple filling just right without overpowering.
- All-Purpose Flour: The base for the crust and helps thicken the filling; you can substitute with cornstarch in the filling if preferred.
- Lemon Juice: Adds a little zing and keeps the apples from browning while prepping.
- Ground Cinnamon: Essential warm spice that pairs beautifully with apples.
- Ground Nutmeg: Adds a subtle depth to the spices without being too strong.
- Unsalted Butter: Cold and cubed, it creates that crumbly, melt-in-your-mouth crust and topping.
Variations
One thing I love about this Apple Pie Bars Recipe is how easy it is to tweak it to your liking. Whether you want to add some nuts for crunch, switch apples for pears, or make it gluten-free, these bars embrace personalization.
- Nutty Twist: I sometimes sprinkle chopped walnuts or pecans over the apple layer before topping with crumbles — my family goes crazy for that extra texture.
- Gluten-Free Option: Swap the all-purpose flour in the crust and filling with a gluten-free blend; just be mindful the texture will vary slightly.
- Fruity Mix: I’ve added diced pears or even a handful of fresh berries to the apple filling for a seasonal spin, and it tastes fantastic.
- Spice it Up: Experiment with adding a pinch of ground ginger or cloves for a deeper spice flavor if you like it extra cozy.
How to Make Apple Pie Bars Recipe
Step 1: Prepare Your Pan and Apples
Preheat your oven to 350°F (177°C) and grease an 8-inch square baking dish. I always line mine with parchment paper, leaving about two inches of overhang on each side. This little trick makes lifting the bars out so much easier once they’re baked and cooled. Then, peel, core, and chop your apples into small cubes—nothing too big or they’ll not cook evenly.
Step 2: Mix the Apple Filling
In a medium bowl, toss the chopped apples with lemon juice, sugar, flour (or cornstarch), cinnamon, and nutmeg. I discovered this trick of adding a little flour to thicken the juices as the apples bake, preventing your bars from getting soggy. Set this aside and get ready for the crust.
Step 3: Make the Crust and Crumble Topping
Combine flour, sugar, and cinnamon in a large bowl. Add the cold, cubed butter on top, then cut it into the flour mixture using either two forks, a pastry blender, or your fingertips — I find rubbing the butter with fingertips works fastest, but watch your hands don’t warm the butter too much. You want crumbly pieces that range from pea to breadcrumb size, which gives a great texture both at the base and the top crumble.
Step 4: Assemble Your Apple Pie Bars
Spread about two-thirds of the crumble mixture evenly into your prepared baking dish. To avoid the mixture sticking to your spoon, lightly flour it or just use your hands to press the crust down firmly and evenly. Next, add the apple filling over the crust, spreading gently to cover. Finally, sprinkle the remaining crumble mixture on top, squeezing some bits together with your hands to make larger crumbles — this gives a beautiful golden topping after baking.
Step 5: Bake and Cool
Bake for about 55 minutes until the top is golden brown and the apple filling is bubbling around the edges. Let it cool completely — I usually leave mine at room temperature for 1 to 1.5 hours. If you’re in a hurry, popping it in the freezer for a short time helps speed up cooling without messing up the texture. Once cool, use the parchment to lift the bars from the pan and cut into 16 pieces. Trust me, waiting for it to cool is worth it — the bars slice cleanly and hold together beautifully.
Pro Tips for Making Apple Pie Bars Recipe
- Use Cold Butter: Cold butter is key for that crumbly texture — it melts during baking to create perfect pockets of buttery goodness.
- Don’t Skip Lemon Juice: It brightens the apples and keeps them from turning brown as you prep the filling.
- Flour Your Spoon: When spreading the crust, flour your spoon or hands to prevent sticking and achieve an even layer easily.
- Cool Completely Before Slicing: This avoids crumbling and helps bars keep their shape — patience pays off here!
How to Serve Apple Pie Bars Recipe
Garnishes
I love topping these bars with a dusting of powdered sugar or a drizzle of caramel sauce for extra sweetness and presentation flair. Sometimes, a scoop of vanilla ice cream alongside warm bars turns this simple treat into an unforgettable dessert experience.
Side Dishes
Pair these apple pie bars with a hot cup of coffee or chai tea to complement the spices. For a brunch spread, they work wonderfully alongside scrambled eggs or a cheese board to offer a sweet note.
Creative Ways to Present
For holiday gatherings, I’ve laid the bars out on a wooden board with apple slices, cinnamon sticks, and fresh rosemary sprigs for a rustic look. Another fun idea is to cut the bars into mini squares and serve them on cocktail sticks for bite-sized treats at parties.
Make Ahead and Storage
Storing Leftovers
I store leftover apple pie bars in an airtight container in the fridge, where they stay fresh for up to 4 days. If you want to keep them longer, just make sure they’re completely cooled before sealing to avoid sogginess.
Freezing
I often freeze these bars for up to 3 months — just wrap them tightly in plastic wrap and then foil or use freezer-safe containers. When you’re ready to enjoy them, thaw in the fridge overnight for the best texture.
Reheating
To reheat, I pop the bars in a warm oven (about 300°F/150°C) for 10-15 minutes to freshen up the crust’s crunch without drying out the filling. A quick zap in the microwave works too if you’re in a pinch, but it won’t keep the crumble as crisp.
FAQs
-
Can I use different types of apples in the Apple Pie Bars Recipe?
Absolutely! While tart varieties like Granny Smith work best to balance sweetness and hold shape, feel free to mix in sweeter apples like Fuji or Honeycrisp for a more complex flavor. Just make sure your apples are firm to avoid a mushy filling.
-
Is it okay to substitute cornstarch for flour in the apple filling?
Yes, cornstarch is a great alternative for thickening the filling and can make the texture a bit more glossy. I sometimes use it when I want a clearer filling without any floury look or taste.
-
Can I make this recipe gluten-free?
You can try using a gluten-free flour blend for both the crust and apple filling thickener. Keep in mind, the texture might differ slightly, but it still turns out delicious! Also, ensure your baking powder and other ingredients are gluten-free certified.
-
How do I prevent the bars from becoming soggy?
The key is to add enough flour or cornstarch to your apple filling to soak up excess juice. Also, letting the bars cool completely before slicing helps them set firmly and avoids crumbling or sogginess.
Final Thoughts
This Apple Pie Bars Recipe holds a special place in my kitchen for its simplicity, flavor, and nostalgia all rolled into one easy treat. Whenever I make them, I’m reminded of cozy family gatherings and the joy of sharing something homemade. I hope you’ll enjoy baking and eating these bars as much as I do — they’re truly a little slice of apple pie happiness without the fuss.
Print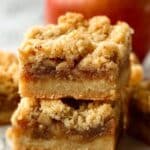
Apple Pie Bars Recipe
- Prep Time: 20 minutes
- Cook Time: 55 minutes
- Total Time: 1 hour 15 minutes
- Yield: 16 bars 1x
- Category: Dessert
- Method: Baking
- Cuisine: American
Description
These Apple Pie Bars are a delightful twist on the classic dessert, combining a buttery crumb crust with a spiced apple filling. Perfectly balanced with cinnamon and nutmeg, they’re easy to make and bake in a single dish, resulting in portable, sliceable bars with a golden crunchy topping and tender apple center.
Ingredients
Apple Filling
- 550 g (4 and 1/2 cups, about 4 medium) chopped cubed apples
- 30 g (2 tablespoons) granulated sugar
- 25 g (2 tablespoons and 1 teaspoon) all-purpose flour (or 1 tablespoon cornstarch as alternative)
- 2 teaspoons lemon juice
- 1 teaspoon ground cinnamon
- 1/4 teaspoon ground nutmeg
Crust & Crumbles
- 280 g (2 cups) all-purpose flour (dip and sweep method)
- 185 g (3/4 cup and 1 tablespoon) unsalted butter, cold, cut into small cubes
- 105 g (1/2 cup) granulated sugar
- 1 teaspoon ground cinnamon
Instructions
- Preheat and Prepare the Dish: Preheat your oven to 350°F (177°C). Grease an 8 inch (20 cm) square oven-proof dish and line the bottom and sides with parchment paper, allowing about 2 inches (5 cm) of overhang on each side for easy removal of the bars later.
- Prepare the Apple Filling: Peel, core, and chop the apples into small cubes. Place them in a medium bowl, then toss with lemon juice, granulated sugar, all-purpose flour (or cornstarch), ground cinnamon, and ground nutmeg to coat evenly. Set this mixture aside.
- Make the Crust & Crumble Mixture: In a large bowl, combine the flour, ground cinnamon, and granulated sugar. Add the cold cubed butter and blend it into the flour mixture by using two forks, a pastry blender, or rubbing with fingertips until the mixture resembles coarse crumbs.
- Assemble the Bars: Spread two-thirds of the crumb mixture evenly into the bottom of the prepared dish, using a lightly floured spoon or your hand. Spread the apple filling evenly over this base. Sprinkle the remaining one-third of the crumb mixture over the apple layer, pressing some down gently to form larger crumbles for texture.
- Bake: Bake the assembled bars in the preheated oven for about 55 minutes, or until the top is golden brown and the crumb topping is crunchy.
- Cool and Slice: Allow the bars to cool completely at room temperature for 1 to 1.5 hours. For faster cooling, place the bars in the freezer after initial cooling. Once fully cooled, use the parchment paper overhang to lift the bars from the dish and transfer to a cutting board. Cut into 16 squares.
- Storage: Store the apple pie bars in an airtight container in the refrigerator for up to 4 days, or freeze for up to 3 months.
Notes
- You can substitute 1 tablespoon of cornstarch for the 2 tablespoons and 1 teaspoon of all-purpose flour in the apple filling for a thicker filling.
- The dip and sweep method for measuring flour involves dipping your measuring cup into the flour and then sweeping off the excess with a knife for accurate measurement.
- The bars are best enjoyed fully cooled to allow the filling to set properly.
- Use cold butter cubed for the crust mixture to ensure a crumbly, tender texture.
- For ease of slicing, use the parchment paper edges to lift the whole bar slab from the baking dish.
Nutrition
- Serving Size: 1 bar
- Calories: 205
- Sugar: 15 g
- Sodium: 40 mg
- Fat: 9 g
- Saturated Fat: 5 g
- Unsaturated Fat: 3 g
- Trans Fat: 0 g
- Carbohydrates: 30 g
- Fiber: 3 g
- Protein: 2 g
- Cholesterol: 25 mg

Your email address will not be published. Required fields are marked *