

If you’re anything like me and you just can’t decide between cookies or brownies, this Chocolate Chip Cookie Brownie Bars Recipe is going to feel like a dream come true. Imagine thick, fudgy brownie layers topped with gooey chocolate chip cookie dough — it’s the perfect mashup that hits all the right notes every time. I absolutely love how this turns out because it’s got that rich chocolatey punch alongside sweet, chewy cookie bites. Stick with me, and I’ll share everything you need to know to get these irresistibly delicious bars on your table.
Why You’ll Love This Recipe
- Two Classics in One: You get the best of chewy chocolate chip cookies and fudgy brownies all in one bite.
- Simple Ingredients: Nothing fancy, just pantry staples that come together easily for a crowd-pleaser.
- Perfect Texture: Soft, gooey center with slightly crisp edges — just like you want in a brookie.
- Family Favorite: My family goes crazy for these bars whether it’s snack time or dessert, and I’m confident yours will too.

Ingredients You’ll Need
You’ll find that the ingredients here are pretty straightforward but the real magic is in how they come together. Make sure to soften your butter well and use good-quality cocoa powder for that deep chocolate flavor that makes the brownie layer shine.
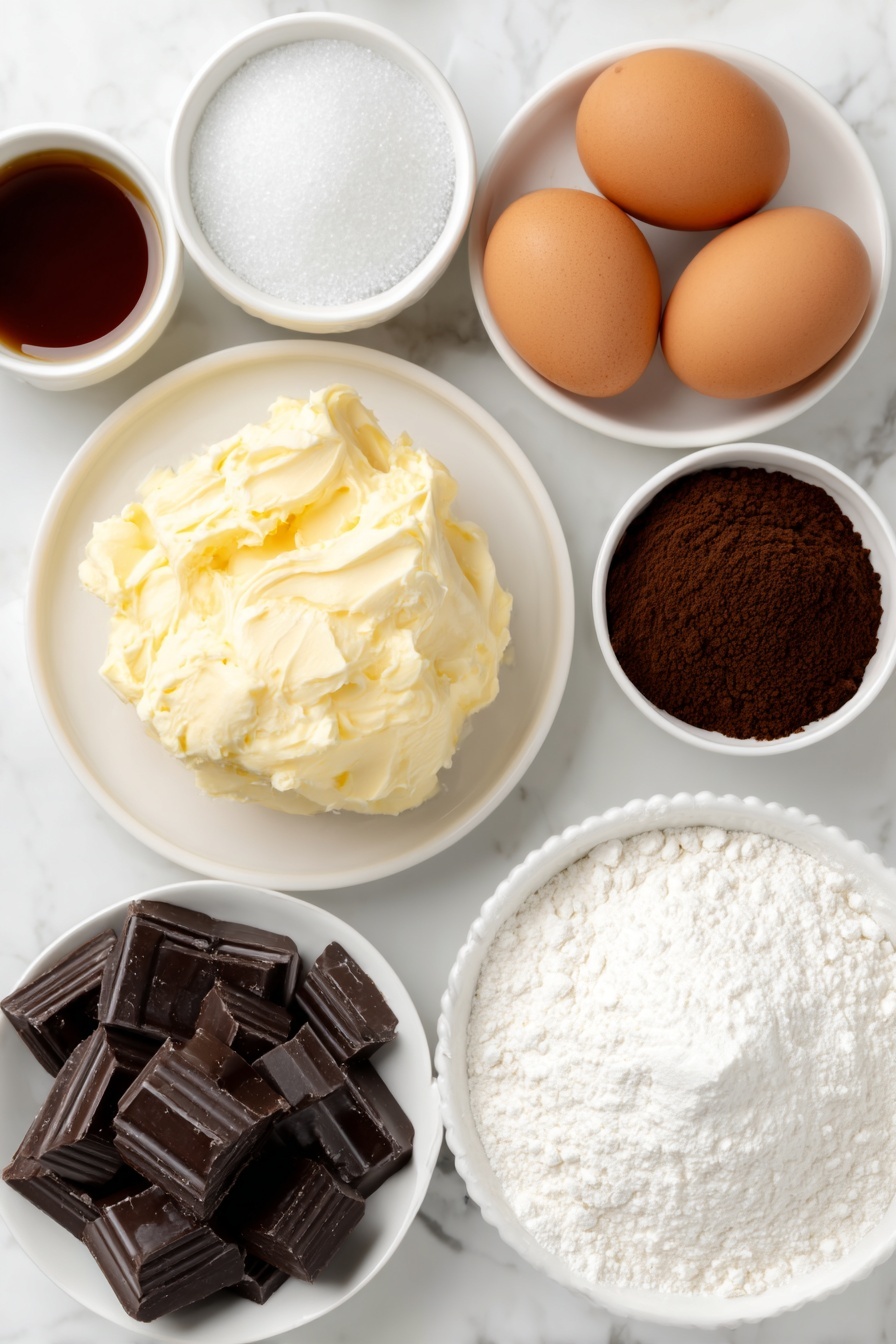
- Butter: Softened butter works best so it creams smoothly with your sugars, creating that tender texture in both layers.
- Sugar and Brown Sugar: A combo of both gives sweetness plus chewiness—brown sugar keeps the cookie layer moist and slightly caramel-y.
- Eggs: They bind everything beautifully and add moisture; I like adding them one at a time for perfect batter consistency.
- Vanilla Extract: It’s subtle but essential — makes the flavors pop without stealing the spotlight.
- Unsweetened Cocoa Powder: This packs in the chocolate for the brownie part without being too sweet or oily.
- Flour: All-purpose flour keeps the structure balanced—too much and your bars become cakey, too little and they’re gooey but may fall apart.
- Baking Soda & Salt: These are your leavening and flavor enhancers; don’t skip them to keep the brookies light and flavorful.
- Chocolate Chips (plus chunks if you like): You can never have too much chocolate! I love folding chips into both layers and sprinkling chunks on top for extra richness.
Variations
I love making this Chocolate Chip Cookie Brownie Bars Recipe my own depending on the occasion. Feel free to toss in walnuts if you like a bit of crunch or swap out half the semi-sweet chips for white chocolate for a sweeter twist. And if you want to go gluten-free, using a blend-specific flour works surprisingly well here.
- Nutty Brookies: Adding chopped walnuts or pecans gives a lovely crunch – my family always asks me to add these when they’re around!
- Double Chocolate: Swap some chocolate chips for chunks or chunks of dark chocolate for a richer experience that’s perfect for serious chocoholics.
- Gluten-Free Option: Use a 1:1 gluten-free flour blend and keep an eye on baking time as it may vary slightly.
- Peanut Butter Swirl: A little swirl of peanut butter in the brownie batter is my secret indulgence — trust me on this one.
How to Make Chocolate Chip Cookie Brownie Bars Recipe
Step 1: Whip up the fudgy brownie base
Start by preheating your oven to 350°F (175°C). Grab a large bowl and cream together the softened butter with both sugars until light and fluffy—this takes about 3-4 minutes with an electric mixer and makes all the difference for the texture. Then, add eggs one at a time, mixing well after each, and stir in vanilla. Next, whisk together your cocoa powder, flour, baking soda, and salt in a separate bowl before folding them into your wet ingredients. Lastly, gently mix in the chocolate chips. Pour this luscious brownie batter into a 9×13-inch aluminum pan — I say aluminum because glass tends to make these take longer and bake unevenly. Spread it out evenly but don’t stress about perfection here; the cookie dough layer on top will cover it nicely.
Step 2: Dollop on that cookie dough goodness
In a clean bowl, cream your butter with the sugars again for the cookie layer. Add the egg and vanilla, mixing until smooth, then stir in flour, baking soda, and salt. Fold in chocolate chips, then drop spoonfuls of the cookie dough all over the brownie batter. The key is to cover most of the surface but don’t worry if you see brownie peeking through here and there — it bakes beautifully like that. This combination is what makes these bars so special.
Step 3: Bake and sprinkle for perfection
Bake for about 28-32 minutes, checking around the 25-minute mark. You want the edges to be set but the center still soft—a perfect chewy-ooey balance. If you’re adding milk chocolate chunks on top, sprinkle them over the bars in the last 5 minutes of baking so they melt just right and look glossy. Once baked, resist the urge to cut right away! Let the pan cool completely, then pop it in the freezer for 20-30 minutes to make slicing cleaner and easier.
Pro Tips for Making Chocolate Chip Cookie Brownie Bars Recipe
- Use Aluminum Over Glass: I learned this the hard way—glass pans can make edges crisp too fast and centers undercooked. Aluminum pans distribute heat evenly, giving you that soft, chewy middle.
- Cream Butter and Sugars Well: Don’t rush this step! Creaming until fluffy traps air which helps the texture in both layers.
- Chill Before Cutting: Freezing the bars for about half an hour made cutting so much cleaner and prevented crumbly edges for me.
- Check Baking Time Carefully: Because ovens vary, start peeking at 25 minutes to avoid overbaking – you want that perfect soft center.
How to Serve Chocolate Chip Cookie Brownie Bars Recipe

Garnishes
When I serve these, a light dusting of powdered sugar or a drizzle of caramel sauce really ups the wow factor. If you want to get truly fancy, a scoop of vanilla ice cream on the side turns these bars into an unforgettable dessert that your guests will rave about.
Side Dishes
These bars stand beautifully on their own but pair wonderfully with a cup of coffee or a cold glass of milk. For a touch of freshness, I like serving them alongside fresh berries or a simple fruit salad to balance all that richness.
Creative Ways to Present
For birthdays or celebrations, I’ve laid them out on a wooden board with ramekins of assorted dipping sauces like melted chocolate, peanut butter, or raspberry jam. It makes for a fun “dip and bite” dessert experience. You can also cut them into bite-sized squares and serve with little forks or picks for parties—it’s super popular with kids!
Make Ahead and Storage
Storing Leftovers
Once cooled, I keep leftover bars in an airtight container at room temperature for up to 3 days. If you want to keep them fresh longer, store them in the fridge – they stay moist longer but might firm up a bit, which some people actually prefer.
Freezing
I usually freeze these bars individually wrapped in plastic wrap and then all together in a freezer-safe bag. They freeze beautifully for up to 3 months, so you can always have a guilty pleasure stash ready for unexpected cravings.
Reheating
To enjoy leftovers warm, I pop one bar on a microwave-safe plate for about 15-20 seconds. This softens the brownie and cookie layers perfectly without drying them out. You could also warm in a 300°F oven for 5-7 minutes wrapped in foil if you prefer a more even heat.
FAQs
-
Can I use a glass pan instead of aluminum for this Chocolate Chip Cookie Brownie Bars Recipe?
While you technically can, I don’t recommend it. Glass pans tend to conduct heat differently, often resulting in burnt edges and underbaked centers for this recipe. Aluminum pans give you more even cooking and a better texture overall.
-
Can I make the brownie and cookie layers ahead of time?
You can prepare the brownie batter a day ahead and keep it covered in the fridge. The cookie dough can also be made in advance. However, for best results, combine and bake both layers fresh to preserve their texture and moisture.
-
Do I have to add chocolate chips to both layers?
No, it’s not mandatory but the chocolate chips add wonderful pockets of melty chocolate throughout. You could skip them in one layer or swap for nuts or chunks depending on your preference.
-
Will this recipe work gluten-free?
Yes! Just substitute the all-purpose flour with a 1:1 gluten-free baking flour blend. Expect a slightly different texture, but it still bakes up delicious and fudge-y.
Final Thoughts
I discovered this Chocolate Chip Cookie Brownie Bars Recipe when I wanted the best of both worlds for dessert—and let me tell you, it’s been a game changer in my kitchen ever since. It’s that perfect “treat yourself” balance of gooey, chewy, and chocolatey that’s universally loved. Whether you’re baking for family, a party, or just to satisfy your sweet tooth, I hope you enjoy making and eating these as much as I do. Give it a try and watch these brookies disappear fast!
Print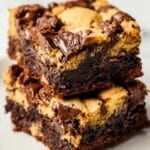
Chocolate Chip Cookie Brownie Bars Recipe
- Prep Time: 20 minutes
- Cook Time: 30 minutes
- Total Time: 50 minutes
- Yield: 20 bars 1x
- Category: Dessert
- Method: Baking
- Cuisine: American
Description
Delicious Brookies combine the rich, fudgy texture of brownies with the classic chewiness of chocolate chip cookies in one irresistible layered bar. Perfectly baked in a 9×13 pan, these bars feature a dense brownie layer topped with a generous dollop of chocolate chip cookie dough and optional milk chocolate chunks for extra indulgence.
Ingredients
Brownie Layer
- 3/4 cup Butter (softened)
- 1 cup Sugar
- 1/3 cup Brown Sugar
- 2 large Eggs
- 1 teaspoon Vanilla Extract
- 1/2 cup Unsweetened Cocoa Powder
- 1 cup All-purpose Flour
- 1/2 teaspoon Baking Soda
- 1/4 teaspoon Salt
- 1/2 cup Chocolate Chips (optional)
Chocolate Chip Cookie Layer
- 1/2 cup Butter (softened)
- 3/4 cup Brown Sugar
- 1/4 cup Sugar
- 1 large Egg
- 1 teaspoon Vanilla Extract
- 1 1/4 cups All-purpose Flour
- 1/2 teaspoon Baking Soda
- 1/2 teaspoon Salt
- 1 cup Chocolate Chips
- Milk chocolate chunks (optional, for topping)
Instructions
- Preheat Oven: Preheat your oven to 350 degrees Fahrenheit (175 degrees Celsius). Prepare a 9×13-inch aluminum baking pan; avoid glass pans to ensure even baking and prevent hard edges.
- Make Brownie Batter: In a large mixing bowl, cream together 3/4 cup softened butter, 1 cup sugar, and 1/3 cup brown sugar for 3-4 minutes until the mixture is light and fluffy. Add 2 eggs one at a time, mixing thoroughly after each addition. Stir in 1 teaspoon vanilla extract.
- Combine Dry Ingredients for Brownie: Sift or whisk together 1/2 cup unsweetened cocoa powder, 1 cup all-purpose flour, 1/2 teaspoon baking soda, and 1/4 teaspoon salt. Gradually incorporate these into the butter mixture until just combined. Fold in 1/2 cup chocolate chips if using. Spread the batter evenly in the prepared pan.
- Make Chocolate Chip Cookie Dough: In another large bowl, cream 1/2 cup softened butter with 3/4 cup brown sugar and 1/4 cup sugar for 3-4 minutes. Add 1 large egg and 1 teaspoon vanilla extract, mixing for an additional minute.
- Combine Dry Ingredients for Cookie Dough: Mix 1 1/4 cups all-purpose flour, 1/2 teaspoon baking soda, and 1/2 teaspoon salt. Gradually stir these into the creamed butter mixture until combined. Fold in 1 cup chocolate chips.
- Assemble Brookies: Drop spoonfuls of the chocolate chip cookie dough evenly over the brownie batter layer, covering as much surface as possible.
- Bake: Bake for 28 to 32 minutes until the edges of the bars begin to set up. If using milk chocolate chunks, sprinkle them on top during the last 5 minutes of baking.
- Cool and Slice: Remove from oven and allow to cool completely in the pan. For easier cutting, place the baked bars in the freezer for 20-30 minutes before slicing into bars.
Notes
- DO NOT use a glass pan as it causes longer baking time, resulting in hard edges and an underbaked center.
- For best texture, use an aluminum pan for baking.
- Cooling completely before slicing ensures clean cuts and ideal texture.
- Freezing before slicing makes it easier to cut neat bars.
Nutrition
- Serving Size: 1 bar (approximately)
- Calories: 280
- Sugar: 20g
- Sodium: 130mg
- Fat: 14g
- Saturated Fat: 8g
- Unsaturated Fat: 5g
- Trans Fat: 0.1g
- Carbohydrates: 35g
- Fiber: 2g
- Protein: 3g
- Cholesterol: 50mg

Your email address will not be published. Required fields are marked *