

If you’re looking for a dinner that hits all the right notes—creamy, tangy, and packed with bold flavor—then you’ve come to the right place. I absolutely love this Creamy Pepperoncini Chicken Recipe because it’s quick to pull together, yet it feels special enough to impress anyone at your table. With juicy chicken breasts swimming in a luscious sauce brightened by pickled pepperoncinis, you’re in for a real treat that’s both comforting and exciting. Keep reading, and I’ll walk you through every step to make sure your dinner turns out just right.
Why You’ll Love This Recipe
- Speedy Weeknight Favorite: You’ll have dinner on the table in just about 35 minutes, even after prepping everything.
- Balance of Flavors: The tangy pepperoncini juice perfectly cuts through the creamy sauce for a delicious harmony.
- Adaptable for Dietary Needs: I made sure this recipe is fantastic whether you’re dairy-free or not, with easy swaps.
- Crowd-Pleaser: My family goes crazy for this— it’s rich but never overwhelming, making it a repeat recipe in our house.

Ingredients You’ll Need
The magic of this Creamy Pepperoncini Chicken Recipe lies in its simple but harmonious ingredients. Each one plays a key part in crafting that tangy, silky sauce that clings so beautifully to the chicken. When you shop, aim for fresh chicken breasts and a good-quality jar of pepperoncinis with tasty brine—that tangy juice makes all the difference!
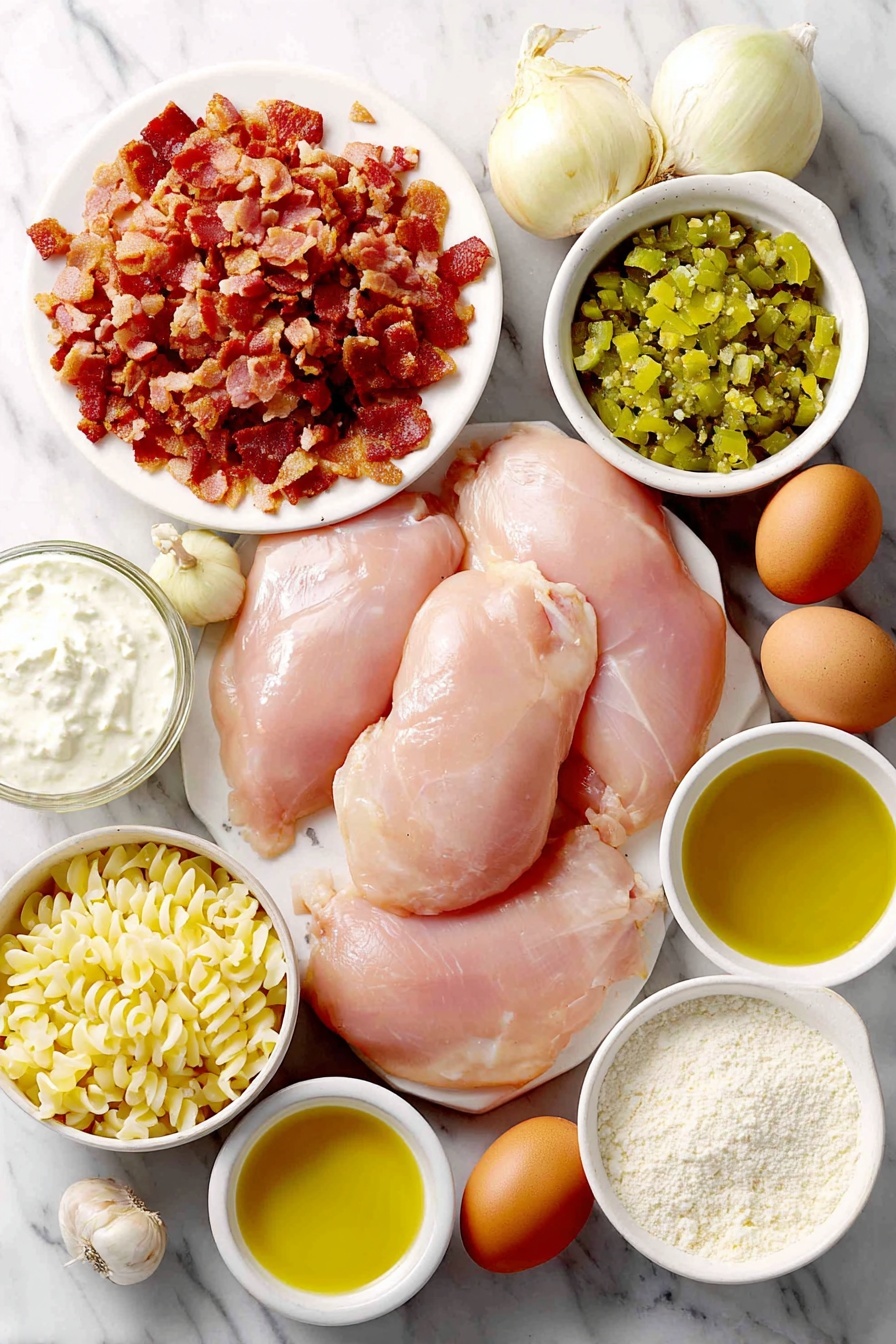
- Chicken breasts: Opt for boneless, skinless breasts for quick cooking and easy slicing; pat them dry before seasoning to get a nice sear.
- Italian seasoning: A blend that adds herbal warmth without overpowering the flavor.
- Olive or avocado oil: Both work well for searing; avocado oil has a higher smoke point if you want to be extra safe.
- Dairy-free butter: Adds richness and depth when cooking aromatics—can substitute with regular butter if you’re not dairy-free.
- Shallot: Softer and sweeter than onions, it mellows the garlic and builds flavor in the sauce.
- Garlic: Freshly minced, because nothing beats that punch of garlicky goodness.
- Pepperoncinis and their juice: The stars of this dish—don’t skip on the brine; it’s the secret to brightness!
- Chopped bacon: Crispy, smoky bits that add texture and umami.
- Coconut milk or heavy cream: Coconut milk keeps it dairy-free but creamy, while heavy cream ups the decadence if you’re not avoiding dairy.
- Chicken broth: A little extra liquid to build the sauce and keep it flavorful.
- Dairy-free sour cream or Greek yogurt: Both add tanginess and a velvety finish to the sauce.
- Gluten-free flour: For thickening without gluten—regular flour works too if you’re not gluten-free.
- Smoked paprika (optional): A subtle smoky note that pairs beautifully with the bacon.
- Fresh parsley: For a fresh, bright garnish at the end.
Variations
What I love about the Creamy Pepperoncini Chicken Recipe is how easy it is to make your own mark on it. Over the years, I’ve tweaked it a bit to accommodate different palates and preferences, and each time it’s come out mouthwatering. Don’t be afraid to experiment and make it fit your own kitchen style!
- Dairy Swap: When I first found out someone at my table needed dairy-free options, switching to full-fat coconut milk and dairy-free sour cream kept the sauce just as creamy and dreamy.
- Extra Heat: If you like spice, I sometimes add a pinch of red chili flakes or swap out some pepperoncinis for hot cherry peppers—adds a fantastic kick.
- Herb Boost: Throw in fresh thyme or rosemary if you have them on hand for an herby aroma that elevates the dish even more.
- Slow Cooker Version: For busy days, I’ve adapted this by layering the ingredients in a slow cooker and letting it simmer all afternoon—results are tender chicken and a rich sauce that’s perfect for meal prep.
How to Make Creamy Pepperoncini Chicken Recipe
Step 1: Season and Sear the Chicken
First things first: pat those chicken breasts dry with a paper towel—that step helps you get a beautiful golden crust instead of steaming them in the pan. Sprinkle both sides evenly with salt, pepper, and Italian seasoning. Heat your oil of choice in a large skillet over medium-high heat. When hot, add the chicken and let it sear undisturbed for about 5 to 6 minutes on each side. You want a deep golden color, which locks in juices and creates flavor. Once seared, transfer the chicken to a plate and set aside—the sauce is coming next.
Step 2: Cook the Bacon and Sauté Aromatics
In that same skillet, toss in the chopped bacon. Cook until it’s crispy and releases all its smoky goodness. Remove the bacon and place it on a paper towel-lined plate to drain excess grease—don’t discard that leftover fat just yet! Lower the heat to medium and add your dairy-free butter to the skillet. Once melted, add chopped shallots and sauté until softened—about 2-3 minutes. Then toss in the minced garlic and chopped pepperoncinis, cooking for another 1-2 minutes until you can smell their beautiful aroma filling the kitchen. This base is where all that tangy, savory love builds.
Step 3: Build the Creamy Sauce
Sprinkle the gluten-free flour evenly over your aromatics and stir constantly for 1-2 minutes. This step cooks out the raw flour taste while helping create a smooth roux to thicken your sauce. Slowly pour in chicken broth while whisking vigorously to avoid lumps—this gradual mixing helps your sauce stay silky. Stir in pepperoncini brine, dairy-free milk, and sour cream or Greek yogurt, whisking until everything is blended and irresistibly creamy. Add smoked paprika if you like that little smoky nuance, and a touch more Italian seasoning for depth. Taste and adjust salt and pepper — the tanginess and creaminess should be perfectly balanced.
Step 4: Finish and Simmer
Return your seared chicken breasts back to the skillet, nestling them gently in the sauce. Spoon some of that saucy goodness over the top. Lower the heat to a simmer, cover loosely, and let the chicken cook through—about 8-10 minutes or until it reaches an internal temp of 165°F (75°C). Near the end, sprinkle your perfectly crispy bacon over the chicken and sauce to add an irresistible crunch and smoky layer. Then it’s time to plate it up!
Pro Tips for Making Creamy Pepperoncini Chicken Recipe
- Perfect Searing: Make sure your skillet and oil are hot before adding chicken. A good sear locks in moisture and flavor, so resist the temptation to move the chicken around too soon.
- Use the Brine Wisely: I discovered this trick after many tries—the pepperoncini juice brings an amazing brightness but can easily overpower if too much is added. Measure it carefully and add gradually, then taste as you go.
- Sauce Consistency Control: If your sauce feels too thick, add a splash more chicken broth; if it’s too thin, stir in a little extra flour mixed with water to thicken without clumps.
- Don’t Skip Resting: Let the finished chicken rest 5 minutes before serving. This keeps it juicy and allows the sauce flavors to really meld.
How to Serve Creamy Pepperoncini Chicken Recipe

Garnishes
I always love to sprinkle fresh parsley on top before serving—it adds a pop of color and freshness that brightens the whole dish. Extra pepperoncinis on the side are perfect if you want to dial up the tanginess. Sometimes, I even add a light squeeze of fresh lemon juice if the sauce needs a little extra zing.
Side Dishes
My go-to pairings for this recipe are simple but satisfying: gluten-free pasta tossed with olive oil, steamed rice, or roasted vegetables like asparagus or green beans. You really can’t go wrong because the sauce is so rich and flavorful—it’s the star that ties everything together.
Creative Ways to Present
For special occasions, I like to serve this chicken on a bed of creamy polenta or even mashed potatoes for an indulgent twist. Drizzling additional sauce over the presentation plate and garnishing with fresh herbs and crispy bacon crumbles creates an elegant look that impresses guests without extra fuss in the kitchen.
Make Ahead and Storage
Storing Leftovers
I usually store leftover creamy pepperoncini chicken in an airtight container in the fridge for up to 3 days. The sauce thickens a bit when chilled, so it’s important to stir it before reheating.
Freezing
This recipe freezes surprisingly well! I freeze the chicken and sauce together in a freezer-safe container for up to 2 months. To thaw, just pop it in the fridge overnight. This makes it great for meal prep or saving a special meal for a busy day.
Reheating
When it’s time to enjoy leftovers, I gently warm the dish on the stovetop over low heat or in the microwave with a splash of chicken broth to loosen the sauce. Stir often to keep the sauce silky and prevent it from drying out. It almost tastes like fresh, promise!
FAQs
-
Can I make this Creamy Pepperoncini Chicken Recipe gluten-free?
Absolutely! The recipe includes a gluten-free flour for thickening, but you can also opt for other gluten-free starches like arrowroot or cornstarch if you prefer. Just whisk them in slowly to avoid lumps.
-
What can I substitute if I don’t have pepperoncinis?
If you can’t find pepperoncinis, mild banana peppers or pickled pepper slices are good alternatives. Just be sure to include some of their pickling brine to maintain that signature tang in the sauce.
-
Is there a way to make this recipe dairy-free?
Yes, swap the butter for dairy-free butter, use coconut milk or any non-dairy milk, and replace sour cream with a dairy-free sour cream or full-fat coconut yogurt. The creamy texture and flavor remain delicious.
-
Can I prepare this dish in a slow cooker?
You sure can! After searing the chicken and cooking the bacon, place everything including the sauce ingredients into the slow cooker. Cook on low for 4-5 hours or until chicken is tender and cooked through. Just remember to stir in the flour mixed with broth toward the end to thicken the sauce if needed.
Final Thoughts
This Creamy Pepperoncini Chicken Recipe holds a special place in my kitchen because it combines simple ingredients into a dish that feels both comforting and a little adventurous. When I first tried it, I was amazed at how the pepperoncini brine lifted the creaminess and gave the dish a zest that keeps everyone reaching for seconds. Giving this recipe a try is like inviting a bright, flavorful hug to your dinner table—I honestly can’t recommend it enough. I hope you enjoy making it as much as I do, and that it becomes one of your new favorites too!
Print
Creamy Pepperoncini Chicken Recipe
- Prep Time: 5 minutes
- Cook Time: 30 minutes
- Total Time: 35 minutes
- Yield: 4 servings 1x
- Category: Main Course
- Method: Stovetop
- Cuisine: American
- Diet: Gluten Free
Description
This Easy Creamy Pepperoncini Chicken recipe features tender seared chicken breasts simmered in a tangy, flavorful creamy sauce made with pickled pepperoncinis, garlic, bacon, and dairy-free ingredients. Perfect for a quick yet impressive meal, it’s versatile to serve over gluten-free pasta, rice, or roasted vegetables, offering a rich and zesty comfort dish with a dairy-free option.
Ingredients
Chicken
- 4 boneless skinless chicken breasts
- 1 teaspoon Italian seasoning
- Salt and pepper to taste
Chicken Skillet and Sauce
- 1 tbsp olive oil or avocado oil
- 2 tbsp dairy-free butter
- 1 large shallot, finely chopped
- 3–4 cloves garlic, minced
- 1/2 cup chopped pickled pepperoncinis (add more to taste)
- 2–3 tbsp pepperoncini juice or brine
- 1/4 tsp garlic powder
- 3–4 slices bacon, chopped
- 1 cup coconut milk or dairy-free milk of choice (substitute heavy cream if not dairy-free)
- 1 cup chicken broth (add 2 additional tbsp if needed to thin sauce)
- 1/2 cup dairy-free sour cream or Greek yogurt (if not dairy-free)
- 2 1/2–3 tbsp gluten-free flour
- 1/2 tsp Italian seasoning
- 1/2 tsp smoked paprika (optional)
- Salt and pepper to taste
- Fresh parsley for garnish
Instructions
- Season and Sear the Chicken: Pat the chicken breasts dry with a paper towel. Season both sides evenly with salt, pepper, and Italian seasoning. Heat the olive or avocado oil in a large skillet over medium-high heat. Once hot, sear the chicken for 5-6 minutes on each side until they develop a golden brown crust. Remove the chicken from the skillet and set aside on a plate.
- Cook the Bacon: Using the same skillet, add the chopped bacon. Cook over medium heat until crispy and browned. Once cooked, transfer the bacon to a plate lined with paper towels to drain excess fat.
- Sauté Aromatics: Reduce the heat to medium and add the dairy-free butter to the skillet. Once melted, add the finely chopped shallots and sauté for 2-3 minutes until softened and translucent. Add the minced garlic and chopped pickled pepperoncinis, cooking for an additional 1-2 minutes until fragrant and combined.
- Make the Roux and Sauce: Sprinkle the gluten-free flour evenly over the sautéed aromatics and stir constantly for 1-2 minutes, ensuring the flour coats everything and cooks through. Slowly pour in the chicken broth while whisking continuously to prevent lumps. Then add the pepperoncini brine, unsweetened dairy-free milk (or heavy cream), and dairy-free sour cream or Greek yogurt. Whisk the mixture until it forms a smooth, creamy sauce.
- Add Flavorings: Stir in the garlic powder, smoked paprika (if using), Italian seasoning, and season with salt and pepper to your taste. Mix well to incorporate all flavors.
- Combine and Simmer: Return the seared chicken breasts to the skillet, spooning some of the sauce over each piece. Reduce heat to low and let the chicken simmer gently in the sauce for 8-10 minutes, or until the internal temperature of the chicken reaches 165°F (75°C). Just before finishing, sprinkle the crispy bacon over the chicken.
- Serve: Garnish the creamy pepperoncini chicken with fresh chopped parsley and extra pepperoncinis if desired. Serve this flavorful dish hot over gluten-free pasta, rice, or alongside roasted vegetables for a complete meal.
Notes
- For a thinner sauce, add 1–2 tablespoons of chicken broth as needed. To thicken, whisk in an additional tablespoon or two of gluten-free flour.
- The pepperoncini brine adds essential tang and brightness to balance the creamy sauce; be sure to measure it carefully for best flavor.
- Use a large bowl to prep ingredients and consider using a crock pot or instant pot for a hands-off cooking alternative. See FAQs for details.
- Store leftovers in an airtight container in the refrigerator for up to 3 days. You can also freeze the chicken and sauce in a freezer-safe container for up to 2 months. Thaw overnight in the fridge before reheating.
- To reheat, warm gently on the stovetop over low heat or in the microwave. Add a splash of chicken broth to help maintain creamy sauce consistency while reheating.
Nutrition
- Serving Size: 1 chicken breast with sauce (approximately 1/4 of recipe)
- Calories: 400 kcal
- Sugar: 3 g
- Sodium: 650 mg
- Fat: 28 g
- Saturated Fat: 10 g
- Unsaturated Fat: 16 g
- Trans Fat: 0 g
- Carbohydrates: 8 g
- Fiber: 1 g
- Protein: 32 g
- Cholesterol: 95 mg

Your email address will not be published. Required fields are marked *