

If you’re craving a sweet treat that’s truly addictive, you’ve come to the right place! This Chocolate Peanut Butter Butterfinger Balls Recipe is one of my all-time favorites — it perfectly blends that creamy peanut butter goodness with crunchy Butterfinger bars and rich chocolate. Seriously, once you try these, you’ll find yourself thinking of excuses to make more. They’re decadent, easy to whip up, and absolutely perfect for sharing (or not!). Let me walk you through everything you need to know to nail this recipe and wow whoever’s lucky enough to enjoy them.
Why You’ll Love This Recipe
- Perfect Flavor Combo: Peanut butter, Butterfinger crunch, and chocolate come together in harmony.
- No-Bake Delight: You don’t need an oven—just a little chill time and some simple prep.
- Great for Gifting: These balls make fabulous homemade gifts when presented nicely.
- Kid-Approved & Crowd-Pleaser: My family goes crazy for these every time, and guests always ask for seconds.

Ingredients You’ll Need
The magic here lies in combining creamy peanut butter with buttery richness and crunchy Butterfinger bars, all tied together with sweet powdered sugar and coated in melty chocolate. Choosing quality ingredients really makes a difference, especially the peanut butter and chocolate type.
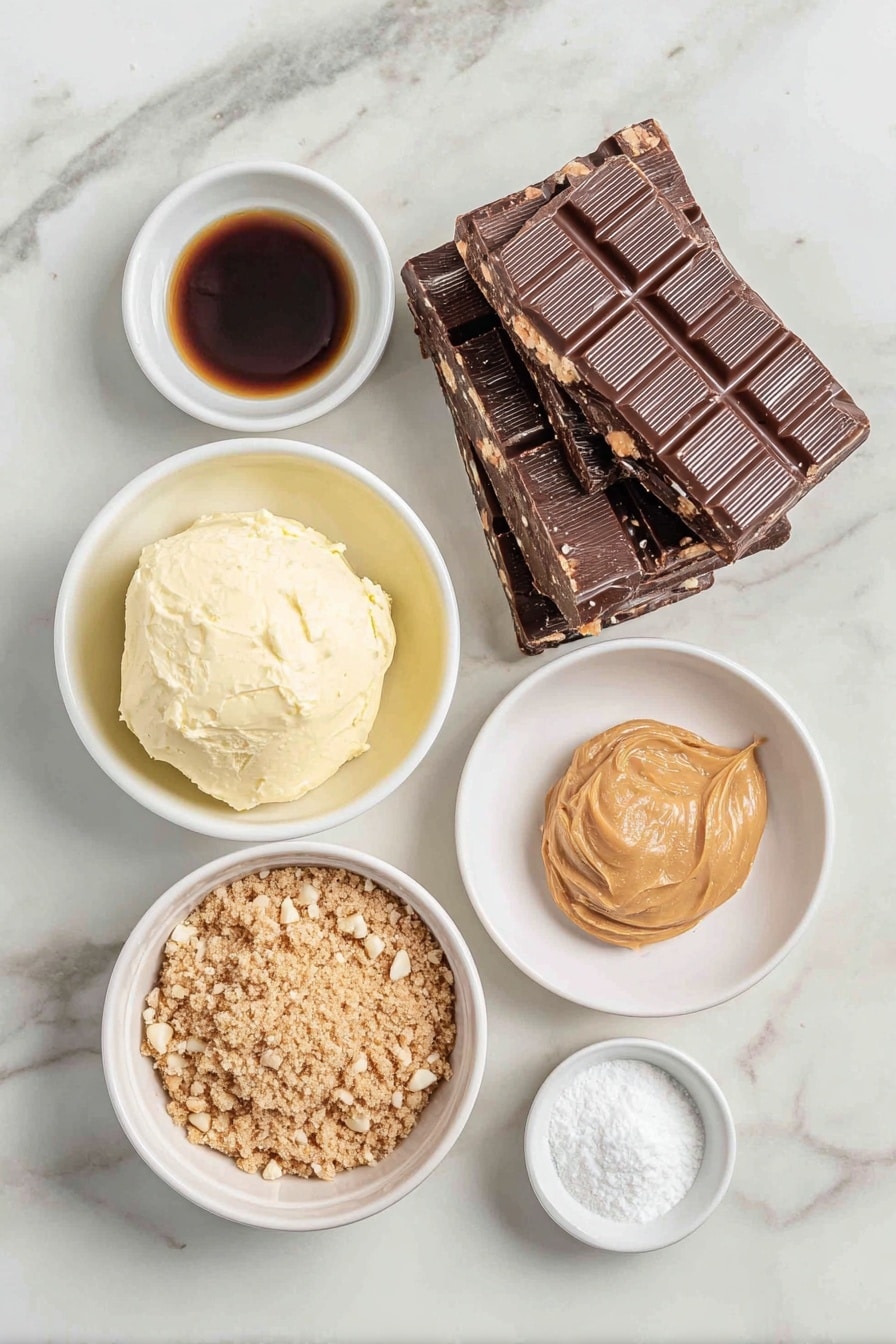
- Butter: Softened, so it blends smoothly with the peanut butter for a creamy base.
- Vanilla Extract: Adds a subtle warmth and depth to balance the sweetness.
- Chocolate Bark or Chocolate Chips: Choose a smooth melting chocolate; chocolate bark is my secret weapon for silky coverage.
- Butterfinger Bars: Crushed to add that signature crunchy, crispy texture and peanut buttery flavor.
- Powdered Sugar: Sweetens and firms up the mixture for easy shaping.
- Peanut Butter: Use classic creamy peanut butter like Jif or Skippy for best texture—avoid natural varieties that can be oily.
- Graham Cracker Crumbs: Provides a nice crumbly texture and balances the sweetness.
- Optional Garnishes: Extra crushed Butterfinger pieces, festive sprinkles, or coarse sea salt for a finishing touch.
Variations
One of the best things about this Chocolate Peanut Butter Butterfinger Balls Recipe is how adaptable it is. I often tweak it a bit depending on the occasion or ingredients on hand—feel free to make it your own!
- Nut-Free Version: Once, I swapped peanut butter with sunflower seed butter for a friend’s allergy, and it still tasted amazing!
- Darker Chocolate: If you prefer a less sweet finish, try using dark chocolate or a bittersweet bark instead.
- Add a Kick: Sprinkle in a pinch of cayenne or cinnamon into the batter for a warming surprise.
- Mini Balls: Rolling the dough into smaller balls makes them perfect for bite-sized snacking or party platters.
How to Make Chocolate Peanut Butter Butterfinger Balls Recipe
Step 1: Cream the Butter and Peanut Butter
Start by softening your butter—if you forget, just pop it in the microwave for 10 seconds. Combine the butter with your peanut butter in a mixing bowl and blend on medium speed until it’s creamy and perfectly smooth. This part sets the creamy base, so don’t rush it! Using an electric mixer really helps get that ideal consistency without lumps.
Step 2: Blend in Vanilla and Powdered Sugar
Next, pour in the vanilla extract and mix well. Then, little by little, add the powdered sugar, mixing on low speed to avoid a sugar cloud. I like to scrape down the sides of my bowl a couple of times here to make sure everything gets folded in evenly. The mixture will thicken and become much easier to handle.
Step 3: Fold in Graham Cracker Crumbs and Crushed Butterfinger
Gently fold in your graham cracker crumbs and the beautifully crushed Butterfinger bars by hand. This is the step that adds the exciting texture and candy crunch, so don’t skip on the Butterfinger pieces! Be careful not to overmix—you want to keep those crunchy bits intact.
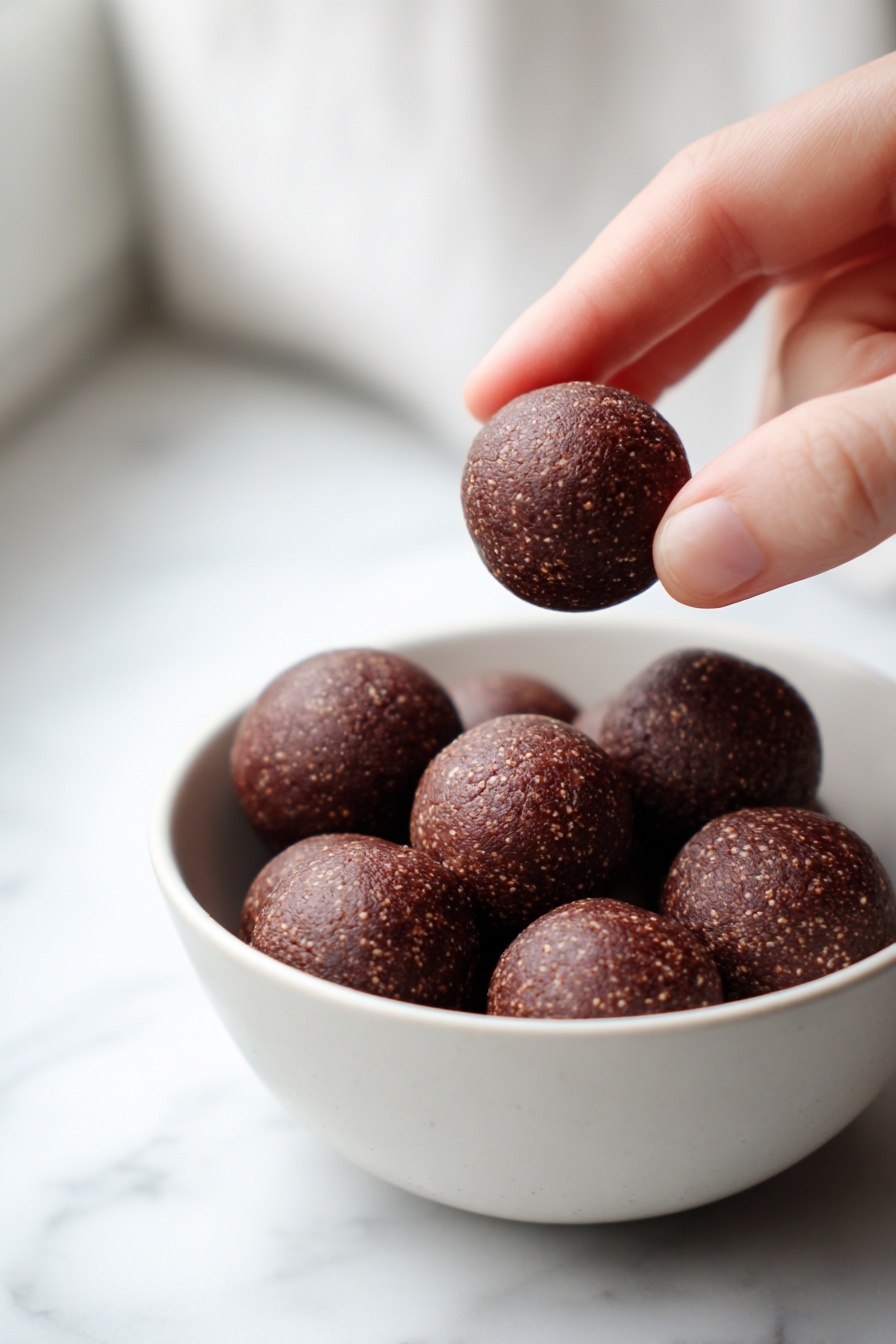
Step 4: Shape and Chill the Dough Balls
Line a cookie sheet with parchment paper, then scoop about 1 to 1½ tablespoons of batter at a time. Roll each into neat balls with your hands. Pro tip: Lightly dampen your palms with water or a little butter to prevent sticking. Once shaped, pop them into the freezer for about 30 minutes until they’re firm—this chilling step makes dipping much easier!
Step 5: Melt the Chocolate
While your dough balls are chilling, melt your chocolate in a microwave-safe bowl. Heat in 30-second bursts at 50% power, stirring in between. You want it mostly melted but don’t overheat it as it can seize. I usually leave a few chunks that melt as I stir—that trick saves the chocolate!
Step 6: Coat the Balls and Add Finishing Touches
Dip each chilled ball into the melted chocolate. You can decide how much chocolate you want covering each one—I love to fully coat some and only halfway coat others for a bit of peanut butter peeking through. Before the chocolate hardens, sprinkle on extra crushed Butterfinger pieces, colorful sprinkles for a festive look, or a pinch of flaky sea salt to balance the sweetness. Then, let them sit at room temperature or back in the fridge until the chocolate sets.
Pro Tips for Making Chocolate Peanut Butter Butterfinger Balls Recipe
- Softened Butter Is Key: I learned that if your butter’s too cold, the dough gets lumpy—soften it well beforehand.
- Scrape Your Bowl Often: Scraping down the sides while mixing helps avoid dry pockets of powdered sugar and guarantees smooth dough.
- Freezing Before Dipping: Freezing the balls makes them firm enough to dip cleanly without breaking apart.
- Chocolate Melting Patience: Melting chocolate low and slow prevents it from seizing—don’t rush this step!
How to Serve Chocolate Peanut Butter Butterfinger Balls Recipe
Garnishes
I adore finishing off these balls with a sprinkle of extra crushed Butterfinger pieces—it amps up the crunch and looks beautiful. Sometimes I add a pinch of flaky sea salt for a salty-sweet contrast that’s absolutely irresistible. Around the holidays, colorful sprinkles add a festive touch that kids especially love.
Side Dishes
Since these are rich and sweet, I often serve them alongside a cup of hot coffee or a refreshing glass of cold milk to balance the flavors. They also pair wonderfully with fresh fruit or simple vanilla ice cream if you’re going the dessert plate route.
Creative Ways to Present
For parties or gifting, I like arranging the Chocolate Peanut Butter Butterfinger Balls on a pretty platter lined with doilies or crinkled parchment. Wrapping them individually in mini cupcake liners and placing them in a decorative box makes them feel extra special. Once, I dipped some in white chocolate and drizzled with colored chocolate for a fun two-tone effect that was a big hit at a birthday!
Make Ahead and Storage
Storing Leftovers
I keep leftover balls stored in an airtight container in the refrigerator—they stay fresh and perfect for up to a week. That way, the chocolate stays firm, and the peanut butter mixture inside keeps its creamy texture without getting crumbly.
Freezing
If I want to make these in advance, I freeze the balls before dipping. They freeze beautifully on a tray, then transfer easily to a freezer-safe bag. When I’m ready for a treat, I dip them straight from frozen into freshly melted chocolate — it’s a bit sturdier that way and helps prevent melting mess.
Reheating
Since these are cold bites, there’s no reheating needed! But if the chocolate loses its shine or firmness, just leave them out at room temp for 10–15 minutes before serving to soften them up slightly.
FAQs
-
Can I use natural peanut butter for this recipe?
It’s best to avoid natural peanut butter because it tends to be oily and runny, which can affect the texture and firmness of your butterfinger balls. I recommend sticking to creamy, conventional brands like Jif or Skippy for a smooth, consistent dough.
-
What’s the best chocolate to use for coating?
I personally go for chocolate bark because it melts smoothly and covers evenly. However, quality chocolate chips or a mix of both also work well. Just be careful to melt the chocolate gently to avoid seizing.
-
How long do these Chocolate Peanut Butter Butterfinger Balls last?
Stored in an airtight container in the fridge, they stay fresh for up to a week. Just be sure to keep them chilled to maintain that perfect chocolate shell and creamy center.
-
Can I make these ahead of time for a party?
Absolutely! You can prepare the dough balls in advance and freeze them. When it’s party time, dip them in chocolate fresh from the freezer to get that perfect coat. It makes hosting so much easier!
Final Thoughts
I absolutely love how this Chocolate Peanut Butter Butterfinger Balls Recipe turns out every time—it’s like having a little bite of candy heaven in every ball. When I first made these, I couldn’t believe how simple the process was but how luxurious the result tasted. My family goes crazy for them, and it’s one of those recipes that feels like a warm hug on a plate. Give it a try, and I promise you’ll want to keep this recipe in your go-to dessert rotation just like I do!
Print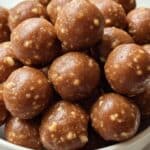
Chocolate Peanut Butter Butterfinger Balls Recipe
- Prep Time: 15 minutes
- Cook Time: None (no cooking involved)
- Total Time: 45 minutes (including chilling time)
- Yield: 20 balls 1x
- Category: Dessert
- Method: No-Cook
- Cuisine: American
Description
Indulge in the delightful and crunchy Butterfinger Balls, a no-bake treat blending creamy peanut butter, buttery graham cracker crumbs, and crushed Butterfinger bars, all coated in smooth melted chocolate. Perfect for festive occasions or anytime you crave a sweet, crunchy bite.
Ingredients
Main Ingredients
- 4 tablespoons softened butter (½ stick)
- 1 teaspoon vanilla extract
- 8 ounces chocolate bark or chocolate chips
- ½ cup Butterfinger bars, crushed
- 1 cup powdered sugar
- 1 cup peanut butter (avoid all-natural varieties)
- ¾ cup crumbs from graham crackers
Optional Garnishes
- Additional crushed Butterfinger bars
- Festive sprinkles
- Coarse sea salt
Instructions
- Prepare the Dough: In a mixing bowl, combine the peanut butter and softened butter. Use an electric or stand mixer set to medium speed and blend until the mixture is creamy and uniform.
- Add Aromatic Notes: Incorporate the vanilla extract and blend thoroughly to infuse flavor throughout the dough.
- Sweeten the Deal: Gradually add the powdered sugar in increments, blending at low speed. Scrape down the sides of the bowl to ensure everything is evenly mixed.
- Crunch Time: Gently fold in the graham cracker crumbs and crushed Butterfinger bars, maintaining the crunchy texture in the dough.
- Shape ’em Up: Line a large cookie sheet with parchment paper. Scoop approximately 1 to 1½ tablespoons of the dough, roll into neat balls, and place them evenly spaced on the sheet.
- Chilling Phase: Freeze the dough balls on the cookie sheet for about 30 minutes until they are fully firm and easy to handle for dipping.
- Melting the Chocolate: Place the chocolate in a microwave-safe bowl and heat in 30-second increments at 50% power, stirring between each interval. Avoid overheating to keep some lumps, which will melt while stirring to smooth chocolate.
- Coat and Decorate: Dip each chilled ball into the melted chocolate, fully coating or partially exposing the peanut butter center as desired.
- Finishing Touches: Sprinkle additional crushed Butterfinger bars, festive sprinkles, or a dash of flaky sea salt over the coated balls to elevate the flavor and look.
- The Grand Finale: Allow the chocolate coating to set completely at room temperature or in the refrigerator before enjoying your Butterfinger Bliss Balls.
Notes
- Store the Butterfinger Balls in an airtight container and refrigerate for up to one week to maintain freshness.
- Use conventional peanut butter brands like Jif or Skippy instead of all-natural varieties, which tend to be too oily and affect texture.
- For smoother melting and coating, chocolate bark is preferred but you can also use a mix of chocolate bark and chocolate chips or tempered chips.
- If preferred, melt the chocolate using a double boiler set on low or medium-low heat as an alternative to microwaving.
Nutrition
- Serving Size: 1 ball
- Calories: 160 kcal
- Sugar: 15 g
- Sodium: 75 mg
- Fat: 10 g
- Saturated Fat: 4 g
- Unsaturated Fat: 5 g
- Trans Fat: 0 g
- Carbohydrates: 15 g
- Fiber: 1 g
- Protein: 3 g
- Cholesterol: 15 mg

Your email address will not be published. Required fields are marked *