
If you’re a fan of rich, creamy, and delightfully nutty treats, then you are absolutely going to adore this Moose Tracks Fudge Recipe. It’s one of those recipes that feels like a hug in dessert form—smooth layers of decadent chocolate combined with the irresistible crunch and flavor of peanut butter cups. I can’t wait to walk you through it because trust me, once you make this, you’ll find it hard to stop sharing it with friends and family.
Why You’ll Love This Recipe
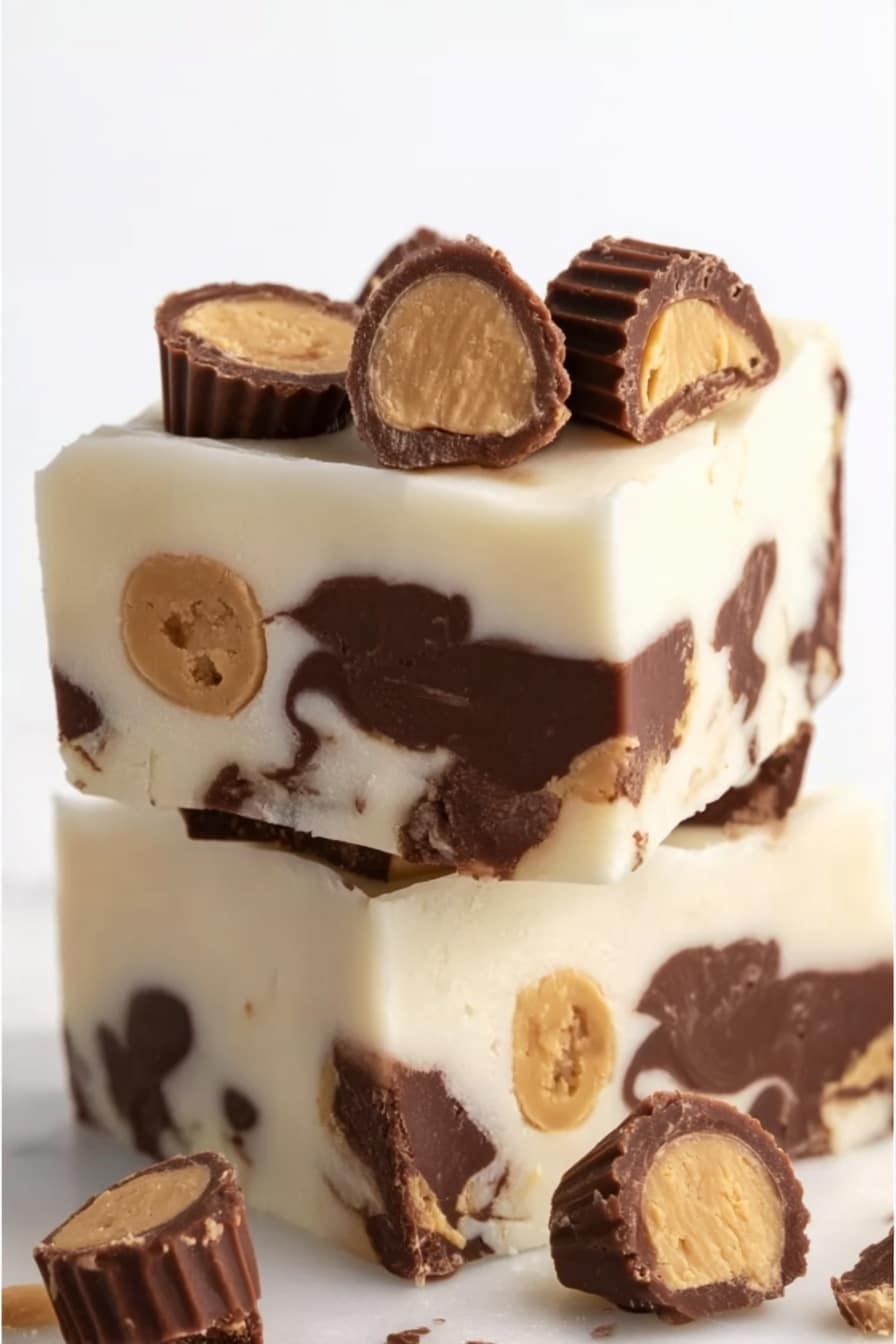
- Layered Goodness: The blend of creamy vanilla fudge and rich chocolate ganache creates a flavor duo that’s hard to beat.
- Perfect Peanut Butter Punch: Mini peanut butter cups bring just the right amount of salty sweetness and texture.
- Easy Enough for Beginners: I used to struggle with fudge, but this microwave method made it foolproof.
- Great for Gifts or Parties: It stores well and always gets rave reviews wherever I take it.

Ingredients You’ll Need
Each ingredient in this Moose Tracks Fudge Recipe was chosen to complement the others—classic white chocolate for sweetness, real semi-sweet chocolate for depth, and peanut butter cups to add that nostalgic twist. I recommend using Nestle Premier White Morsels if you want that perfect smoothness without the hassle of chopping pure white chocolate bars.

- Heavy whipping cream: This adds silkiness to the chocolate ganache, making the fudge luxuriously smooth.
- Semi-sweet chocolate: Choose good-quality chocolate here, either finely chopped bars or chips, for the richest ganache layer.
- White chips: Nestle Premier White Morsels work wonderfully, but pure white chocolate bars chopped finely will also do the trick.
- Sweetened condensed milk: It’s the secret to a creamy, no-fail fudge texture without the fuss of cooking sugar to precise temperatures.
- Vanilla extract or vanilla bean paste: Vanilla punches up the flavor and gives it that warm, inviting finish.
- Mini peanut butter cups: These little guys bring that irresistible Moose Tracks signature flavor and fun bite-sized crunch.
Variations
One of the best things about the Moose Tracks Fudge Recipe is how easy it is to customize. You can swap out flavors or mix-ins to suit your cravings or dietary needs, and I’ve found some variations that really elevate this fudge in fun ways.
- Nut-Free Version: Replace peanut butter cups with pretzel pieces or crushed cookies for that crunch without nuts—I’ve done this for family members with allergies and it’s still a hit.
- Salted Caramel Twist: Drizzle in a layer of homemade or store-bought salted caramel before chilling to add an extra dimension of flavor.
- Dark Chocolate Lovers: Use bittersweet instead of semi-sweet chocolate in the ganache for a richer, slightly more intense chocolate layer.
- Vegan Adaptation: Substitute the condensed milk with coconut condensed milk and use dairy-free chocolate chips—I’ve tried this and it still comes out delightfully creamy.
How to Make Moose Tracks Fudge Recipe
Step 1: Whip Up That Silky Chocolate Ganache
Start by combining the semi-sweet chocolate and heavy whipping cream in a microwave-safe bowl or measuring cup. I like this step because it’s fast and sets the tone for a rich fudge. Heat it in two quick 15-second bursts, stirring well each time to avoid burning the chocolate. What you want is a perfectly smooth, glossy ganache. If you’re patient with stirring, it melts beautifully without needing more heat. Set it aside while we move on to the vanilla layer.
Step 2: Make the Creamy Vanilla Fudge Layer
This step is a little like magic—but you’ll quickly get the hang of it. Pour your white chips into a large microwave-safe bowl and heat at high power for 1 minute. Stir in the sweetened condensed milk, then heat again at 70% power for 90 seconds and let it sit right inside the microwave for 3 minutes. This resting helps the chips melt gently without seizing or separating, which I used to struggle with before discovering this trick. Stir again until smooth and creamy. If some chips are still un-melted, just let it rest a little longer or use short 10-second bursts at 70% power. Finally, fold in the vanilla extract or bean paste to brighten the flavor.
Step 3: Layer and Swirl Your Moose Tracks Fudge
Line an 8-inch square pan with non-stick foil or parchment for easy removal. Pour about two-thirds of the vanilla fudge into the pan and spread evenly. Pour two-thirds of your chocolate ganache over, then use a toothpick or skewer to swirl the two layers together—you want swirls, not a muddy mix. This is where your fudge starts to look so inviting! Sprinkle 1 cup of mini peanut butter cups over the top, then quickly rewarm the remaining vanilla fudge for 5-10 seconds at 70% power to loosen it just a touch, and pour over the candies. Drizzle the rest of the chocolate ganache on top and swirl again. Don’t wait too long between these steps because the fudge starts to set quickly.
Step 4: Chill and Cut
Cover the pan with plastic wrap and pop it in the fridge for about 2 hours, or set it on your counter for roughly 4 hours until firm. Once it’s set, lift the fudge out with the foil, then cut into neat squares. This is one of those moments where all your patience pays off—perfect fudge squares that look as gorgeous as they taste.
Pro Tips for Making Moose Tracks Fudge Recipe
- Don’t Rush the Melting: Patience with stirring and resting times ensures your fudge is silky, not grainy.
- Use a Toothpick for Swirling: A fine skewer makes prettier, more delicate swirls than a spoon.
- Line Your Pan Well: This step keeps removal easy and fudge squares perfectly intact.
- Keep Ingredients at Room Temp: Chocolate and cream mix best when not cold, so bring them to room temperature before starting.
How to Serve Moose Tracks Fudge Recipe

Garnishes
I tend to keep garnishes simple here because the fudge is already packed with flavor. Occasionally, I’ll sprinkle a few extra mini peanut butter cups or a dusting of finely crushed pretzels on top for an added salty-sweet crunch. For special occasions, a tiny drizzle of melted caramel adds a beautiful sheen and sweet surprise.
Side Dishes
If you’re serving a dessert platter, this fudge pairs wonderfully with fresh berries or a light fruit salad to balance the richness. I also love it alongside vanilla bean ice cream for an indulgent treat that my family gobbles up faster than I can dish it out.
Creative Ways to Present
For gifting, I like to cut the fudge into bite-sized squares and wrap each in wax paper before placing them in a pretty box tied with a ribbon. This recipe also works as an elegant edible centerpiece—arranged on a plate with some chocolate shavings and a rustic sprinkle of chopped nuts. It’s always a showstopper at holiday parties!
Make Ahead and Storage
Storing Leftovers
I usually store my Moose Tracks fudge in an airtight container at room temperature, and honestly, it lasts surprisingly well for up to a month without drying out. Just make sure to keep it away from heat and direct sunlight, and your fudge will stay soft and delicious.
Freezing
When I’ve got leftovers I want to save longer, I wrap them tightly in wax paper or foil, then place them in a zip-top bag before freezing. The fudge freezes beautifully for up to three months. When thawing, I leave it in the fridge overnight to gently defrost, preserving that creamy texture.
Reheating
If your fudge gets a bit firm or cold, I rewarm small portions by letting them sit at room temperature or warming very briefly in the microwave (just a few seconds at 30% power) to soften it back up without melting it completely.
FAQs
-
Can I make this Moose Tracks Fudge Recipe without a microwave?
Absolutely! If you don’t have a microwave, you can melt the chocolate and make the fudge on the stovetop using low heat. Stir frequently and remove the mixture from heat when most of the chips have melted—then let it rest and stir until smooth. This gentle heating method helps prevent burning and keeps the texture perfect.
-
What if I don’t have mini peanut butter cups?
You can substitute with chopped full-size peanut butter cups or even Reese’s Pieces candies for a similar effect. If you want to keep the texture but avoid peanut butter, crushed pretzels or your favorite chopped nuts add great crunch and flavor.
-
How do I get perfect swirls in my fudge?
Swirling works best when the layers aren’t too hot or cold. Use a toothpick or skewer to gently draw circles or lines through the fudge before chilling. Avoid over-mixing—the goal is pretty ribbons of chocolate and vanilla to show through.
-
Can I use different chocolates for the fudge?
Yes! The recipe is flexible. You can use bittersweet chocolate for a deeper flavor or white chocolate bars instead of chips (just chop finely). Just keep the ratios and melting times in mind for smooth results.
Final Thoughts
I really love this Moose Tracks Fudge Recipe because it’s a wonderful blend of nostalgia and gourmet flavor that’s surprisingly easy to make. Every time I pull this fudge out at holiday gatherings or just for an indulgent treat, it’s always met with ooohs and ahhhs. The layers of creamy vanilla fudge, rich chocolate ganache, and peanut butter cups create a texture and taste that’s totally addictive. I encourage you to try it and make it your own—you might just find this becoming your new go-to for every special occasion.
Print
Moose Tracks Fudge Recipe
- Prep Time: 20 mins
- Cook Time: 3 mins
- Total Time: 23 mins
- Yield: 16 servings 1x
- Category: Dessert
- Method: No-Cook
- Cuisine: American
Description
Moose Tracks Fudge is a decadent layered treat combining creamy vanilla fudge with rich semi-sweet chocolate ganache and mini peanut butter cups. This no-bake recipe uses simple ingredients melted in the microwave, creating a luscious swirl of flavors and textures perfect for gifting or indulgent snacking.
Ingredients
Chocolate Ganache (Dark Chocolate Fudge Layer)
- 3 tablespoons heavy whipping cream
- 3 ounces semi-sweet chocolate (finely chopped bars or chips)
Vanilla Fudge Layer
- 24 ounces white chips (Nestle Premier White Morsels or 28 ounces pure white chocolate)
- 14 ounces (1 can) sweetened condensed milk
- 1 teaspoon pure vanilla extract or vanilla bean paste
Add-ins
- 1 ⅓ cups mini peanut butter cups
Instructions
- Prepare the Chocolate Ganache: Combine the semi-sweet chocolate and heavy whipping cream in a microwave-safe bowl or measuring cup. Heat in two 15-second bursts at full power, stirring after each burst until melted and smooth. Set aside while preparing the vanilla fudge.
- Make the Vanilla Fudge Layer: Place the white chips in a large microwave-safe bowl and heat at full power for 1 minute. Stir in the sweetened condensed milk. Heat again at 70% power for 90 seconds, then let the bowl rest in the microwave for 3 minutes. Remove and stir until smooth. If chips remain unmelted, rest the mixture for an additional 3-5 minutes or heat at 70% power in 10-second bursts, stirring in between until fully melted. Stir in the vanilla extract until the mixture is creamy and smooth.
- Layer the Fudge: Pour about two-thirds of the vanilla fudge into an 8-inch square baking pan lined with non-stick foil. Spread evenly. Pour two-thirds of the chocolate ganache over the vanilla layer and use a toothpick or skewer to create swirls by gently mixing the two layers.
- Add Peanut Butter Cups: Sprinkle 1 cup of mini peanut butter cups evenly over the fudge layers.
- Finish Layering: Reheat the remaining vanilla fudge in the microwave at 70% power for 5-10 seconds to warm slightly. Stir and pour it over the peanut butter cups. Drizzle the remaining chocolate ganache on top and use a toothpick or skewer again to swirl the fudge layers together decoratively.
- Chill and Set: Cover the pan with plastic wrap and chill in the refrigerator for about 2 hours or leave at room temperature for approximately 4 hours until the fudge firms up.
- Serve: Cut into squares and serve immediately or package for gifting.
Notes
- Store fudge in an airtight container at room temperature for up to one month.
- To freeze, wrap fudge tightly in wax paper or tin foil, place in a zip-top bag, and freeze for up to three months.
- For stovetop preparation instead of microwave, melt chocolate and combine ingredients over low heat, stirring until 75% of chips are melted, then remove from heat and stir until smooth.
Nutrition
- Serving Size: 1 piece (approx. 1/16 of recipe)
- Calories: 210
- Sugar: 22g
- Sodium: 45mg
- Fat: 12g
- Saturated Fat: 7g
- Unsaturated Fat: 3.5g
- Trans Fat: 0g
- Carbohydrates: 25g
- Fiber: 1g
- Protein: 3g
- Cholesterol: 20mg

Your email address will not be published. Required fields are marked *