

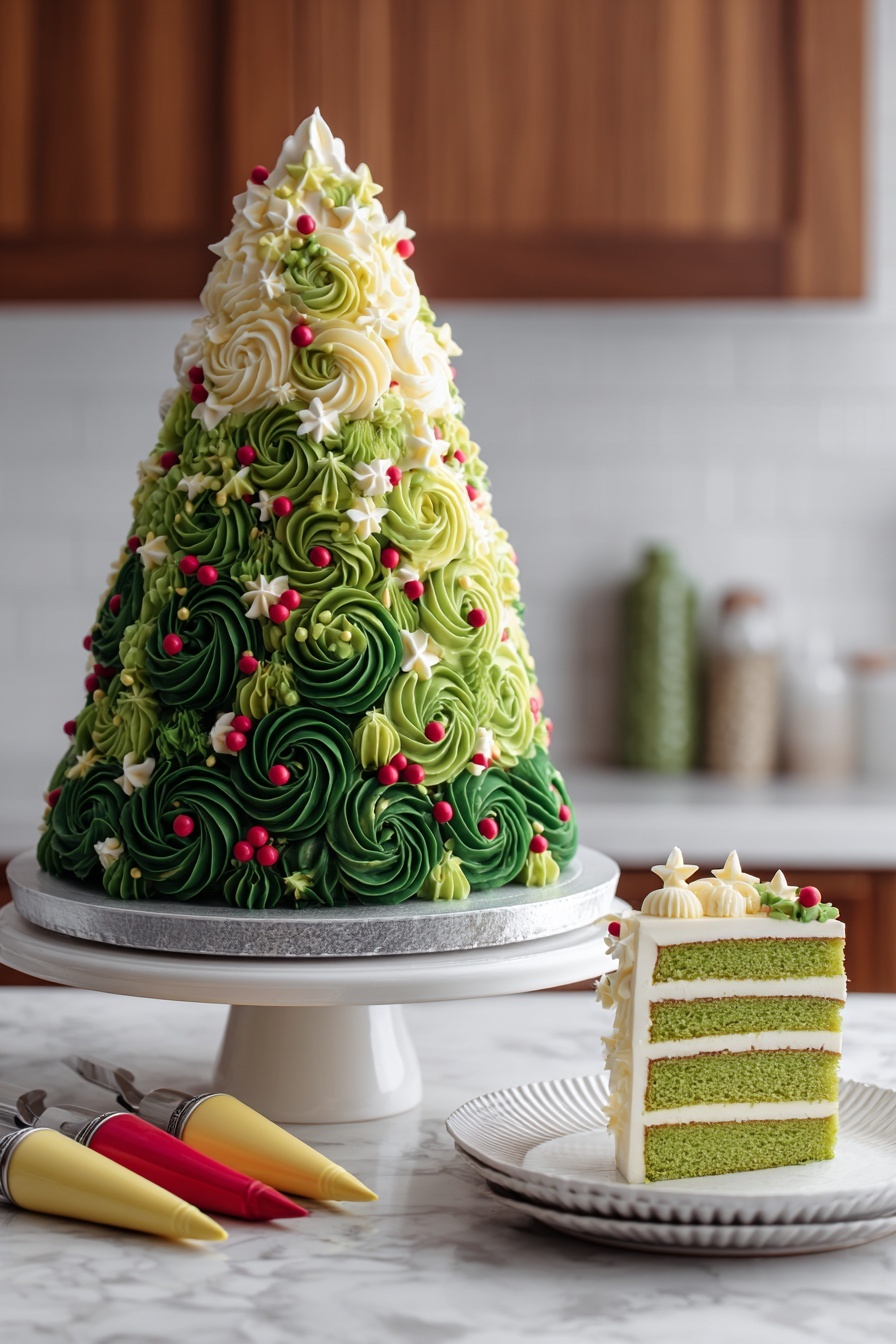
If you’re looking for a showstopper that brings festive joy right into your kitchen, this Christmas Tree Spice Cake Recipe is exactly what you need. I absolutely love how this cake combines warm spices with vibrant green marbled layers that look just like a holiday tree—perfect for impressing guests or surprising your family this season. Stick around, because I’m sharing everything you need to make this fan-freaking-tastic cake come to life effortlessly!
Why You’ll Love This Recipe
- Visually Stunning: The marbled green layers swirl together beautifully to create a tree that’s almost too pretty to cut into.
- Rich, Warm Flavors: Cinnamon, ginger, and nutmeg bring that classic holiday spice mix that fills your home with cozy aromas.
- Buttery, Moist Texture: A perfect balance of sour cream, applesauce, and oil keeps this cake tender and melt-in-your-mouth moist.
- Fun to Assemble: Layering and decorating this cake is a joy, making it ideal for holiday baking sessions with family or friends.

Ingredients You’ll Need
The magic behind this Christmas Tree Spice Cake Recipe comes from combining classic spice cake ingredients with vibrant food coloring and a buttercream frosting that’s both simple and stunning. When you shop, look for fresh spices and good-quality butter to really make your flavors pop.
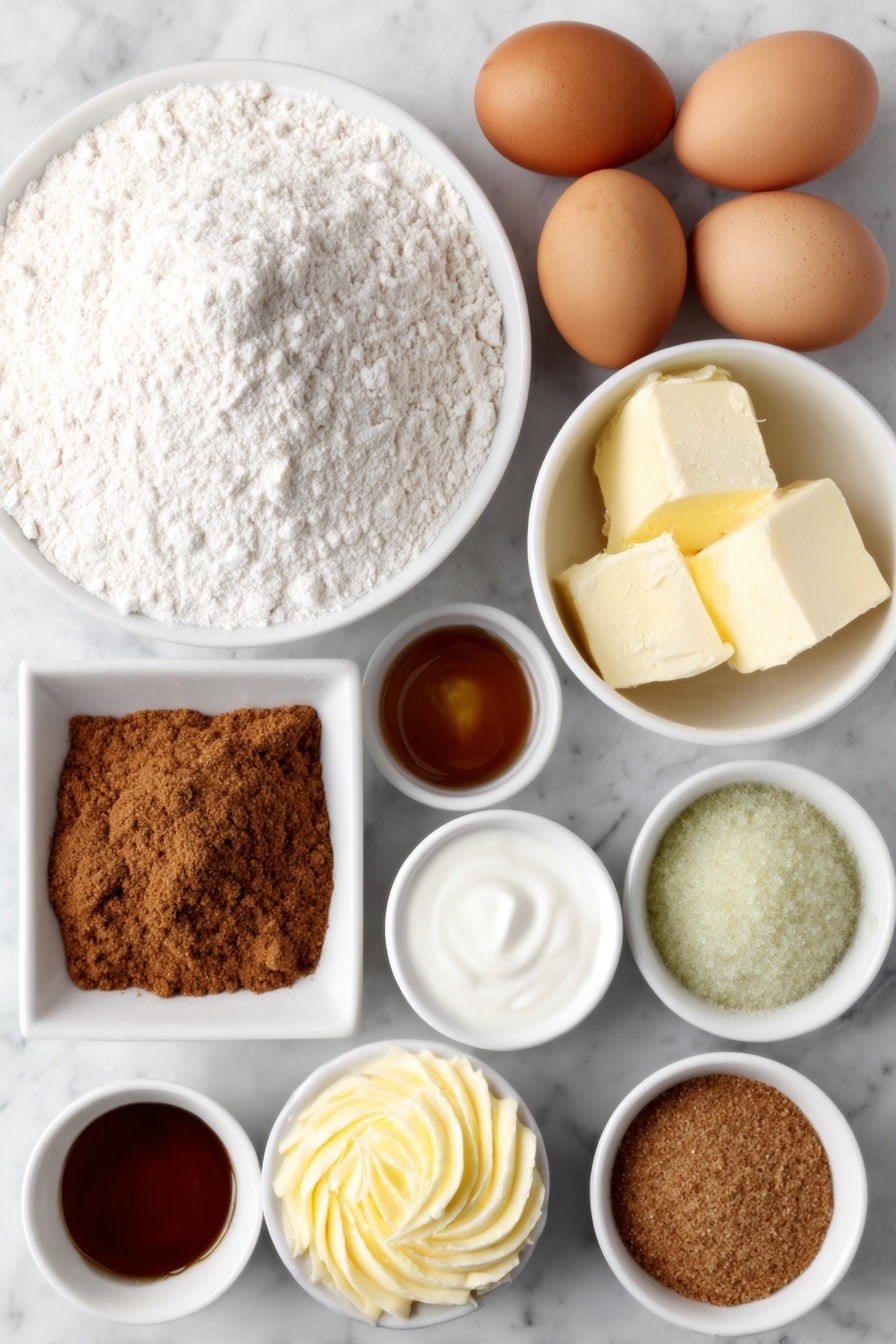
- All-purpose flour: The base of your cake; provides structure—be sure not to over-measure for a tender crumb.
- Granulated sugar: Sweetens gently, balancing the spices.
- Light brown sugar: Adds moisture and subtle caramel notes.
- Baking powder: Gives your cake its nice lift and fluffiness.
- Fine salt: Essential to deepen all the flavors.
- Ground cinnamon, ginger, and nutmeg: The warming spices that scream holiday magic.
- Unsalted butter: Room temperature butter whips evenly into the batter and frosting.
- Large eggs: Bind and enrich the cake layers.
- Full-fat sour cream: Adds tenderness and tang for that moist crumb.
- Unsweetened applesauce: Boosts moisture naturally and keeps the cake soft.
- Vegetable or canola oil: A little fat to keep the cake delightfully moist.
- Vanilla extract or vanilla bean paste: Brings warmth and depth to both the cake and frosting.
- Green gel food coloring: To paint those festive tree layers—you can play with different green hues.
- Buttercream Frosting ingredients: Unsalted butter, powdered sugar, heavy whipping cream, vanilla, salt, and gel food coloring in green, red, and yellow to decorate.
Variations
I love making this Christmas Tree Spice Cake Recipe just as it is, but feel free to personalize it to suit your tastes or dietary needs. You can swap ingredients or decorating styles to make it totally your own holiday masterpiece.
- Gluten-Free Variation: I once tried using a gluten-free flour blend with this recipe—just keep an eye on the baking time, which might be a bit longer but still yields a moist, spicy cake.
- Dairy-Free Option: Swap sour cream for coconut yogurt and use dairy-free butter in the frosting if you’re catering to those with sensitivities; the spices still shine beautifully.
- Spice Mix Tweaks: Feel free to add a pinch of clove or cardamom if you like! I sometimes do this for a slightly different festive twist.
- Frosting Flavors: Try adding a bit of orange zest or peppermint extract to the buttercream for a subtle holiday flair.
How to Make Christmas Tree Spice Cake Recipe
Step 1: Prepare Your Pans and Mix the Dry Ingredients
First things first, preheat your oven to 350°F (175°C). Line your cake pans—one 8-inch, one 7-inch, two 6-inch, and two 4-inch—with parchment and give them a light coat of non-stick spray. This variety of sizes helps create the tapering Christmas tree shape, so take your time to prep right here. Then, mix together your flour, both sugars, baking powder, salt, cinnamon, ginger, and nutmeg until combined. Getting this base mix ready early makes the batter come together smoothly.
Step 2: Cut In Butter and Add Eggs
Using a mixer on low, slowly add your softened butter to the dry ingredients. I discovered this slow mixing step is key—it keeps the butter from clumping up and helps create that tender crumb we love. Once the butter is mixed in with no big chunks visible, beat in the eggs two at a time, mixing just until combined after each addition to avoid overworking the batter.
Step 3: Add Wet Ingredients and Mix Colors
Next, stir in the sour cream, applesauce, vegetable oil, and vanilla extract gently on low. Scrape the bowl down to make sure the batter is evenly combined, then beat for about one minute on medium speed. Now for the fun part—divide your batter in half and mix green gel food coloring into each portion, making one light green and one darker green. This contrast creates the lovely marbled effect that looks just like a Christmas tree’s branches.
Step 4: Layer and Marble the Batter in Pans
Drop spoonfuls of both green batters into all your prepared pans, filling them evenly to about one inch deep. Use a butter knife or offset spatula to swirl the colors just a little—this marbling makes each slice delightfully festive and unpredictable. Trust me, this step feels a bit like art and makes the whole cake so much more special.
Step 5: Bake, Cool, and Trim Layers
Bake your layers for 28 to 33 minutes or until a toothpick comes out with a few moist crumbs (don’t worry if it’s not perfectly clean, you want a tender cake). Let the cakes cool in their pans for 10 minutes, then run a spatula around the edges and flip them onto wire racks to cool completely. Once cooled, carefully level the tops with a serrated knife, and trim the edges so the stacked layers taper into a perfect Christmas tree shape. Bonus tip: if you make these layers ahead and freeze them, letting them thaw about 20 minutes before assembly helps a ton—it keeps them firm but workable!
Step 6: Prepare the Buttercream Frosting
While your cake layers are baking and cooling, whip up the buttercream. Beat your room temperature butter with a paddle or hand mixer for about 30 seconds on medium speed until smooth and creamy. Add vanilla and salt, then gradually mix in powdered sugar and heavy cream on low speed. Play with the consistency here: add cream a tablespoon at a time if it’s too stiff or powdered sugar in small increments if too loose. Hold off on coloring the frosting until the cake is crumb coated—that way you avoid wasting icing if you need to adjust the base coat.
Step 7: Assemble and Crumb Coat the Cake
Start stacking your layers from biggest (8-inch) to smallest (4-inch) on a cake board, securing the first layer with a little frosting dab so it doesn’t slide around. Spread a thin, even layer of buttercream between each cake layer. Once stacked, insert a wooden dowel or a thick bubble tea straw through the center to stabilize the whole tree. Next, apply a thin crumb coat all over the cake and smooth it nicely with an offset spatula or bench scraper. Chill in the fridge for 30 minutes or the freezer for 10 to let it set up nicely.
Step 8: Color and Pipe the Decorative Frosting
While the crumb coat firms, divide your remaining frosting into small and large batches and color accordingly: white, red, yellow, light green, and dark green. Use various piping tips to create rosettes and dots, decorating the cake like a real Christmas tree with colorful “ornaments” and layers of green “branch” rosettes. This step really makes the cake pop and is a lot of fun to do—your family will go crazy for the festive look!
Pro Tips for Making Christmas Tree Spice Cake Recipe
- Don’t Overmix the Batter: I learned early on that mixing too long makes the cake dense, so mix just until combined.
- Use Room Temperature Ingredients: This helps the batter come together smoothly for a lighter texture.
- Freeze Cake Layers Ahead: Make your layers in advance and freeze them—this breaks up the process and keeps things stress-free.
- Chill Before Decorating: Chilling the crumb coat makes decorating easier and prevents crumbs from mixing with the final frosting layer.
How to Serve Christmas Tree Spice Cake Recipe
Garnishes
For garnishes, I love adding little edible glitter dust or mini silver dragées for “tree lights” that sparkle under holiday lights. Mini candy canes or red and gold sprinkles also bring a festive touch that your guests will adore.
Side Dishes
This cake pairs beautifully with a cup of spiced chai tea or a warm mug of hot chocolate—perfect for cozy evenings. You can also serve it with a scoop of vanilla ice cream or lightly whipped cream to balance the spices.
Creative Ways to Present
I once created a winter wonderland scene with this cake by placing it on a platter surrounded by crushed peppermint candies and miniature pinecones. You can also place it atop a mirrored cake stand for an extra festive shimmer or add a dusting of powdered sugar as “snow” around the edges.
Make Ahead and Storage
Storing Leftovers
I store leftovers covered tightly with plastic wrap or in a cake dome in the fridge for up to a week. If you want to keep it fresher longer, cover any cut edges with leftover frosting to lock in moisture—it really keeps the cake from drying out.
Freezing
Freezing this cake works great! I wrap slices individually in plastic wrap and place them in a freezer-safe bag or container. When you thaw them in the fridge overnight, they come back moist and delicious—like they were fresh-baked.
Reheating
To refresh the cake, I like to warm slices gently in the microwave for about 10 seconds, which softens the buttercream and wakes up the spices, making each bite just as lovely as day one.
FAQs
-
Can I make this Christmas Tree Spice Cake Recipe without using food coloring?
Absolutely! The green swirls make the cake festive, but if you prefer natural colors or want to skip the coloring, the spice flavor shines through beautifully on its own. You can swirl plain batter or add natural matcha powder for a subtle green tint if you want to keep it natural.
-
What’s the best way to level cake layers for stacking?
I use a serrated knife to gently trim the tops once the cakes are fully cooled. The key is to go slowly and keep the knife parallel to the cutting board for even layers, ensuring your Christmas tree shape stacks nicely without wobbling.
-
Can I use a different spice combination for this cake?
Definitely! The classic cinnamon, ginger, and nutmeg combo is crowd-pleasing, but you can experiment with adding cloves, allspice, or cardamom for a more complex holiday flavor profile. Just keep the total spice quantity balanced to avoid overpowering the cake.
-
How do I avoid crumbs in my frosting?
The best way is to apply a crumb coat—a thin layer of frosting that traps the crumbs—and chill the cake before adding the final frosting layers and decorations. This creates a smooth surface that looks professional and delicious.
-
Can I make this cake layers and frosting ahead of time?
Yes! I recommend baking the layers in advance and freezing them; this saves time the day of your party. You can also make the frosting ahead and store it in the fridge or freezer. Just bring it to room temperature and rewhip before using for best results.
Final Thoughts
This Christmas Tree Spice Cake Recipe has become my go-to festive treat because it’s not only delicious but also a delight to make—there’s something heartwarming about swirling those green batters and piling on the colorful frosting ornaments. The moment you cut into it and see those beautiful marbled layers, you’ll understand why it’s worth the effort. I can’t wait for you to try it at home and create your own holiday memories around this cake. Trust me, everyone will be asking for seconds!
Print
Christmas Tree Spice Cake Recipe
- Prep Time: 15 minutes
- Cook Time: 32 minutes
- Total Time: 1 hour 47 minutes
- Yield: 24 servings 1x
- Category: Dessert, Cake
- Method: Baking
- Cuisine: American
Description
This festive Christmas Tree Cake features spiced layers in beautiful marbled green shades, stacked and trimmed into a tree shape, then decorated with colorful buttercream rosettes. Moist and flavorful with warm spices, it’s a show-stopping holiday centerpiece perfect for celebrating the season.
Ingredients
Spice Cake Layers
- 3 cups all-purpose flour (375g)
- 1 1/2 cups granulated sugar (300g)
- 1 1/2 cups packed light brown sugar (300g)
- 2 1/2 tsp baking powder (10g)
- 1 tsp fine salt (6g)
- 2 tsp ground cinnamon (6g)
- 1 tsp ground ginger (3g)
- 1/2 tsp ground nutmeg (2g)
- 1/2 cup unsalted butter, room temperature (113g)
- 4 large eggs, room temperature (224g)
- 1 cup full-fat sour cream, room temperature (255g)
- 1/2 cup unsweetened apple sauce (90g)
- 1/2 cup vegetable or canola oil (105g)
- 1 tsp vanilla extract or vanilla bean paste (4g)
- Green gel food coloring
Buttercream Frosting
- 3 cups unsalted butter, room temperature (678g)
- 1 Tbsp vanilla extract or vanilla bean paste (12g)
- 1 tsp fine salt (3g)
- 10 cups powdered sugar (1250g)
- 1/2 cup heavy whipping cream, room temperature (120g)
- Green, yellow, and red gel food coloring
Instructions
- Prepare Cake Pans and Oven: Preheat the oven to 350°F (175°C). Line one 8-inch, one 7-inch, two 6-inch, and two 4-inch cake pans with parchment rounds and grease them with non-stick baking spray to prevent sticking.
- Mix Dry Ingredients: In a large bowl, thoroughly combine the all-purpose flour, granulated sugar, brown sugar, baking powder, salt, cinnamon, ginger, and nutmeg until evenly mixed.
- Add Butter to Dry Mix: Slowly add the room temperature unsalted butter to the dry ingredients on low mixer speed. Continue mixing until no large butter chunks remain, creating a crumbly mixture.
- Incorporate Eggs: Add the eggs two at a time to the mixture on low speed, mixing just until incorporated to maintain batter lightness.
- Add Wet Ingredients: Mix in the sour cream, unsweetened applesauce, vegetable oil, and vanilla extract on low speed until just combined. Scrape down the sides of the bowl.
- Mix Batter Thoroughly: Increase mixer speed to medium and beat for about one minute to ensure smooth, well-incorporated batter.
- Color the Batter: Divide the batter into two parts. Use green gel food coloring to tint half the batter a light green and the other half a darker green.
- Fill Cake Pans and Marble: Spoon alternating colors of batter into each prepared pan, filling about 1 inch high. Using a butter knife or offset spatula, gently swirl the batter to create a marbled effect.
- Bake the Cakes: Bake the pans for 28-33 minutes, or until a toothpick inserted into the center comes out with a few moist crumbs attached.
- Cool Cake Layers: Let the cakes cool in the pans for 10 minutes. Run a small offset spatula around the edges, then invert the cakes onto wire racks to cool completely. Level the tops with a serrated knife once cool.
- Make Buttercream Frosting: Beat unsalted butter on medium speed with a paddle attachment for 30 seconds until smooth. Add vanilla extract and salt, mixing well.
- Add Sugar and Cream: Gradually add powdered sugar and heavy cream on low speed. Adjust consistency by adding more cream or powdered sugar as needed until smooth and spreadable. Do not color yet.
- Assemble Cake Layers: On a greaseproof cake board or flat plate, place the largest cake layer and secure with a dab of frosting. Stack layers from largest to smallest to form a tapered Christmas tree shape, spreading an even layer of frosting between each.
- Insert Dowel for Stability: Insert a thick wooden dowel or bubble tea straw through the center of the stacked layers to stabilize the cake.
- Crumb Coat and Chill: Apply a thin crumb coat of frosting over the entire cake, smoothing with an offset spatula or bench scraper. Chill in the refrigerator for 30 minutes or freezer for 10 minutes until firm to the touch.
- Color Remaining Frosting: Divide and color remaining buttercream into light green, dark green, red, yellow, and leave a portion white, placing each into piping bags fitted with appropriate piping tips.
- Decorate Cake: Pipe rosettes using the green frostings around the cake. Fill in spaces with dollops of red, yellow, and white frostings to mimic ornaments, achieving a festive look.
Notes
- This recipe works well with either a stand mixer or hand mixer; a paddle attachment is preferred for best texture in batter and frosting.
- For ease and better workflow, make cake layers in advance and freeze. Thaw about 20 minutes before assembly; slightly chilled layers are easier to work with.
- Buttercream can also be prepared ahead and stored airtight in the refrigerator up to 2 weeks or frozen up to 1 month. Stir well after thawing to restore smooth consistency.
- The assembled and frosted cake can be refrigerated up to 1 week or frozen wrapped well for up to 1 month.
- Leftover cake can be kept moist by covering cut sides with remaining frosting; store in the fridge for up to a week.
Nutrition
- Serving Size: 1 slice (approx. 1/24th of cake)
- Calories: 420
- Sugar: 35g
- Sodium: 180mg
- Fat: 28g
- Saturated Fat: 15g
- Unsaturated Fat: 12g
- Trans Fat: 0g
- Carbohydrates: 40g
- Fiber: 1g
- Protein: 4g
- Cholesterol: 75mg

Your email address will not be published. Required fields are marked *