
If you’re looking for a festive treat that’s both delightful to make and absolutely scrumptious to eat, I can’t recommend this Decorated Christmas Shortbread Cookies Recipe enough. These cookies are the perfect blend of buttery richness and holiday cheer, topped with a beautiful mint glaze and charming buttercream designs that will wow your friends and family — honestly, they taste as good as they look!
Why You’ll Love This Recipe
- Simple Ingredients: You only need a few pantry staples that come together into the most buttery, tender cookies.
- Fun to Decorate: The mint glaze and buttercream piping make these cookies festive and customizable for your holiday vibe.
- Perfect Texture: Crispy edges with a melt-in-your-mouth center — just how shortbread should be!
- Kid-Friendly Activity: Decorating these little beauties is a joy for the whole family, creating memories and sweet treats simultaneously.

Ingredients You’ll Need
What I love about this Decorated Christmas Shortbread Cookies Recipe is how these ingredients work in harmony to create both flavor and texture while giving you a canvas to get creative with your decorations. Choose high-quality butter as it truly makes a difference in the rich flavor, and use good vanilla extract for that perfect holiday aroma.

- Salted butter: Make sure it’s very soft for easy mixing but not melted.
- Powdered sugar: Keeps the dough silky smooth and sweet without grittiness.
- Vanilla extract: Adds warmth and depth; pure vanilla always shines brighter.
- All-purpose flour: The base making the cookies tender yet sturdy.
- Cornstarch: Secret weapon for a melt-in-your-mouth softness.
- Half and half or milk: Needed for the glaze and piping; adds creaminess.
- Peppermint extract: Gives that refreshing holiday twist, adjust to your liking.
- Blue paste food coloring: For that beautiful wintery glaze color; I use Wilton Delphinium Blue.
- White nonpareils and pearlized snowflakes: Optional, but they add delightful texture and sparkle.
Variations
I’m a big fan of tweaking recipes to fit the occasion or dietary needs. This Decorated Christmas Shortbread Cookies Recipe is wonderfully flexible — you can adapt the flavors, colors, and decorations to make it truly yours.
- Flavored Extract Swap: I swapped peppermint for almond extract one year and loved the cozy, nutty twist it gave the cookies.
- Gluten-Free Version: By replacing flour with a gluten-free blend and reducing cornstarch slightly, these cookies still keep their tender texture.
- Color Customization: Try festive red or green food coloring in the glaze for variety, or make a batch with multiple colors to brighten up the cookie tray.
- Different Shapes: While circles are classic, I love using holiday-themed cutters, like stars and trees, to really set the mood.
How to Make Decorated Christmas Shortbread Cookies Recipe
Step 1: Cream the Butter and Sugar
Start by placing your very soft salted butter into a medium mixing bowl. Using a wooden spoon or sturdy spatula, stir until smooth and creamy—this usually takes about 30 seconds by hand. Then add the powdered sugar and vanilla extract, mixing together until everything becomes fluffy and well combined. I love this step because it sets that silky texture that makes the dough so easy to work with.
Step 2: Incorporate the Dry Ingredients
Sprinkle the all-purpose flour and cornstarch evenly over your butter mixture. Stir gently until the flour is just incorporated and you have a shaggy dough. Turn the dough onto a lightly floured surface and gather it into a ball. Knead a few times until smooth, then flatten into a disk. This hands-on part helps ensure the dough comes together without overmixing, which keeps your cookies tender.
Step 3: Roll Out and Chill the Dough
On a lightly floured surface, roll the dough out to roughly 3/8-inch thickness. Don’t skimp on dusting your rolling pin and work surface to prevent sticking; it makes this step way easier. Cut out your shapes with a cookie cutter, placing them on parchment-lined baking sheets. Gather and re-roll the scraps to get the most cookies out of your batch. Pop the trays into the fridge for at least an hour or up to 24 hours to firm up the dough. This chill time is key to crisp edges and preventing spreading during baking.
Step 4: Bake to Golden Perfection
When ready, preheat your oven to 350˚F. Bake the chilled cookies for 12-16 minutes, watching closely so they’re just beginning to turn golden at the edges. Rotating the pans halfway helps them brown evenly. Let them cool completely before icing — trust me, patience here pays off with smooth glaze and neat decorations.
Step 5: Mix Up the Mint Glaze
In a medium bowl, whisk powdered sugar, half and half, and peppermint extract until smooth, aiming for a thick but pourable consistency. If you want a more vibrant blue glaze like I do, swirl in a bit of blue paste food coloring until you get that perfect wintery shade. Give it a taste and add more peppermint if you love that refreshing zing!
Step 6: Glaze the Cookies
Hold a cookie by the edges and dip the top into the glaze, making sure the entire surface is covered. Let the excess drip back into your bowl, then quickly set the cookie right side up and gently jiggle it to smooth the glaze evenly over the top. Repeat with all your cookies, then let them rest for 15-30 minutes to set. This step feels a little messy at first, but once you get the hang of it, it’s super satisfying!
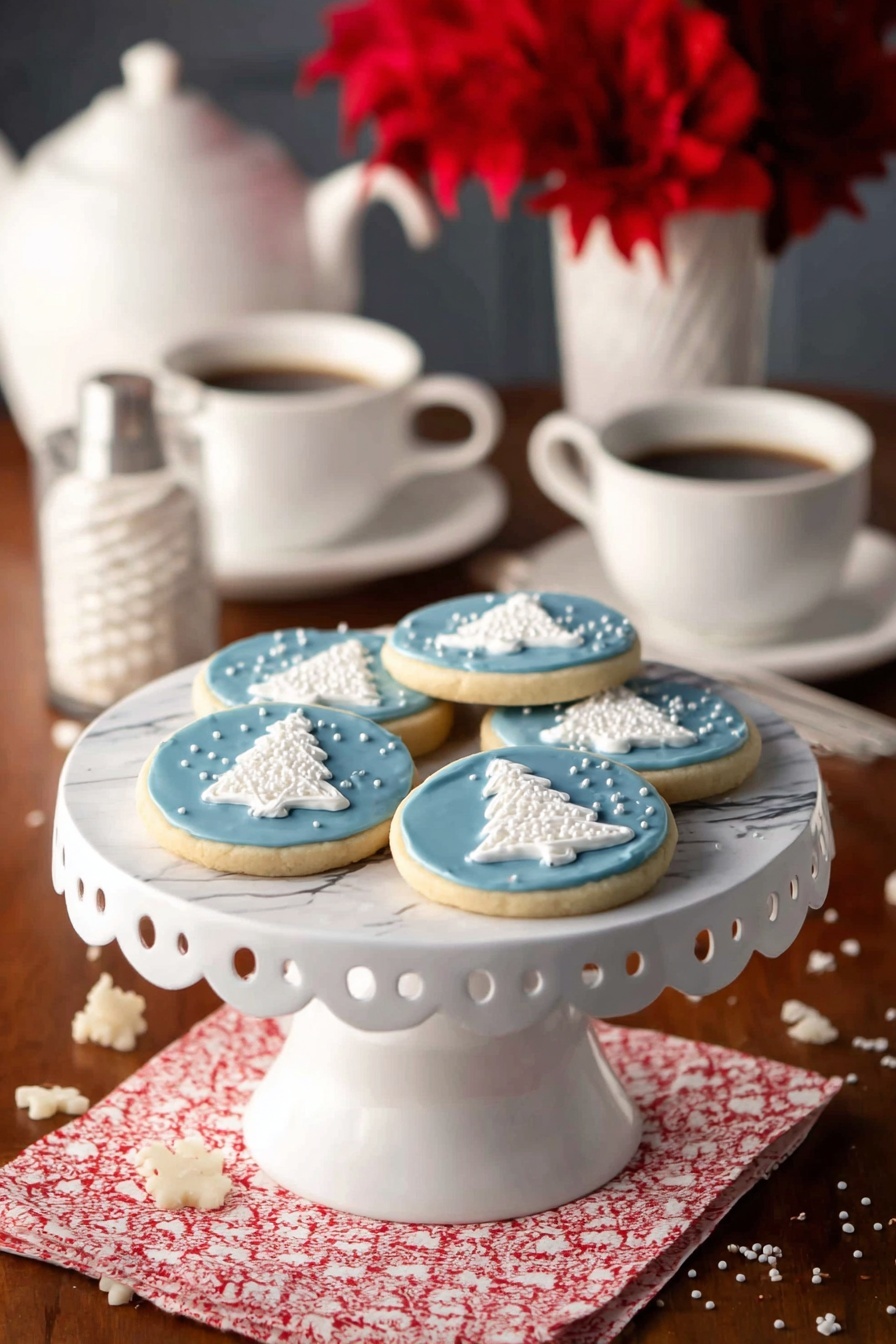
Step 7: Pipe the Buttercream Christmas Trees
For the finishing touch, whip the butter into smoothness, then stir in powdered sugar, half and half, and mint extract. The consistency should be thick but still spoonable. Transfer it to a pastry bag with a small round tip. Starting near the top of each cookie, pipe short horizontal lines that get longer as you move down, creating the silhouette of a Christmas tree. Sprinkle white nonpareils for snow effect and place a pearlized snowflake at the top if you want that extra sparkle. I promise it looks complicated but is really just a fun creative moment!
Pro Tips for Making Decorated Christmas Shortbread Cookies Recipe
- Keep Butter Soft but Cool: Use softened butter not melted—it makes the dough easier to work with but still keeps structure.
- Chill as Long as Possible: I discovered chilling the dough overnight dramatically improves cookie shape and prevents spreading.
- Glaze Consistency Is Key: A thicker glaze will hold decorations better, but too thick makes dipping tricky; aim for that sweet spot by slowly adding half and half.
- Avoid Overbaking: Pull cookies out just as edges start to brown so they stay tender inside, then let them cool completely before decorating.
How to Serve Decorated Christmas Shortbread Cookies Recipe

Garnishes
I like to keep things simple and elegant with garnishes. White nonpareils add a lovely snowy texture, and the little pearlized snowflakes on top of the trees bring that festive sparkle everyone notices. You can also toss edible glitter or crushed candy canes on top before the glaze sets to add a pop of seasonal color and crunch.
Side Dishes
Serve these cookies alongside a warm mug of peppermint hot chocolate or a classic eggnog for ultimate holiday vibes. They also pair beautifully with a pot of mulled wine or spiced cider if you want to elevate your Christmas dessert table.
Creative Ways to Present
One year I arranged these decorated cookies on a large wooden board with fresh pine sprigs and cranberries for a rustic holiday feel. I’ve also packaged them in clear cellophane bags tied with ribbon for hostess gifts, and stacked them in pretty tins layered with parchment paper for a crowd-pleasing cookie exchange.
Make Ahead and Storage
Storing Leftovers
Once your decorated Christmas shortbread cookies have fully dried—usually 4-5 hours or overnight—you can stack them gently in an airtight container. I recommend layering wax paper between tiers to protect the decorations and keep them fresh for up to a week.
Freezing
I’ve found that freezing these cookies works best before glazing and piping. Wrap the unbaked dough or cut shapes tightly in plastic wrap, then place in a freezer-safe container. When ready, thaw in the fridge overnight before baking, glazing, and decorating.
Reheating
If you want to refresh the cookies after storage, I gently warm them in a 300˚F oven for 5-7 minutes. This helps revive that fresh-baked aroma and slight crispness. Just avoid heating too long, or the buttercream and glaze might soften or melt.
FAQs
-
Can I use unflavored extract if I don’t like peppermint?
Absolutely! Vanilla or almond extract work well too. You can customize the flavor to your preference — just make sure to adjust the amount since some extracts are stronger than others.
-
How do I prevent the cookies from spreading too much during baking?
Chilling the dough for at least an hour before baking is key. This firms up the butter and helps cookies hold their shape. Also, avoid using melted butter in the dough—it should be soft but cool.
-
Can I make these cookies gluten-free?
Yes! Swap the all-purpose flour with a gluten-free flour blend and adjust the cornstarch slightly if needed. Keep an eye on dough consistency as gluten-free mixes vary, but these cookies adapt well.
-
What’s the best way to transport these decorated cookies?
I suggest stacking them in a sturdy airtight container with wax paper between layers to protect the decorations. For longer trips, place the container in a hard box or tote to avoid jostling.
-
How can I get a perfectly smooth glaze?
Whisk the glaze thoroughly to remove lumps and pace yourself when adding liquid. The glaze should be thick enough to coat but still flow easily. Dipping cookies one at a time and letting excess drip off helps you get a smooth finish.
Final Thoughts
I absolutely love how this Decorated Christmas Shortbread Cookies Recipe brings that warm, cozy holiday feeling to my kitchen each year. It’s more than just a cookie — it’s a tradition my family and I look forward to, and the best part is sharing these little masterpieces with friends. If you try this recipe, I hope it becomes a staple for your holidays too, filling your home with sweet joy and plenty of happy memories.
Print
Decorated Christmas Shortbread Cookies Recipe
- Prep Time: 25 minutes
- Cook Time: 16 minutes
- Total Time: 41 minutes
- Yield: 24 cookies 1x
- Category: Dessert
- Method: Baking
- Cuisine: American
- Diet: Vegetarian
Description
These Easy Decorated Christmas Shortbread Cookies burst with buttery richness and a tender, crumbly texture, beautifully adorned with a refreshing mint glaze and delicate buttercream piping. Perfect for festive celebrations, these cookies combine classic flavors with charming holiday decoration techniques that are approachable for bakers of all levels.
Ingredients
For the cookies:
- 8 ounces very soft salted butter
- ½ cup powdered sugar
- 1 teaspoon vanilla extract
- 1 ¾ cups all-purpose flour
- ¼ cup cornstarch
For the mint glaze:
- 2 cups powdered sugar
- 4 tablespoons half and half or milk, maybe more
- ¼–1 teaspoon peppermint extract
- blue paste food coloring (Wilton Delphinium Blue recommended)
For the buttercream piping:
- 1 tablespoon very soft butter
- 1 cup powdered sugar
- 1 ½–2 tablespoons half and half or milk
- ½ teaspoon peppermint extract
- white nonpareils
- small white pearlized snowflakes for the tree topper (optional)
Instructions
- Prepare the dough: Line 2 sheet pans with parchment paper and set aside. Place the very soft butter in a medium mixing bowl and stir with a wooden spoon or sturdy spatula until smooth. Add powdered sugar and vanilla extract, mixing by hand for about 30 seconds until fluffy and combined.
- Mix dry ingredients: Evenly sprinkle the flour and cornstarch over the butter mixture. Stir until the flour is incorporated and the dough appears shaggy. Turn the dough onto a lightly floured surface, press into a ball, knead a few times until smooth, then form into a flat disk.
- Roll and cut: Roll out the dough on a lightly floured surface to ⅜-inch thickness. Keep the surface, dough, and rolling pin dusted with flour to prevent sticking. Cut circular shapes with a cookie cutter and place them on prepared pans. Gather and reroll scraps as needed.
- Chill: Refrigerate cut cookies for at least one hour, up to 24 hours, to firm them before baking.
- Bake: Preheat oven to 350˚F (175˚C). Remove cookies from refrigerator and bake for 12-16 minutes, until edges just begin to turn golden. Rotate pans halfway through for even baking. Let cookies cool completely on wire racks before icing.
- Make the glaze: In a medium bowl, combine powdered sugar, half and half, and ¼ teaspoon peppermint extract. Stir until smooth with a thick but pourable consistency. Adjust thickness with more half and half if necessary. Add more peppermint extract to taste. Mix in blue food coloring gradually until desired color is achieved. Transfer glaze to a shallow bowl.
- Glaze the cookies: Hold each cookie by the edges and dip the top side into the glaze ensuring full coverage. Lift out and let excess drip off back into a separate bowl. Once dripping stops, flip the cookie right side up and gently jiggle to spread glaze evenly. Repeat with all cookies. Allow glaze to dry for 15-30 minutes.
- Prepare buttercream piping: Stir softened butter in a bowl until smooth. Add powdered sugar, 1½ tablespoons half and half, and peppermint extract. Mix vigorously until smooth and thick but spoonable. Add more half and half if needed.
- Pipe decorations: Transfer buttercream to a pastry bag fitted with a small round tip (#3). Starting at the upper edge of a cookie, pipe Christmas tree shapes using increasingly wider horizontal lines, stopping about ¼-inch from the bottom edge. Immediately sprinkle white nonpareils on the piped trees. Optionally, add pearlized snowflake toppers. Let dry completely before storing.
Notes
- Half and half is an American dairy product commonly used as creamer; if unavailable, substitute with half milk and half cream, just milk, or just cream.
- The recipe yields about 16 large (3-inch) cookies or 24 smaller (2-inch) cookies.
- Once dried, the cookies can be stacked and stored in an airtight container for several days.
- Chilling the dough before baking helps maintain shape and improves texture.
- Use parchment paper to prevent cookies from sticking and to facilitate easy transfer.
Nutrition
- Serving Size: 1 cookie (approximately 30g)
- Calories: 130
- Sugar: 12g
- Sodium: 60mg
- Fat: 7g
- Saturated Fat: 4.5g
- Unsaturated Fat: 2g
- Trans Fat: 0g
- Carbohydrates: 16g
- Fiber: 0.3g
- Protein: 1g
- Cholesterol: 18mg

Your email address will not be published. Required fields are marked *