

If you’re anything like me, there’s something absolutely comforting about warm, soft dinner rolls fresh from the oven. I’m excited to share this Fluffy Homemade Dinner Rolls Recipe that never fails to bring smiles at my dinner table. Whether it’s a holiday feast or a simple weeknight meal, these rolls elevate the experience and are surprisingly easy to make at home. Stick with me, and you’ll soon have your own batch of pillowy, tender rolls that pull apart like little clouds.
Why You’ll Love This Recipe
- Fluffy Texture: Thanks to the perfect balance of ingredients and kneading technique, these rolls come out light, soft, and airy every single time.
- Simple Ingredients: No fancy or hard-to-find stuff—just pantry basics that come together effortlessly.
- Versatile for Any Meal: These rolls make an excellent side for soups, stews, holiday dinners, or just snack time with butter.
- Great for Beginners: Even if you’ve never made rolls from scratch before, the step-by-step process is incredibly forgiving and rewarding.

Ingredients You’ll Need
What I love about this Fluffy Homemade Dinner Rolls Recipe is how it uses simple, wholesome ingredients that blend perfectly to give you a tender crumb and beautiful rise. You probably already have most of these in your kitchen, making it super convenient to whip up a fresh batch anytime.
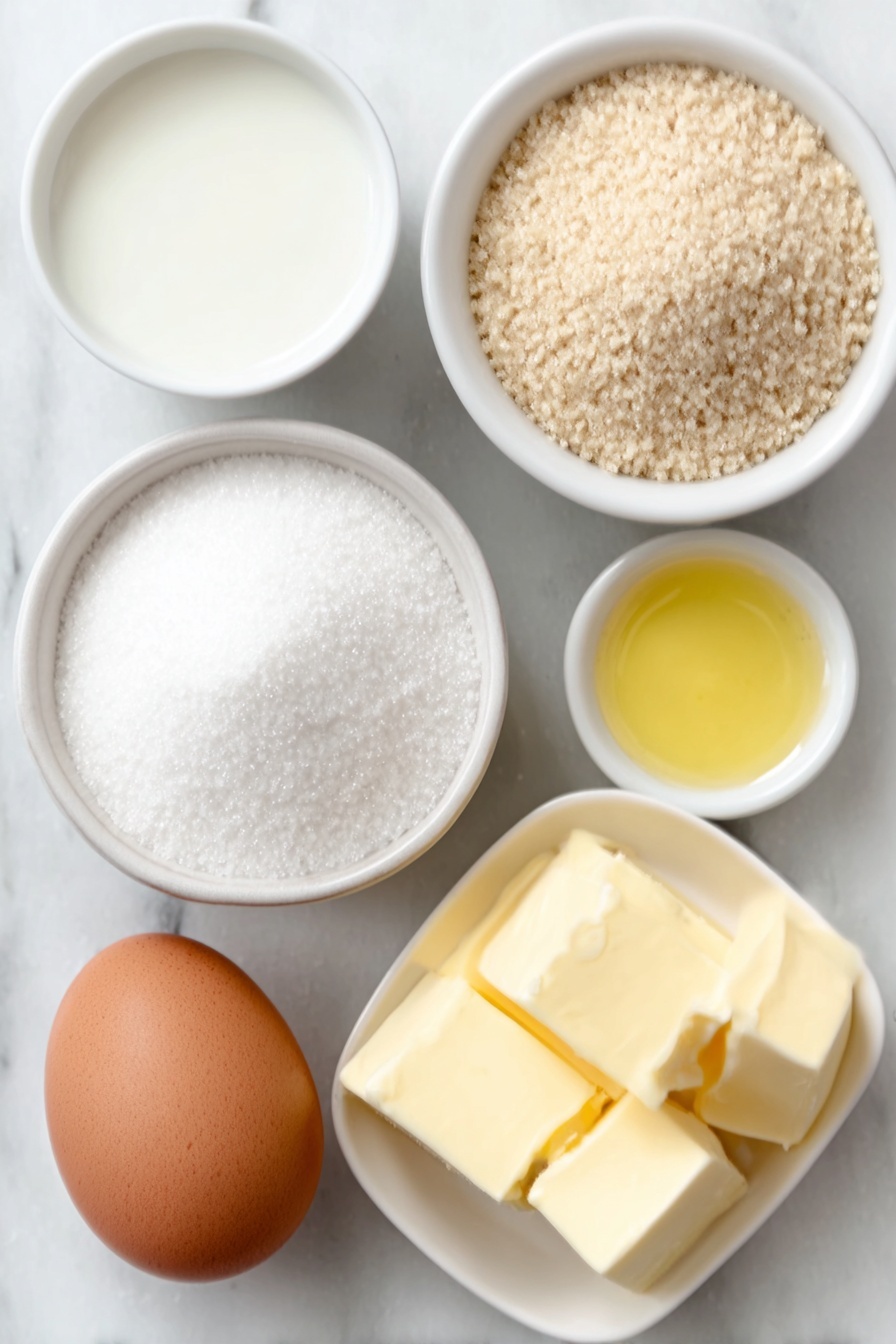
- Whole Milk: Using whole milk adds richness and moisture; I wouldn’t recommend switching to skim as the texture could be affected.
- Water: Helps activate the yeast and balances the dough’s moisture.
- Granulated Sugar: A little sweetness to fuel the yeast and add depth to the flavor.
- Active Dry Yeast: My go-to for fluffy, well-risen rolls. Make sure it’s fresh for the best results.
- Salt: Enhances flavor and strengthens the dough’s structure.
- Large Egg: Adds richness and helps with the dough’s elasticity.
- All-Purpose Flour: The backbone of the dough; I’ve found all-purpose flour perfect here to get that soft yet structured crumb.
- Unsalted Butter: I use this both in the dough and melted on top for that irresistible golden finish and slight buttery crunch.
Variations
One of the things I love about this Fluffy Homemade Dinner Rolls Recipe is how easy it is to make it your own. Whether you want a hint of herbs or need to adjust for dietary needs, you can customize these rolls without losing their signature softness.
- Herb-Infused Rolls: I like adding fresh rosemary or thyme to the dough for a fragrant twist that pairs beautifully with dinner meats.
- Garlic Butter Rolls: Brush the tops with garlic-infused melted butter after baking—my family goes crazy over this variation!
- Whole Wheat Blend: For a healthier option, swap half the flour with whole wheat flour; just be prepared for a slightly denser but still delicious roll.
- Dairy-Free Option: Substitute plant-based milk and butter alternatives if dairy is a concern—you’ll still get a wonderful rise and flavor.
How to Make Fluffy Homemade Dinner Rolls Recipe
Step 1: Warm Up Your Milk and Activate the Yeast
The very first step is warming your milk and water mixture to about 110-115°F. I usually heat them together gently in my microwave, stirring once or twice to equalize the temperature. This step is crucial because yeast loves that warm environment—it wakes up and starts bubbling, which is your cue that it’s alive and active. After whisking in the sugar and sprinkling the yeast, let it sit for 5 to 10 minutes. You’ll see it foam nicely—that’s your yeast ready to work its magic!
Step 2: Mix Your Dough and Add Butter Gradually
Once the yeast is bubbling, add the salt, egg, and flour to the bowl. I use my stand mixer with the paddle attachment on low speed to combine everything, then introduce the softened butter cubes. Incorporating the butter slowly helps the dough get that tender, buttery texture. If you don’t have a mixer, you can definitely mix by hand—you’ll just need a bit of patience and muscle.
Step 3: Knead Your Dough to the Perfect Consistency
Switch out the paddle for the dough hook, and knead to smooth out the dough, about 8 minutes on low speed. Your dough should feel a little sticky but not so much that it’s unmanageable. If it feels overly sticky, sprinkle a tablespoon of flour at a time. Trust me, it’s better to keep it a touch sticky than to add too much flour, which makes rolls dense—that’s a mistake I learned early on! When you touch the dough, it should cling lightly to your finger but still be soft and airy.
Step 4: First Rise – Let the Dough Puff Up Nicely
Place the dough in a large oiled bowl, turning it once to coat in oil. Cover with a towel or plastic wrap and let it rise warm and cozy for 30 to 60 minutes until it doubles in size. My trick for a warm spot is to preheat the oven to 200°F, then turn it off and pop the dough inside—it’s like a little proofing box!
Step 5: Shape the Dough Into Perfect Balls
Once your dough has doubled, transfer it to a floured surface and give it a few gentle kneads to deflate those big bubbles. To create 15 rolls, cut the dough into three large pieces, then cut each into five pieces. I like to shape each into a ball by tucking the edges underneath and spinning it gently between my palms on the counter. This little technique helps make smooth, tight balls that rise up beautifully and bake evenly.
Step 6: Second Rise and Bake
Put your shaped rolls into a greased 13×9-inch baking dish and cover them loosely with a cloth or plastic wrap. Let them rise for another 20 minutes—this last puff is what gives you that soft, fluffy finish. While they’re rising, preheat your oven to 375°F. Then bake them uncovered for about 19-23 minutes, watching for a golden-brown top and fully cooked centers.
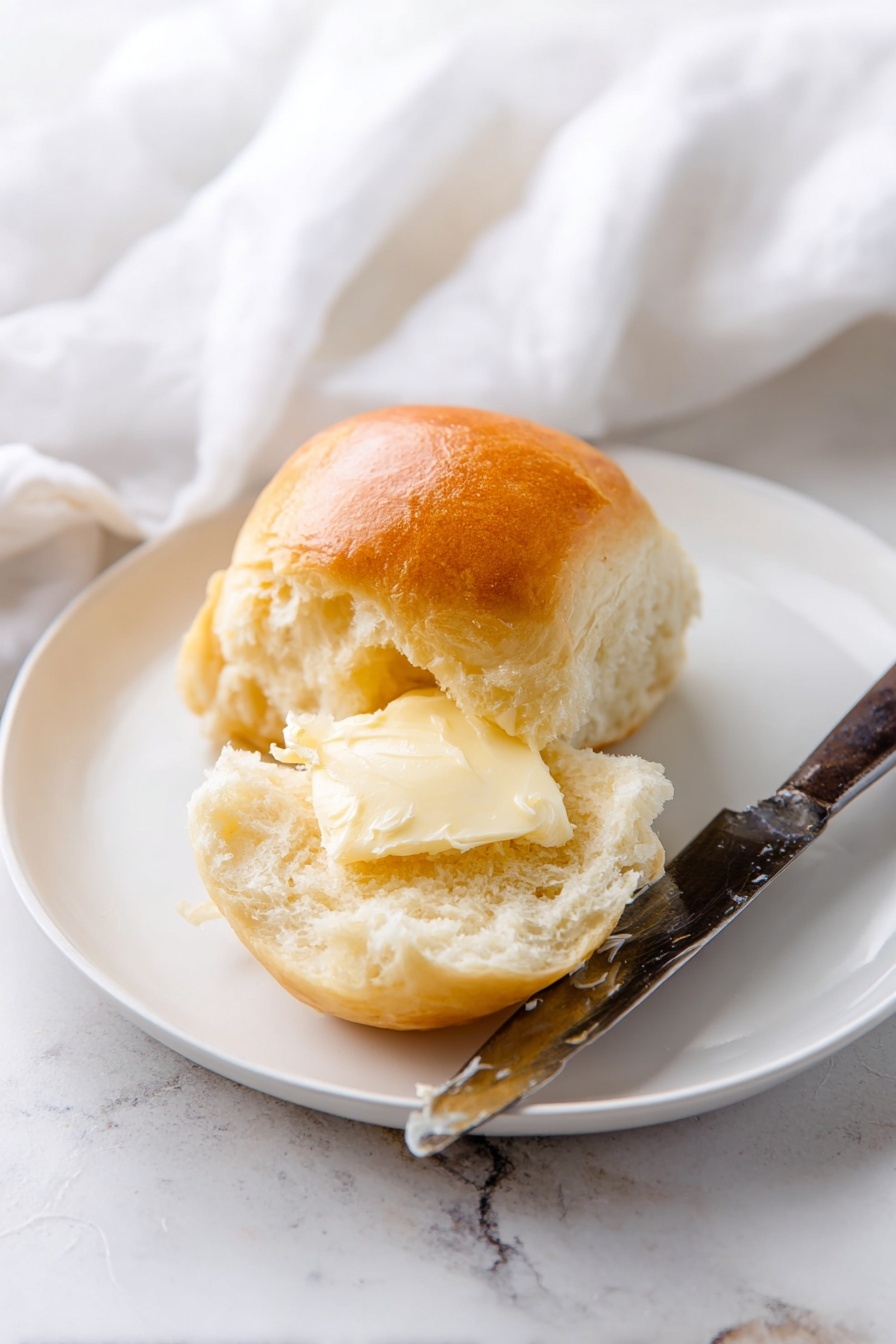
Step 7: Butter Them Up and Serve Warm
Right out of the oven, brush the tops with melted butter for that glossy, rich finish that makes these rolls utterly irresistible. I always like to serve them while warm, straight from the pan, so everyone can pull apart those soft, buttery bites. Get ready for compliments!
Pro Tips for Making Fluffy Homemade Dinner Rolls Recipe
- Don’t Over-Flour: I learned that adding too much flour makes the rolls dense, so stick to just enough to make the dough manageable.
- Temperature Matters: Warm liquids activate yeast best; too hot can kill it, so 110-115°F is just right.
- Patience with Rising: Giving the dough enough time to rise ensures those soft, fluffy interiors everyone loves.
- Butter Brushing After Baking: That final buttery brush seals in moisture and adds sparkle to your rolls’ crust.
How to Serve Fluffy Homemade Dinner Rolls Recipe
Garnishes
When it comes to garnishing, I keep it simple yet indulgent. A sprinkle of flaky sea salt over the melted butter tops just before serving adds a lovely crunch and flavor contrast. Sometimes, I dust with finely chopped fresh herbs like parsley or chives for a touch of color and freshness.
Side Dishes
These rolls pair beautifully with cozy soups and stews—think creamy tomato basil soup or beef stew. They’re wonderful alongside roasted chicken or ham, soaking up all those savory juices. My kids especially love them with homemade chili during cooler evenings.
Creative Ways to Present
For special occasions, I’ve arranged these fluffy rolls in a circular wreath shape on a serving platter, which instantly makes the table look festive and inviting. Adding rosemary sprigs in between each roll not only looks elegant but infuses a gentle aroma. You could also serve them in mini baskets lined with napkins for easy passing around at parties.
Make Ahead and Storage
Storing Leftovers
I usually wrap leftover rolls tightly in plastic wrap or put them in an airtight container at room temperature, and they stay soft for a couple of days. If I know I won’t finish them that quickly, I pop the extras in the freezer to keep that fresh-baked feel longer.
Freezing
Freezing these rolls works brilliantly. I freeze them individually wrapped in plastic wrap and stored in a freezer bag. That way, I can thaw just how many I need. When you’re ready, thaw at room temperature or in the fridge overnight.
Reheating
To bring those frozen or leftover rolls back to life, warm them in a 350°F oven for about 5-8 minutes, tented loosely with foil to keep them from over-browning. This gently refreshes their softness and warmth without drying them out.
FAQs
-
Can I use rapid-rise yeast in this recipe?
Absolutely! Both regular active dry yeast and rapid-rise yeast work well here. If using rapid-rise, you can skip the extra 5-10 minute proofing step and add it directly to your dry ingredients, but I personally find the proofing step gives the best flavor and texture.
-
How do I know if the dough has risen enough?
A good rule of thumb is that the dough should roughly double in size. You can gently poke it with your finger—if the indentation stays, it’s ready. If the dough springs back immediately, it needs more time.
-
Why are my rolls dense instead of fluffy?
This often happens when too much flour is added or if the dough isn’t kneaded enough to develop gluten. Make sure not to over-flour the dough, and knead until smooth and slightly sticky. Also, allowing enough rise time is crucial for fluffiness.
-
Can I make these dinner rolls dairy-free?
Yes! Substitute the whole milk with your preferred plant-based milk and use dairy-free butter alternatives. You may notice a slight change in taste but the rolls will still be soft and delightful.
Final Thoughts
This Fluffy Homemade Dinner Rolls Recipe quickly became a favorite in my house because it strikes the perfect balance of ease, softness, and flavor. Nothing beats the joy of pulling these warm rolls apart and feeling that tender crumb melt in your mouth. If you try this recipe, I promise it’ll become your go-to for family dinners, celebrations, or anytime you want a little homemade comfort. Grab your mixing bowl and some butter — you’re just a few steps away from your own batch of delightful rolls!
Print
Fluffy Homemade Dinner Rolls Recipe
- Prep Time: 40 minutes
- Cook Time: 20 minutes
- Total Time: 2 hours 20 minutes
- Yield: 15 rolls 1x
- Category: Bread
- Method: Baking
- Cuisine: American
- Diet: Vegetarian
Description
These soft and fluffy dinner rolls are perfect for any meal, featuring a tender crumb and buttery top. Made with a combination of milk and water, yeast, and all-purpose flour, they rise twice for optimal lightness and have a golden-brown crust when baked. Ideal for family dinners, holiday gatherings, or serving alongside soups and salads.
Ingredients
For the rolls:
- 1 cup whole milk
- ½ cup water
- 3 tablespoons granulated sugar
- 2 ¼ teaspoons active dry yeast (or one packet)
- 1 ½ teaspoons salt
- 1 large egg
- 4 ½ cups all-purpose flour
- 4 tablespoons unsalted butter, at room temperature and cut into cubes
- 1 tablespoon melted butter, for brushing on rolls after baking
Instructions
- Warm the Milk and Water: Combine the milk and water and heat until the mixture reaches 110-115°F. This can be done in a microwave-safe measuring cup or on the stove. The temperature is crucial to activate the yeast without killing it.
- Activate the Yeast: Pour the warm milk and water mixture into the bowl of a stand mixer. Add the granulated sugar and sprinkle the yeast evenly over the top. Gently whisk to combine and let it sit for 5-10 minutes until the yeast becomes foamy and bubbly, indicating it’s active.
- Add Dry and Wet Ingredients: Add the salt, egg, and all-purpose flour to the yeast mixture. Mix on low speed using the paddle attachment until combined. Add the softened butter and continue mixing until the butter is thoroughly incorporated into the dough.
- Knead the Dough: Switch to the dough hook attachment and knead on low speed for about 8 minutes until the dough is smooth and only slightly sticky. If the dough is too sticky to handle, add flour one tablespoon at a time, being careful not to add too much to maintain a light texture.
- First Rise: Transfer the dough to a lightly oiled large bowl, turning it once to coat all sides. Cover the bowl with a kitchen towel or plastic wrap and let the dough rise in a warm place for 30 minutes to 1 hour, until it doubles in size.
- Prepare Baking Dish and Shape Rolls: Lightly grease a 13×9 inch baking dish. Turn the dough out onto a floured surface and knead a few times to release air bubbles. Cut the dough into 15 equal pieces by first dividing into 3 pieces, then each into 5. Shape each piece into a smooth ball by tucking edges underneath and spinning with your hands.
- Second Rise: Place the shaped dough balls into the prepared baking dish. Cover with a kitchen towel or plastic wrap and allow to rise for an additional 20 minutes until puffy.
- Preheat Oven: While the rolls rise, preheat your oven to 375°F.
- Bake the Rolls: Bake the rolls uncovered for 19-23 minutes, or until the tops are golden brown and the center rolls are fully cooked through.
- Brush with Butter and Serve: Remove the rolls from the oven and immediately brush the tops with melted butter. Serve the rolls warm for best texture and flavor.
Notes
- Both regular active dry yeast and rapid-rise yeast can be used; measure 2 ¼ teaspoons from a jar or use one packet.
- To create a warm environment for rising, preheat your oven to 200°F, then turn it off before placing the dough inside covered.
- Store rolls tightly wrapped at room temperature for up to 2 days or freeze for up to 2 months. Rewarm frozen rolls in a 350°F oven covered to prevent over-browning.
- You can make the rolls a day ahead by completing the first rise and shaping them, then refrigerate overnight. Allow to come to room temperature and rise before baking.
Nutrition
- Serving Size: 1 roll
- Calories: 150
- Sugar: 3g
- Sodium: 220mg
- Fat: 4g
- Saturated Fat: 2.5g
- Unsaturated Fat: 1g
- Trans Fat: 0g
- Carbohydrates: 25g
- Fiber: 1g
- Protein: 4g
- Cholesterol: 30mg

Your email address will not be published. Required fields are marked *