
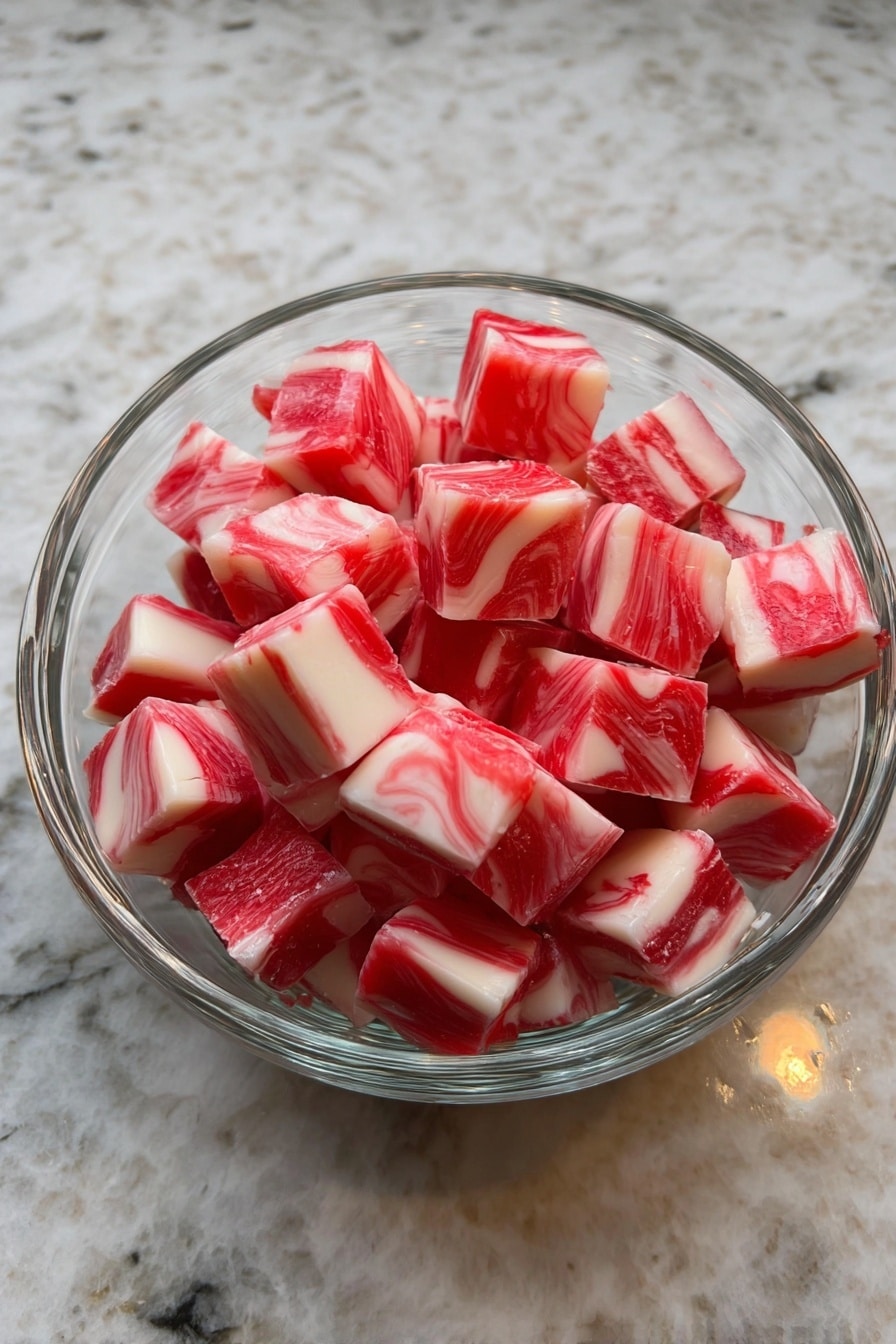
If you’ve ever wanted to make charming, melt-in-your-mouth holiday treats that feel both fancy and nostalgic, you’re going to love this Easy Homemade Peppermint Butter Mints Recipe. I absolutely love how these little mints turn out—soft, buttery, and bursting with refreshing peppermint, they’re perfect for gifting, decorating your holiday table, or just sneaking a few whenever you need a little sweet pick-me-up. Stick with me, and I’ll walk you through every step to make your peppermint mints come out flawless!
Why You’ll Love This Recipe
- Simple Ingredients: You likely have everything in your pantry, no complicated shopping trips required.
- Perfect Texture: Soft and creamy, not chalky or hard, just how butter mints are meant to be.
- Customizable Colors & Shapes: The peppermint twist is classic, but you can add your own flair with different color combos.
- Great for Gifts and Parties: These mints store well and make an elegant homemade gift or holiday treat.

Ingredients You’ll Need
Each ingredient in this Easy Homemade Peppermint Butter Mints Recipe works together to create that perfect balance of sweetness, creaminess, and refreshing peppermint. I always recommend using good quality butter because it makes such a difference, and powdered sugar is essential for the right smooth texture without any graininess.
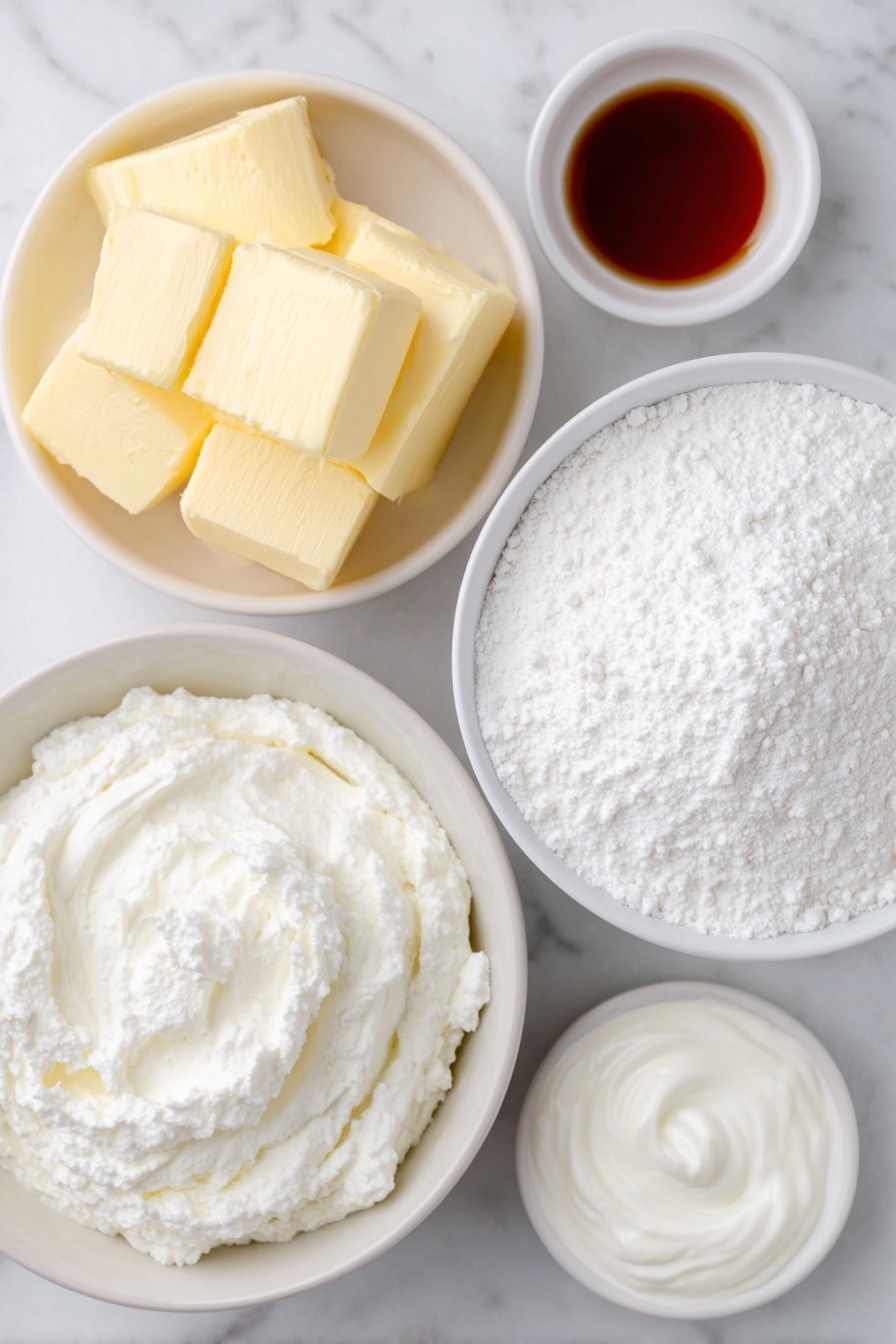
- Butter: Room temperature is key — it should be soft but not melted, so it blends smoothly without making the dough greasy.
- Powdered sugar: This provides the sweetness and the powdery texture typical of classic butter mints.
- Heavy whipping cream: Adds just enough moisture and richness to keep the mints luscious and soft.
- Peppermint extract: Go light at first—you can always add more. High-quality extract really elevates the flavor.
- Red coloring gel or food coloring: I love to use gel because it’s vibrant and doesn’t make the dough too wet.
Variations
One of the things I love most about this Easy Homemade Peppermint Butter Mints Recipe is how easily you can play around with it to suit your taste or occasion. I often switch up the colors and sometimes even the flavor – you might be surprised how fun and versatile it can be!
- Different Flavors: I’ve tried lemon or orange extracts instead of peppermint for a fresh twist, and my family is always intrigued by new flavors like vanilla or almond.
- Dairy-Free Version: Swap out butter for a plant-based butter and use coconut cream to keep them creamy yet vegan-friendly.
- Festive Colors: Beyond red and white, try green and white for St. Patrick’s Day or pastel shades for Easter—this candy is like a blank canvas!
- Shape Play: Instead of twisting, you can roll the dough into balls or press into molds for fun shapes that kids love.
How to Make Easy Homemade Peppermint Butter Mints Recipe
Step 1: Prep Your Workspace
I like to cover my counter with parchment paper—it makes cleanup a breeze and keeps the mints from sticking. Wax paper or a silicone baking mat works just as well. Keep extra powdered sugar nearby so you can dust your hands or surface if the dough gets sticky while twisting and rolling.
Step 2: Beat the Butter Until Fluffy
Using room temperature butter, beat it in a large bowl until it’s light and fluffy—this usually takes about 2-3 minutes with a hand mixer. This step is crucial because it gives the mints that creamy texture we love and ensures a smooth mixture when you add the other ingredients.
Step 3: Mix in the Cream, Powdered Sugar & Peppermint
Add the heavy whipping cream, powdered sugar, and peppermint extract to your fluffy butter. I usually start with the minimum amount of peppermint and taste as I go—sometimes you want that subtle hint, sometimes that full peppermint punch! Mix thoroughly until the dough becomes firm enough to handle but not dry or crumbly.
Step 4: Color and Divide the Dough
Divide your dough into two parts, coloring about one-quarter red and leaving three-quarters white. I use gel food coloring because it blends in evenly without thinning the dough. Roll each colored portion into balls and set them aside on your parchment-covered workspace.
Step 5: Twist and Shape Your Mints
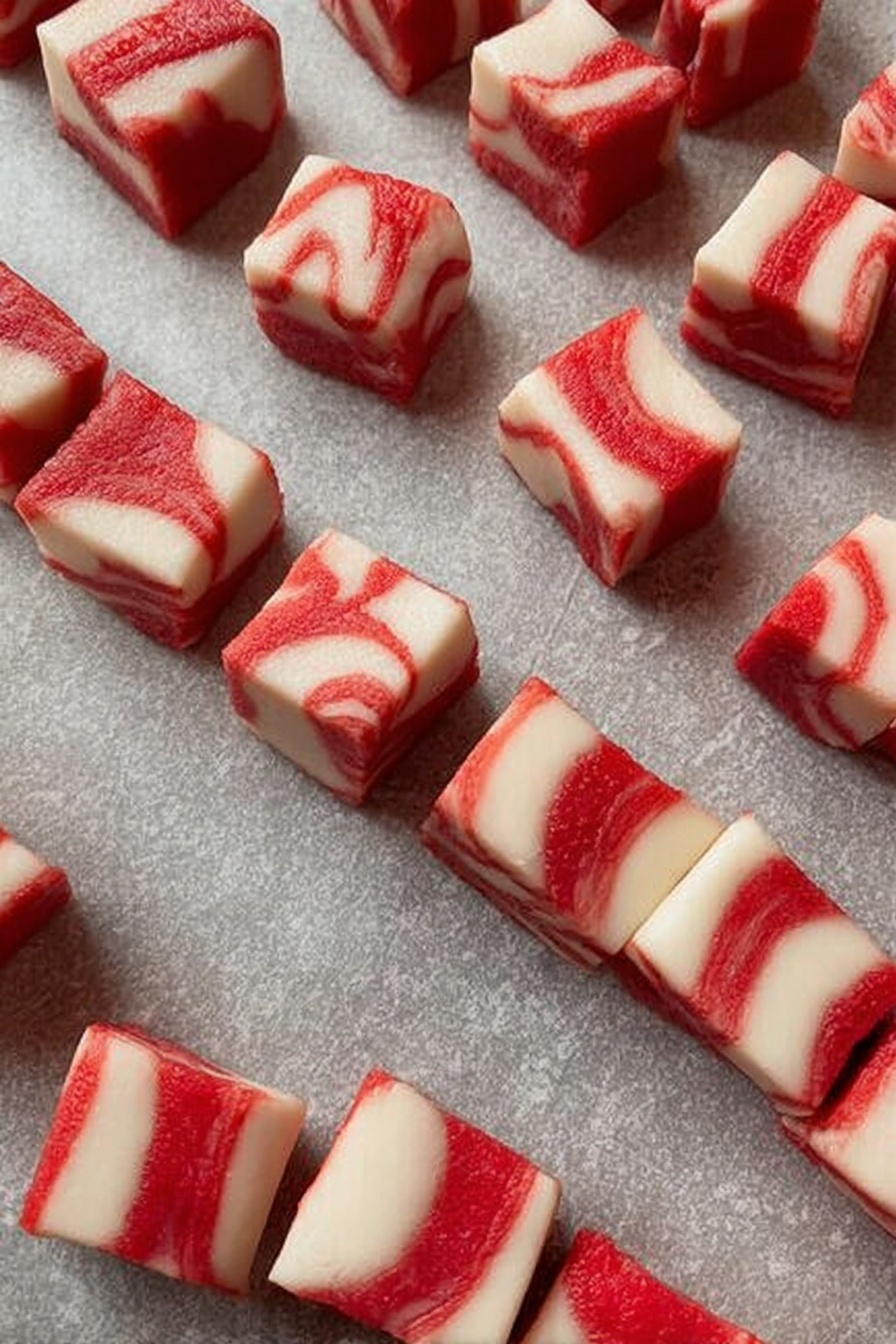
This is the fun part! Roll smaller ropes of the red dough alongside thicker ropes of white, then twist them together tightly like you would with two strands of hair. Pinch the twisted rope into smaller sections and roll gently between your palms to smooth. Place them back on the parchment or wax paper to dry a bit before cutting.
Step 6: Cut and Dry Your Mints
After the mints have been drying for about an hour or two—just until they’re less sticky but still pliable—I slice them using a pizza cutter. It’s tempting to cut them right away, but patience really pays off here. Once cut, let the individual mints dry out for a full 24 hours at room temperature to develop that perfect buttery finish.
Pro Tips for Making Easy Homemade Peppermint Butter Mints Recipe
Pro Tips for Making Easy Homemade Peppermint Butter Mints Recipe
- Soft But Firm Dough: Don’t overdo the cream; adding too much makes the dough too soft to handle easily.
- Perfect Drying Time: Waiting the full 24 hours before storing is key for mints that hold their shape and don’t stick together.
- Twist Technique: Take your time twisting the ropes tightly—this ensures the mint stripes stay beautiful and won’t separate while drying.
- Use a Sharp Pizza Cutter: A dull blade will mash the mints, so keep your cutter sharp for clean cuts.
How to Serve Easy Homemade Peppermint Butter Mints Recipe
Garnishes
I love serving these mints with a tiny sprinkle of crushed candy canes or a few peppermint leaves for an extra festive touch. It adds a little texture and makes them pop visually, especially for holiday gatherings.
Side Dishes
These mints pair beautifully with a hot cup of coffee or tea, especially after a rich holiday meal. They’re also a refreshing palate cleanser alongside dense desserts like chocolate cake or pecan pie.
Creative Ways to Present
For a special occasion, I’ve arranged butter mints in decorative glass jars with ribbon tied around the neck or presented them in mini cupcake liners arranged on a festive platter. They also make stunning edible place cards when tagged with guests’ names!
Make Ahead and Storage
Storing Leftovers
Once your mints have dried completely for 24 hours, I store them in an airtight container at room temperature. They keep beautifully for 2 to 3 weeks without losing their classic texture or flavor. No need to refrigerate unless your kitchen is super warm.
Freezing
Freezing these mints isn’t something I usually do, but if you need to make them way ahead, freeze the rolled dough before twisting, wrapped tightly in plastic. Thaw in the fridge before shaping. Finished mints don’t freeze as well because their soft texture can suffer.
Reheating
These mints don’t really need reheating since they’re best enjoyed at room temperature. If they’ve softened too much, just pop them in the fridge for 10-15 minutes to firm back up before serving.
FAQs
-
Can I use almond extract instead of peppermint in this recipe?
Absolutely! Almond extract is a great substitute and offers a lovely, slightly nutty flavor. Just use it sparingly as it’s quite potent. You might want to start with half the amount and adjust to taste.
-
How do I prevent my mints from sticking together?
Drying the mints for a full 24 hours at room temperature before storing is the best way to prevent stickiness. Also, storing them in an airtight container with layers separated by parchment or wax paper helps keep them fresh and separate.
-
What if my dough feels too sticky to work with?
Dusting your hands and work surface lightly with powdered sugar usually helps. If it’s still too sticky, you can gently knead in a bit more powdered sugar, but be careful not to add too much or the mints will become dry.
-
Is it necessary to use cream, or can I substitute milk?
Heavy cream gives these mints their rich texture, but you can substitute whole milk if needed. Keep in mind the dough might be slightly less creamy and firm, so add it slowly and monitor the consistency.
Final Thoughts
I can’t tell you how many times this Easy Homemade Peppermint Butter Mints Recipe has been my holiday lifesaver. It’s simple enough to whip up during busy seasons and always impresses guests with that classic melt-in-your-mouth charm. If you love peppermint and buttery sweets like I do, you’re going to have so much fun making (and sharing!) these little mints. Give it a try, and trust me—you’ll be coming back to this recipe year after year.
Print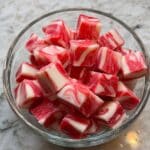
Easy Homemade Peppermint Butter Mints Recipe
- Prep Time: 30 minutes
- Cook Time: 0 minutes
- Total Time: 30 minutes prep plus 24 hours drying
- Yield: Approximately 100 pieces 1x
- Category: Candy
- Method: No-Cook
- Cuisine: American
Description
These Soft Christmas Peppermints, also known as Easy Butter Mints, are a festive, melt-in-your-mouth treat perfect for holiday gatherings. Made with butter, powdered sugar, and peppermint extract, these buttery candies are subtly flavored with peppermint and colored red and white for a classic Christmas look. They require no baking and simply need to dry before serving, making them an easy and delightful homemade holiday candy.
Ingredients
Butter Mints Ingredients
- 1/2 cup butter, room temperature
- 4 cups powdered sugar
- 2 tablespoons heavy whipping cream
- 1/4 teaspoon peppermint extract (adjust to taste)
- Red coloring gel or food coloring
Instructions
- Prepare workspace: Line a clean surface with parchment paper, waxed paper, or a baking mat. Keep extra powdered sugar nearby for rolling the dough.
- Cream the butter: Place the room temperature butter in a large mixing bowl and beat until light and fluffy, creating a smooth base for the mints.
- Add ingredients: Add the heavy whipping cream, powdered sugar, and peppermint extract to the butter. Mix well until the dough forms a firm consistency suitable for shaping.
- Divide and color dough: Split the dough into two portions. Color one quarter with red coloring gel; leave the remaining three quarters white. Form both into balls and set aside.
- Form ropes: Roll small portions of the red dough into thin ropes and the white dough into thicker ropes. Place a red rope alongside a white rope.
- Twist ropes: Twist the red and white ropes together to create a festive striped candy rope.
- Shape the mints: Pinch off smaller sections from the twisted rope. Roll each section between your palms to smooth and shape the candy.
- Dry the ropes: Lay the twisted ropes on wax paper and allow them to dry for 1–2 hours, so they aren’t too sticky for cutting.
- Cut into pieces: Using a pizza cutter, slice the ropes into bite-sized pieces once partially dried.
- Complete drying: Leave the cut pieces out at room temperature for 24 hours to fully dry and set.
- Store the candy: After drying, store the butter mints in an airtight container at room temperature. Refrigeration is optional but not necessary.
Notes
- Homemade butter mints store well and remain fresh for 2–3 weeks when kept in an airtight container at room temperature after fully drying.
- Allowing the candy to dry completely ensures the best firm texture; without drying, they can be sticky and soft.
- Adjust the peppermint extract amount to preferred strength for flavor.
- Use a pizza cutter for clean, even slices of the candy ropes.
Nutrition
- Serving Size: 1 piece (approx. 3 g)
- Calories: 30
- Sugar: 4.5 g
- Sodium: 5 mg
- Fat: 1.3 g
- Saturated Fat: 0.8 g
- Unsaturated Fat: 0.4 g
- Trans Fat: 0 g
- Carbohydrates: 4.7 g
- Fiber: 0 g
- Protein: 0.1 g
- Cholesterol: 5 mg

Your email address will not be published. Required fields are marked *