

If you’re looking to wow your guests this holiday season with something truly festive and delicious, you’re going to love this Christmas Tree Charcuterie Board Recipe. It’s not just a treat for the taste buds, but also a stunning centerpiece for your holiday table that brings everyone together. I’ve tried this a bunch of times, and every single time, it brings out smiles and “wow” moments—whether for a cozy family night or a bright holiday party. Keep reading, because I can’t wait to share all the tips that make this board both gorgeous and easy to put together.
Why You’ll Love This Recipe
- Festive and Fun Presentation: It transforms a simple charcuterie board into a Christmas tree shape that’s visually striking and perfect for holiday vibes.
- Easy to Customize: You can swap out ingredients based on what’s in season or your guests’ preferences without losing the wow factor.
- No Stress Assembly: Once you get the hang of laying out the rosemary and celery outlines, the rest is just adding tasty goodies in a fun pattern.
- Crowd-Pleaser Guaranteed: My family goes crazy for this board every year—it’s a perfect mix of sweet, savory, crunchy, and fresh.

Ingredients You’ll Need
What’s great about this Christmas Tree Charcuterie Board Recipe is that it combines fresh herbs, fruits, cheese, and nuts in a way that’s colorful and totally balanced. When shopping, look for fresh, vibrant produce and good-quality cheeses because those small details really show through on your board.
- Fresh Rosemary Sprigs: These create the green “branch” outline and add a beautiful, natural pine scent—buy fresh for the best shape and aroma.
- Celery Stalk: Acts as the tree trunk—choose a sturdy, crisp stalk that can stand upright well.
- Red, Green, and Black Seedless Grapes: Small clusters add juicy bursts and colorful variety; clip into tiny bunches or remove stems for easy picking.
- Sharp Cheddar Cheese: Its bold flavor contrasts nicely with the fruit; cut into uniform squares for a neat look.
- Monterey Jack Cheese: Mild and creamy, it balances the sharp cheddar perfectly.
- Mild or Medium Cheddar Cheese: Adds an extra layer of familiar, comforting cheddar flavor.
- Fresh Cranberries: Bright, tart accents that look like Christmas ornaments scattered on the tree.
- Star Fruit (Carambola): Sliced star shapes add the perfect “star” on top and decorative points throughout the board; if you can’t find it, pineapple or apple slices cut into stars work well too.
- Assorted Nuts: Provides crunchy texture and can double as the “pot” at the base; almonds are my favorite for this.
- Green Kiwi Fruit: Adds a pop of vibrant green and refreshing sweetness.
Variations
I love playing around with this Christmas Tree Charcuterie Board Recipe depending on who I’m serving it to. Whether you want to keep it traditional or shake things up, it’s really easy to swap ingredients and still keep the festive vibe alive.
- Vegetarian Variation: Use plant-based cheeses and add more nuts or veggies like cherry tomatoes for color—you’ll still get that gorgeous board your guests admire.
- Seasonal Fruit Swap: In winter, pomegranate seeds or dried apricots can replace grapes for a tart sweetness; in summer, berries bring fresh pops of color.
- Gluten-Free Option: This recipe is naturally gluten-free but feel free to add gluten-free crackers or sliced baguettes for serving without worries.
- Kid-Friendly Twist: Kids love small bites—try mini cheese cubes with honey drizzle and use colorful fruit gummies to decorate instead of nuts or spicy flavors.
How to Make Christmas Tree Charcuterie Board Recipe
Step 1: Create Your Tree Outline with Rosemary and Celery
Start by laying out your fresh rosemary sprigs to form the triangular shape of a Christmas tree. Begin with a small point at the top and spread the sprigs wider at the bottom. Don’t worry if it looks a bit messy at first—you’ll adjust it as you arrange the other ingredients. Then place the celery stalk vertically as the tree trunk at the base; cut it to a length that looks balanced with your rosemary branches. This part is a little like arranging a painting—you’ll find what feels and looks right as you go.
Step 2: Layer Your Rows of Cheese and Fruit
Starting from the bottom, arrange a row of your cheese squares—sharp cheddar works best here for a punch of flavor. Next to that, add a cluster of red grapes in a neat line. Repeat this pattern upward with rows of Monterey Jack cheese, green grapes, mild cheddar, and black grapes, creating alternating stripes. You’ll see the tree shape start to come alive as you go! For the top triangle, place your kiwi slices carefully in a triangle formation—this creates a fresh green crown for your tree.
Step 3: Add Star Fruit, Cranberries, and Nuts for Final Touches
Finish your tree by placing one slice of star fruit at the very top—this is your beautiful natural “star.” Then scatter additional star fruit slices across the tree for that twinkling effect. Add fresh cranberries to fill in gaps and mimic ornaments, and sprinkle your assorted nuts—particularly almonds—around the base and between the fruits. If you like, create a “pot” for your tree using almonds or other nuts around the celery stalk base. This final step really amps up the festive, natural appeal and invites guests to grab a little bit of everything.
You can assemble this Christmas Tree Charcuterie Board Recipe up to four hours in advance—just cover it tightly with plastic wrap and keep it chilled until it’s time to impress everyone.
Pro Tips for Making Christmas Tree Charcuterie Board Recipe
- Fresh Herb Framing: I learned that using fresh rosemary not only looks like pine branches but also keeps the board smelling amazing—don’t hesitate to fluff and reposition as you go.
- Uniform Cheese Cubes: Cutting your cheese into similar-sized cubes helps keep your tree neat and makes picking bites easier.
- Balance the Flavors and Colors: I always arrange alternating rows of cheese and grapes to create contrast—this keeps the board interesting both visually and taste-wise.
- Avoid Overcrowding: Sometimes less is more—leave a little breathing room around the edges so the “tree” shape stays clear and pretty.
How to Serve Christmas Tree Charcuterie Board Recipe
Garnishes
I typically garnish the board with fresh rosemary sprigs tucked around the edges for that evergreen feel. Sometimes I add a few extra cranberries or star fruit slices on the platter outside the tree shape to tie everything together. Fresh herbs really elevate the aroma and look, which delights guests before they even take their first bite.
Side Dishes
To keep the snack fest rolling, I like serving this charcuterie board with some crusty baguette slices, honey, and fig jam on the side—that combo is magical with the cheeses and fruit. For drinks, a sparkling cider or light red wine pairs perfectly and keeps things festive.
Creative Ways to Present
One year, I laid the ingredients directly onto a wooden cutting board in the shape of the tree, which guests loved because it felt rustic and natural. You can also use a large white platter to make the colors pop. Adding small string lights around the board or placing it near a centerpiece with candles takes your presentation next-level festive and cozy.
Make Ahead and Storage
Storing Leftovers
If you have leftovers (which is rare!), loosely cover the board with plastic wrap and refrigerate. I usually separate the cheese and fruit into airtight containers to keep them fresh longer. The rosemary and celery can be refreshed by placing them in a small glass of water briefly before reassembling if needed.
Freezing
Honestly, I don’t recommend freezing this charcuterie board because fresh fruit and herbs lose their texture and taste after freezing. It’s best enjoyed fresh within a few hours and stored chilled if necessary.
Reheating
This is a cold, fresh snack board, so it doesn’t require reheating. Just bring it back to room temperature before serving if it’s been in the fridge a while—that’s when the cheeses are at their tastiest.
FAQs
-
Can I prepare the Christmas Tree Charcuterie Board Recipe ahead of time?
Absolutely! You can assemble the entire board up to 4 hours before serving. Just cover it with plastic wrap and keep it refrigerated to maintain freshness and vibrancy. Bringing it back to room temperature before serving helps the cheese flavors shine.
-
What can I use if I can’t find star fruit?
If star fruit isn’t available, pineapple slices cut into star shapes, apple slices, or even kiwi can work as festive “stars” on your board. The key is to have a bright, star-shaped accent for the top and scattered decorations.
-
How do I keep the grapes fresh and juicy on the board?
Choose firm, seedless grapes without bruises, and rinse them just before assembly. Dry them well with paper towels to avoid excess moisture on the board, which can affect other ingredients.
-
Can I customize the types of cheese used on the board?
Definitely! The recipe uses sharp cheddar, Monterey Jack, and mild cheddar for balance, but you can mix in your favorites like gouda, brie, or blue cheese depending on your taste and what’s available.
-
Is this recipe suitable for children?
Yes, it’s very kid-friendly! Just consider swapping out nuts if allergies are a concern and choosing milder cheeses and sweeter fruits to suit their palates. The festive shapes and colors usually excite kids to dig in.
Final Thoughts
This Christmas Tree Charcuterie Board Recipe has become my go-to for holiday celebrations because it’s just so much fun to make and share. I love how it brings a little magic to the table without any complicated cooking—just fresh ingredients arranged thoughtfully. Whether you’re a seasoned host or just want a show-stopping snack, I promise this board will be a hit. So grab your rosemary sprigs and festive spirit, and start building your own edible Christmas tree—it’s a joyful way to spread holiday cheer one bite at a time!
Print
Christmas Tree Charcuterie Board Recipe
- Prep Time: 25 minutes
- Cook Time: 0 minutes
- Total Time: 25 minutes
- Yield: 10 servings 1x
- Category: Appetizer
- Method: No-Cook
- Cuisine: American
Description
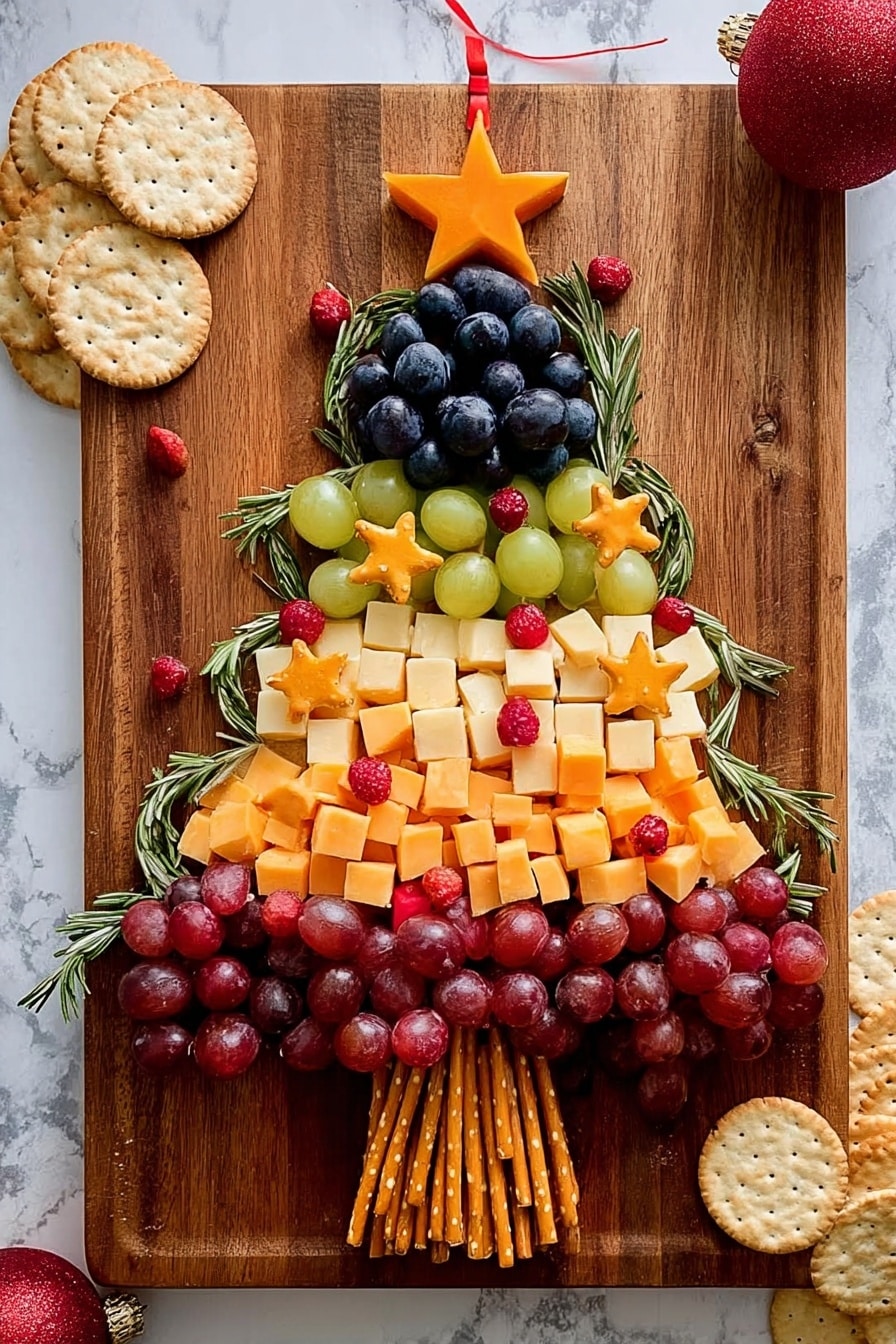
Create a festive and visually stunning Christmas Tree Shaped Charcuterie Board that’s perfect for holiday gatherings. This no-cook recipe combines fresh fruits, assorted cheeses, nuts, and herbs arranged artfully to resemble a Christmas tree, making it a delightful centerpiece and crowd pleaser for your party table.
Ingredients
Herbs
- 10 fresh Rosemary sprigs (more or less depending on size)
Vegetables
- 1 celery stalk
Fruits
- Red seedless grapes, clipped into small clusters or stems removed
- Green seedless grapes, clipped into small clusters or stems removed
- Black seedless grapes, clipped into small clusters or stems removed
- ½ cup fresh cranberries
- 1–2 star fruits, sliced
- 1 green kiwi fruit, sliced
Cheeses
- 4 ounces sharp cheddar, cut into ¾-inch squares
- 4 ounces Monterey Jack, cut into ¾-inch squares
- 4 ounces mild or medium cheddar, cut into ¾-inch squares
Nuts
- 1 cup assorted nuts (almonds preferred for the pot shape)
Instructions
- Create the Tree Outline: Arrange the rosemary sprigs on your board starting at the top center and spread them outward as you move downward, forming the shape of a Christmas tree. Adjust the sprigs as needed to get a balanced tree shape.
- Add the Trunk: Place the celery stalk vertically at the bottom center of the tree outline to serve as the tree trunk. Adjust the length to fit the overall look of your tree.
- Layer the Ingredients: Beginning at the bottom of the tree shape, create rows with a narrow-to-wide arrangement. Place a row of cheese squares, then a row of red grapes, another row of cheese, followed by green grapes, then cheese again, and finally black grapes. At the top part of the tree, arrange the kiwi slices in a triangular pattern to simulate the tree’s leafy texture.
- Add the Star and Decorations: Place one star fruit slice at the very tip of the tree to represent the star. Scatter the remaining star fruit slices randomly throughout the tree. Intermingle fresh cranberries and assorted nuts around the tree branches and within empty spaces to fill out the design and add texture.
- Form the Pot: Use almonds or other nuts to create a square-shaped base around the bottom of the celery stalk, simulating the tree’s pot.
- Final Touches and Serving: Your Christmas Tree shaped charcuterie board is now assembled and ready to serve. You can prepare this up to 4 hours in advance; cover the board with plastic wrap and refrigerate until serving time.
Notes
- This Christmas tree charcuterie board is customizable to suit various dietary preferences by swapping cheeses or nuts as needed.
- If star fruit is unavailable, you can substitute with yellow bell pepper slices or pineapple pieces cut into star shapes.
- The nut “pot” adds a charming finishing touch but can be omitted or replaced with any decorative item if desired.
- Assemble the board close to serving time for maximum freshness, or store refrigerated up to 4 hours covered with plastic wrap.
- Consider adding other festive fruits like pomegranate arils or dried cranberries for extra color and flavor.
Nutrition
- Serving Size: 1/10th of the board
- Calories: 180
- Sugar: 10g
- Sodium: 120mg
- Fat: 12g
- Saturated Fat: 5g
- Unsaturated Fat: 6g
- Trans Fat: 0g
- Carbohydrates: 12g
- Fiber: 2g
- Protein: 6g
- Cholesterol: 20mg

Your email address will not be published. Required fields are marked *