

If you’re craving warm, soft bread slathered in garlicky goodness, then this Garlic Butter Dinner Rolls Recipe is about to become your new favorite. I absolutely love how these rolls turn out – pillowy soft on the inside with a golden, buttery crust that’s loaded with fresh garlic flavor. Whether you’re serving these at family dinners, holiday feasts, or just craving a comforting snack, these rolls make every meal a little extra special. Stick with me, and I’ll share everything you need to make these irresistible rolls at home.
Why You’ll Love This Recipe
- Pillowy Soft Texture: The long kneading and yeast rise give these rolls that perfect fluffy crumb you’ll fall in love with.
- Rich Garlic Butter Flavor: Fresh garlic sautéed in butter with parsley makes every bite pop with flavor.
- Perfect for Any Occasion: Whether it’s a simple weeknight dinner or a festive holiday table, these rolls shine.
- Made from Scratch, Yet Easy: With just a few ingredients and my step-by-step tips, you’ll breeze through making these homemade rolls.

Ingredients You’ll Need
One of the things I adore about this Garlic Butter Dinner Rolls Recipe is its simplicity. The ingredients are easy to find and work beautifully together to create those dreamy rolls. Here’s a quick rundown of the essentials and why each piece matters.
- Whole milk: Warm milk activates the yeast and adds richness to the dough.
- Active dry or instant yeast: The magic behind the rise and fluffiness of the rolls.
- Sugar: Feeds the yeast and helps with browning for that perfect crust.
- All-purpose flour: Creates structure; I always recommend fresh, high-quality flour for best results.
- Large egg: Adds moisture and tenderness to the dough.
- Salt: Essential for balancing sweetness and bringing out flavors.
- Unsalted butter: Used in the dough for a tender crumb—it’s best softened to room temperature.
- Egg yolk and milk (for egg wash): Gives the rolls that gorgeous glossy finish.
- Salted butter (for garlic butter): Melted and infused with garlic for spreading.
- Fresh garlic cloves: Finely chopped to release that punchy garlic aroma and flavor.
- Fresh parsley: Adds just the right amount of color and freshness to the butter topping.
Variations
One of the best things about this Garlic Butter Dinner Rolls Recipe is how easy it is to make it your own. I often tweak the recipe to fit different occasions or dietary needs, and you’ll find that experimenting is half the fun!
- Herb-infused butter: Sometimes, I swap parsley for rosemary or thyme in the garlic butter—adds a lovely twist that’s perfect for holiday meals.
- Cheesy rolls: I like to sneak in shredded parmesan or mozzarella inside the dough for a gooey surprise in every bite.
- Whole wheat twist: For a heartier version, swap half the all-purpose flour with whole wheat flour. Just know it might take a bit longer to rise.
- Vegan version: You can replace the butter with vegan margarine and the milk and egg with plant-based alternatives and flax egg—it’s wonderful once you get the kneading right!
How to Make Garlic Butter Dinner Rolls Recipe
Step 1: Activate Your Yeast and Mix the Dough
Start by warming your milk to around 110°F—warm but not hot, so you don’t kill the yeast. Stir in the yeast until it blooms, which usually takes about 5 minutes. Then add the sugar, flour, egg, salt, and softened butter all to the same bowl. I love using a large bowl here for plenty of room to mix. Stir everything together until you get a shaggy dough. Don’t worry if it looks rough now—that first mix is just the beginning.
Step 2: Knead the Dough Until It’s Smooth
Transfer the dough onto a clean surface and get ready to knead! Use your palms with a gentle push-pull motion for about 15 minutes. Yes, fifteen minutes might sound like a workout, but trust me, it’s the secret to that soft, elastic dough. The dough will start off sticky, and that’s completely normal—resist the urge to add more flour. You’ll know you’re done kneading when you can stretch a little piece of dough thin enough to see light through it without tearing—a neat little trick called the windowpane test.
Step 3: Let the Dough Rise Until It Doubles
Pop your dough into a lightly greased bowl, cover it tightly with cling wrap, and let it rise in a warm, humid spot. I usually place mine in the oven with just the light on—perfect cozy environment. It takes about 90 minutes for the dough to double in size. This rise is so important because it develops the flavor and creates that dreamy texture.
Step 4: Shape the Rolls Like a Pro
Once risen, punch the dough down gently and turn it onto a clean surface. Divide it into 12 equal pieces. I love this part because rolling each piece into a tight, smooth ball feels almost therapeutic. I place the dough on one flat palm and twist it with the other, curling my fingers slightly to create surface tension—this helps avoid wrinkles or cracks on the rolls, giving them that perfect round look after baking. Arrange the balls evenly on a parchment-lined 9×13” baking sheet.
Step 5: The Egg Wash and Second Rise
Mix the egg yolk with a tablespoon of milk for your egg wash. Brush it generously over your rolls to give them a shiny golden finish once baked. Place them back in a warm spot for their second rise—this one takes about 30 to 45 minutes, just until the rolls look puffy and inviting.
Step 6: Bake to Golden Perfection
Preheat your oven to 350°F (conventional) about 20 minutes before you plan to bake. Give the rolls one last brush with egg wash, then bake for 20 to 22 minutes. You’ll know they’re done when they have that perfect shiny, golden crust—and your kitchen smells like heaven.
Step 7: Whip Up the Garlic Butter and Glaze the Rolls
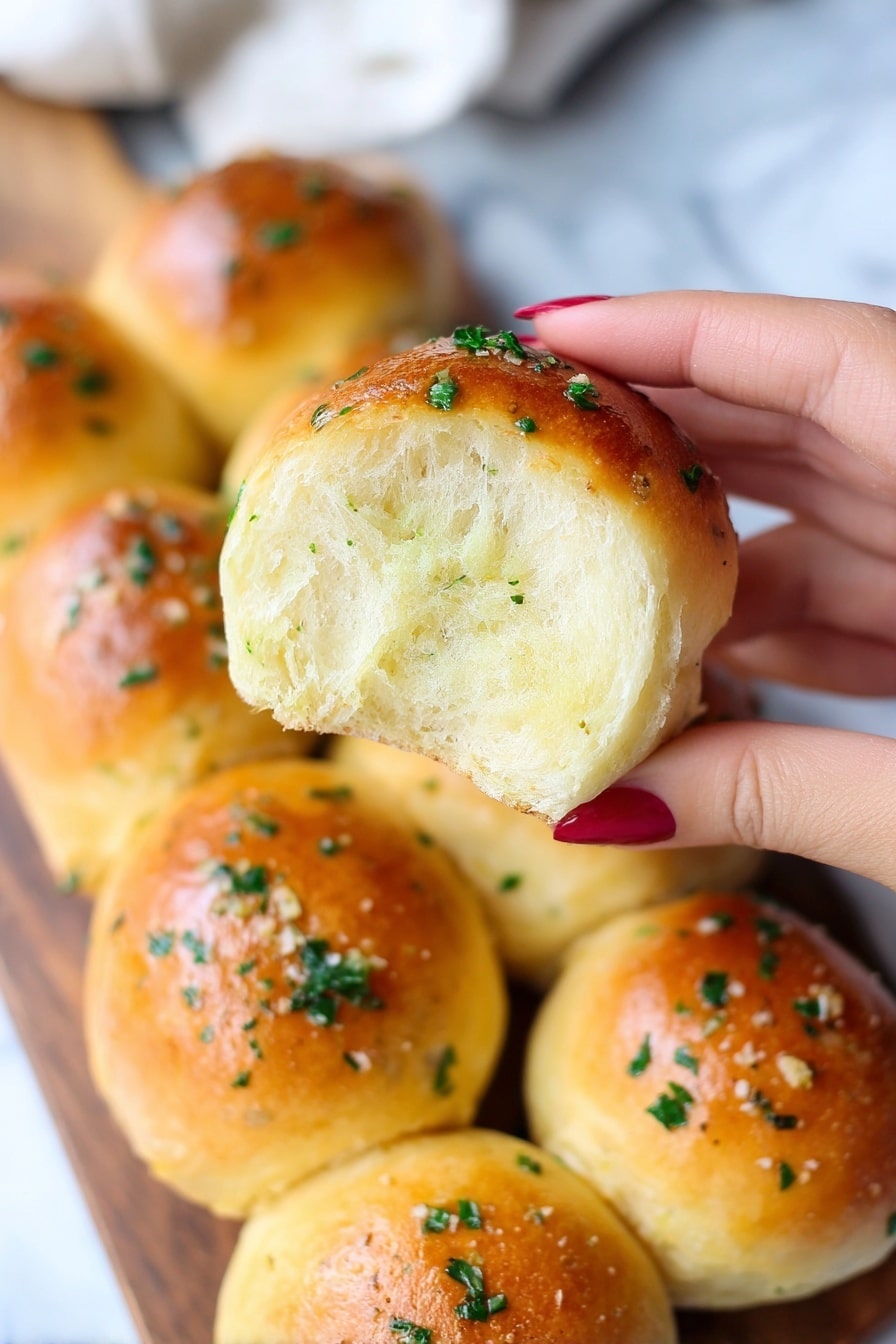
While the rolls are baking, melt the salted butter in a small saucepan and add finely chopped garlic. Sauté for just 1 to 2 minutes to soften the garlic but not burn it. Remove from heat and stir in freshly chopped parsley. Now, the best part: brush the warm garlic butter all over the rolls right out of the oven. This step is what takes these rolls from amazing to absolutely addictive.
Pro Tips for Making Garlic Butter Dinner Rolls Recipe
- Don’t Add Extra Flour Early: I learned that adding flour too soon makes rolls dense, so stick with sticky dough during kneading—it turns smooth with time.
- Windowpane Test Is Key: This simple stretch test saved me from under- or over-kneading countless times—don’t skip it.
- Warm Rising Spot: Use your oven light or a warm sunny spot to help dough rise faster and more reliably.
- Brush Rolls While Hot: Applying garlic butter right out of the oven locks in moisture and flavor—I never miss this step.
How to Serve Garlic Butter Dinner Rolls Recipe
Garnishes
I love sprinkling a little extra fresh parsley on top of the rolls just before serving—it adds a pop of color and freshness that balances the richness of the garlic butter perfectly. Sometimes, a light dusting of parmesan also works wonders if you want a cheesy touch.
Side Dishes
These rolls are my go-to side for hearty meals like roasted chicken, beef stew, or a big bowl of homemade soup. During the holidays, I often pair them with mashed potatoes and green bean casserole, and my family always asks for seconds. They’re also fantastic alongside a fresh salad for a lighter meal.
Creative Ways to Present
For special occasions, I like to arrange the rolls in a pull-apart style on a round baking dish with an extra drizzle of garlic butter over the top. Another fun idea is to stuff the rolls with small pieces of cheese or herbs before baking for a delightful surprise inside. Presentation-wise, a basket lined with a cozy linen and garnished with fresh herbs makes these rolls look bakery-fresh and inviting.
Make Ahead and Storage
Storing Leftovers
Whenever I have leftovers (rare, but it happens!), I store them in an airtight container at room temperature and they stay soft for up to 2 days. To keep them fresh longer, I wrap them individually in plastic wrap and place them in a zip-top bag.
Freezing
I often freeze these rolls to save time on busy days. Just wrap each roll tightly in plastic wrap and then place them in a freezer-safe bag. They freeze beautifully for up to 3 months without losing their softness. When you’re ready to enjoy, thaw overnight in the fridge or on the counter for a couple of hours.
Reheating
To bring frozen or leftover rolls back to life, I warm them in a 300°F oven wrapped in foil for about 10-15 minutes. If I’m in a hurry, I microwave a roll covered with a damp paper towel for 20-30 seconds—just be careful not to overdo it or they get rubbery.
FAQs
-
Can I use instant yeast instead of active dry yeast?
Absolutely! Instant yeast works just as well in this Garlic Butter Dinner Rolls Recipe. If you use instant yeast, you can mix it directly with the dry ingredients without proofing it in warm milk first, which can save some time.
-
How can I tell when the dough has risen enough?
The dough should roughly double in size and look puffier and softer. A simple test is to gently press your finger into the dough; if the indentation stays and doesn’t spring back quickly, your dough is ready.
-
Why are my rolls dense instead of fluffy?
The most common causes are under-kneading the dough, adding too much flour, or not letting the dough rise enough. Kneading until the dough passes the windowpane test and allowing ample rising time are crucial to getting that light, fluffy texture.
-
Can I prepare the dough the night before?
Yes! For convenience, you can mix and knead the dough, then refrigerate it overnight in a covered bowl. The next day, bring it to room temperature, punch it down, shape the rolls, and let them rise before baking.
Final Thoughts
This Garlic Butter Dinner Rolls Recipe holds a special place in my kitchen because nothing beats the smell of fresh bread mingling with garlic butter filling the house. It’s one of those recipes that comforts your soul and makes any meal feel like a celebration. I hope you give this recipe a try soon and enjoy every warm, buttery bite as much as my family and I do. Once you make these, I’m sure you’ll keep coming back to this easy, delicious classic.
Print
Garlic Butter Dinner Rolls Recipe
- Prep Time: 40 minutes
- Cook Time: 20 minutes
- Total Time: 1 hour 35 minutes
- Yield: 12 dinner rolls 1x
- Category: Bread
- Method: Baking
- Cuisine: American
Description
These Easy Garlic Butter Dinner Rolls are soft, fluffy, and flavorful, perfect as a side for any meal or for enjoying on their own. The rolls are made with a simple dough that rises twice, then baked to a beautiful golden brown and brushed with a delicious garlic butter and fresh parsley for an irresistible finish.
Ingredients
Dough Ingredients
- 1 cup whole milk (240g), warm (around 110°F)
- 3 teaspoons active dry yeast or instant yeast
- 1/3 cup sugar (70g)
- 3 3/4 cup all-purpose flour (490g)
- 1 large egg
- 1.5 teaspoon salt
- 6 tbsp unsalted butter, softened at room temperature (85g)
Egg Wash
- 1 egg yolk
- 1 tbsp milk
Garlic Butter Topping
- 1/4 cup salted butter (57g)
- 2–3 garlic cloves, finely chopped
- 1–2 tbsp freshly chopped parsley
Instructions
- Activate the yeast: In a large bowl, stir together the warm milk with the yeast until combined and let it activate for a few minutes.
- Mix dough ingredients: Add all other dough ingredients (sugar, flour, egg, salt, and softened unsalted butter) to the bowl with the yeast mixture. Stir together until a shaggy dough forms.
- Knead the dough: Turn the dough onto a clean surface and knead using a push-pull motion with your palms for about 15 minutes. The dough will be sticky at first but will become smooth and stretchy. Do not add flour. The dough is ready when it passes the windowpane test, stretching thin without tearing.
- First rise: Transfer the dough to a large clean bowl lightly sprayed with oil. Cover with cling wrap and place in a warm, humid spot to rise until it doubles in size, about 90 minutes.
- Shape rolls: Punch down the risen dough and turn it out onto a clean surface. Divide into 12 equal pieces and roll each piece into a tight, smooth ball with no wrinkles or cracks.
- Arrange and egg wash: Line a 9×13″ baking sheet with parchment paper. Place the rolls spaced evenly on the sheet. Mix egg yolk and milk to make egg wash, then generously brush all rolls.
- Second rise: Let the rolls rise in a warm spot again until puffy for 30-45 minutes.
- Preheat oven: About 20 minutes before baking, preheat your oven to 350°F (conventional).
- Final egg wash coat: Once risen, brush the rolls again generously with the egg wash for a shiny, golden crust.
- Bake rolls: Bake in the preheated oven for 20-22 minutes, until the rolls are golden brown and have a shiny crust.
- Prepare garlic butter: While rolls bake, melt the salted butter in a saucepan. Add finely chopped garlic and sauté for 1-2 minutes until fragrant. Remove from heat and stir in freshly chopped parsley.
- Brush with garlic butter: Immediately after removing the rolls from the oven, brush them generously with the garlic butter mixture while still hot.
- Serve and enjoy: Serve these warm garlic butter dinner rolls fresh for the best pillowy soft texture and savory flavor.
Notes
- These rolls are best eaten fresh to enjoy their soft, fluffy texture and buttery garlic flavor.
- Do not add extra flour when kneading, even if sticky; the dough will become smooth and stretchy with proper kneading.
- The windowpane test is essential to know when the dough is properly kneaded for perfect texture.
- The two rises ensure the rolls become light and airy.
- Brushing with egg wash twice gives the rolls a beautiful shiny, golden crust.
- The garlic butter topping can be adjusted in garlic amount according to taste.
Nutrition
- Serving Size: 1 dinner roll (approximately 70g)
- Calories: 210 kcal
- Sugar: 5 g
- Sodium: 180 mg
- Fat: 8 g
- Saturated Fat: 5 g
- Unsaturated Fat: 3 g
- Trans Fat: 0 g
- Carbohydrates: 29 g
- Fiber: 1 g
- Protein: 5 g
- Cholesterol: 40 mg

Your email address will not be published. Required fields are marked *