
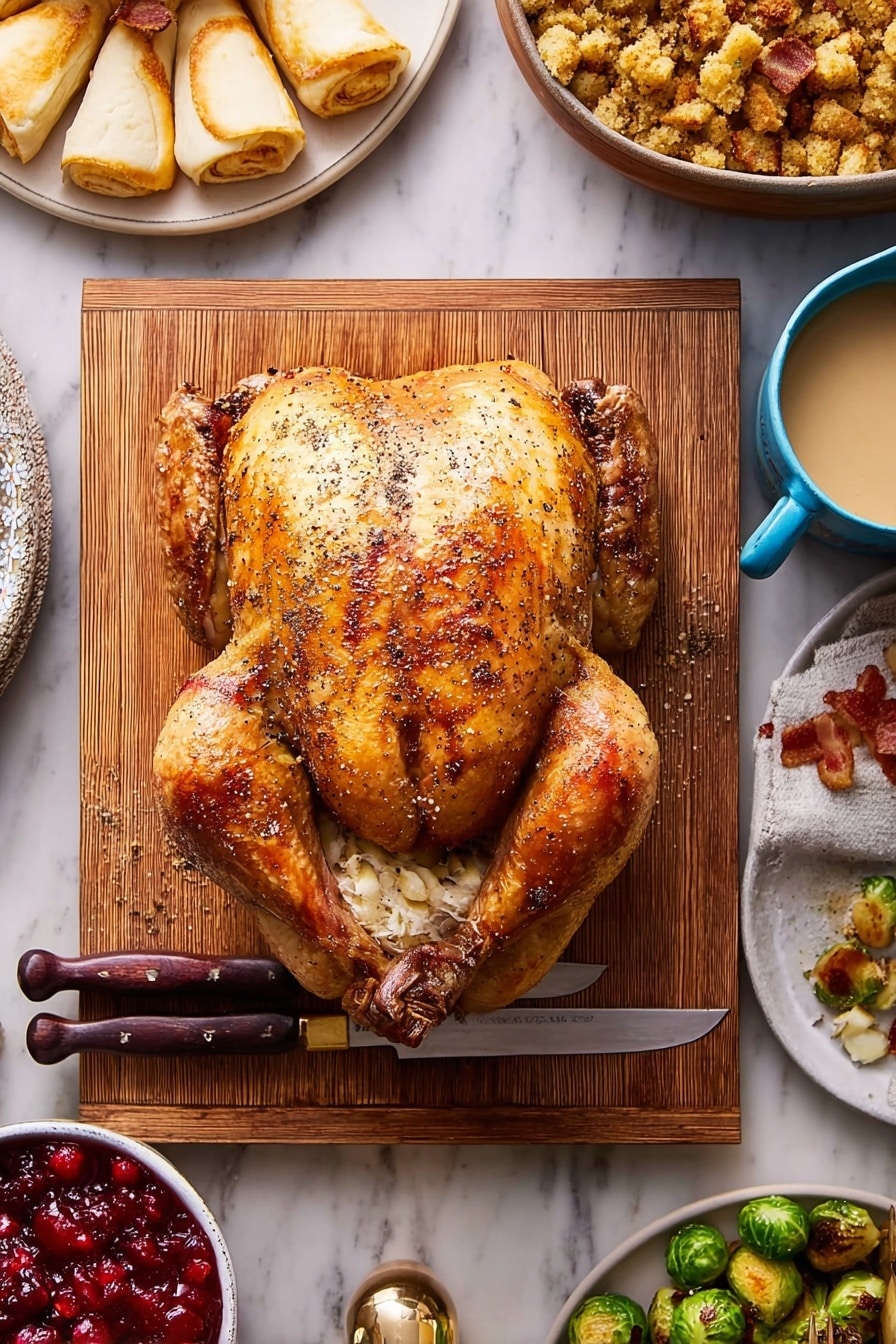
If you’re ready to impress everyone at your next gathering with juicy, tender turkey and satisfy the craving for perfectly crispy skin, then you’re going to love this Crispy Spatchcock Turkey with Homemade Gravy Recipe. Believe me, once I started spatchcocking my turkeys, I never looked back—this method speeds up the roasting time and makes carving a breeze, plus the gravy from the pan drippings? Absolutely heavenly. Stick with me and I’ll walk you through everything to nail it perfectly!
Why You’ll Love This Recipe
- Faster Cooking Time: Spatchcocking flattens the turkey, letting it roast evenly and quicker than a whole bird.
- irresistibly Crispy Skin: Pressing down on the breast helps achieve that golden, crackling skin everyone fights over.
- Rich Homemade Gravy: Using the pan drippings and reserved giblets, this gravy is packed with flavor—no jar needed.
- Simple Yet Showstopping: Even if you’re not a seasoned cook, these steps ensure turkey perfection every time.

Ingredients You’ll Need
To make this Crispy Spatchcock Turkey with Homemade Gravy Recipe, you’ll want fresh, simple ingredients that complement each other perfectly. Each one plays a key role—from the aromatic veggies that create a flavorful roasting bed to the herbs that elevate the gravy. Shopping for quality basics here really makes all the difference.
- Whole turkey: Aim for a 12 to 14-pound bird for balanced cook time and portion size; spatchcocking helps it cook more evenly.
- Onions, carrots, celery: Classic aromatic trio—use fresh and roughly chopped to form your roasting pan’s flavor base and broth for gravy.
- Thyme sprigs: Fresh thyme gives that warm, earthy fragrance that’s perfect with turkey.
- Vegetable oil: Helps with browning and crisping the skin without smoking up your kitchen.
- Kosher salt and black pepper: Season generously but adjust salt if your turkey is brined or pre-salted.
- Chicken or turkey broth: Low-sodium is best since seasoning gets added later; it forms the base of your rich gravy.
- Bay leaves: Add subtle depth to the gravy’s flavor, making it truly restaurant-worthy.
- Butter and flour: To make a perfectly silky roux that thickens your homemade gravy just right.
Variations
One of the things I love about this Crispy Spatchcock Turkey with Homemade Gravy Recipe is how easy it is to tweak to suit your tastes or dietary needs. Whether you want to add a smoky twist or keep things super simple, you’ll find this method is super versatile.
- Smoky Flavor Boost: When I want a smoky aroma, I toss in a few smoked paprika or chipotle flakes into the oil rub before roasting—it’s a game changer.
- Herb Swaps: Feel free to replace thyme with rosemary or sage to match the season or your pantry stash; just keep the quantity about the same.
- Low Sodium: If you’re watching salt intake, skip adding salt to the turkey if it’s already brined, and use low-sodium broth for gravy.
- Vegetarian-Style Gravy: For a veggie gravy twist, swap giblets and turkey stock for mushrooms and vegetable broth, cooking down as usual for depth.
How to Make Crispy Spatchcock Turkey with Homemade Gravy Recipe
Step 1: Preheat and Prepare Your Roasting Base
Set your oven rack to the middle position and crank the oven up to 450°F (230°C). I always line my rimmed baking sheet or broiler pan with foil to make cleanup easier. Scatter about two-thirds of your chopped onions, carrots, celery, and thyme sprigs over the bottom—this little vegetable bed not only flavors the pan drippings but keeps the bird elevated and airflow crisp under the skin. Then, pop a slotted broiler rack or wire rack right on top. Easy and genius!
Step 2: Butterflied Turkey Love—Pat and Season
Pat your spatchcocked turkey dry with paper towels—this step is key for that skin to crisp nicely. Rub all over with 1 tablespoon of vegetable oil, and then season generously with salt and freshly cracked black pepper. Skip adding salt if your bird is pre-brined or kosher. Don’t forget to tuck those wing tips behind the back; it helps keep everything neat and prevents burning in the oven. Press down lightly on the breastbone so it lies flatter—that’s what helps even cooking and unbeatable crispy skin.
Step 3: Roast Until Perfectly Juicy
Place your turkey on the rack so that no parts hang over the edges—it ensures even cooking. Roast at that high heat, turning occasionally for even browning. Your turkey should hit 150°F (66°C) in the deepest part of the breast and 165°F (74°C) in the thighs—usually around 80 minutes, but keep an eye on it. Remember, an instant-read thermometer is your best friend here!
Step 4: While It Roasts, Make That Homemade Gravy
Chop up the turkey’s backbone, neck, and giblets to release all that intense flavor. Heat the remaining 1 tablespoon of oil in a saucepan and brown those parts until they smell amazing and golden, about 5 minutes. Add the rest of the vegetables and cook till they start to caramelize—this building of layers is what sets your gravy apart. Pour in the broth, throw in the remaining thyme and bay leaves, then simmer gently for 45 minutes. Don’t rush—low and slow really extracts all that flavor.
Step 5: Strain and Finish the Gravy
After simmering, strain the broth through a fine-mesh sieve, discard solids, then skim off excess fat from the surface—you want rich but not greasy. In a clean saucepan, melt butter and whisk in flour until golden and nutty—a perfect roux. Slowly whisk in the broth in a thin stream, stirring constantly to keep it silky smooth. Bring to a boil, then simmer until reduced to about a quart, roughly 20 minutes. Season with salt and pepper and keep warm—you’re almost there!
Step 6: Rest, Carve, and Serve With Gratitude
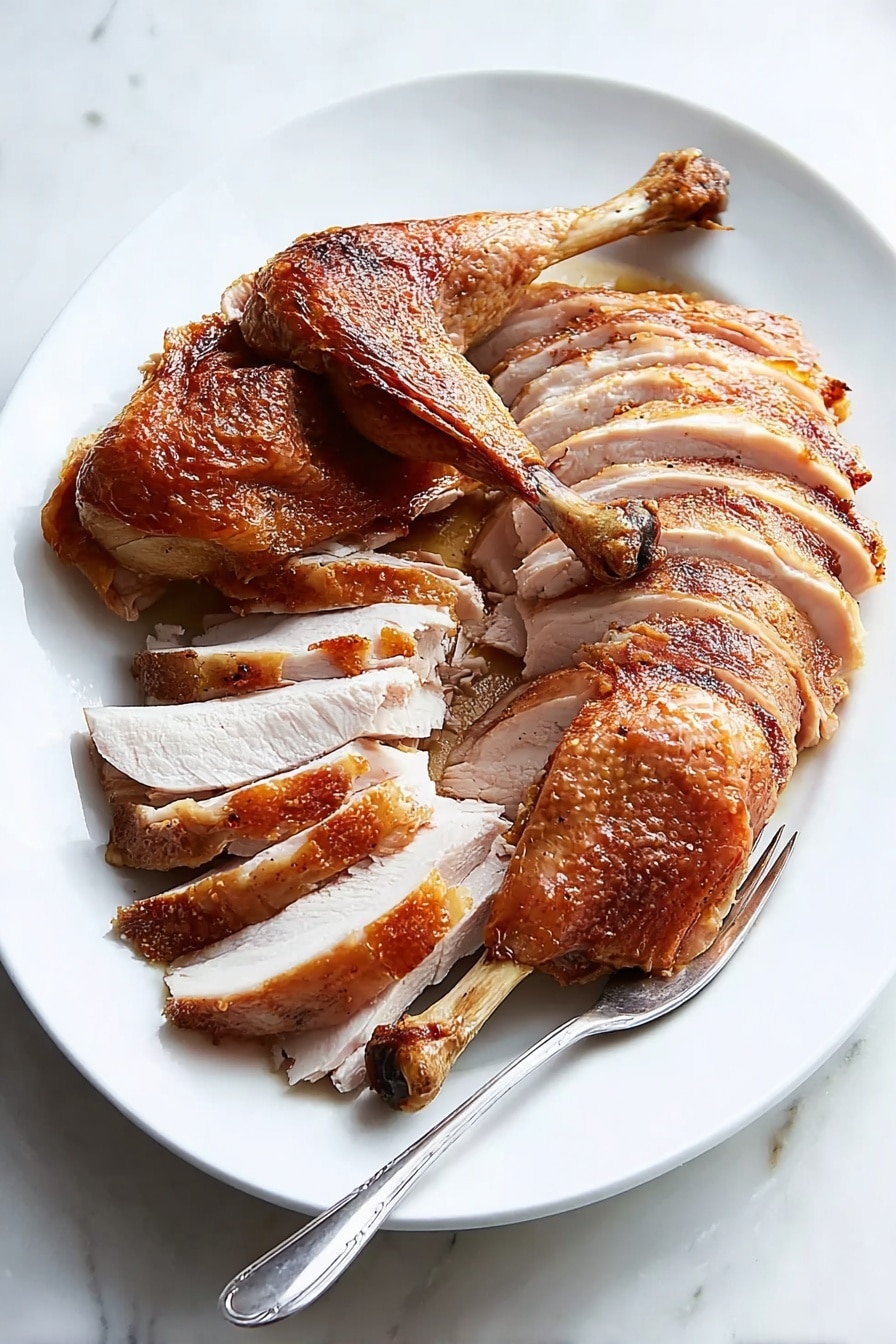
Once your turkey is out of the oven, transfer it on the rack to a fresh baking sheet and let it rest for 20 minutes at room temp—this keeps the juices locked in, so every bite is juicy. Meanwhile, strain out the pan drippings from the roasting pan, skim the fat, and whisk those gorgeous juices into your gravy for that final burst of flavor. Carve up your beautifully crisp spatchcock turkey, ladle the homemade gravy generously, and enjoy the applause!
Pro Tips for Making Crispy Spatchcock Turkey with Homemade Gravy Recipe
- Dry the Skin Thoroughly: Pat the turkey skin completely dry before oiling to get the crispiest skin possible.
- Use an Instant-Read Thermometer: Don’t guess the doneness—checking temps precisely avoids overcooking and dryness.
- Don’t Skip Resting Time: Resting your turkey after roasting lets the juices redistribute for moist slices.
- Keep the Pan Drippings for Gravy: Pour pan juices carefully through a strainer and whisk into your gravy for rich flavor.
How to Serve Crispy Spatchcock Turkey with Homemade Gravy Recipe
Garnishes
I like to garnish with a few fresh thyme sprigs and some bright cranberry sauce on the side—it adds color and just the right sweet-tart pop. Lemon wedges also bring a fresh zing if you want to brighten up your plate right before eating.
Side Dishes
My go-to sides here are creamy mashed potatoes to soak up that luscious gravy, roasted Brussels sprouts with a touch of balsamic glaze, and a simple but colorful autumn salad to cut through the richness. When I serve this at holiday dinners, everyone asks for seconds!
Creative Ways to Present
For special occasions, I sometimes arrange the carved turkey beautifully on a large wooden board garnished with whole fresh herbs and roasted root vegetables. It’s a rustic, inviting spread that always impresses without feeling fussy.
Make Ahead and Storage
Storing Leftovers
I like to carve the leftover turkey and store it in airtight containers in the fridge for up to 4 days. Pro tip: keep the turkey juices and some gravy separate to reheat along with the meat, so it stays moist and flavorful.
Freezing
Freeze carved turkey in portioned freezer bags with a little gravy or broth to prevent freezer burn. It freezes beautifully and lasts up to 3 months. When I plan ahead, I thaw slowly in the fridge overnight for best texture.
Reheating
To reheat, I gently warm the turkey slices in a covered skillet over low heat with a splash of broth or gravy—it keeps the meat juicy without drying out or turning rubbery, unlike the microwave.
FAQs
-
What does spatchcocking a turkey mean, and why do it?
Spatchcocking means removing the backbone and flattening the bird, so it cooks more evenly and faster. This method gives you crispy skin all over the breast and juicy meat without the long wait of traditional roasting.
-
Can I use a brined turkey for this recipe?
Absolutely! Just skip adding additional salt to avoid over-salting your turkey. The spices and aromatics will still shine through beautifully in the gravy and overall flavor.
-
How do I know when my turkey is done without drying it out?
The best way is with an instant-read thermometer. Your target temps are 150°F for the breast and 165°F for the thigh. Once it hits those temps, remove it from the oven and let it rest to lock in juices.
-
Can I make the gravy ahead of time?
Yes! You can make the gravy while the turkey roasts or even a day ahead. Just reheat gently and add a splash of broth if it thickens too much before serving.
Final Thoughts
This Crispy Spatchcock Turkey with Homemade Gravy Recipe quickly became my favorite way to roast turkey—it’s straightforward, dependable, and delivers that gorgeous golden skin and luscious gravy that everyone raves about. I love how this approach frees up oven space and cooking time, which feels like a small victory during busy holidays. Trust me, once you try this, you’ll enjoy turkey roasting more than ever, and your family will keep asking when you’re making it again!
Print
Crispy Spatchcock Turkey with Homemade Gravy Recipe
- Prep Time: 10 minutes
- Cook Time: 1 hour 45 minutes
- Total Time: 1 hour 55 minutes
- Yield: Serves 10 to 12 1x
- Category: Main Course
- Method: Roasting
- Cuisine: American
Description
A crisp-skinned butterflied roast turkey recipe featuring spatchcocking for evenly cooked meat and a rich homemade gravy made from pan drippings and turkey parts, perfect for a flavorful holiday centerpiece.
Ingredients
Vegetables and Herbs
- 3 large onions, roughly chopped (about 1 1/2 quarts)
- 3 large carrots, peeled and roughly chopped (about 1 quart)
- 4 stalks celery, roughly chopped (about 1 quart)
- 12 thyme sprigs
- 2 bay leaves
Turkey
- 1 whole turkey (12 to 14 pounds total), butterflied (spatchcocked), backbone, neck, and giblets reserved
- 2 tablespoons vegetable oil, divided
- Kosher salt and freshly ground black pepper
Gravy
- 1 1/2 quarts low-sodium homemade or store-bought chicken or turkey broth
- 3 tablespoons butter
- 4 tablespoons flour
Instructions
- Prepare Oven and Vegetables: Adjust oven rack to middle position and preheat oven to 450°F (230°C). Line a rimmed baking sheet or broiler pan with aluminum foil. Scatter two-thirds of the chopped onions, carrots, celery, and thyme sprigs across the bottom of the pan. Place a slotted broiler rack or wire rack directly on top of the vegetables.
- Prepare Turkey: Pat the spatchcocked turkey dry with paper towels. Rub all surfaces with 1 tablespoon of vegetable oil. Season generously with kosher salt and freshly ground black pepper on all sides. Tuck wing tips behind the back. Place the turkey on the rack, pressing down on the breastbone to flatten the breasts slightly and ensure even cooking.
- Roast Turkey: Transfer the turkey to the oven and roast, rotating occasionally, until the internal temperature reaches 150°F (66°C) in the deepest part of the breast and at least 165°F (74°C) in the thighs. This should take about 80 minutes.
- Make Gravy Base: While the turkey roasts, roughly chop the reserved neck, backbone, and giblets. Heat the remaining 1 tablespoon of vegetable oil in a 3-quart saucepan over high heat until shimmering. Add the chopped turkey parts and cook, stirring occasionally, until lightly browned, about 5 minutes. Add the remaining onions, carrots, and celery, and cook, stirring occasionally, until the vegetables start to soften and brown in spots, about another 5 minutes.
- Simmer Broth: Add the chicken or turkey broth, remaining thyme sprigs, and bay leaves to the saucepan. Bring to a boil, then reduce to a bare simmer. Cook uncovered for 45 minutes to extract flavors, then strain the mixture through a fine-mesh strainer into a 2-quart measuring cup. Discard solids and skim off any fat from the surface of the broth.
- Prepare Gravy: In a 2-quart saucepan, melt butter over medium-high heat. Add flour and cook, stirring constantly, until the flour turns golden brown, about 3 minutes. Gradually whisk in the strained broth in a thin, steady stream until fully incorporated. Bring the mixture to a boil, then reduce heat to a simmer. Cook until the gravy thickens and reduces to about 1 quart, approximately 20 minutes. Season the gravy with salt and pepper to taste. Cover and keep warm.
- Rest Turkey and Finish Gravy: Once the turkey is cooked, remove it from the oven and transfer the rack to a new baking sheet. Allow the turkey to rest at room temperature for 20 minutes before carving. Carefully pour any collected pan juices through a fine-mesh strainer into a liquid measuring cup, skimming off excess fat. Whisk these juices into the prepared gravy to enhance flavor.
- Carve and Serve: Carve the rested turkey and serve it with the homemade gravy for a delicious and elegant meal.
Notes
- Spatchcocking (butterflying) the turkey ensures crisp skin and evenly cooked white and dark meat.
- This recipe creates a flavorful gravy using the pan drippings and reserved turkey parts for maximum depth.
- If you use a brined, salted, or kosher turkey, omit the added salting step to prevent over-salting.
- Use a meat thermometer to ensure perfect doneness and food safety.
- Letting the turkey rest before carving allows juices to redistribute, keeping the meat moist.
Nutrition
- Serving Size: 1 serving (approximately 8 ounces cooked turkey with gravy)
- Calories: 552 kcal
- Sugar: 0 g
- Sodium: 696 mg
- Fat: 24 g
- Saturated Fat: 8 g
- Unsaturated Fat: 16 g
- Trans Fat: 0 g
- Carbohydrates: 4 g
- Fiber: 0 g
- Protein: 76 g
- Cholesterol: 288 mg

Your email address will not be published. Required fields are marked *