

If you’ve ever wanted a batch of perfect little sweet treats that bake up fast and never disappoint, then you’re going to absolutely adore this Mini Pecan Pies in Mini Muffin Pan Recipe. These tiny pies are a delightful twist on a classic Southern favorite—just bite-sized enough for snacking, sharing, or even as a fun party dessert. Trust me, once you see how easy they are to make and how insanely delicious they turn out, you’ll want to keep this recipe close forever.
Why You’ll Love This Recipe
- Perfectly Portable: These mini pecan pies fit right into your palm, making them perfect for potlucks, picnics, or lunchbox treats.
- Simplified Baking: Using a mini muffin pan keeps things simple and quick without sacrificing that classic pecan pie flavor and texture.
- Crisp Yet Gooey: The crunch of toasted pecans pairs beautifully with the silky, sugary filling every single time.
- A Family Favorite: My family goes crazy for these little pies whenever I make them, and I bet yours will too!

Ingredients You’ll Need
Each ingredient in this Mini Pecan Pies in Mini Muffin Pan Recipe is chosen for balance—rich sweetness, a touch of buttery crunch, and that satisfying gooey filling we all crave. When shopping, I always pick fresh, raw pecans for the best flavor, and good-quality vanilla makes a surprising difference here.
- Mini Muffin Pan: This is key! Using a mini muffin pan ensures perfectly portioned pies that bake evenly.
- Pie Crust: Store-bought or homemade works fine, but homemade adds a lovely flaky texture I love.
- Pecans: Fresh, raw pecans that you can toast yourself make all the difference in flavor.
- Light Corn Syrup: Helps create that classic sticky and glossy pecan pie filling.
- Brown Sugar: Adds a rich molasses depth that’s hard to beat.
- Butter: Unsalted, melted butter provides richness to the filling and crust.
- Egg: Acts as a binder to hold the filling together while baking.
- Vanilla Extract: Just a splash amps up all the flavors.
- Salt: A small pinch balances the sweetness.
Variations
I love that this Mini Pecan Pies in Mini Muffin Pan Recipe is a perfect canvas for your own little twists. Over the years, I’ve played with everything from nut swaps to add-ins, and it’s worth experimenting to find what suits your taste.
- Nut Swap: Tried walnuts or mixed nuts for a different crunch, and it was surprisingly delicious!
- Chocolate Drizzle: A drizzle of melted dark chocolate on top after baking adds an indulgent finish that my kids adore.
- Gluten-Free Crust: Using a gluten-free pie crust didn’t compromise flavor, so don’t hesitate to adapt for dietary needs.
- Spice It Up: Adding a pinch of cinnamon or nutmeg to the filling gives a warm, cozy flavor that’s amazing during the holidays.
How to Make Mini Pecan Pies in Mini Muffin Pan Recipe
Step 1: Prepare Your Mini Muffin Pan and Crust
Start by preheating your oven to 350°F (175°C). Give your mini muffin pan a good spray with non-stick cooking spray—this will make releasing those little pies a breeze. Next, roll out your pie crust to about 1/8-inch thickness and use a small round cutter just big enough to fit snugly into each muffin cup. Press the dough gently but firmly to create a perfect crust base.
Step 2: Make the Filling
In a mixing bowl, whisk together corn syrup, brown sugar, melted butter, the egg, vanilla extract, and salt until smooth. Toast your pecans for enhanced flavor, then fold most of them into the filling mixture, saving a few for sprinkling on top. The filling should be glossy and pourable but still thick enough to hold together in those tiny cups.
Step 3: Fill and Bake
Pour or spoon the filling evenly into each crust-lined cup—about ¾ full to avoid overflow. I like using a small spoon or a measuring cup with a spout for easy pouring. Sprinkle the reserved pecans on top for that inviting crunch and bake for about 20 to 25 minutes until the filling sets and the crust turns golden brown.
Step 4: Cool and Release
Once baked, give your mini pecan pies a good 10 minutes to cool in the pan. This step is important—if you try to remove them too soon, they might fall apart. After cooling, gently run a small butter knife around the edges to loosen, then carefully pop them out. They’ll be firm yet gooey and ready for tasting!
Pro Tips for Making Mini Pecan Pies in Mini Muffin Pan Recipe
- Warm the Pie Crust Slightly: Slightly softening your pie crust before cutting makes it easier to press into mini muffin cups without tearing.
- Don’t Overfill the Cups: Filling the cups about ¾ full keeps filling from bubbling over and creating a mess.
- Toasting Pecans Intensifies Flavor: Toast pecans lightly in a dry pan for a few minutes before mixing to bring out their rich, nutty aroma.
- Let Pies Cool Before Removing: Waiting 10 minutes helps the filling set, preventing breakage when you pop them out of the pan.
How to Serve Mini Pecan Pies in Mini Muffin Pan Recipe
Garnishes
I often top these mini pecan pies with a dollop of fresh whipped cream or a small scoop of vanilla ice cream to balance the sweetness and add that lovely creamy contrast. Sometimes, a light dusting of powdered sugar or a drizzle of warm caramel sauce adds an extra touch of indulgence that makes them feel extra special.
Side Dishes
These mini pies are such a hit on their own but also pair beautifully with a bright fruit salad or some candied pecans for a full dessert spread. I like to serve them at holiday dinners alongside a cup of coffee or spiced tea for that cozy, comforting vibe.
Creative Ways to Present
For parties, I like to arrange these mini pies on a tiered dessert stand surrounded by fresh seasonal fruits and mint leaves—it makes for a stunning, tempting centerpiece. I’ve even wrapped individual pies in small parchment squares tied with string for homemade party favors that my guests rave about.
Make Ahead and Storage
Storing Leftovers
After baking, I let these mini pecan pies cool completely, then store them in an airtight container at room temperature. They usually stay fresh and tasty for about 2 days—though if your family is anything like mine, they’ll be gone long before then!
Freezing
If you want to make them ahead of time, I recommend freezing the unbaked pies. Line a baking sheet with parchment, freeze the filled cups until firm, then transfer to a freezer-safe container. You can bake them straight from frozen, just add a few extra minutes to the baking time. This trick saved me during the holidays more than once!
Reheating
I usually reheat leftovers gently in a 300°F oven for 5-7 minutes to warm the filling and crisp up the crust again. Avoid the microwave if you want to maintain that signature flakiness and gooey texture.
FAQs
-
Can I use store-bought pie crust for this Mini Pecan Pies in Mini Muffin Pan Recipe?
Absolutely! Store-bought pie crust works perfectly and is a huge time-saver. Just thaw it according to package instructions and roll it out slightly thinner if needed to fit your mini muffin pans easily.
-
How do I prevent the pecan pies from spilling over in the mini muffin pan?
Filling each crust-lined cup about ¾ full is crucial. Overfilling can cause syrupy filling to bubble up and spill during baking. Also, using a non-stick spray helps with cleanup just in case.
-
Can I freeze baked mini pecan pies?
It’s best to freeze them before baking for best texture upon reheating. However, baked pies can be frozen too—wrap them tightly to avoid freezer burn and thaw at room temperature before gently reheating in the oven.
-
What’s the best way to toast pecans?
Simply heat a dry skillet over medium heat and toss pecans in the pan, stirring frequently for about 3-5 minutes until fragrant and lightly browned. Watch carefully—they can burn fast!
-
Can I make these mini pecan pies gluten-free?
Yes! Using a gluten-free pie crust substitute works well. Just be mindful of the crust’s texture—it might be a tad more delicate, but the filling and flavor shine through beautifully.
Final Thoughts
I absolutely love how this Mini Pecan Pies in Mini Muffin Pan Recipe turns out every time—it’s like a little slice of Southern comfort in each bite. Making these tiny pies brings back memories of family gatherings and sweet, cozy kitchen moments. I promise if you give them a try, you’ll find they’re surprisingly easy to master and irresistibly delicious. So grab your mini muffin pan, gather your ingredients, and let’s bake some magic together—you won’t regret it!
Print
Mini Pecan Pies in Mini Muffin Pan Recipe
- Prep Time: 20 minutes
- Cook Time: 10 minutes
- Total Time: 45 minutes
- Yield: 8 donuts 1x
- Category: Dessert, Breakfast, Snack
- Method: Baking
- Cuisine: American
- Diet: Vegetarian
Description
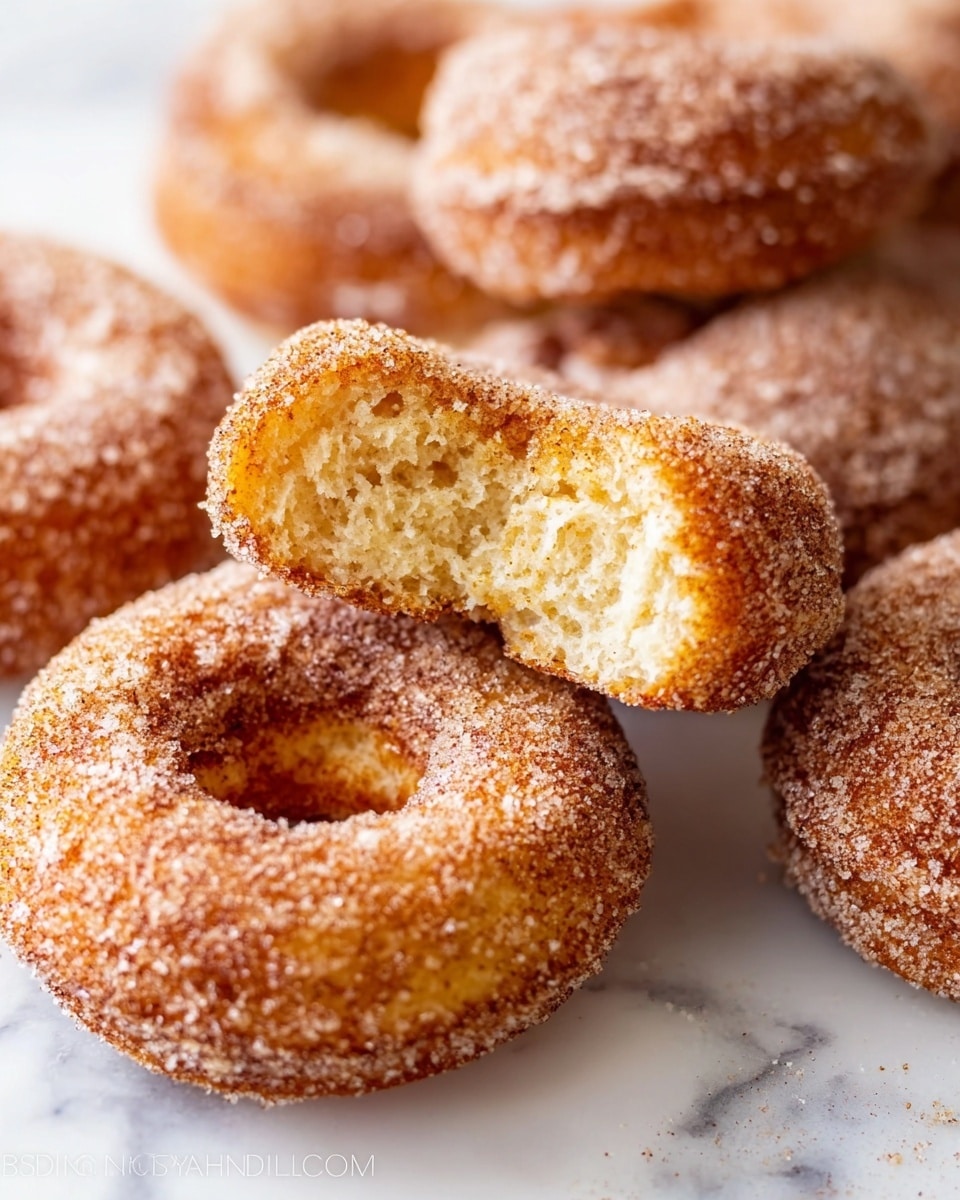
These Baked Cinnamon Sugar Donuts are a delicious and easy homemade treat featuring a fluffy, tender texture with a perfect balance of warm cinnamon and sweet sugar coating. Baked instead of fried, these donuts are lighter and perfect for a quick breakfast or snack. They come out beautifully golden with a soft crumb and are finished with a classic cinnamon sugar dunk in melted butter for that irresistible sweet crunch.
Ingredients
Dry Ingredients
- 1 cup (125g) all-purpose flour (spooned & leveled)
- 1 teaspoon baking powder
- 1/4 teaspoon baking soda
- 1/2 teaspoon salt
- 1/2 teaspoon ground cinnamon
- 1/4 teaspoon ground nutmeg
Wet Ingredients
- 1 large egg, at room temperature
- 1/3 cup (65g) packed light brown sugar
- 1/4 cup (60ml) milk*
- 1/4 cup (60g) yogurt*
- 2 Tablespoons (28g) unsalted butter, melted
- 1 and 1/2 teaspoons pure vanilla extract
Topping
- 1 cup (200g) granulated sugar
- 1 teaspoon ground cinnamon
- 1/2 cup (8 Tbsp; 113g) unsalted butter, melted
Instructions
- Preheat and Prepare Pan: Preheat your oven to 350°F (177°C). Lightly spray a donut pan with non-stick cooking spray to ensure the donuts release easily after baking.
- Mix Dry Ingredients: In a medium bowl, whisk together the all-purpose flour, baking powder, baking soda, salt, ground cinnamon, and ground nutmeg until well combined. Set aside.
- Combine Wet Ingredients: In another bowl, whisk the egg, packed light brown sugar, milk, and yogurt together until smooth. Then add the melted unsalted butter and pure vanilla extract, whisking everything together until fully incorporated.
- Make the Batter: Pour the wet ingredients into the dry ingredients and gently mix until just combined. Be careful not to overmix, as this will make the donuts tough. The batter should be quite thick.
- Fill the Donut Pan: Using a large resealable plastic bag, spoon the batter inside, then cut one corner off to create a piping bag. Pipe the batter evenly into each donut cavity, filling about two-thirds to three-quarters full.
- Bake the Donuts: Place the pan in the preheated oven and bake for 9 to 10 minutes, or until the edges are lightly browned and a toothpick inserted comes out clean. Remove from oven and allow the donuts to cool in the pan for about two minutes, then carefully transfer them to a wire rack set over parchment paper or a baking sheet to cool further. Bake any remaining batter in the same manner.
- Prepare Cinnamon Sugar Coating: While the donuts are cooling, combine granulated sugar and ground cinnamon in a medium bowl.
- Dip and Coat Donuts: Dip each cooled donut into the melted butter, then immediately dunk into the cinnamon sugar mixture, coating all sides evenly.
- Serve and Store: Serve the donuts immediately for best taste and texture. Any leftovers should be stored tightly covered at room temperature and consumed within two days.
Notes
- There is nothing like waking up to fresh-baked cinnamon sugar donuts. What makes this recipe a winner is its simplicity and ease.
- Using the piping bag method helps you fill the donut pan evenly and neatly.
- Donuts can be served warm or at room temperature, but dipping in melted butter and cinnamon sugar is best when donuts are fully cooled.
- Leftovers keep well covered at room temperature up to 2 days but are best fresh.
- You can substitute yogurt with sour cream for a similar texture and tang.
Nutrition
- Serving Size: 1 donut
- Calories: 220 kcal
- Sugar: 17 g
- Sodium: 160 mg
- Fat: 11 g
- Saturated Fat: 7 g
- Unsaturated Fat: 3 g
- Trans Fat: 0 g
- Carbohydrates: 27 g
- Fiber: 1 g
- Protein: 3 g
- Cholesterol: 45 mg

Your email address will not be published. Required fields are marked *