
I absolutely love sharing this **Butternut Squash Soup Recipe** with friends because it’s cozy, comforting, and packs a beautiful, velvety richness that feels like a warm hug in a bowl. When I first tried making this soup myself, I discovered a few tricks that really elevate the flavor and texture, and now it’s a staple in my kitchen whenever squash is in season. You’ll find that it’s straightforward to prepare and wonderfully forgiving, making it perfect for both busy weeknights and relaxed weekend cooking.
Why You’ll Love This Recipe
- Smooth & Creamy Texture: The soup blends to silky perfection using just the right amount of cream, making each spoonful a delight.
- Natural Sweetness: Roasting the butternut squash enhances its natural sugars for a rich, deep flavor without needing extra sugar.
- Simple Ingredients: You’ll find everything you need in your pantry and fridge, with no fancy extras necessary.
- Versatile Comfort Food: This soup works beautifully as a light lunch, a starter for dinner, or a cozy weekend treat.

Ingredients You’ll Need
Choosing fresh and quality ingredients is key to nailing this Butternut Squash Soup Recipe. I always look for firm, bright orange squash without any soft spots, and I love using fresh herbs to brighten the flavor just before serving.
- Butternut squash: Make sure it’s fresh and firm; roasting it brings out the best flavor.
- Olive oil or butter: For roasting and sautéing to deepen the soup’s flavor.
- Onion: Adds a sweet, savory base when softened.
- Garlic cloves: Use fresh for that little punch of warmth and aroma.
- Vegetable or chicken broth: A flavorful liquid to cook the squash and blend it smoothly.
- Heavy cream or coconut milk: For creaminess; I sometimes swap in coconut milk for a dairy-free twist.
- Fresh herbs (sage or thyme): They add a beautiful fragrant note that complements the squash.
- Salt and pepper: To taste, for seasoning and bringing out all the flavors.
- Optional spices (nutmeg or cinnamon): Just a pinch to enhance the warmth and complexity.
Variations
I love customizing this Butternut Squash Soup Recipe depending on my mood or what’s in the fridge. Feel free to mix it up—you’ll find each variation brings something new and exciting to the bowl!
- Spicy Kick: Add a pinch of cayenne or red pepper flakes—I discovered this after a chilly day and it gave the soup such a lovely warmth.
- Dairy-Free: Swap heavy cream for coconut milk, which adds a subtle tropical note while keeping it creamy.
- Earthy Twist: Stir in cooked lentils or pumpkin seeds for texture and an extra nutritional boost.
- Herb Variations: Try rosemary or sage instead of thyme for a unique flavor profile my family adores.
How to Make Butternut Squash Soup Recipe
Step 1: Prepare and Roast the Squash
Start by peeling and cubing your butternut squash—this part can feel a little intimidating, but I promise it gets easier with practice. Roasting the chunks on a baking sheet with olive oil, salt, and pepper for about 25-30 minutes caramelizes their natural sugars, giving the soup that rich and cozy flavor that I absolutely adore. Make sure the cubes are spread out in a single layer to get beautifully roasted edges.
Step 2: Sauté the Aromatics
While the squash roasts, gently sauté diced onions and minced garlic in a pot with some butter or olive oil. This softens their sharpness and introduces a lovely base note to the soup. You’ll want them soft and translucent but not browned—this lets the flavors meld beautifully with the roasted squash later on.
Step 3: Combine and Simmer
Once your squash is roasted and your aromatics are ready, throw them both into the pot, then add your broth and herbs. Let it simmer gently for about 15 minutes to meld everything together. At this point, your kitchen will smell incredible — it’s one of my favorite moments because that aroma just feels like home.
Step 4: Blend Until Silky Smooth
This is where the magic happens! Use an immersion blender directly in the pot, or carefully transfer the soup to a blender in batches, blending until perfectly smooth. I like this soup velvety without being too thick, so I add cream or coconut milk gradually until I get the right luscious texture. Taste and adjust salt, pepper, and any spices now.
Pro Tips for Making Butternut Squash Soup Recipe
- Peeling Made Easy: I discovered that microwaving the whole squash for 2-3 minutes softens the skin and makes peeling way less frustrating.
- Roasting Adds Depth: Don’t underestimate roasting the squash—it’s the secret to the soup’s rich, slightly sweet flavor.
- Gentle Simmer: Keep your simmer low and slow to prevent breaking and keep the texture silky smooth.
- Blend in Batches: If you don’t have an immersion blender, blend the soup in small batches for safety and smoothness.
How to Serve Butternut Squash Soup Recipe
Garnishes
I love sprinkling fresh herbs like chopped parsley or a few crispy sage leaves on top for color and aroma. A drizzle of good-quality olive oil or a swirl of cream makes it look so inviting. For extra texture, toasted pumpkin seeds add a fantastic crunch.
Side Dishes
Butternut squash soup is perfect alongside crusty bread or garlic toast—my family goes crazy for dipping their bread in the soup. I also like pairing it with a fresh green salad, especially dressed with tangy citrus vinaigrette to balance the soup’s creaminess.
Creative Ways to Present
For special occasions, I adore serving this soup in mini pumpkin bowls or hollowed-out small squashes—it instantly makes the meal feel festive and extra cozy. You could also use ramekins for elegant individual servings when entertaining guests.
Make Ahead and Storage
Storing Leftovers
I keep leftovers in an airtight container in the fridge where it stays fresh for up to 4 days—perfect for a quick reheated lunch. Also, be sure to cool the soup completely before refrigerating to preserve its flavor and texture.
Freezing
This soup freezes beautifully! I portion it into freezer-safe containers, leaving room for expansion, and it freezes well for up to 3 months. When I’m ready, I thaw it overnight in the fridge.
Reheating
To reheat, gently warm the soup on the stove over low heat, stirring occasionally. If it thickens too much, just add a splash of broth or cream to bring it back to that luscious consistency. This is what I always do to make sure it tastes like it just came out of the kitchen.
FAQs
-
Can I use frozen butternut squash for this soup?
Yes, you can! Frozen butternut squash is a convenient shortcut, especially outside of squash season. Just thaw it completely and reduce the roasting time since frozen squash typically cooks faster. The flavor might be a bit less intense compared to fresh roasted, but it still makes a tasty soup.
-
How do I make this soup vegan?
To make this Butternut Squash Soup Recipe vegan, simply substitute the heavy cream with coconut milk or your favorite plant-based milk, and use vegetable broth instead of chicken broth. The coconut milk adds a nice creaminess with a subtle tropical flavor.
-
Can I prepare the soup in advance?
Absolutely! This soup actually tastes better after sitting overnight because the flavors deepen. Just store it in an airtight container in the fridge and reheat gently when ready.
-
What can I serve with butternut squash soup?
I like to serve it with crusty bread, garlic toast, or a light salad to balance the richness. For an elegant touch, adding toasted pumpkin seeds or crispy sage leaves on top really elevates the experience.
Final Thoughts
This Butternut Squash Soup Recipe holds a special place in my heart because it’s so simple yet bursting with flavor and creaminess that feels like a true comfort food. Whenever I serve it, everyone asks for seconds. I hope you give this recipe a try and experience the cozy joy it brings—plus, it’s a great way to get creative in your kitchen with minimal fuss. Trust me, you’re going to love it just as much as I do!
Print
Butternut Squash Soup Recipe
- Prep Time: 45 minutes
- Cook Time: 1 hour 5 minutes
- Total Time: 5 hours
- Yield: 8 servings (plus about 1 cup sugared cranberries) 1x
- Category: Dessert
- Method: Baking
- Cuisine: American
Description
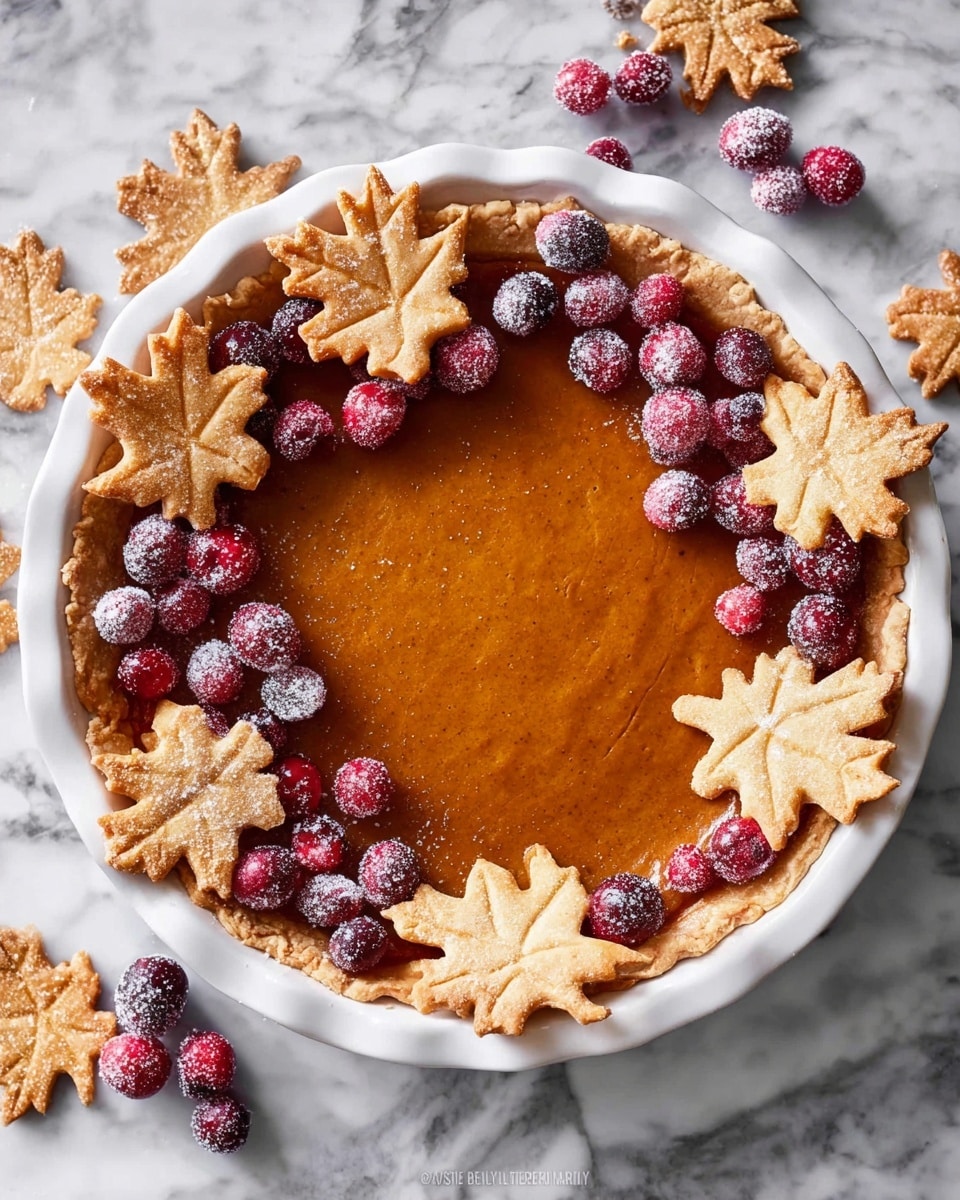
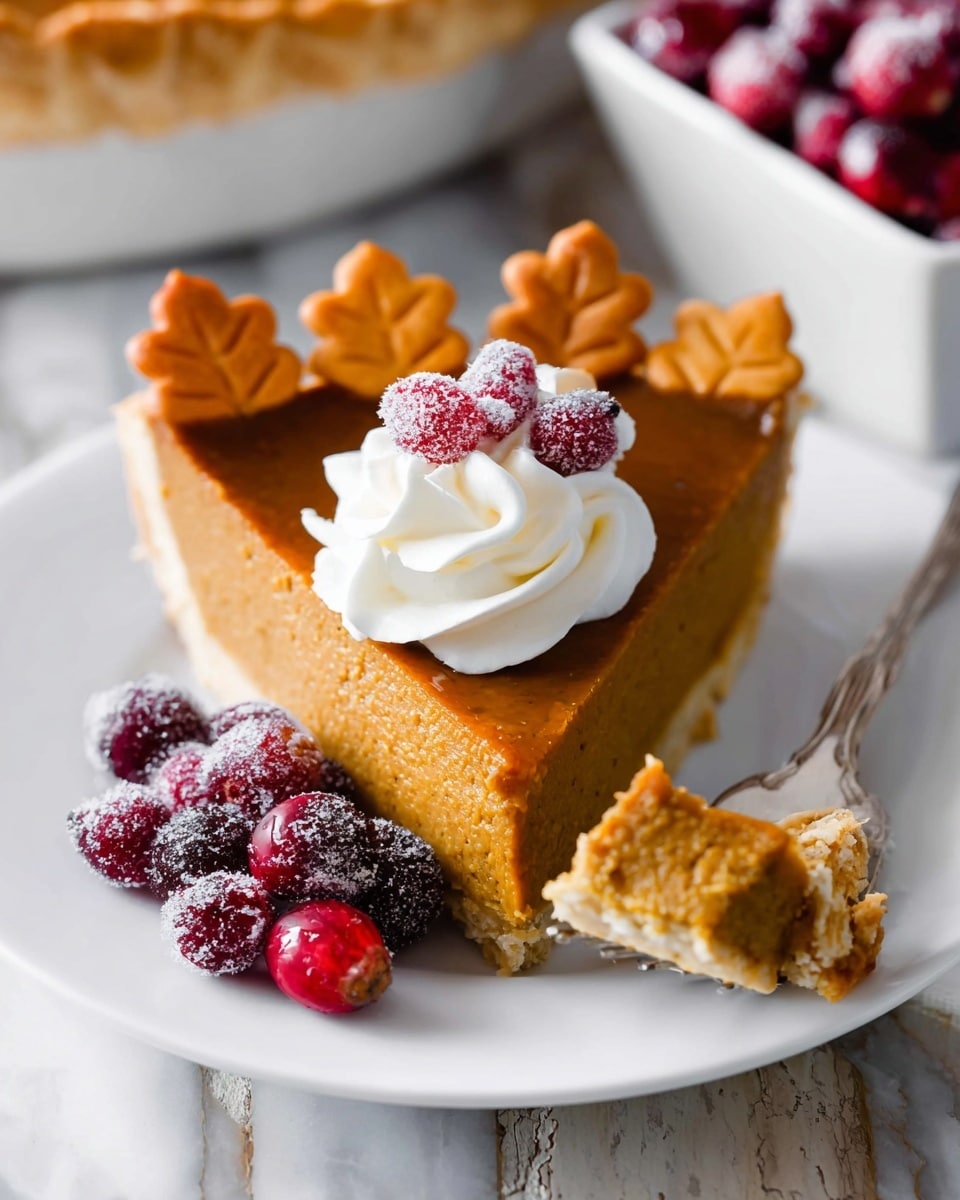
This Great Pumpkin Pie Recipe delivers a rich, smooth, and flavorful pumpkin pie perfect for fall and holiday celebrations. Featuring a homemade pie crust, a spiced pumpkin filling with warm cinnamon, ginger, nutmeg, cloves, and freshly ground black pepper, this pie is sure to impress. It includes optional decorative elements like sugared cranberries and pie crust leaves for an elegant touch. The pie is baked to perfection in a deep dish pie plate and best served chilled with whipped cream.
Ingredients
For the Sugared Cranberries
- 1 cup (100g) fresh cranberries (do not use frozen)
- 3/4 cup (180ml) water
- 1 and 1/4 cups (250g) granulated sugar, divided
For the Pie Dough
- Homemade Pie Dough (full recipe makes 2 crusts: 1 for bottom, 1 for leaf decor)
- Egg wash: 1 large egg beaten with 1 Tablespoon milk
For the Pumpkin Pie Filling
- One 15-ounce can (425g) pumpkin puree
- 3 large eggs
- 1 and 1/4 cups (250g) packed light or dark brown sugar
- 1 Tablespoon (8g) cornstarch
- 1/2 teaspoon salt
- 1 and 1/2 teaspoons ground cinnamon
- 1/2 teaspoon ground ginger
- 1/4 teaspoon ground or freshly grated nutmeg
- 1/8 teaspoon ground cloves
- 1/8 teaspoon freshly ground black pepper
- 1 cup (240ml) heavy cream
- 1/4 cup (60ml) milk
Instructions
- Prepare Sugared Cranberries: Begin by placing fresh cranberries in a large heatproof bowl. In a medium saucepan over medium heat, combine water and 3/4 cup (150g) granulated sugar, bringing it to a simmer while whisking until the sugar dissolves. Remove from heat and let cool for 5 minutes. Pour this syrup over the cranberries, stir, cover, and let sit for 15 minutes. Using a slotted spoon, transfer the cranberries onto a parchment-lined baking sheet and allow them to dry uncovered for 1 hour. Toss the cranberries in the remaining 1/2 cup (100g) sugar, coat evenly, then place them on another parchment-lined baking sheet to dry for at least 1 more hour at room temperature or the refrigerator. Store in the refrigerator for up to 3 days.
- Make Pie Crust: Prepare your homemade pie dough according to your favorite recipe or use store-bought dough. Follow the video tutorial if available. Set aside one disc for the pie bottom and reserve the other for decorative leaves if desired.
- Preheat Oven and Roll Dough: Preheat your oven to 375°F (190°C). On a lightly floured surface, roll out one disc of pie dough into a 12-inch circle. Transfer to a 9×2-inch deep dish pie plate, tucking and pressing firmly to fit the dish. Fold overhang inward to create a thick rim and crimp edges with a fork or fingers. Lightly brush the edges with the egg wash.
- Par-bake the Pie Crust: Line the crust with crumpled parchment paper and fill with pie weights or dried beans, distributing evenly. Bake for 10 minutes. Remove weights and parchment, prick bottom with a fork to vent steam, and bake an additional 7-8 minutes until the crust bottom just begins to brown. Remove from oven.
- Prepare the Filling: In a large bowl, whisk pumpkin puree, eggs, and brown sugar until combined. Add cornstarch, salt, cinnamon, ginger, nutmeg, cloves, black pepper, heavy cream, and milk. Whisk vigorously until the filling is smooth and thoroughly mixed.
- Fill and Bake the Pie: Pour the filling into the warm par-baked crust, filling about 3/4 full. Use leftover filling for mini pies if desired. Bake for 55-60 minutes, checking at 50, 55, and 60 minutes. After 25 minutes, cover the crust edges with foil or use a pie shield to prevent over-browning. The center should be mostly set but slightly wobbly when done.
- Cool and Decorate: Transfer the pie to a wire rack and cool completely for at least 3 hours. Decorate with sugared cranberries and pie crust leaf cutouts if desired. Serve chilled with whipped cream.
- Store Leftovers: Cover the pie tightly and refrigerate for up to 5 days. Enjoy leftover sugared cranberries as a snack or garnish.
Notes
- This pumpkin pie features a rich and smooth filling with warm spices that create a classic flavor profile perfect for fall and holiday gatherings.
- The pie crust leaves are optional decorative pieces; you may omit them for a simpler presentation and make only one crust.
- Sugared cranberries add a festive touch to the pie and can be made ahead but are optional.
- Use fresh cranberries (not frozen) to ensure the best texture for sugared cranberries.
- Keep an eye on the crust edges during baking to prevent burning by using foil or a pie shield.
- Allow the pie to cool completely before serving to ensure the filling sets properly.
- Leftover sugared cranberries are great for snacking or as cocktail garnishes.
Nutrition
- Serving Size: 1 slice (1/8 of pie)
- Calories: 380
- Sugar: 35g
- Sodium: 220mg
- Fat: 20g
- Saturated Fat: 11g
- Unsaturated Fat: 7g
- Trans Fat: 0g
- Carbohydrates: 45g
- Fiber: 3g
- Protein: 5g
- Cholesterol: 110mg

Your email address will not be published. Required fields are marked *