
If you’re hunting for a show-stopping dessert to wow your guests at your next spooky celebration, look no further! This Halloween Witch Cake Recipe is truly fan-freaking-tastic—I absolutely love how it blends rich chocolatey goodness with whimsical Halloween charm. Whether you’re baking for a festive party or just want to delight your family with something special, this cake is a total crowd-pleaser that looks as amazing as it tastes. Stick around, and I’ll walk you through every step to nail this magical treat with ease.
Why You’ll Love This Recipe
- Rich, Moist Cake Layers: The combination of sour cream and melted chocolate keeps these layers incredibly tender and full of flavor every time.
- Fun, Festive Design: The witch hats and black-green frosting turn this cake into a Halloween centerpiece that folks can’t stop talking about.
- Perfect for Parties: With 16 servings and easy-to-follow steps, it’s a breeze to bake for a crowd without stress.
- Customizable Decorations: You can tailor the cake’s look with your favorite sprinkles—or even spooky candy finds for your own spin.

Ingredients You’ll Need
This Halloween Witch Cake Recipe uses classic ingredients that you probably already have in your pantry, which is part of what makes it so wonderful to whip up on a whim. The key is quality chocolate and fresh eggs—they really uplift the taste and texture.
- Butter: Softened butter blends easily for a creamy batter and smooth frosting.
- Brown Sugar: The packed brown sugar adds warmth and subtle molasses depth to the cake.
- Large Eggs: Room temperature eggs help with even mixing for an airy texture.
- Semisweet Chocolate: Melted and cooled for that deep chocolate richness throughout the layers.
- Vanilla Extract: A splash amplifies all the other flavors beautifully.
- All-Purpose Flour: The backbone of the cake—a solid choice for that perfect crumb.
- Baking Soda: Helps the cake rise for that soft and fluffy feel.
- Salt: Balances the sweetness and enhances chocolate flavor.
- Sour Cream: Keeps the cake moist and tender with a slight tang.
- Water: Added gradually to keep batter smooth and moist.
- Confectioners’ Sugar: For that sweet, creamy frosting texture.
- 2% Milk: Adjusts the frosting consistency just right.
- Green and Black Gel Food Coloring: The secret to your spooky color palette without diluting frosting.
- Black Candy Coating Disks: Melted to pipe adorable witch hats that set perfectly.
- Assorted Black Sprinkles, Sanding Sugar, and Pearls: Adds texture and festive finishing touches.
Variations
One of the best parts about this Halloween Witch Cake Recipe is how easy it is to make your own. Over the years, I’ve played around with flavors and decorations, and you can definitely customize it to fit your crowd or dietary preferences.
- Dairy-Free Version: I swapped in coconut milk and dairy-free butter once, and the cake still turned out moist with just a hint of coconut—perfect for vegan friends!
- Spiced Chocolate: Adding a teaspoon of cinnamon and a pinch of cayenne gives this cake a little Halloween kick that my family went wild for.
- Orange Frosting Twist: Adding a splash of fresh orange juice and zest into the frosting brightens the flavor and intensifies the Halloween vibe.
- Mini Cake Pops: I’ve turned leftovers into adorable mini witch hats on sticks for a fun party snack that kids adore.
How to Make Halloween Witch Cake Recipe
Step 1: Prepare Your Pans and Batter
Start by preheating your oven to 350°F and greasing three 8-inch round cake pans. I like to line the bottoms with parchment paper and grease that too—it helps the layers release smoothly without breaking apart, which is key for stacking later. Then, cream together your softened butter and packed brown sugar for about 5 to 7 minutes until light and fluffy; this step is where your cake starts developing its wonderfully tender texture.
Step 2: Add Your Eggs, Chocolate & Flavor
Add the eggs one at a time, beating well after each addition. This ensures everything emulsifies nicely. Then beat in your melted, cooled semisweet chocolate and vanilla extract. The chocolate gives the cake a rich depth, while that vanilla lifts all the flavors together. You’ll notice the batter smells like pure indulgence—so good!
Step 3: Combine Dry Ingredients and Sour Cream
In a separate bowl, whisk together flour, baking soda, and salt. Add these dry ingredients into your creamed mixture alternately with sour cream, starting and ending with the dry. Be sure to beat well after each addition—this keeps your batter smooth and ensures your cake stays light and fluffy.
Step 4: Stir in Water and Bake
Gradually beat in the water, which thins the batter for a perfect pour. Divide the batter evenly across your pans and bake for about 40-45 minutes. You’ll want to test doneness by inserting a toothpick into the center—it should come out clean or with just a crumb or two. After baking, cool the layers in the pans 10 minutes before gently transferring them to wire racks to cool completely.
Step 5: Make the Frosting and Create Witch Hats
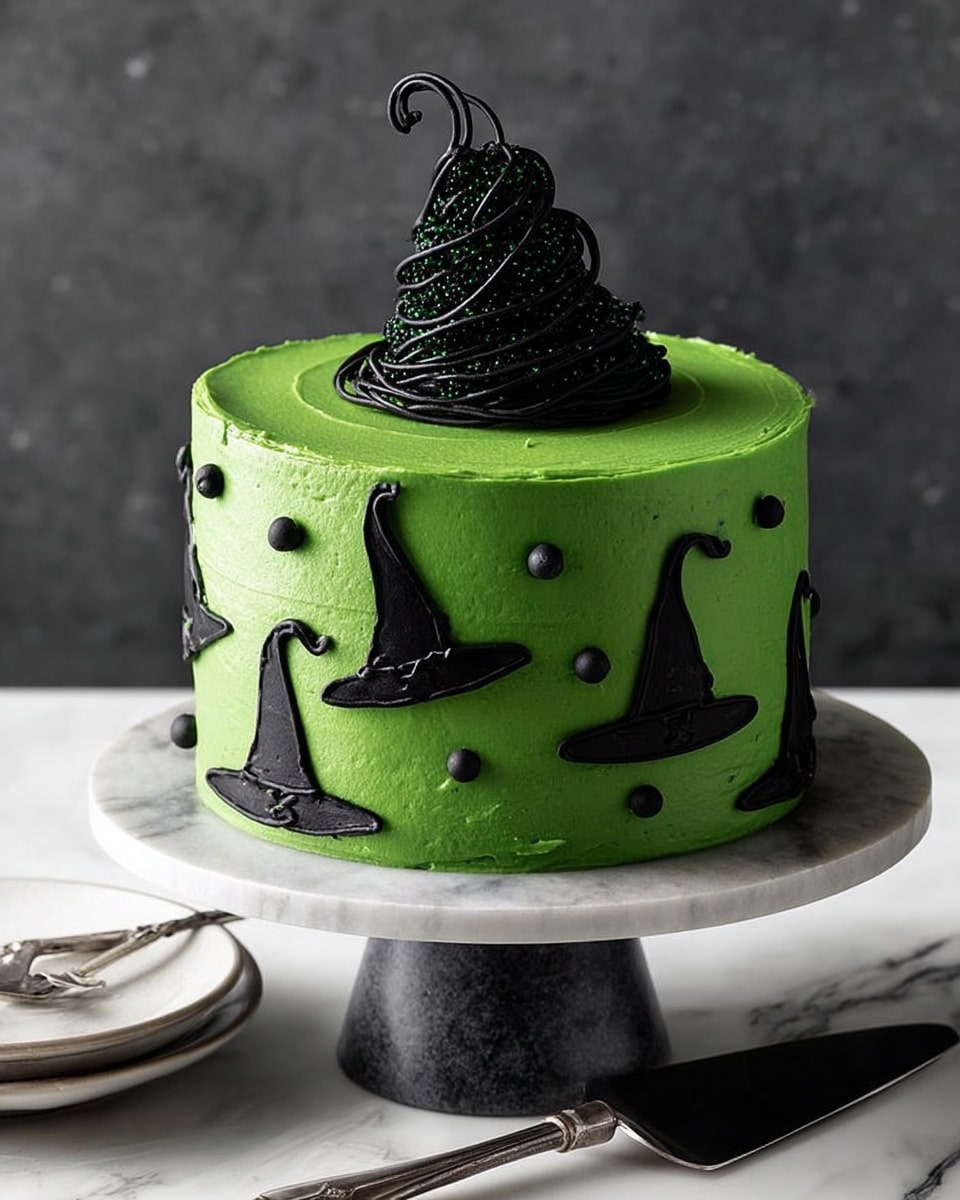
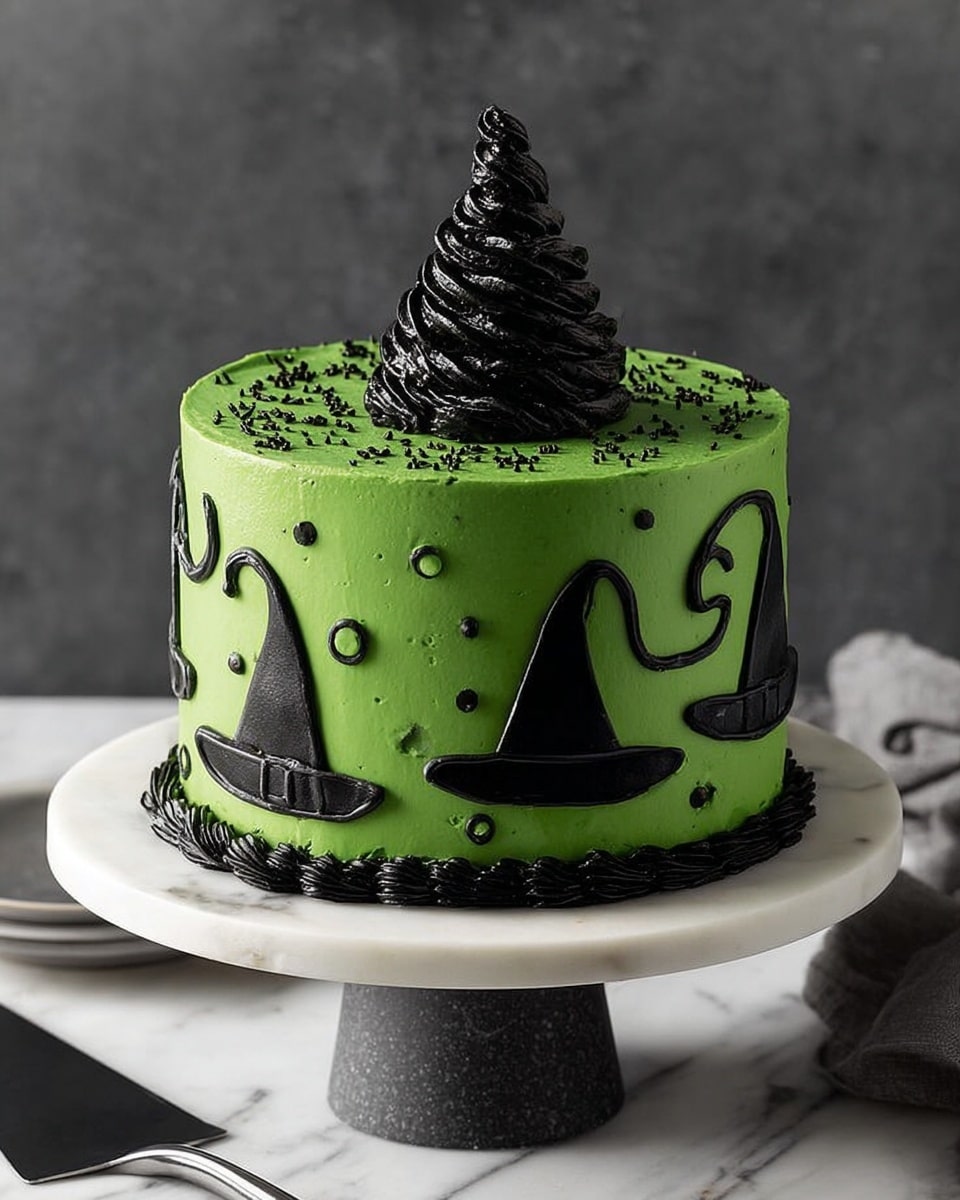
For the frosting, beat softened butter until smooth, then gradually add confectioners’ sugar, vanilla, salt, and milk until it reaches a creamy consistency. Reserve about 1 1/2 cups to tint black and color the rest green with gel food coloring. This way, you’ll get that perfect witchy color palette. Melt your black candy coating disks and pipe them onto waxed paper in whimsical witch hat shapes—this takes a bit of patience but trust me, it’s worth it. Let these set completely before decorating.
Step 6: Assemble and Decorate Like a Pro
If your cake layers have rounded tops, trim them gently with a serrated knife to keep your cake looking sharp and professional. Layer your cake by spreading frosting between each layer, then cover the sides and top. Use the black frosting with a star tip to pipe cool textures, and press in black pearls and sprinkles for added detail. Just before serving, gently position a witch hat on top for that finishing touch everyone will admire.
Pro Tips for Making Halloween Witch Cake Recipe
- Room Temperature Ingredients: I’ve learned that letting my eggs and butter warm up before mixing helps the batter come together smoothly and avoids lumps in frosting.
- Trim Cake Layers Carefully: Don’t rush this step; a steady hand with a serrated knife will keep your layers level and the final cake stable.
- Gel Food Coloring for Vivid Shades: Liquid colors watered down the frosting before, so gel is my go-to for bold, vibrant green and black without compromising texture.
- Pipe Witch Hats on Parchment First: Patience here pays off—letting these hats harden ensures they don’t lose shape when placed on the cake.
How to Serve Halloween Witch Cake Recipe
Garnishes
I personally love garnishing with a mix of black sanding sugar, star-shaped sprinkles, and edible pearls—they add sparkle and texture that make the cake feel extra festive. Plus, pressing in some black candy-coated chocolate balls elevates the witchy vibe. Those little details really wow guests and make the dessert table pop.
Side Dishes
Since this cake is decadently rich, I like to serve it alongside light, refreshing sides like a crisp apple cider or a tart cranberry punch. If you’re feeling extra festive, pair it with a simple fruit salad accented with autumn spices—it balances that chocolate goodness beautifully.
Creative Ways to Present
One time I set up a spooky dessert “witches’ cauldron” table with this cake as the centerpiece, surrounded by dry ice for a smoky effect. Another fun idea is to slice the cake and serve each piece with mini witches’ hats or edible eyes on top to keep the Halloween spirit going strong. It’s always a hit with kids and adults alike!
Make Ahead and Storage
Storing Leftovers
I wrap the leftover cake tightly with plastic wrap and store it in an airtight container in the fridge. This keeps the frosting fresh and the cake moist for up to 4 days—though honestly, it rarely lasts that long in my house!
Freezing
If you want to save some for later, I recommend freezing undecorated cake layers wrapped well in plastic and foil. When you’re ready to enjoy, thaw overnight in the fridge, then frost and decorate. The texture remains excellent and it’s a huge time-saver during busy holiday seasons.
Reheating
I usually serve this cake chilled, but if you want to warm a slice slightly, just let it sit at room temp for 30 minutes or microwave briefly for about 10 seconds—enough to bring out the cake’s flavors without melting the frosting.
FAQs
-
Can I make the Halloween Witch Cake Recipe ahead of time?
Absolutely! You can bake the cake layers a day or two in advance and keep them wrapped tightly in the refrigerator. The frosting and decorations are best done just before serving to keep everything fresh, but the cake itself holds up wonderfully ahead of time.
-
What’s the best way to level the cake layers?
I use a serrated knife to gently trim off the domed tops after the layers are cool. It’s easier to cut when the cake is completely cool, and using a sawing motion helps to keep the layers even without squishing the cake.
-
Can I substitute the sour cream?
You can try substituting with full-fat Greek yogurt for a similar tang and moisture. However, the cake’s texture may be slightly different, so I recommend sticking to sour cream when possible for best results.
-
What if I don’t have black gel food coloring?
Black gel coloring often produces the best vibrant color without thinning the frosting. If you don’t have it, a mix of blue and green gel colors with a dash of brown can approximate dark tones, though it might appear more muted.
-
How do I make the witch hats stand upright on the cake?
Make sure the candy-coated hats are fully set and firm before placing them on the cake. Gently press the base into the frosting—this acts like glue. For extra security, you can insert a small piece of waxed paper underneath while decorating, then remove it before serving.
Final Thoughts
When I first tried this Halloween Witch Cake Recipe, it quickly became my go-to spooky bake because it’s just the right mix of deliciousness and creativity. I love how easy it is to customize, and nothing beats seeing the smiles on my guests’ faces when they spot those charming witch hats perched on top. If you want a recipe that’s fun to make and even more fun to eat, give this one a shot—you’ll enjoy every single chocolaty, festive bite as much as I do!
Print
Halloween Witch Cake Recipe
- Prep Time: 1 hour 15 minutes
- Cook Time: 40 minutes
- Total Time: 1 hour 55 minutes
- Yield: 16 servings 1x
- Category: Dessert
- Method: Baking
- Cuisine: American
Description
Celebrate Halloween with this spooky and delicious Halloween Witch Cake. Featuring moist layers of chocolate-infused cake frosted with vibrant green and black buttercream, topped with festive witch hats made from melted candy coating and assorted sprinkles, this cake is perfect for a festive party or gathering.
Ingredients
Cake
- 3/4 cup butter, softened
- 2–1/2 cups packed brown sugar
- 4 large eggs, room temperature
- 6 ounces semisweet chocolate, melted and cooled
- 3 teaspoons vanilla extract
- 3 cups all-purpose flour
- 3 teaspoons baking soda
- 1 teaspoon salt
- 1–1/2 cups sour cream
- 1–1/2 cups water
Frosting
- 1–1/4 cups butter, softened
- 10 cups confectioners’ sugar
- 3 teaspoons vanilla extract
- 1/4 teaspoon salt
- 1/2 to 2/3 cup 2% milk
- Green gel food coloring
- Black gel food coloring
Decoration
- 4 ounces black candy coating disks, melted
- Assorted black sprinkles, sanding sugar and pearls
Instructions
- Prepare the pans: Preheat the oven to 350°F. Grease the bottoms of three 8-inch round baking pans and line them with parchment paper. Grease the parchment paper as well to prevent sticking.
- Cream butter and sugar: In a large bowl, beat the softened butter with the packed brown sugar using an electric mixer until the mixture is light and fluffy, about 5 to 7 minutes.
- Add eggs and flavorings: Add the eggs one at a time, beating well after each addition to fully incorporate them. Mix in the melted and cooled semisweet chocolate along with the vanilla extract.
- Combine dry ingredients: In a separate bowl, whisk together the all-purpose flour, baking soda, and salt.
- Mix batter: Alternately add the flour mixture and sour cream to the creamed mixture, starting and ending with the flour mixture, beating well after each addition. Gradually beat in the water until the batter is smooth.
- Bake the cake layers: Divide the batter evenly among the prepared pans. Bake in the preheated oven for 40 to 45 minutes, or until a toothpick inserted in the center comes out clean. Cool the cakes in pans for 10 minutes before removing them to wire racks to cool completely.
- Prepare the frosting: In a large bowl, beat the softened butter until smooth. Gradually add the confectioners’ sugar, vanilla extract, salt, and enough 2% milk to achieve a spreadable consistency. Set aside 1-1/2 cups of this frosting to color black and tint the remaining frosting with green gel food coloring to your desired shade.
- Level the cake layers: If the cakes have rounded tops, trim them with a serrated knife to create flat surfaces for stacking.
- Assemble the cake: Place one cake layer on a serving plate and spread with 2/3 cup of green frosting. Repeat for the second layer, then place the third layer on top. Frost the top and sides of the cake with the remaining green frosting.
- Create decorations: Using a piping bag with a small round tip, pipe witch hat shapes onto waxed paper using the melted black candy coating. Allow them to set until firm.
- Decorate the cake: Place black frosting into a piping bag fitted with a large star tip and pipe decorative stars on top of the cake. Gently press assorted black sprinkles, sanding sugar, and pearls onto the sides of the cake. Just before serving, gently stand one witch hat on top of the cake, and adhere remaining witch hats and black pearls to the sides by pressing them into the frosting.
Notes
- Ensure eggs are at room temperature to help with batter volume and texture.
- Take care when trimming cake layers to keep them even for a professional look.
- Melt candy coating gently to avoid burning and ensure smooth piping.
- Store cake covered at room temperature for up to 2 days or refrigerate for longer freshness.
- Use gel food coloring for vibrant frosting without affecting texture.
Nutrition
- Serving Size: 1 slice (approximately 1/16 of cake)
- Calories: 510
- Sugar: 46g
- Sodium: 330mg
- Fat: 25g
- Saturated Fat: 15g
- Unsaturated Fat: 8g
- Trans Fat: 0.5g
- Carbohydrates: 68g
- Fiber: 2g
- Protein: 5g
- Cholesterol: 95mg

Your email address will not be published. Required fields are marked *