

If you’re looking for a spook-tacular treat that’s both fun to make and absolutely delicious, you’ve gotta try this Werewolf Cupcakes Recipe. I stumbled upon this gem a while back, and ever since, it’s been a hit whenever I need a whimsical yet chocolatey dessert. These cupcakes are creepy in the best way, with Reese’s Cup werewolves perched right on top, making them perfect for Halloween or any party where you want to wow your friends. Trust me, once you make these, you’ll find yourself coming back to this recipe again and again!
Why You’ll Love This Recipe
- Cute & Creative: The werewolf design is so clever and guaranteed to get attention.
- Easy Assembly: No complicated baking tricks—mostly decorating with candy melts.
- Delicious Flavor: Chocolate lovers rejoice: chocolate cupcakes, frosting, and Reese’s cups!
- Perfect for Parties: These cupcakes are a fantastic centerpiece for Halloween or themed gatherings.

Ingredients You’ll Need
For this Werewolf Cupcakes Recipe, you want to gather both baking basics and some fun candy pieces. Combining rich chocolate flavors with playful decorations makes these cupcakes unique. I recommend getting good quality candy melts and Reese’s cups because they really set the “werewolf” vibe.
- Light cocoa candy melts: These give a nice furry texture and make the werewolves look realistic.
- Full size Reese’s Cups: The main base of your werewolf face – peanut butter chocolate goodness!
- Reese’s Cup Minis: Perfect for the werewolf’s snout.
- Black M&M’s: Use as noses for that adorable snout.
- Yellow candy eyes: They add character and just a little bit of creepiness.
- White candy melts: Great for fangs to complete the werewolf look.
- Chocolate cupcakes: I love using homemade, but store-bought absolutely works to save time.
- Thick chocolate frosting: This holds everything in place and tastes fantastic.
- Whoppers (small malted milk balls): These work as the werewolf’s paws, so cute!
- Candy bones: Available as bone sprinkles, perfect spooky touch.
Variations
I love how versatile this Werewolf Cupcakes Recipe is—you can easily customize it to suit your tastes or dietary needs. If you want to switch things up, don’t hesitate! I sometimes swap chocolate cupcakes for pumpkin or spice flavors around fall, and it’s just as amazing.
- Nut-Free Version: Replace Reese’s cups with nut-free chocolate discs and find allergy-safe mini candies to keep the design intact.
- Vegan Variation: Use vegan chocolate cupcakes and non-dairy candy melts—I’ve tried this with a friend, and it worked beautifully!
- Color Pop: Swap yellow candy eyes for green or red eyes to give your werewolves an extra eerie vibe.
- Gluten-Free: Use gluten-free cupcakes, and double-check your candy ingredients for gluten content.
How to Make Werewolf Cupcakes Recipe
Step 1: Crafting the Werewolf Faces
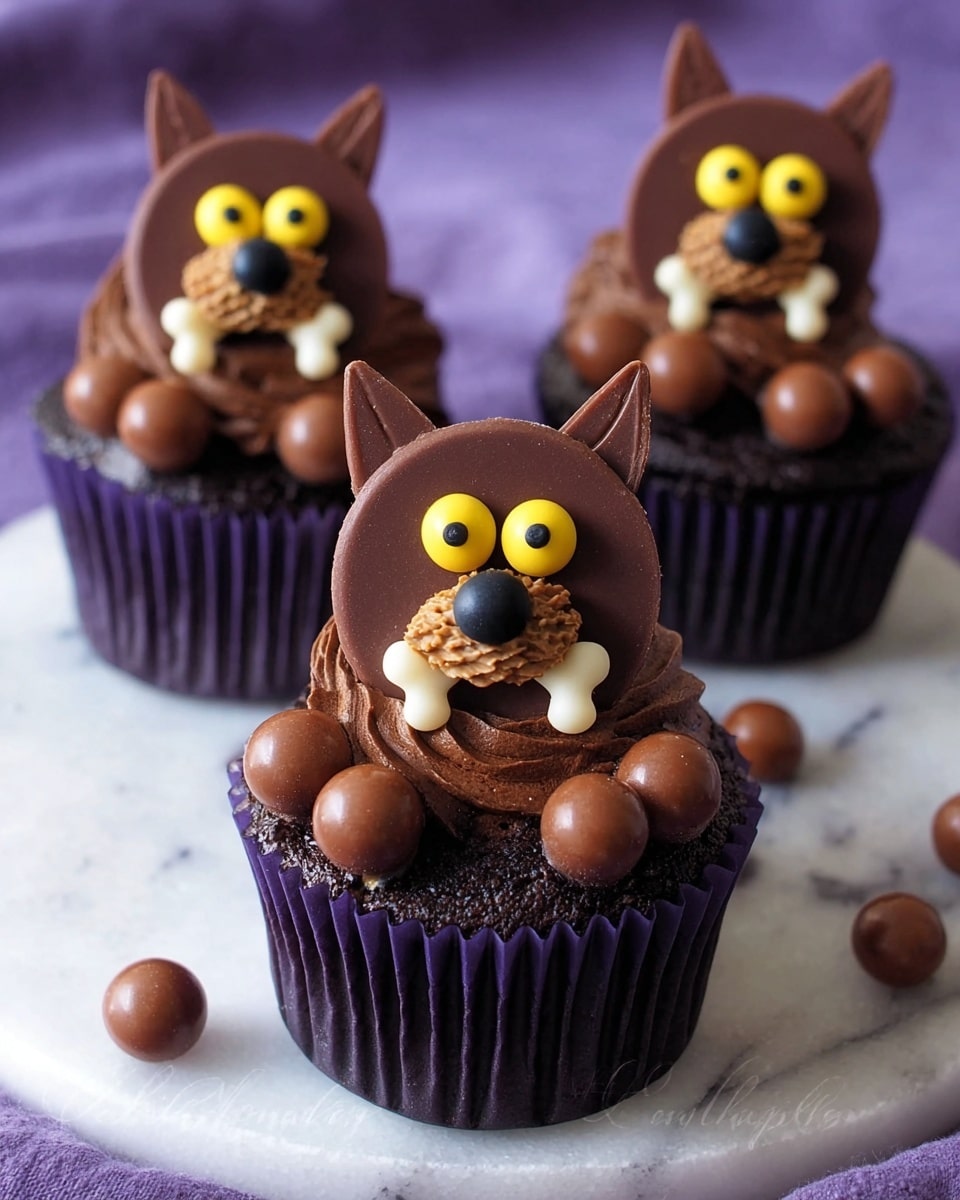
Start by spreading your melted light cocoa candy melts over the flat side of the full-size Reese’s Cups. This base layer is where the magic begins. Using a small, food-safe paintbrush, press it into the wet candy melts and pull up quickly to create furry spikes—the texture is so fun to work with and really brings the werewolf to life. Next, attach a mini Reese’s Cup as the snout, covering it with more candy melts to continue the furry effect. Then stick on the black M&M for the nose and add yellow candy eyes right above, securing them with little dabs of candy melt. Pop your werewolf face into the freezer for about a minute to set everything.
Step 2: Adding Ears and Fangs
Cut two triangle shapes out of the candy melt wafers to make ears. Attach these to the top of the werewolf’s head with a bit more melted candy and “fur” them up using the paintbrush technique again—this detail really sells the werewolf look! For fangs, you can pipe on some white candy melt or use tiny heart-shaped sprinkles if you’re pressed for time. The contrast of the fangs against the darker chocolate adds just the right spooky charm. Repeat these steps until all six werewolf faces are ready.
Step 3: Creating Candy Moon Picks
To add an extra Halloween touch, pipe candy moons onto a parchment-lined sheet using white candy melts. Let these harden in the freezer for about 3–5 minutes. Later, these will become adorable picks that you’ll insert into the cupcakes to make the whole scene even more enchanting.
Step 4: Assembling the Cupcakes
Now it’s time to assemble! Pipe a generous swirl of thick chocolate frosting onto each cupcake—a quick swirl works just fine. Place one of your werewolf Reese’s faces right on top of the frosting; it’s heavy enough that it settles nicely. Then stick the candy moon pick behind the werewolf. For paws, nestle two Whoppers on each side, and finally, press a candy bone in between them. It’s like the werewolf is ready to pounce—so cute and a little eerie all at once!
Pro Tips for Making Werewolf Cupcakes Recipe
- Use a Small Paintbrush: This helps create those perfect furry spikes with candy melts—makes all the difference for werewolf texture.
- Work Quickly with Candy Melts: They set fast, so have your pieces ready before melting your candy.
- Freeze in Short Bursts: Pop werewolf faces in the freezer for just 1-2 minutes; too long and condensation can form and mess with your decorations.
- Choose Thick Frosting: It holds the werewolf and candy decorations firmly in place without them sliding off.
How to Serve Werewolf Cupcakes Recipe
Garnishes
I usually keep the garnishes simple and spooky—those candy bones and malted milk ball paws are my go-to. If you want to get fancy, consider a light dusting of edible glitter for a mystical moonlight effect. I also love sprinkling crushed chocolate cookies around the base for an earth-like “forest floor” vibe.
Side Dishes
These cupcakes stand out enough on their own, but pairing them with a rich hot chocolate or a spiced apple cider really takes your dessert spread up a notch. For parties, I like serving alongside simple vanilla or caramel popcorn for a fun, complementary snack.
Creative Ways to Present
For Halloween gatherings, I like to place the cupcakes on a “haunted forest” platter lined with dry ice or fake moss. Another fun idea is to use a black cake stand and surround the cupcakes with mini pumpkins or spider web decor to really set the scene. If you’re giving them as gifts, arrange them in cute boxes with a clear window so the werewolf faces peek out—guaranteed to make the recipient smile!
Make Ahead and Storage
Storing Leftovers
I usually store these cupcakes at room temperature in an airtight container for up to three days. Since there’s no perishable filling, they hold up nicely, and the candy decorations stay intact. Just keep them away from direct sunlight or heat to avoid melting.
Freezing
If you want to make these in advance, you can freeze the decorated cupcakes wrapped gently in plastic wrap and placed in an airtight container. When I’ve done this, I find freezing for up to a month works well, but it’s best to thaw them in the fridge overnight to keep the frosting from getting too soft.
Reheating
Usually, these cupcakes are best served at room temperature, but if you want to warm them slightly, I recommend a brief pause on the counter rather than microwaving, since the candy melts can get gooey. A gentle warming makes the chocolate flavors shine without losing the werewolf details.
FAQs
-
Can I make the werewolf decorations ahead of time?
Yes! You can prepare the Reese’s Cup werewolves a day or two before assembling the cupcakes. Just store them in an airtight container in the fridge. This actually helps the candy melts set firmly, making it easier to decorate your cupcakes later.
-
What if I don’t have a paintbrush for the candy melts?
If you don’t have a food-safe paintbrush, a small silicone brush or even a toothpick can work for creating the furry texture, though it might take a bit more time. Just be gentle to avoid smudging the melted candy.
-
Can I use different candies if I can’t find the exact ones listed?
Absolutely! The key is to keep similar sizes and colors to maintain the look. For example, white candy melts can be swapped with white chocolate chips, and yellow candy eyes can be replaced with small colored sprinkles or edible candy eyeballs.
-
How long does the werewolf face stay fresh on the cupcake?
The werewolf faces are stable for about 3 days at room temperature. Since they’re made with candy melts and chocolate, they don’t spoil quickly, but for best taste and appearance, enjoy them within that timeframe.
Final Thoughts
I absolutely love how this Werewolf Cupcakes Recipe turns out every time—each cupcake feels like a little Halloween masterpiece. When I first tried making these werewolves, I was amazed at how simple it was to turn basic candy and cupcakes into something so fun and festive. My family and friends go crazy for them, and honestly, I end up making more than I planned because they’re just that addictive! If you want a recipe that’s equal parts cute, spooky, and delicious, give these a whirl—you won’t regret it.
Print
Werewolf Cupcakes Recipe
- Prep Time: 10 mins
- Cook Time: 0 mins
- Total Time: 10 mins
- Yield: 6 cupcakes 1x
- Category: Dessert
- Method: No-Cook
- Cuisine: American
Description
These Werewolf Cupcakes are a fun and spooky treat perfect for Halloween or themed parties. Each cupcake is topped with a creative Reese’s Cup werewolf crafted using candy melts and Reese’s Cups, then decorated with candy eyes, noses, and fangs. The cupcakes are finished with thick chocolate frosting, malted milk ball paws, candy bones, and a white chocolate candy moon, making them as delicious as they are adorable.
Ingredients
Reese’s Cup Werewolves
- 4 ounces light cocoa candy melts, melted
- 6 full size Reese’s Cups
- 6 Reese’s Cup Minis
- 6 black M&M’s
- 12 yellow candy eyes
- 12 light cocoa candy melt wafers
- 4 ounces white candy melts, melted
Decorating the Cupcakes
- 6 chocolate cupcakes
- 1 1/2 cups thick chocolate frosting
- 12 Whoppers (small malted milk balls)
- 6 candy bones (bone sprinkles)
Instructions
- Prepare Reese’s Cup Base: Spread the melted light cocoa candy melts evenly over the surface of each full-size Reese’s Cup. Using a food-use-only paintbrush, press the brush into the wet candy melts and quickly pull up to create furry spikes effect on the surface.
- Attach Snouts: Press a mini Reese’s Cup snout onto each full-size Reese’s Cup. Brush melted candy melts all around the snout to blend and create a furry texture.
- Add Facial Features: Use melted candy melts to attach a black M&M as the nose and two yellow candy eyes onto the front of each werewolf face.
- Freeze the Werewolves: Place the decorated Reese’s Cup werewolves in the freezer for 1 minute to set the candy melts.
- Create Ears: Cut two triangle-shaped ears from the light cocoa candy melt wafers per werewolf. Attach them with melted candy melts to the top edges of each Reese’s Cup and make the ears furry by brushing with more melted candy melts.
- Add Fangs: Either pipe on white candy melt to form fangs or attach four small white heart sprinkles to each werewolf’s mouth area using melted candy melts.
- Make Candy Moons: Pipe six candy moon shapes using the white candy melts onto parchment paper, inserting a pick into each moon for insertion into the cupcakes. Freeze for 3-5 minutes until the candy hardens completely.
- Frost Cupcakes: Pipe a large swirl of thick chocolate frosting onto each of the six chocolate cupcakes.
- Assemble the Cupcakes: Place one Reese’s Cup werewolf on top of the frosting swirl of each cupcake.
- Insert Candy Moon Picks: Insert the hardened white chocolate moon picks into the frosting behind each werewolf to simulate a moonlit backdrop.
- Add Paws and Bones: Place two Whoppers on either side of the werewolf to represent paws, then press a candy bone sprinkles in between the paws to complete the look.
Notes
- Store your decorated cupcakes at room temperature for up to 3 days to maintain freshness.
- Use a food-safe paintbrush for applying candy melts to achieve the best furry texture effect.
- Ensure candy melts are fully set before assembling to prevent melting or smudging.
- The candy moons can be made ahead of time and stored in the freezer until needed.
- For best results, work quickly while the candy melts are still wet to attach decorations securely.
Nutrition
- Serving Size: 1 cupcake
- Calories: 380
- Sugar: 30g
- Sodium: 150mg
- Fat: 20g
- Saturated Fat: 9g
- Unsaturated Fat: 8g
- Trans Fat: 0g
- Carbohydrates: 45g
- Fiber: 3g
- Protein: 5g
- Cholesterol: 25mg

Your email address will not be published. Required fields are marked *