

If you’re looking for a festive treat that’s as fun to make as it is to eat, you’re going to love this Halloween Hand Held Pies Recipe. These little pies have the perfect mix of flaky crust and sweet raspberry filling, plus a fun marshmallow drizzle that turns them into spooky mummy hands—perfect for any Halloween party or cozy night in. I promise, once you try this recipe, it will quickly become your new favorite seasonal snack!
Why You’ll Love This Recipe
- Super Easy to Make: Even if you’re new to baking, this recipe uses simple steps and ready-made crust for hassle-free fun.
- Kid-Friendly: My family—and all the little ghosts and goblins I know—go crazy for these cute, handheld pies.
- Festive and Customizable: You can easily swap the raspberry jam for your favorite fillings, making these pies perfect for any spooky occasion.
- Mess-Free and Portable: Hand held pies mean you won’t need plates or forks—just grab and enjoy!

Ingredients You’ll Need
I like using ready-made pie crusts here because they save so much prep time, and pair beautifully with the raspberry jam’s tart sweetness and the marshmallow drizzle’s gooey fun. If you want, you can absolutely try a homemade pie crust, but these pre-made ones make the whole process a breeze.
- Ready-made pie crusts: Choose good quality frozen crusts that thaw evenly; they roll out smoothly and bake perfectly golden.
- Raspberry jam: The tartness helps balance the sweetness of the marshmallow; fresh or homemade jam works great too.
- Egg yolk: This is for brushing the pie tops to get that beautiful golden shine—don’t skip it!
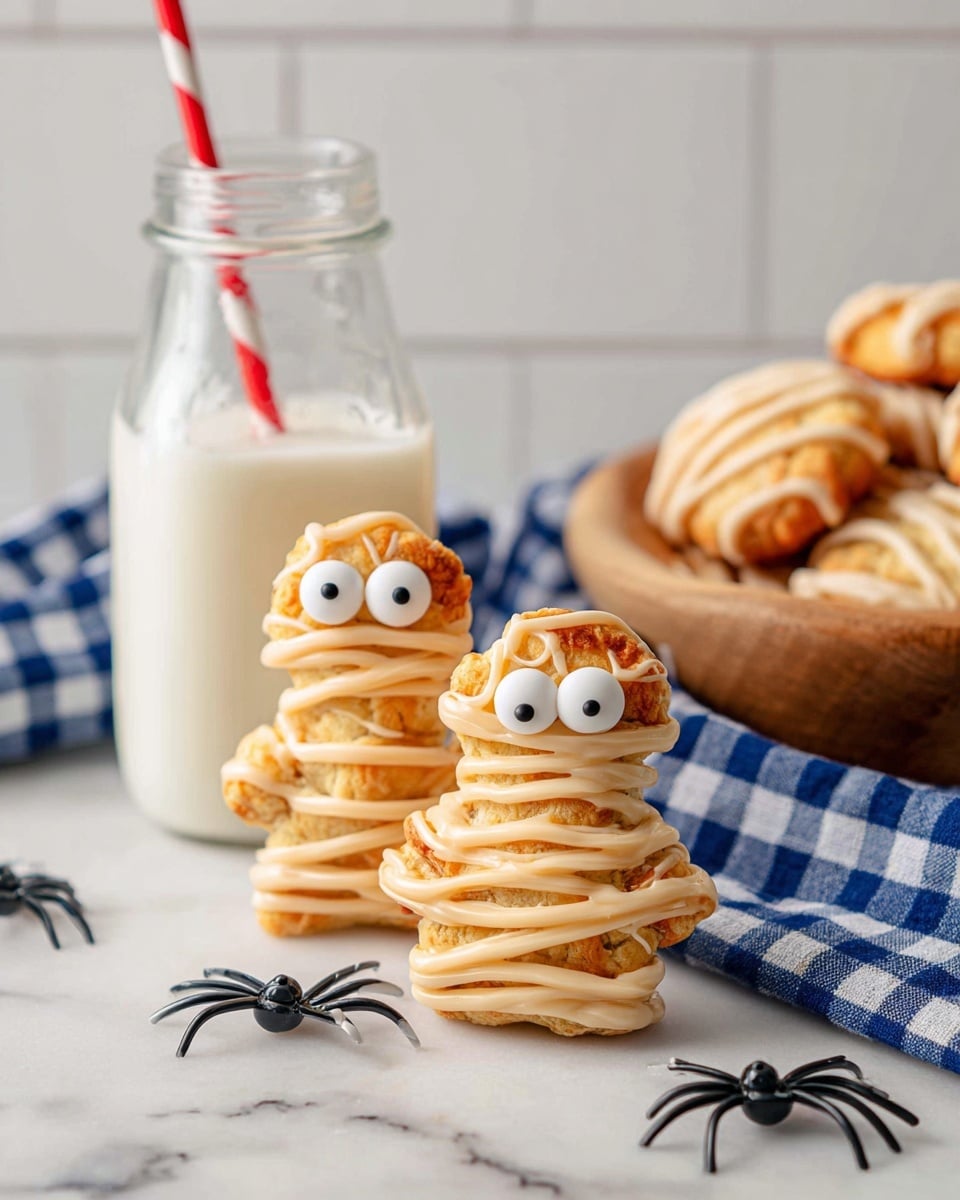
- Mini marshmallows: These melt quickly and drizzle well, giving you that fun mummy-wrapped look.
- Powdered sugar (optional): A light dusting adds a touch of icing sugar sweetness and looks cute for presentation.
Variations
This Halloween Hand Held Pies Recipe is super versatile—I’ve played around with different fillings and decorations over the years. Feel free to make it your own! There’s something special about tweaking a recipe and watching it become a family favorite.
- Filling Swap: I once replaced raspberry jam with apple pie filling and added a dash of cinnamon; it turned out so cozy, perfect for a fall twist.
- Chocolate Drizzle: Instead of marshmallow, drizzling melted chocolate adds a rich, decadent vibe that kids adore.
- Vegan Option: Use plant-based crust and swap the egg wash with almond milk for a cruelty-free treat.
- Savory Version: For a twist, fill pies with cheese and ham or spinach and feta—making it a fun appetizer at Halloween parties.
How to Make Halloween Hand Held Pies Recipe
Step 1: Roll Out and Cut Your Pie Crusts
Start by preheating your oven to 375°F, then line a baking sheet with parchment paper—trust me, it makes cleanup so much easier! On a lightly floured surface, gently roll out your pie crusts; if they’re frozen, make sure they’re fully thawed for the best texture. Using a gingerbread man cookie cutter (or any spooky shape you like), cut out as many shapes as you can. You’ll need pairs for each pie’s top and bottom. I love how precise cuts make these pies look extra special, so take your time here.
Step 2: Fill and Seal the Pies
Place half of the cut-out shapes on your lined baking sheet. Spoon a little raspberry jam in the center of each—just enough to fill but leave a good border around the edges so you can seal the pies well. Place the matching cut-out shapes on top, then press the edges together with a fork to finish sealing them. This not only keeps the filling inside but also creates a cute pattern along the edges!
Step 3: Brush, Bake, and Cool
Brush the tops of your pies with beaten egg yolk—this step gives them that gorgeous golden brown color, making them look almost too good to eat. Bake your pies for about 10 minutes or until you see them puff up slightly and turn golden. Once out of the oven, set them on a wire rack to cool completely—this is key before adding the marshmallow drizzle, or it will melt too much and lose its shape.
Step 4: Create the Marshmallow Mummy Effect
Pop your mini marshmallows into a microwave-safe bowl and heat in 15-20 second intervals, stirring after each burst until they’re melted and smooth. Let the marshmallow cool just a bit—it should be thick enough to drizzle without running all over the pies. Then, drizzle the marshmallow over each pie to mimic mummy wrappings. If you have candy eyes, add them while the drizzle is still wet to make those haunting little faces pop! Let everything cool completely, and then you’re ready to enjoy your spooky treat.
Pro Tips for Making Halloween Hand Held Pies Recipe
- Perfect Seal: Press edges firmly with a fork then chill pies for 10 minutes before baking to prevent leaking filling.
- Marshmallow Melt: Don’t overheat marshmallows—they’ll become too runny to create the mummy wrap effect properly.
- Even Baking: Place pies in the center rack and rotate halfway through baking for golden, evenly cooked crust.
- Cool Completely: Wait until pies are fully cool before drizzling marshmallow to keep the drizzle intact and prevent melting away.
How to Serve Halloween Hand Held Pies Recipe
Garnishes
I usually sprinkle a little powdered sugar on top just before serving to add a touch of sweetness and that classic Halloween ‘spooky’ look. Plus, tossing on some candy eyes while the marshmallow drizzle is wet really gives these pies a playful, creepy personality that kids (and adults!) adore.
Side Dishes
These hand held pies are amazing paired with a big cup of hot cider or a pumpkin spice latte. If you want to round out your Halloween spread, a bowl of spiced nuts or a simple green salad with autumnal fruits like pears and cranberries complements the sweetness perfectly.
Creative Ways to Present
I once arranged these pies on a dark serving platter lined with fake spider webs and plastic spiders for a haunted house party—such a hit! You can also serve them in small brown paper bags tied with orange or black ribbon for a fun party favor or school treat.
Make Ahead and Storage
Storing Leftovers
I store any leftovers in an airtight container at room temperature for up to two days. The crust stays flaky, and the filling remains delicious. Just avoid refrigerating because the crust can get soggy.
Freezing
I’ve frozen these pies before baking by assembling and sealing them, then wrapping individually in plastic wrap and storing them in a freezer-safe bag. When ready, just bake from frozen—add a few extra minutes to baking time for a fresh-baked feel!
Reheating
To warm up leftovers, I pop them in a 325°F oven for about 5-7 minutes. This freshens the crust without melting the marshmallow drizzle too much. Microwaving tends to soften the crust, so avoid it when you can.
FAQs
-
Can I use homemade pie crust for this Halloween Hand Held Pies Recipe?
Absolutely! Homemade crust can add an extra layer of flavor and flaky texture. Just make sure it’s rolled out evenly and chilled well before cutting to make handling easier.
-
What if I don’t have a gingerbread man cookie cutter?
No worries! You can use any cookie cutter shape you have, or even cut squares or rectangles with a knife for a fun rustic look. The key is making pairs to sandwich your filling.
-
Can I make these pies ahead of time for a party?
Yes! You can assemble and bake the pies a day in advance and store them at room temperature in an airtight container. Add marshmallow drizzle and candy eyes just before serving for the freshest look and taste.
-
What else can I use instead of raspberry jam?
Feel free to use any jam or preserves you love—strawberry, blueberry, apricot, even pumpkin butter. Just pick something with enough thickness so it doesn’t leak out during baking.
Final Thoughts
I absolutely love how this Halloween Hand Held Pies Recipe brings a little festive magic to baking without making you work too hard. When I first made these with my kids, their excitement over the marshmallow mummy design made it all the more memorable. These pies are cute, tasty, and perfect for sharing, so I really hope you’ll give them a try this Halloween—you’ll be so glad you did!
Print
Halloween Hand Held Pies Recipe
- Prep Time: 20 minutes
- Cook Time: 10 minutes
- Total Time: 45 minutes
- Yield: 10 hand pies 1x
- Category: Dessert, Snack
- Method: Baking
- Cuisine: American
Description
These Halloween Hand Held Pies are a festive and fun treat perfect for spooky celebrations. Made with ready-made pie crusts filled with sweet raspberry jam and decorated with melted marshmallow to create a mummy-wrapping effect, these hand pies are easy to bake and delightful to eat. Cute candy eyes add a creepy yet adorable finishing touch, making them a perfect Halloween party snack for kids and adults alike.
Ingredients
Pie Crusts
- 2 ready-made pie crusts (1 package)
Filling
- 1/2 cup raspberry jam
Topping
- 1 cup mini marshmallows
- 1 egg yolk, beaten
- Powdered sugar (optional, for dusting)
- Store-bought candy eyes
Instructions
- Preheat Oven: Preheat your oven to 375°F (190°C) and line a baking sheet with parchment paper to prepare for baking the hand pies.
- Prepare Pie Crusts: On a lightly floured surface, roll out the ready-made pie crusts to even thickness. If you prefer, you can use homemade pie crust for this recipe.
- Cut Shapes: Use a gingerbread man cookie cutter to cut out as many shapes as possible from the pie crusts. Make sure you have an even number to create matching tops and bottoms for the hand pies.
- Assemble Pies: Place half of the cut-out shapes on the lined baking sheet. Spoon a small amount of raspberry jam onto the center of each shape, leaving a border to seal. Place the remaining shapes on top, then press edges together firmly using a fork to seal each pie.
- Egg Wash: Brush the tops of the hand pies with the beaten egg yolk to help them develop a golden, shiny crust while baking.
- Bake: Bake the pies in the preheated oven for about 10 minutes or until they turn golden brown.
- Cool: Remove the baking sheet from the oven and transfer the pies to a wire rack. Allow them to cool completely before decorating.
- Melt Marshmallows: Place mini marshmallows in a microwave-safe bowl and microwave in 15-20 second intervals, stirring in between until the marshmallows have melted into a smooth, slightly cooled drizzle-ready consistency.
- Decorate: Drizzle the melted marshmallow over the cooled hand pies to mimic mummy wrappings. Quickly add candy eyes onto the marshmallow while it is still wet so they adhere well.
- Final Cool: Let the decorated pies cool completely to set the marshmallow drizzle before serving. Optionally dust with powdered sugar for extra sweetness and appearance.
Notes
- Ensure the hand pies are completely cool before drizzling with melted marshmallow to prevent it from melting too much and losing shape.
- Use a light hand when filling to avoid overflow during baking.
- Store the finished hand pies in an airtight container to keep them fresh for up to 2 days.
- Mini marshmallows can be substituted with marshmallow fluff melted gently if preferred.
- For a dairy-free version, check that pie crust and egg wash substitutes are used accordingly.
Nutrition
- Serving Size: 1 hand pie (approximate)
- Calories: 180
- Sugar: 12g
- Sodium: 120mg
- Fat: 8g
- Saturated Fat: 3g
- Unsaturated Fat: 4g
- Trans Fat: 0g
- Carbohydrates: 25g
- Fiber: 1g
- Protein: 2g
- Cholesterol: 25mg

Your email address will not be published. Required fields are marked *