

If you’re looking to wow guests at your Halloween party with something eerie yet delicious, you’ve come to the right place. I’m excited to share my **Halloween Blackened Deviled Eggs Recipe** — it’s a spooky twist on a classic that’s as fun to make as it is to eat. The blackened egg whites catch everyone’s eye, while the creamy, flavorful yolk filling keeps them coming back for more. Trust me, once you see how cool these look, you’ll want to make them every year!
Why You’ll Love This Recipe
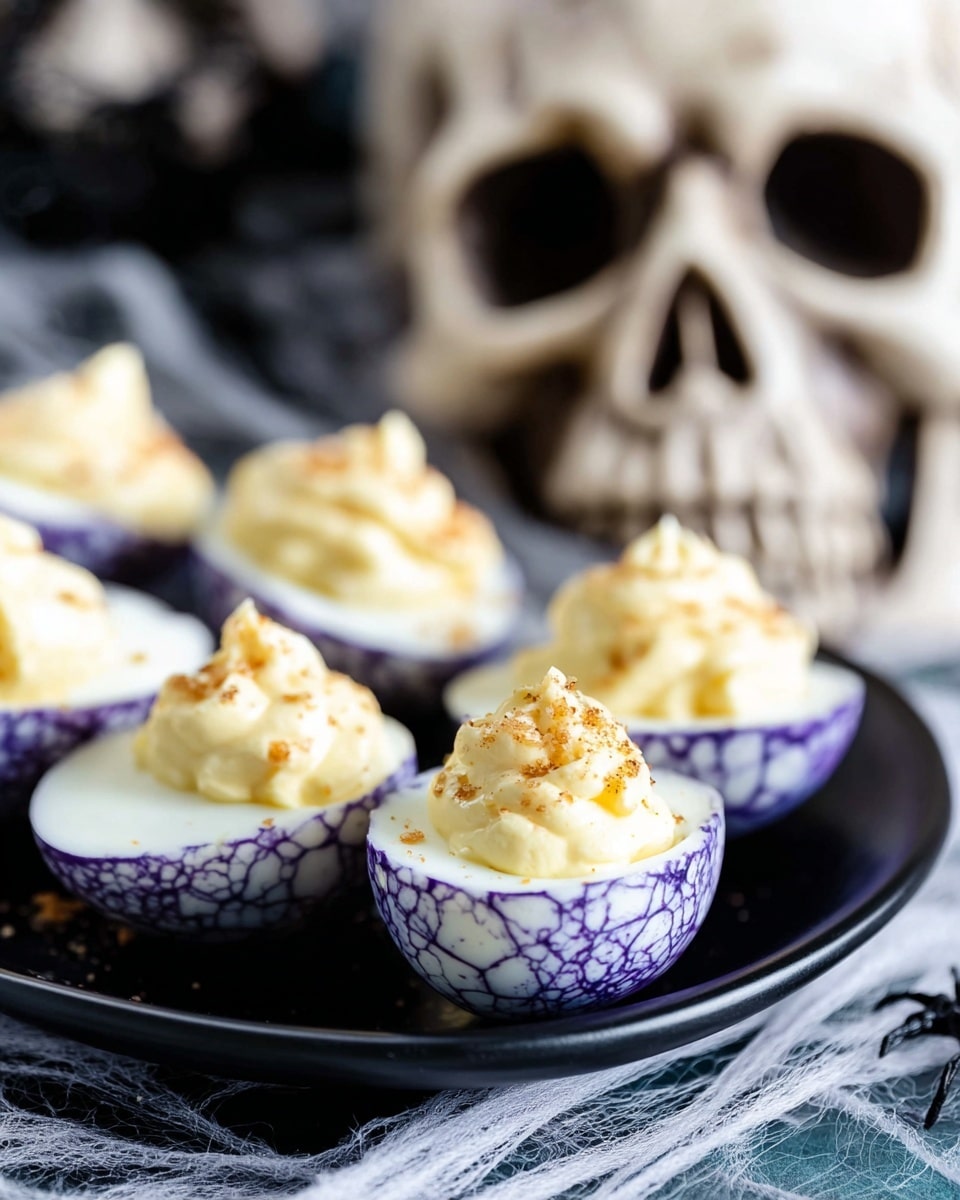
- Striking Presentation: The blackened egg whites create an instantly spooky look that’s perfect for Halloween gatherings.
- Classic Flavors with a Twist: The filling’s creamy mayo and tangy mustard get a subtle kick from Tabasco, making every bite exciting.
- Make Ahead Friendly: You can prepare these the day before, making party day stress-free.
- Family Favorite: My family goes crazy for these, and kids surprisingly love them too — Halloween magic, I guess!

Ingredients You’ll Need
Each ingredient plays its part in creating this Halloween Blackened Deviled Eggs Recipe magic — from the eggs themselves to the black food coloring that transforms the whites into spooky shells.
- Large eggs: Use fresh eggs for best results; they’re easier to peel after steeping and taste richer.
- Water: For boiling and steeping your eggs; having clean water is key.
- Black food coloring: This is critical for that dark, glossy look on the egg whites — you can get creative and use gel or liquid, but gel gives more intense color.
- White vinegar: It helps the black dye adhere better to the egg whites and tenderizes shells for easier peeling.
- Dijon mustard: Adds a mild tanginess that balances the richness of the yolk filling.
- Tabasco sauce: Just a couple dashes add a gentle heat — feel free to adjust depending on your spice tolerance!
- Salt: Essential to season the yolks perfectly.
- Freshly ground black pepper: Adds subtle warmth and depth.
- Mayonnaise: Makes the yolk mixture delightfully creamy.
- Fresh chives: Mix some into the yolk and use extra for garnish for a mild oniony crunch and color contrast.
- Crispy fried onions (optional): For an extra crunch on top if you want to get fancy.
Variations
I love making this Halloween Blackened Deviled Eggs Recipe my own by tweaking the filling or toppings depending on who’s coming over. Don’t hesitate to experiment—you might discover your new favorite version!
- Spicy Variation: I’ve added a bit more Tabasco or swapped it with smoky chipotle powder for a deep, smoky heat that my spice-loving friends adore.
- Vegetarian Twist: Swap mayonnaise for vegan mayo easily without losing that creamy texture.
- Herb Boost: Sometimes I mix fresh dill or tarragon into the yolk filling, adding a fresh pop of flavor that pairs beautifully with the blackened egg white.
- Halloween Theme: For a creepy effect, sprinkle a little smoked paprika or cayenne on top to mimic “blood” drops—kids get a kick out of this.
How to Make Halloween Blackened Deviled Eggs Recipe
Step 1: Cooking the Perfect Hard-Boiled Eggs
Start by placing your eggs in a saucepan and covering them with cold water—about an inch or so over the eggs. I like to add the white vinegar now because it helps later with the peeling and dye absorption. Bring the water to a rolling boil over medium-high heat, then immediately turn off the heat, cover the pan, and let the eggs steep in the hot water for about 10-12 minutes. This method reliably gives me eggs cooked just right—firm whites with creamy yolks without a greenish ring.
Step 2: Cracking and Steeping in Black Dye
Once your eggs have cooled down after rinsing with cold water, gently tap and crack the shells all around. This lets the black food coloring seep in, which is the secret to that Halloween blackened look. Mix your 2 cups of water with 5-6 drops of black food coloring and a splash of white vinegar in a large ziplock bag or container. Place your cracked eggs in the dye and pop them into the fridge overnight. I discovered this overnight steeping trick when I wanted a deeper, richer black color that homemade deviled eggs don’t usually have.
Step 3: Preparing the Yolk Filling
Carefully peel the blackened eggs after steeping, then slice them in half lengthwise. Scoop out the yolks into a bowl and mash them thoroughly with a fork. Mix in mayonnaise, Dijon mustard, Tabasco sauce, salt, pepper, and finely chopped fresh chives. This combo gives you a perfect balance of creaminess, tang, and just a touch of heat. I love using a fork over a blender here because it keeps the texture just right — silky but not gluey.
Step 4: Assembling Your Halloween Blackened Deviled Eggs
Use a piping bag or a small spoon to fill each egg white half with the yolk mixture — I usually aim for about 1½ teaspoons per egg half. Arrange them neatly on a platter. Finally, sprinkle fresh chives or crispy fried onions on top for that little textural pop and lovely green contrast. Cover and refrigerate the eggs for a couple of hours before serving so the flavors can meld and it stays fresh.
Pro Tips for Making Halloween Blackened Deviled Eggs Recipe
- Crack But Don’t Peel: Cracking the eggshell before dyeing helps that eerie black marbled effect without risking the eggs falling apart.
- Use Gel Food Coloring: It gives a richer, deeper black than liquid food coloring and fewer drops are needed.
- Overnight Dyeing Yields Best Color: I’ve tried shorter times, but overnight steeping guarantees the darkest hue.
- Pipe the Filling: Piping the yolk mixture makes your deviled eggs look professional and neat — it’s a small step with a big payoff.
How to Serve Halloween Blackened Deviled Eggs Recipe
Garnishes
I usually stick with fresh snipped chives on top for color and a little fresh bite, but sometimes I add crispy fried onions if I want extra crunch and a festive flair. For Halloween parties, I’ve even dusted a little smoked paprika around the edges — it looks like a spooky “blood” effect that never fails to amuse guests.
Side Dishes
These eggs pair wonderfully with other Halloween-themed finger foods—think stuffed mini bell peppers, spooky cheese boards, or even some fresh veggie sticks with dip. My go-to is a vibrant beet hummus to contrast the blackened eggs and add an extra pop of color on the table.
Creative Ways to Present
One year, I displayed these blackened deviled eggs on a bed of kale sprinkled with edible autumn leaves and little plastic spiders for a full-on haunted vibe. Another time, I served them in a hollowed-out pumpkin tray—super easy and totally festive. Presentation can really amp up the fun at your Halloween celebration!
Make Ahead and Storage
Storing Leftovers
After assembling your Halloween Blackened Deviled Eggs Recipe, cover them tightly with plastic wrap or place in an airtight container and refrigerate. I find they stay fresh and delicious for up to 6 hours, which works perfectly for a daytime or evening party. Beyond that, the texture can start to change, so I recommend prepping close to serving time.
Freezing
I don’t recommend freezing deviled eggs because the texture of the yolk filling changes and can get watery or grainy after thawing. It’s better to stick with refrigeration for this recipe’s best flavor and appearance.
Reheating
Reheating deviled eggs is a no-go — they’re best served chilled. If you’ve made them ahead, just take them out of the fridge about 10-15 minutes before serving to take the chill off slightly and let the flavors shine.
FAQs
-
Can I use regular food coloring instead of black?
Black food coloring is key to getting that dark, dramatic effect on the egg whites. If you don’t have black, you might try mixing blue and red food coloring together to approximate it, but it won’t be as intense. Gel colorings generally give better saturation compared to liquid.
-
How long can I keep these Halloween Blackened Deviled Eggs in the fridge?
These are best eaten within 6 hours of assembling for optimal flavor and texture. You can dye the eggs up to a day in advance, but once filled, consume them same day.
-
Why do I crack the eggs before dyeing?
Cracking the shells creates cracks for the black dye to seep through, creating a cool marbled or “blackened” effect on the egg whites when peeled. It’s what gives these deviled eggs their spooky look!
-
Can I make this recipe vegan or dairy-free?
You can swap the mayonnaise for a vegan mayo alternative to keep it dairy-free and vegan-friendly. The eggs themselves aren’t vegan, but some might try using avocado or tofu-based fillings for a plant-based spin.
Final Thoughts
Making this Halloween Blackened Deviled Eggs Recipe was a game-changer for me during party season. Not only do they look super impressive with minimal effort, but the flavor combo is just spot on. I love surprising guests with something that tastes as good as it looks, and these eggs deliver every time. If you’re planning a spooky festivity or just want to add a fun twist to your appetizer repertoire, give this recipe a try — I promise it’ll be a hit!
Print
Halloween Blackened Deviled Eggs Recipe
- Prep Time: 20 mins
- Cook Time: 15 mins
- Total Time: 35 mins
- Yield: 12 deviled egg halves 1x
- Category: Appetizer
- Method: Stovetop
- Cuisine: American
- Diet: Halal
Description
Celebrate Halloween with these spooky yet delicious Halloween Deviled Eggs. Featuring eggs steeped in black food coloring for a dramatic effect, the creamy yolk filling is perfectly seasoned with Dijon mustard, Tabasco, and fresh chives. These fun and festive deviled eggs are a perfect party appetizer that’s easy to prepare ahead and impress guests with their eerie appearance and tasty flavor.
Ingredients
Egg Preparation
- 6 large eggs
- 2 cups water
- Black food coloring (5-6 drops)
- 2 teaspoons white vinegar
Yolk Filling
- 1 teaspoon Dijon mustard
- 2 dashes Tabasco sauce
- 1/4 teaspoon salt
- 1/4 teaspoon freshly ground black pepper
- 1 tablespoon fresh chives, finely chopped
- 3 tablespoons mayonnaise
Garnish
- Fresh chives or crispy fried onions for garnish
Instructions
- Boil the Eggs: Cover the eggs with cold water in a medium saucepan. Place the pan over medium-high heat and bring the water to a boil. Once boiling, turn off the heat, cover the pan, and let the eggs sit for 10-12 minutes. Drain and rinse the eggs under cold water to stop the cooking process.
- Crack Shells for Dyeing: Gently crack the eggs all around without removing the shells. This will allow the dye to seep under the shell and give the eggs a spooky marbled effect.
- Prepare Dye Bath: In a large ziplock bag or bowl, combine 2 cups water, 5-6 drops of black food coloring, and 2 teaspoons white vinegar. The vinegar helps the color adhere better to the eggshell.
- Steep the Eggs Overnight: Place the cracked eggs into the dye bath, making sure they are fully submerged. Refrigerate and let steep overnight to develop the dark, eerie coloring.
- Peel and Halve Eggs: After steeping, gently remove the eggs from the dye bath. Carefully peel away the shells to reveal the colored eggs. Cut the eggs lengthwise in half and scoop out the yolks into a bowl.
- Make the Filling: Mash the yolks with a fork and add mayonnaise, Dijon mustard, Tabasco sauce, salt, freshly ground black pepper, and finely chopped chives. Mix until well combined and creamy.
- Fill the Egg Whites: Using a spoon or a piping bag, fill each egg white half with approximately 1 ½ teaspoons of the yolk mixture. Arrange the filled eggs on a platter.
- Garnish and Chill: Sprinkle the filled deviled eggs with fresh chives or crispy fried onions for added texture and visual appeal. Cover and refrigerate until ready to serve, up to 6 hours.
Notes
- For best results, soak the eggs overnight to maximize the black coloring effect.
- Use fresh chives or fried onions for garnish to add a burst of flavor and crunch.
- These deviled eggs can be made up to 6 hours in advance; keep refrigerated until serving.
- Adjust the amount of Tabasco sauce according to your preferred spice level.
- If black food coloring is unavailable, use a very dark purple or blue dye for a similar effect.
Nutrition
- Serving Size: 1 deviled egg half
- Calories: 70
- Sugar: 0.3g
- Sodium: 180mg
- Fat: 6g
- Saturated Fat: 1g
- Unsaturated Fat: 4g
- Trans Fat: 0g
- Carbohydrates: 1g
- Fiber: 0g
- Protein: 3g
- Cholesterol: 70mg

Your email address will not be published. Required fields are marked *