
If you’re looking for a showstopper dessert that’s as thrilling to make as it is to eat, you’ve got to try my Brain Cake with Red Velvet Layers and Blood-Soaked Frosting Recipe. This cake isn’t just about spooky vibes — it’s rich, moist, and unbelievably creamy with that classic red velvet flavor layered between swirls of dreamy cream cheese buttercream. I absolutely love how this turns out every time, and I promise you, whether it’s for Halloween or just a fun special occasion, this cake will blow your mind (pun intended!). Stick with me as I share everything you need to know to nail this ghoulishly delicious treat.
Why You’ll Love This Recipe
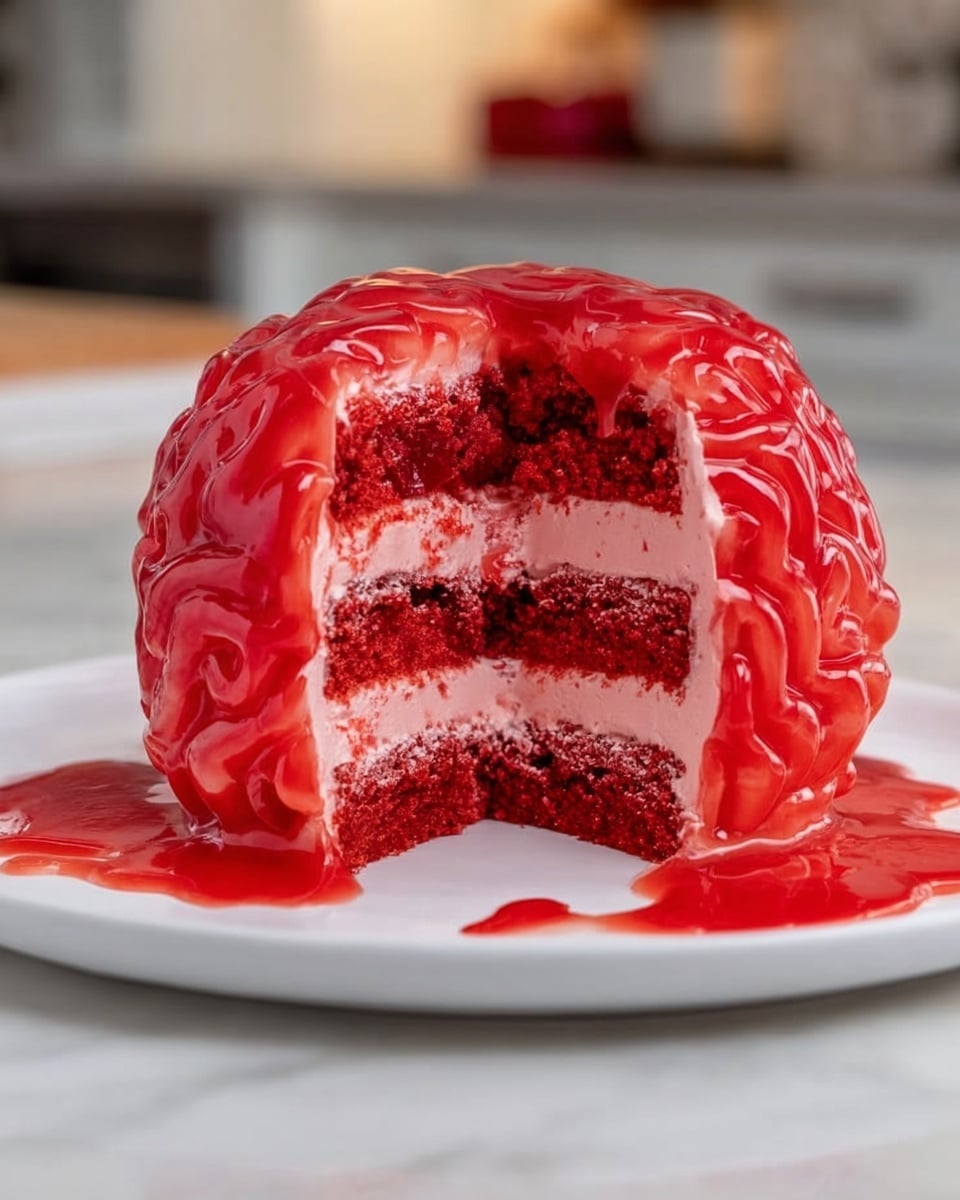
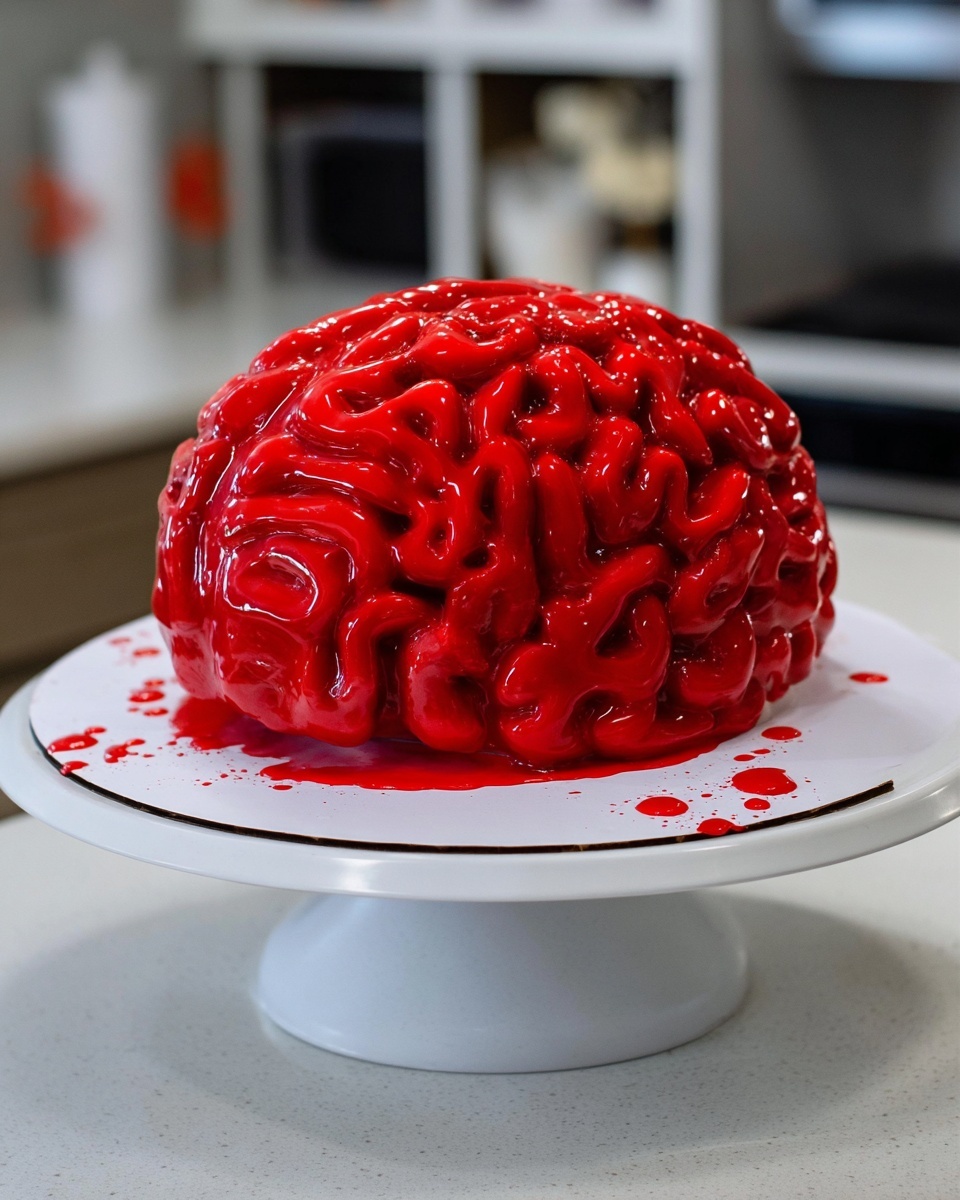
- Visually Stunning: The brain-like shape with blood-soaked frosting is a major conversation starter and looks way more impressive than it is difficult.
- Moist and Flavorful Layers: The rich red velvet cake stays perfectly tender thanks to buttermilk and oil, creating an irresistible texture.
- Creamy Frosting With a Twist: The subtle pink cream cheese buttercream contrasts beautifully with the vibrant red jam “blood,” adding decadent flavor and texture.
- Make Ahead Friendly: This recipe breaks into manageable steps and freezes well, so you can prep early and wow guests stress-free.

Ingredients You’ll Need
Putting this cake together is surprisingly straightforward when you have all the right ingredients lined up. The classic combination of red velvet cake ingredients paired with cream cheese buttercream is a guaranteed crowd-pleaser. When shopping, choose good quality cream cheese and fresh buttermilk for the best flavor and texture.
- Cake Flour: Light and delicate to keep the cake layers tender and soft.
- Unsweetened Cocoa Powder: Adds that subtle chocolate undertone essential for red velvet.
- Baking Soda: The leavening agent — make sure it’s fresh for best rise.
- Fine Salt: Enhances all the flavors in the cake and frosting.
- Unsalted Butter: Room temperature to cream perfectly with sugar in the cake and frosting.
- Granulated Sugar: Sweetens the cake just right without overpowering.
- Large Eggs: Bring moisture and structure; room temperature eggs blend better.
- Buttermilk: Adds tang and helps tenderize via its acidity.
- Vegetable or Canola Oil: Keeps the cake extra moist and soft.
- Vanilla Extract or Vanilla Bean Paste: For that warm, mellow flavor boost.
- White Vinegar: Reacts with baking soda to help the cake rise and keeps colors vibrant.
- Red Gel or Liquid Food Coloring: The signature red velvet color — I prefer gel to avoid thinning the batter.
- Cream Cheese: Full-fat for rich, tangy frosting that pairs perfectly with the cake.
- Powdered Sugar: Sweetens and thickens the frosting to perfect piping consistency.
- Heavy Whipping Cream: Lightens the frosting texture for easy spreading and piping.
- Seedless Raspberry or Strawberry Jam: Mixes with a bit of water to create the spooky edible blood glaze.
- Optional Red Food Coloring for Jam: To amp up the color and make it extra vivid.
Variations
I like to play around with this Brain Cake recipe depending on the occasion. You can easily swap ingredients to suit dietary preferences or just shake things up. Don’t hesitate to make it your own — that’s what cooking is all about!
- Dairy-Free Version: I once made this cake vegan by using dairy-free cream cheese, plant-based buttermilk, and vegan butter — it was a hit and just as moist.
- Flavor Twists: You can add a hint of espresso powder to the cake batter to deepen the chocolate flavor or swirl in some white chocolate chips to surprise your guests.
- Size Adjustments: For a tiered Brain Cake, use my cake batter calculator to scale ingredients perfectly without wasting batter.
- Spooky Colors: Replace the red food coloring with purple or green for different creepy vibes!
How to Make Brain Cake with Red Velvet Layers and Blood-Soaked Frosting Recipe
Step 1: Prepare and Bake Your Red Velvet Cake Layers
Start by preheating your oven to 350°F (175°C) and prepping three 7 or 8-inch cake pans with non-stick spray and parchment paper—it saves you from cake mishaps later on. I always sift the dry ingredients together first: cake flour, cocoa powder, baking soda, and salt. This ensures everything blends smoothly and your cake stays light. Then, cream the butter and sugar until fluffy—don’t rush this part, it makes the cake lighter! Add eggs one at a time, then the buttermilk, oil, vanilla, vinegar, and finally the red food coloring. When the batter looks a bit “broken” after adding wet ingredients, don’t panic; that’s totally normal. Fold in the dry ingredients gently until the batter is just combined to keep the texture tender. Divide evenly into pans and bake for about 24-28 minutes. Once baked, let the layers cool for 10 minutes, then carefully transfer to a wire rack. For perfectly shaped “brains,” trim the edges into an oval shape—freezing the layers for 20 minutes makes this a breeze!
Step 2: Whip Up Cream Cheese Buttercream
This frosting is what I call the “magic glue” that holds the brain cake together. Beat butter and cream cheese first till smooth, then add vanilla and salt to deepen the flavor. Slowly mix in powdered sugar and heavy cream until you hit the perfect spreadable consistency. Adding red food coloring here turns it a subtle pink, which looks amazing under the raspberry “blood” later. Watch out for the powdered sugar clouds—cover your mixer with a kitchen towel and scrape the bowl often to keep it even. If your frosting is too stiff, add cream in tablespoons, or if it’s too runny, sugar in a bit at a time. Trust me, getting this right makes decorating so much easier!
Step 3: Make the Edible ‘Blood’ Glaze
Nothing beats the creepy effect of homemade blood sauce! Whisk seedless raspberry or strawberry jam with water and a touch of red food coloring until it’s smooth and thin enough to drip but still vibrant. This is the secret that turns your innocent-looking cake into a chilling centerpiece.
Step 4: Assemble and Decorate Your Brain Cake
Start stacking your cake layers with frosting in between each one—about ⅓ of your frosting should go here for perfect moisture and flavor balance. Then carve the stacked cake into a rounded brain shape, trimming edges and rounding corners as needed. Next, apply a crumb coat of frosting all around the cake to trap crumbs and give you a smooth base. Chill until firm. I pipe squiggly lines with the remaining frosting to mimic brain folds — don’t stress if it’s not perfect; the ‘blood’ glaze will cover any gaps! After piping, chill the cake again to set the design. Finally, brush on the red jam glaze thickly, making sure it pools realistically in the crevices and drips down the sides. It’s so satisfying to see it transform into spooky goodness!
Pro Tips for Making Brain Cake with Red Velvet Layers and Blood-Soaked Frosting Recipe
- Chill Layers Before Carving: It makes the cake firmer and prevents crumbling as you shape the brain silhouette.
- Use Gel Food Coloring: It keeps your batter and frosting thick and vibrant without adding unwanted liquid.
- Don’t Overmix Dry Ingredients: Mixing just until combined keeps the layers light and fluffy, not dense.
- Cover Frosting During Mix: A kitchen towel keeps all the powdered sugar from flying everywhere — trust me, your kitchen will thank you!
How to Serve Brain Cake with Red Velvet Layers and Blood-Soaked Frosting Recipe
Garnishes
I love finishing off this cake with a few simple but effective garnishes. Fresh raspberries or strawberries around the base add a natural touch of “blood.” For extra creep factor, you can scatter edible red sugar crystals or use plastic spiders—perfect for Halloween! I sometimes dust a little cocoa powder on top of the frosting for depth. These small touches make the cake feel thoughtfully styled and inviting.
Side Dishes
Since this brain cake is quite rich and sweet, I like to serve it with lighter sides. A simple glass of cold milk is a classic. For parties, fresh fruit salad or a tart lemon sorbet complement the flavors beautifully, balancing the sweetness. Coffee or a spiced tea also pairs wonderfully with the cocoa notes in the cake.
Creative Ways to Present
Once, I presented the brain cake on a platter coated with crushed Oreo crumbs to mimic dark soil, and added some plastic bones and red gelatin “veins” for a gruesome effect that guests loved. Wrapping the cake board with red ribbon or placing it on a skull-themed cake stand is another fun way to elevate the presentation. At a past Halloween party, I stacked smaller brain cakes at different heights for a spooky “brain buffet” that got tons of compliments!
Make Ahead and Storage
Storing Leftovers
Leftover brain cake? I typically cover it tightly with plastic wrap or transfer slices to an airtight container and store it in the fridge. The buttercream frosting keeps the cake moist for up to a week! Just make sure to keep it chilled and bring to room temperature before serving so the flavors and texture come alive again.
Freezing
I’ve frozen both the layered and fully frosted cake with great results. For best quality, freeze single slices or the entire cake wrapped tightly in plastic wrap and foil. Thaw overnight in the fridge, then allow to sit at room temperature before enjoying. This way, you can spread out your baking and create stress-free holiday desserts!
Reheating
No reheating needed here! Just bring the chilled slices to room temperature for about an hour so the cream cheese frosting softens and the cake regains its full flavor and moist texture. The warmer, the more decadent it feels without any fuss.
FAQs
-
Can I make this Brain Cake with Red Velvet Layers and Blood-Soaked Frosting Recipe ahead of time?
Absolutely! I highly recommend baking the cake layers in advance and freezing them—it saves so much time on the big day. The frosting can also be made ahead and stored in the fridge or freezer. Assembly can be done a day or two before serving for the best results.
-
What can I do if my frosting is too runny?
If your cream cheese buttercream frosting is too thin, add powdered sugar gradually (about 1/4 cup at a time) until you reach desired thickness. Chilling the frosting for a bit can also help it firm up before decorating.
-
How do I keep the cake from crumbling when carving the brain shape?
Freezing your cake layers for about 20 minutes before carving is my go-to trick. It firms up the cake, making it easier to trim edges without crumbling or tearing.
-
Can this recipe be made vegan or dairy-free?
Yes! Use vegan butter and cream cheese alternatives, plant-based milk for buttermilk, and an egg replacer like flax eggs or commercial substitutes. It won’t compromise the flavor or texture much and is great for accommodating diets.
Final Thoughts
This Brain Cake with Red Velvet Layers and Blood-Soaked Frosting Recipe has become one of my all-time favorites for any celebration that calls for a little drama and a lot of flavor. I used to shy away from elaborate cake designs, but this recipe made me realize you don’t have to be a pro baker to create something amazing and memorable. I hope you enjoy making—and eating—it as much as I do. Trust me, when you bring this cake out at your next party, you’re going to be the star of the show!
Print
Brain Cake with Red Velvet Layers and Blood-Soaked Frosting Recipe
- Prep Time: 20 minutes
- Cook Time: 27 minutes
- Total Time: 1 hour 17 minutes
- Yield: Serves 20 1x
- Category: Dessert
- Method: Baking
- Cuisine: American
Description
This Brain Cake is a spooky, delicious red velvet cake shaped and decorated to look like an eerie brain, perfect for Halloween or any creepy celebration. Layers of moist red velvet cake are stacked and carved into an oval brain shape, then frosted with creamy pink cream cheese buttercream and finished with a glossy edible fake blood made from raspberry jam for a ghoulishly realistic effect.
Ingredients
Red Velvet Cake
- 2 1/2 cups cake flour (300g)
- 2 Tbsp unsweetened cocoa powder, sifted (10g)
- 1 tsp baking soda (6g)
- 1/2 tsp fine salt (3g)
- 1/2 cup (1 stick) unsalted butter, room temperature (113g)
- 1 3/4 cups granulated sugar (350g)
- 2 large eggs, room temperature (112g)
- 1 1/4 cups buttermilk, room temperature (300g)
- 1/2 cup vegetable or canola oil (120g)
- 2 tsp vanilla extract or vanilla bean paste (8g)
- 1 tsp white vinegar (4g)
- 1 tsp red gel food coloring or 1 Tbsp liquid food coloring
Cream Cheese Buttercream Frosting
- 1 1/2 cups (3 sticks) unsalted butter, room temperature (339g)
- 1 cup (8 oz) full-fat cream cheese, room temperature (226g)
- 1 Tbsp vanilla extract or vanilla bean paste (12g)
- 1 tsp fine salt (6g)
- 7 cups powdered sugar (904g) or a 2lb. bag
- 3 Tbsp heavy whipping cream, room temperature (45g)
- small squirt of red gel food coloring or 1 tsp liquid food coloring
Edible Fake Blood
- 1/2 cup seedless raspberry or strawberry jam
- 3 Tbsp water (45g)
- 1/4 tsp red gel food coloring or 1 tsp liquid food coloring (optional)
Instructions
- Prepare Cake Pans: Preheat your oven to 350°F (175°C). Grease three 8-inch or 7-inch cake pans with non-stick baking spray and line with parchment paper to ensure easy removal of cakes after baking.
- Mix Dry Ingredients: In a medium bowl, sift together cake flour, cocoa powder, baking soda, and salt. Set this mixture aside for later use.
- Cream Butter and Sugar: In a large bowl or stand mixer fitted with a whisk attachment, beat the butter and granulated sugar on medium-high speed for 1-2 minutes until the mixture lightens in color and is fluffy. Scrape down the sides as needed.
- Add Eggs: Beat in the eggs one at a time on medium speed until fully incorporated.
- Add Wet Ingredients and Coloring: Mix in buttermilk, vegetable oil, vanilla extract, white vinegar, and red gel food coloring on low speed. The mixture may appear separated but will come together when dry ingredients are added.
- Combine Dry and Wet Mixtures: Gradually add the dry ingredients to the wet ingredients in two additions, mixing on low speed until just combined and no flour streaks remain.
- Divide and Bake: Evenly divide the batter among the prepared pans (approximately 415g per pan). Bake for 24-28 minutes until a toothpick inserted in the center comes out with moist crumbs. Let cool in pans for 10 minutes.
- Cool and Remove Cakes: Run a spatula around the edges, then invert the cakes onto a wire rack to cool completely. The layers should be fairly flat, so leveling is optional.
- Shape the Cake: Stack the cooled layers and trim about 1 inch off two sides to create an oval/brain shape. Round off the top edges with a sharp knife. If the layers tear or crumble, chill them in the freezer for about 20 minutes before cutting. Layers can be wrapped and frozen at this point for future use.
- Make Buttercream Frosting: Beat the butter and cream cheese on medium speed until smooth, about 30 seconds, using a paddle attachment. Add vanilla and salt, mixing until combined. On low speed, gradually add powdered sugar and heavy cream, covering the mixer to prevent sugar dust. Adjust consistency by adding more cream or powdered sugar as needed. Add a small amount of red food coloring to color the frosting a light pink. Cover with plastic wrap.
- Prepare Edible Blood: In a small bowl, whisk together the seedless jam, water, and red food coloring until smooth and thin in consistency. Cover and set aside.
- Assemble and Frost Cake: Place the first cake layer on a greaseproof cake board, securing with a dab of frosting. Spread an even layer of frosting between each cake layer as you stack them. Trim the stacked cake as needed to enhance the brain shape. Apply a thin crumb coat of frosting all around the cake and smooth the surface with an offset spatula or acetate sheet. Chill the cake in the fridge for 20 minutes or freezer for 5 minutes until firm.
- Pipe Brain Details: Fill a piping bag fitted with a large round tip with the pink frosting. Draw a center line down the cake to separate hemispheres and pipe squiggly lines across both sides to mimic brain folds. Don’t worry about imperfections as the fake blood will cover these.
- Chill Again: Refrigerate the cake for 30 minutes or freeze for 10 minutes until the frosting is firm to the touch.
- Apply Fake Blood: Using a pastry brush, coat the frosted brain design thoroughly with the jam mixture, making sure to get into all the crevices and around the cake base to create a realistic bloody effect.
- Serve and Enjoy: Let the cake come to room temperature before serving for the best texture and flavor. Store leftovers in the fridge up to 1 week or freeze up to 1 month.
Notes
- The finished cake, after trimming, serves about 20 people.
- To make different sized or tiered brain cakes, use a cake batter calculator to adjust recipe quantities accordingly.
- For convenience, bake the cake layers ahead of time and freeze them; thaw layers before assembling.
- The buttercream frosting can also be made ahead and stored in airtight containers up to a month in the fridge or 3 months in the freezer; stir well when thawed.
- Properly measure flour using a kitchen scale or spoon and level method to ensure cake texture.
- Room temperature ingredients help create a smooth batter and frosting.
- Chilling layers before stacking makes cutting and shaping easier and cleaner.
- Use gel food coloring to preserve frosting and cake texture and avoid bitterness.
- For vegan or dairy-free versions, substitute dairy with plant-based alternatives and use an egg replacer.
- Leftover cake scraps can be repurposed into cake pops, snacks with frosting, or crumbled as ice cream topping; keep them airtight at room temperature for up to 3 days.
- Allow the cake to come to room temperature before slicing for best texture.
Nutrition
- Serving Size: 1 slice (1/20 of cake)
- Calories: 420
- Sugar: 50g
- Sodium: 350mg
- Fat: 20g
- Saturated Fat: 11g
- Unsaturated Fat: 7g
- Trans Fat: 0.5g
- Carbohydrates: 58g
- Fiber: 1g
- Protein: 4g
- Cholesterol: 75mg

Your email address will not be published. Required fields are marked *