

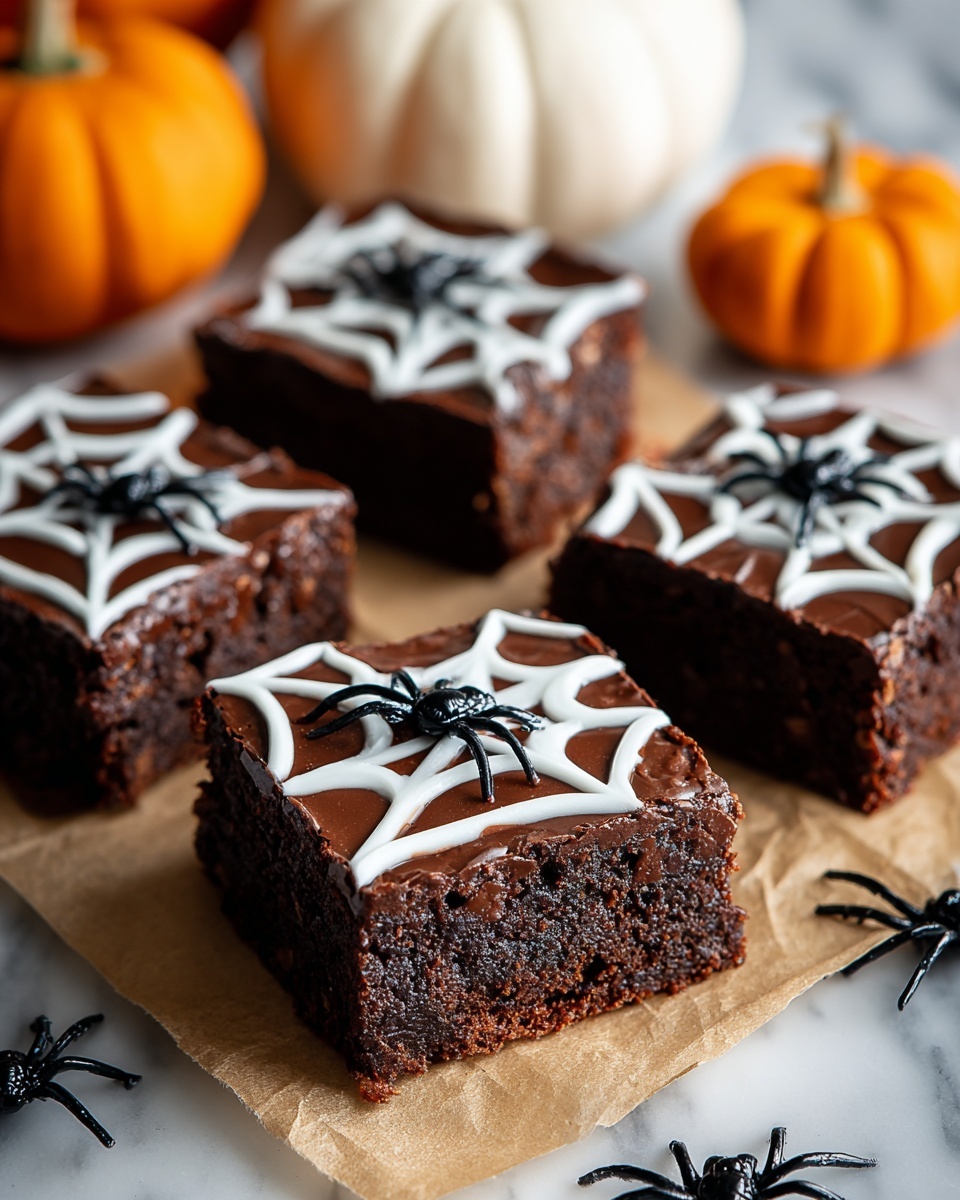
If you’re looking for a Halloween treat that’s as fun to make as it is to eat, then you’re in for a real treat with my Spooky Spiderweb Brownies Recipe. These brownies are rich, fudgy, and topped with a spooky yet adorable spiderweb design that will wow anyone who sees them. I absolutely love how this turns out because it’s a perfect mix of classic chocolate goodness with an easy, playful twist that anyone can master—even if you’re not usually a baker. Stick around, and I’ll walk you through everything to get these creepy-cool brownies just right!
Why You’ll Love This Recipe
- Easy Decoration: The spiderweb design looks impressive but is simple to create, even if you’re just starting out with decorating.
- Fudgy and Moist: The base brownies stay perfectly moist, giving you a rich chocolatey base that everyone loves.
- Fun for All Ages: Kids and adults alike go crazy for these festive treats, making them perfect for parties or family gatherings.
- Quick to Make: Using a boxed mix keeps prep and cleanup minimal without skimping on flavor or style.

Ingredients You’ll Need
Let’s talk ingredients real quick—I’m all about simplifying things, which is why I typically use a quality boxed brownie mix as a base. It’s reliable and lets you focus on the fun spiderweb decoration, which truly transforms these into a Halloween showstopper.
- Brownie mix: Choose your favorite brand; I like one that’s fudgy and chocolaty for the best base.
- White chocolate chips: These melt beautifully and give a nice contrast to the dark brownies.
- Black gel icing or dark chocolate: Perfect for drawing the spider details with precision.
Variations
One of the things I love most about the Spooky Spiderweb Brownies Recipe is how easy it is to personalize. I encourage you to make it your own—try different chocolates or even add a little spice to the brownie batter for something unexpected.
- White chocolate peppermint swirl: I once added peppermint extract into the melted white chocolate for a festive minty twist that was a big hit at a Halloween party.
- Nutty addition: Toss in some chopped pecans or walnuts into the brownie batter before baking for extra crunch and flavor.
- Vegan substitute: Use a vegan brownie mix and dairy-free chocolate chips to keep this treat friendly for vegan friends.
How to Make Spooky Spiderweb Brownies Recipe
Step 1: Prepare and bake the brownies
Start by following the instructions on your brownie mix box—usually this means mixing the dry mix with eggs, oil, and water. Pour the batter into a greased baking pan. I like to use a glass pan because it heats evenly, but any will do. Pop them in the oven and bake exactly as directed. When they come out, let them cool completely—that’s key because the spiderweb design will melt or smear if the brownies are warm.
Step 2: Create the spiderweb design
While the brownies are cooling, melt your white chocolate chips gently—either in a microwave in short bursts or over a double boiler. Transfer the melted chocolate into a piping bag or a zip-top bag with a tiny corner snipped off for precision. Pipe concentric circles over the cooled brownies, starting from the center outward. Then, use a toothpick to drag from the center of the circle outward to the edges to create the classic spiderweb effect. It looks way more impressive than it is—I promise!
Step 3: Add the spooky spider details
Finally, grab your black gel icing or melted dark chocolate and draw little spiders on the web with a fine-tipped tool. I love how just a couple of these spiders can transform the whole dessert from cute to creepily fun. If you’re not confident with freehand drawing, you can even use small candy eyes or chocolate chips to make the spiders look extra cute and spooky.
Step 4: Slice and serve
Once decorated, slice your brownies into squares and get ready to enjoy. These treats are perfect for sharing at Halloween parties or handing out to little ghouls and goblins who stop by. My family goes crazy for these every year!
Pro Tips for Making Spooky Spiderweb Brownies Recipe
- Make sure brownies are fully cooled: If you decorate too soon, the melted chocolate runs and your spiderweb loses its crisp lines.
- Use a toothpick for the web effect: Dragging from the center out gives that classic spiderweb look effortlessly.
- Practice piping on parchment paper: It helped me get the hang of spirals before working on the brownies themselves.
- Don’t overbake your brownies: Slightly underbaked brownies are fudgier and pair perfectly with the sweet white chocolate topping.
How to Serve Spooky Spiderweb Brownies Recipe
Garnishes
I usually keep it simple with these brownies, but if you want to jazz them up, a dusting of powdered sugar or edible glitter can add a magical touch. For the spiders, tiny candy eyes really bring them to life and add a fun surprise as you bite in.
Side Dishes
These spooky brownies pair wonderfully with a scoop of vanilla or cinnamon ice cream. If you want a drink pairing, a hot cup of coffee or spicy pumpkin latte balances the sweetness perfectly. At parties, I like to set up a Halloween-themed beverage station including apple cider for the little ones.
Creative Ways to Present
One of my favorite presentation tricks is placing the spiderweb brownies on a rustic wooden board with some fake spider webs around it for a spooky vibe. You could also wrap individual brownies in cellophane tied with orange and black ribbons for party favors that look so festive and fun.
Make Ahead and Storage
Storing Leftovers
I store leftover brownies in an airtight container at room temperature, and they generally stay moist for up to 4 days. If your kitchen is especially warm, I recommend refrigerating, but that can slightly change the texture.
Freezing
If you want to freeze the brownies, wrap them tightly in plastic wrap and place them in a freezer bag. When thawed, the spiderweb decoration might dull a bit, but the flavor is still fantastic. I usually freeze uncut slabs and decorate after thawing for best results.
Reheating
For reheating, I warm brownies in the microwave for about 10-15 seconds to bring back that gooey texture. Just note that any chilled frosting or decorations might soften more than you want if heated too long.
FAQs
-
Can I use homemade brownies instead of boxed mix?
Absolutely! Homemade brownies work wonderfully for this recipe. Just make sure they’re fully cooled before decorating, so the spiderweb stands out clearly.
-
What if I don’t have white chocolate chips?
You can substitute with white candy melts or melt some white chocolate bars. If you prefer, even cream cheese frosting thinned with milk can be piped to create a similar web effect.
-
How do I make the spiderweb design look neat?
Practice piping your spirals on parchment paper first to get comfortable. Then, drag a toothpick gently but steadily from the center outward for clean lines. Keeping the brownies chilled helps the chocolate stay in place better too.
-
Can I prepare the spiderwebs ahead of time?
It’s best to decorate close to serving time for the freshest look. But if you need to prepare earlier, keep the decorated brownies in an airtight container at room temperature and avoid humid environments.
Final Thoughts
The Spooky Spiderweb Brownies Recipe is one I keep coming back to every Halloween because it’s so much fun and always impresses. I love how easy it is to customize, and it’s perfect if you want spooky, stylish treats without spending hours in the kitchen. Give it a try—you’ll enjoy the smiles these bring out, and honestly, I find the combination of fudgy chocolate and sweet white chocolate webs downright irresistible. Happy baking, and may your Halloween be deliciously spooky!
Print
Spooky Spiderweb Brownies Recipe
- Prep Time: 15 minutes
- Cook Time: 25 minutes
- Total Time: 40 minutes
- Yield: 12 servings 1x
- Category: Dessert
- Method: Baking
- Cuisine: American
Description
Celebrate Halloween with these spooky spiderweb brownies that feature rich chocolatey goodness topped with a delicate white chocolate web and a cute spider detail. Perfect for parties or a fun seasonal treat that’s both eye-catching and delicious.
Ingredients
Brownie Base
- 1 box brownie mix (including ingredients required on the box, typically eggs, oil, and water)
Toppings
- 1/2 cup white chocolate chips
- Black gel icing or melted dark chocolate for spider details
Instructions
- Prepare Brownies: Follow the instructions on your brownie mix box to prepare the batter. Typically, this involves combining the brownie mix with eggs, oil, and water. Pour the batter evenly into a greased baking pan.
- Bake and Cool: Bake the brownies according to the package directions until a toothpick inserted into the center comes out clean. Remove from oven and allow them to cool completely, ensuring the toppings won’t melt when applied.
- Create Spiderweb Design: Melt the white chocolate chips in a microwave-safe bowl or double boiler until smooth. Transfer the melted chocolate into a piping bag or a plastic bag with the tip cut off. Pipe spiral circles starting from the center outwards on the cooled brownies.
- Form the Web Pattern: Using a toothpick or skewer, drag lines from the center of each white chocolate spiral outward to the edges, creating a spiderweb effect. Repeat this pattern across the entire surface of the brownies.
- Add Spider Details: With black gel icing or melted dark chocolate, carefully draw small spiders on some of the webs to enhance the spooky theme.
- Serve: Once decorated, cut the brownies into 12 equal squares and serve as a festive treat.
Notes
- Ensure brownies are completely cooled before decorating to prevent melting of the white chocolate and icing.
- If you don’t have black gel icing, melted dark chocolate works well for spider details.
- Use a toothpick to gently drag lines through the white chocolate to create a neat web pattern.
- These brownies can be stored in an airtight container at room temperature for up to 3 days.
Nutrition
- Serving Size: 1 brownie (1/12 of batch)
- Calories: 220 kcal
- Sugar: 18 g
- Sodium: 150 mg
- Fat: 12 g
- Saturated Fat: 6 g
- Unsaturated Fat: 5 g
- Trans Fat: 0.2 g
- Carbohydrates: 28 g
- Fiber: 2 g
- Protein: 2 g
- Cholesterol: 25 mg

Your email address will not be published. Required fields are marked *