
If you’re looking for a show-stopping Halloween treat that’s as fun to make as it is to eat, then you’re in for a sweet surprise with this Candy Corn Cakes and Cake Tutorial Recipe. I absolutely love how these mini cake towers capture the colors and spirit of candy corn, but with that homemade fluffy cake feeling instead of just candy sugar. You’ll find that layering and coloring the batter is a breeze, and these little beauties become the star of any spooky party or cozy fall gathering. Stick with me because I’m sharing all my tips to nail this fun recipe without stress!
Why You’ll Love This Recipe
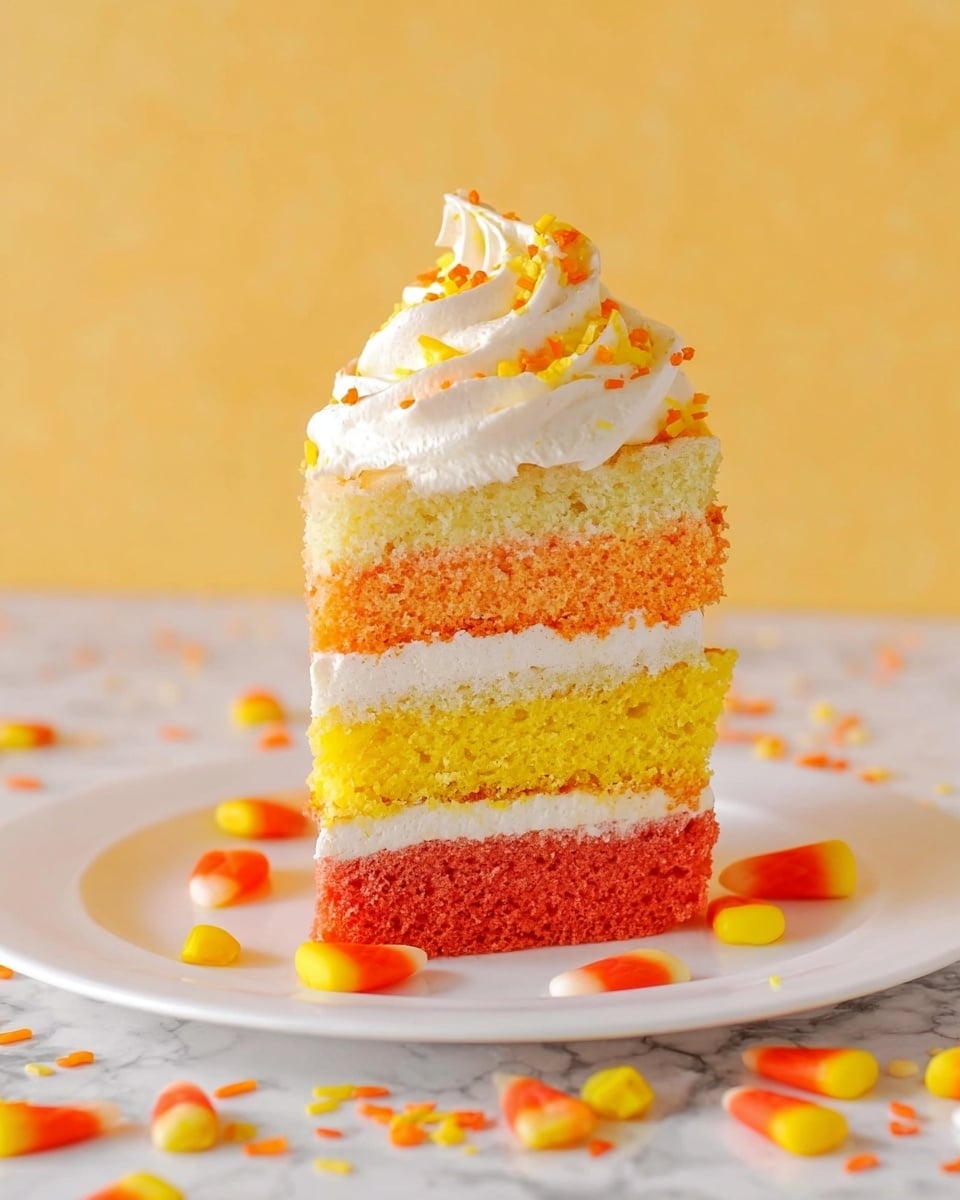
- Visually Stunning Layers: The three-layered candy corn colors make these cakes instantly festive and totally Instagram-worthy.
- Simplified Cake Decorating: You don’t have to be a pro baker to make this look amazing — it’s all about having fun with color and layers.
- Perfect Portion Party Treats: These mini cakes are just the right size for parties and easy to serve, no messy slicing required.
- Family-Friendly Baking: Kids love helping with the vibrant colors, making this a wonderful activity for a cozy afternoon.

Ingredients You’ll Need
The beauty of this Candy Corn Cakes and Cake Tutorial Recipe is how simple the ingredients are, yet how well they come together for both flavor and color. You’ll want a good quality white cake mix as your base, and then the fun really starts with the bright food coloring that brings the candy corn look to life. Softened butter helps with that smooth frosting texture, and powdered sugar keeps everything sweet and creamy.
- White Cake Mix: I prefer a classic white cake mix because it gives a nice neutral base that showcases the colors perfectly.
- Yellow and Red Food Coloring: These two colors are key! They blend with the white batter to create the classic candy corn look—orange, yellow, and white layers.
- Butter (softened): Softened butter works miracles in frosting, making it silky and easy to spread without tearing the cake.
- Powdered Sugar: The main sweetener in the frosting, powdered sugar dusted right — no gritty texture, just smooth sweetness.
- Pure Vanilla Extract: Adds a warm, cozy flavor that balances the sweet icing beautifully.
- Whipping Cream or Half and Half: Just enough to thin your frosting so it spreads easily but still holds shape.
Variations
I love how versatile this Candy Corn Cakes and Cake Tutorial Recipe can be—you can easily swap out flavors or tweak the colors for different occasions. It’s your canvas as much as it’s a recipe, so don’t hesitate to make it your own!
- Flavor Variations: Once, I tried adding a splash of almond extract instead of vanilla, and it gave the frosting a lovely nutty twist everyone noticed but couldn’t quite place.
- Dietary Adjustments: For a dairy-free version, substitute plant-based butter and use oat milk or coconut cream to thin your frosting.
- Color Swaps: Want to reinvent this for a spring party? Use pastel colors instead—it turns this festive cake into a cheerful dessert all year round.
- Size Changes: If you have extra batter, a single cake layered with the same color steps makes a gorgeous larger cake instead of minis.
How to Make Candy Corn Cakes and Cake Tutorial Recipe
Step 1: Mix the Batter and Divide Colors
Start by mixing your white cake mix exactly according to the box instructions. This part is super important; don’t overshift or add extras unless you want a very different texture. Once mixed, divide the batter evenly into four bowls. Set one aside as your pure white layer. In the other three bowls, use yellow and red food coloring to create the three vibrant candy corn colors: one bowl yellow, one bowl orange (red + yellow), and leave the last one white. This layering trick gives you that signature candy corn look that everybody loves.
Step 2: Bake the Layers Partially
Prepare four cake pans by greasing, flouring, and lining the bottoms with wax paper—this prevents sticking and helps your layers come out clean. Pour each colored batter into its own pan. Here’s a trick I learned: bake the cakes for only half the time listed on the box. This will keep them moist and easier to cut into layers, perfect for those mini towers.
Step 3: Cut and Level Your Cake Layers
Once cooled, use a biscuit cutter or the bottom of a glass to cut circles from each cake layer. If your layers came out uneven, don’t stress—grab a serrated knife and level the tops gently. I used to lose a lot of batter here, but with a good serrated knife and a steady hand, you’ll get nice, flat layers ready to stack.
Step 4: Make the Frosting and Assemble Your Cake
Mix softened butter, powdered sugar, and vanilla extract until creamy. To get the frosting spreadable but still fluffy, add whipping cream or half and half little by little until you reach your desired consistency. Now the fun part: build your layers in candy corn order—white on the bottom, then orange, then yellow on top—frosting between each layer to keep them stacked and moist. Don’t be shy with the frosting; it really brings the whole cake together.
Pro Tips for Making Candy Corn Cakes and Cake Tutorial Recipe
- Use Wax Paper Liners: It makes removing each cake layer so much easier and keeps those edges smooth.
- Measure Food Coloring Carefully: I started with too much red once, and my orange turned out too dark—start with a drop or two and build color gradually.
- Don’t Overbake the Cake: Partial baking keeps the cake moist and helps when cutting with the biscuit cutter; otherwise, it can crumble.
- Chill Before Cutting: After baking, chilling the cake for a bit firms up the crumb and makes it easier to cut clean circles.
How to Serve Candy Corn Cakes and Cake Tutorial Recipe

Garnishes
I love adding a tiny dollop of whipped cream on top of each mini cake as a final touch—it softens the sweetness and gives that pumpkin-spice-season creaminess. Sometimes, I sprinkle crushed candy corn pieces or edible glitter on top for extra sparkle. Your guests will think you went all-out professional!
Side Dishes
Since these cakes are rich and sweet, I usually serve them alongside hot apple cider or a lightly spiced pumpkin latte. The warm drinks balance the sugar and create a cozy autumn vibe. For savory sides at a party, simple roasted nuts or a charcuterie board work beautifully.
Creative Ways to Present
One of my favorite presentations was on a tiered cake stand with little Halloween decorations like mini pumpkins and faux spider webs around the edges. For kids’ parties, placing them in clear cupcake wrappers with little flags or name tags makes them feel extra special. Trust me, presentation can really elevate these cute cakes from casual to memorable.
Make Ahead and Storage
Storing Leftovers
I store leftover Candy Corn Cakes in an airtight container in the fridge. This keeps the frosting fresh and the cake moist—just be sure to let them come to room temperature before serving again so all the flavors and textures feel just right.
Freezing
Freezing these cakes works wonders if you want to prepare in advance. I wrap each mini cake individually in plastic wrap and then place them in a freezer bag. They keep well for up to a month, and when you’re ready to enjoy, thaw overnight in the refrigerator.
Reheating
Reheating is easy—just bring the cake to room temp naturally, or if you’re in a hurry, microwave each cake for about 10 seconds. Be careful not to melt the frosting; it should be just warm enough to soften but not so hot it runs.
FAQs
-
Can I use homemade cake batter instead of a cake mix for Candy Corn Cakes and Cake Tutorial Recipe?
Absolutely! Homemade white cake batter works beautifully here; just make sure the batter isn’t too heavy so it bakes evenly and stays light enough to cut into those neat layers.
-
What if I don’t have red food coloring—any alternatives?
If you don’t have red, you can use beet juice for a natural red tone or even raspberry or strawberry puree to add subtle color and a little fruity flavor.
-
How do I prevent the cake layers from drying out when baking only half the time?
Keep a close eye in the oven and test with a toothpick early—when it comes out with only a few moist crumbs, remove the cakes. Cooling them in the pan for just 10 minutes before transferring to a rack also helps retain moisture.
-
Can I make this recipe gluten-free?
Yes! Use a gluten-free white cake mix and ensure your powdered sugar and other ingredients are certified gluten-free. The frosting and color technique work the same.
-
What’s the best way to transport the mini Candy Corn Cakes?
Place them in a sturdy container with individual compartments or boxes with cupcake liners to keep them from shifting. You can also wrap each mini cake loosely in parchment paper to prevent frosting smudges.
Final Thoughts
I really can’t recommend this Candy Corn Cakes and Cake Tutorial Recipe enough—it’s become my go-to festive treat every fall season because it’s easy, customizable, and just plain fun. The kids love getting involved with the coloring, and adults can’t get enough of the sweet, layered goodness. Give it a go, and I promise you’ll impress your family and friends with a dessert that tastes great and looks like a little edible piece of Halloween magic.
Print
Candy Corn Cakes and Cake Tutorial Recipe
- Prep Time: 20 min
- Cook Time: 20 min
- Total Time: 70 min
- Yield: 5 mini cakes, approximately 5 servings 1x
- Category: Dessert
- Method: Baking
- Cuisine: American
Description
Candy Corn Cakes are a delightful Halloween-themed treat featuring multi-colored mini cake towers that resemble candy corn. These cakes are made using a white cake mix divided and tinted with yellow and red food coloring, layered, and topped with a smooth homemade frosting, making them perfect for festive parties and celebrations.
Ingredients
Cake
- 1 white cake mix (plus ingredients listed on the box)
- Yellow food coloring
- Red food coloring
Frosting
- 1 1/2 sticks butter, softened
- 1 lb. powdered sugar
- 1 tsp pure vanilla extract
- Whipping cream or half-and-half, enough to thin frosting to desired consistency
Instructions
- Prepare the cake batter: Mix the white cake mix according to the directions on the back of the box, ensuring the batter is smooth and lump-free.
- Divide and color the batter: Divide the batter equally into four bowls. Leave one portion white, then tint the others using yellow and red food coloring following a food coloring chart to create distinct candy corn colors.
- Prepare cake pans: Grease, flour, and line four cake pans with wax paper to prevent sticking for easy removal after baking.
- Bake the cakes: Pour the colored batters into the prepared pans and bake for half the time recommended on the cake mix box to create thinner layers suitable for stacking.
- Cool and cut layers: Remove the cakes from the oven and cool them on a wire rack completely. Then, use a biscuit cutter or the bottom of a glass to cut out circular pieces. If layers are uneven, use a serrated knife to level them for stacking.
- Prepare the frosting: In a mixing bowl, beat the softened butter until creamy. Gradually add powdered sugar and vanilla extract while mixing, then thin with whipping cream or half-and-half until smooth and spreadable.
- Assemble the cake towers: Stack the colored cake circles in the order of candy corn colors (white, yellow, orange/red) layering with frosting between each layer to build mini cake towers.
Notes
- Candy Corn Cakes make a festive and visually appealing Halloween party treat.
- Using a biscuit cutter or glass ensures uniform cake circles, which enhances the appearance of layered towers.
- Baking the cake for half the recommended time results in thinner layers, perfect for stacking.
- Adjust frosting consistency with cream to ensure easy spreading without melting the cake layers.
Nutrition
- Serving Size: 1 serving
- Calories: 742 kcal
- Sugar: 132 g
- Sodium: 721 mg
- Fat: 4 g
- Saturated Fat: 2 g
- Unsaturated Fat: 2 g
- Trans Fat: 1 g
- Carbohydrates: 175 g
- Fiber: 1 g
- Protein: 4 g
- Cholesterol: 1 mg

Your email address will not be published. Required fields are marked *