
If you’re looking for a chocolate cake that’s rich, moist, and downright irresistible, you’ve got to try this Black Magic Cake Recipe. I absolutely love how this cake turns out — it’s velvety smooth with a deep chocolate flavor that has just a hint of coffee magic hidden inside to make it extra special. Whether you’re baking for a birthday or just because, this cake will wow your friends and family (and maybe even have you sneaking extra slices when no one’s looking!). Keep reading, and I’ll walk you through everything you need to make your own fabulously decadent Black Magic Cake at home.
Why You’ll Love This Recipe
- Rich, Moist Texture: Thanks to the vegetable oil and buttermilk, this cake stays soft and luscious, never dry.
- Secret Coffee Boost: Adding coffee deepens the chocolate flavor perfectly, without making the cake taste like coffee.
- Easy to Make: This beginner-friendly recipe comes together quickly with simple ingredients you probably have on hand.
- Versatile for Any Occasion: Whether you bake it in a tube pan or round pans, it’s a showstopper every time.

Ingredients You’ll Need
All the ingredients in this Black Magic Cake Recipe come together to create a beautifully balanced cake with the perfect texture and flavor. I recommend using real buttermilk or sour milk for a tender crumb, and don’t skip the coffee—it’s a game-changer!
- Sugar: Just regular granulated sugar works perfectly to sweeten without overpowering.
- All-purpose flour: Provides structure but keeps the texture soft.
- HERSHEY’S Cocoa: This is the star—using quality cocoa powder makes all the difference in flavor.
- Baking soda & baking powder: These leaveners help the cake rise nicely and stay airy.
- Salt: Balances flavors and elevates the chocolate taste.
- Eggs: They bind the ingredients and add richness.
- Buttermilk or sour milk: Adds tang and moisture; don’t substitute with regular milk as it affects texture.
- Coffee (brewed or instant): Enhances the chocolate intensity—use whatever you have on hand but make sure it’s strong and hot.
- Vegetable oil: Keeps the cake moist without heaviness.
- Vanilla extract: Adds warmth and depth to the chocolate flavor.
Variations
I love that the Black Magic Cake Recipe is such a great canvas—you can tweak it to suit your taste or dietary needs easily. I often swap up the frosting or add a dash of cinnamon to the batter for a little twist. Feel free to get creative!
- Gluten-Free Version: I’ve tried using a gluten-free flour blend, and while the texture changes slightly, the flavor is still fantastic with a bit more care on mixing.
- Vegan Adaptation: Replace eggs with flax eggs and use non-dairy milk plus vegan buttercream, which worked well in my experiment.
- Coffee-Free Option: If you’re not a coffee fan, swap coffee for hot water—but I do recommend sticking with coffee if you want that classic deep flavor.
- Frosting Flavors: Pair with vanilla bean buttercream or even cream cheese frosting to change things up depending on the occasion.
How to Make Black Magic Cake Recipe
Step 1: Prep Your Pans and Ingredients
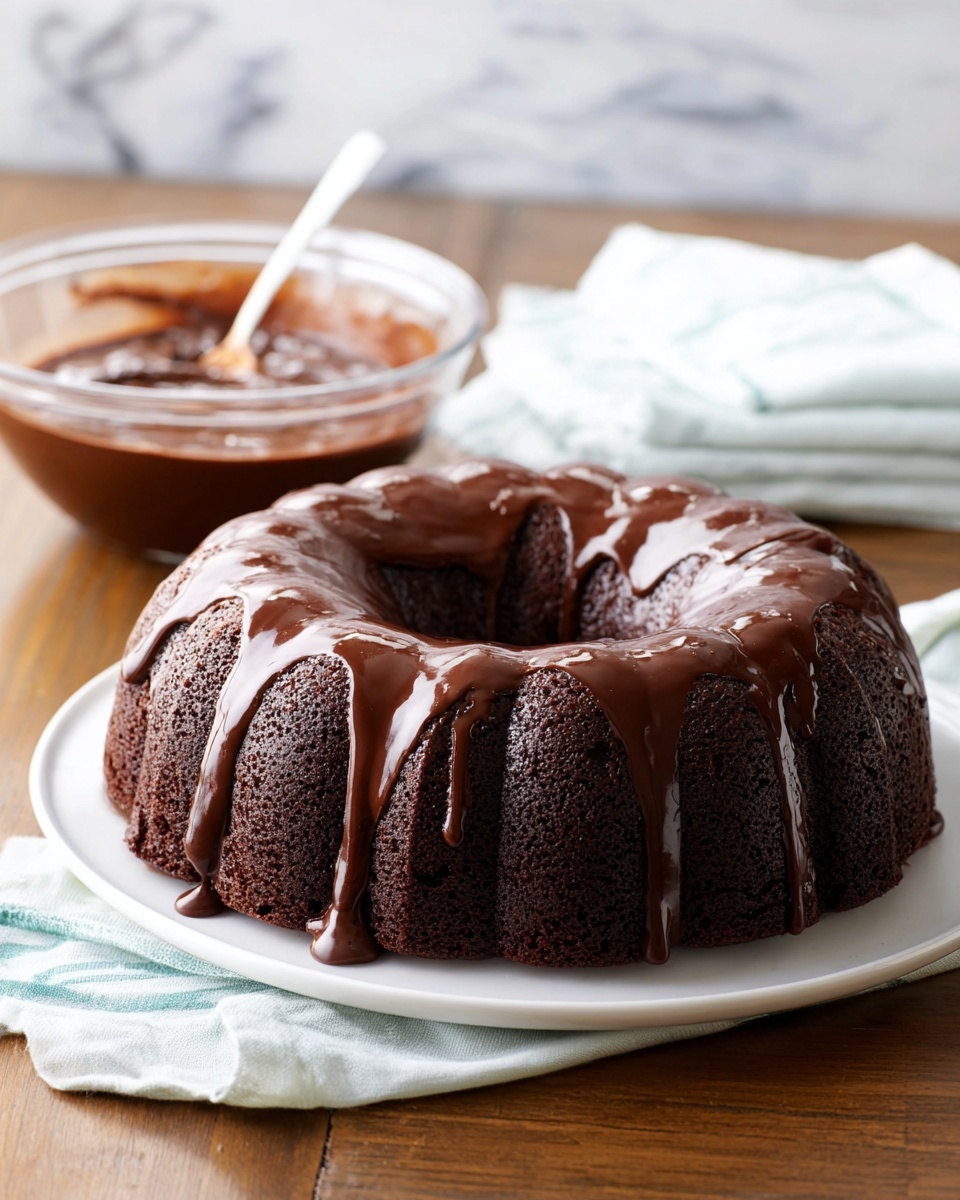
Start by heating your oven to 350°F. Make sure to grease and flour whichever pan you decide to use: a 12-cup fluted tube pan, two 9-inch round pans, or a 13×9-inch rectangular pan. I like using the fluted tube pan for an impressive look with minimal effort, but honestly, all shapes come out delicious. While the oven warms, gather your ingredients to keep everything moving smoothly.
Step 2: Mix the Dry Ingredients
In a large bowl, whisk together the sugar, flour, cocoa powder, baking soda, baking powder, and salt. This ensures everything is evenly distributed for a uniform rise and flavor throughout. I like to sift the cocoa and flour to remove any lumps—makes for a silky batter!
Step 3: Add Wet Ingredients and Beat
Now add your eggs, buttermilk, coffee, vegetable oil, and vanilla to the dry mix. Beat on medium speed for about 2 minutes—you want a smooth, thin batter. I discovered that beating well at this stage gives the cake a nice lift and tender crumb. The batter will look runny, but don’t worry, that’s exactly how it should be.
Step 4: Bake to Perfection
Pour the batter evenly into your prepared pan(s) and pop it in the oven. Baking times vary by pan type, so check around 30 minutes for round pans, 35-40 minutes for a rectangular pan, and 50-55 minutes for the fluted tube pan. You’ll know it’s done when a toothpick inserted into the center comes out clean or with just a few moist crumbs. I’ve learned it’s better to start checking early to avoid overbaking.
Step 5: Cool and Frost
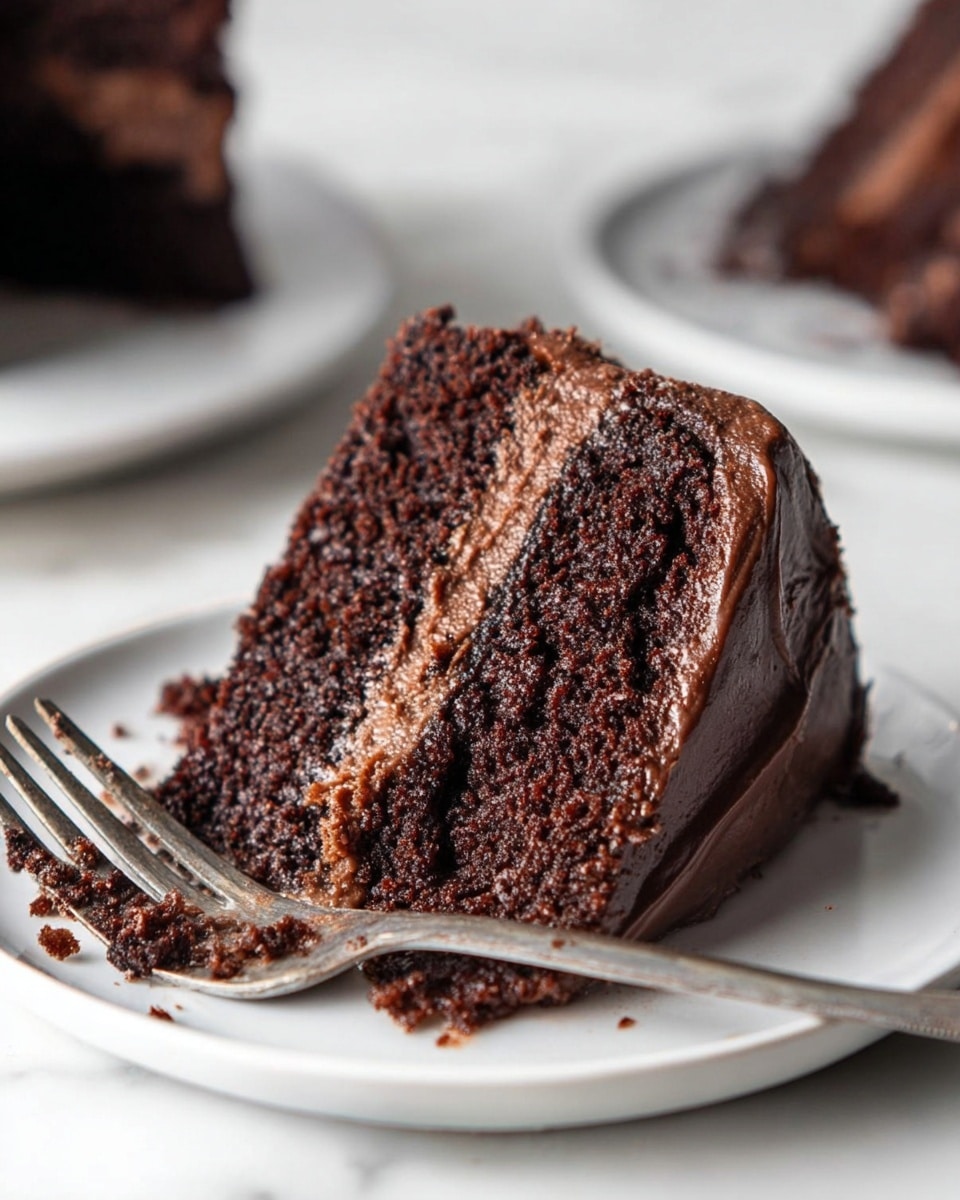
Once baked, let the cake cool in the pan for about 10 minutes. Then loosen the edges with a knife and turn it out onto a wire rack to cool completely. Patience here makes a difference—frosting a warm cake can turn into a messy meltdown. Choose your favorite frosting, whether it’s classic buttercream or vanilla bean, and spread it on generously when the cake is fully cooled.
Pro Tips for Making Black Magic Cake Recipe
- Coffee Makes the Difference: Use freshly brewed strong coffee or instant coffee dissolved in boiling water to get that subtle richness without bitterness.
- Don’t Skimp on Buttermilk: It tenderizes the cake and adds a slight tang to balance the sweetness – if you don’t have buttermilk, add a tablespoon of vinegar or lemon juice to milk and let it sit for 5 minutes.
- Beat Batter Well: Giving that batter a good 2-minute mix helps create a light crumb and a shiny, smooth texture.
- Check Oven Temperature: I use an oven thermometer because even a slight difference can affect the baking time and cake texture.
How to Serve Black Magic Cake Recipe
Garnishes
I love garnishing this Black Magic Cake with a dusting of cocoa powder or a handful of fresh raspberries for a pop of color and a hint of tartness. Sometimes I add chocolate shavings or a drizzle of caramel sauce when I’m feeling fancy. It’s such a flexible cake, you can dress it up or keep it simple, and it always impresses.
Side Dishes
When serving, I like pairing a slice with a scoop of vanilla ice cream or whipped cream on the side—that creaminess balances the rich chocolate beautifully. A cup of coffee or milk is a natural match too, and perfect for an afternoon treat or after-dinner dessert.
Creative Ways to Present
For special occasions, I’ve layered this cake with espresso-soaked cake layers or filled it with chocolate ganache for something extra luxurious. Another fun idea is to turn it into cupcakes for easy serving at parties. You can also decorate with edible gold leaf or fresh edible flowers to make it look stunning without much effort.
Make Ahead and Storage
Storing Leftovers
I usually store leftover Black Magic Cake tightly wrapped in plastic wrap or in an airtight container at room temperature for up to 3 days. It stays moist and tasty, but if your kitchen is warm, popping it in the fridge is fine—just let it come back to room temperature before serving.
Freezing
This cake freezes beautifully! I slice it into individual portions, wrap each piece securely in plastic wrap, then place them all in a freezer bag. When you want a quick dessert fix, just thaw slices overnight in the fridge or at room temp for a couple of hours.
Reheating
If you want to enjoy leftovers warm, I find microwaving for about 15-20 seconds works wonders—just be careful not to overdo it or the cake can dry out. Another option is a quick zap in the oven at low heat wrapped in foil to preserve moisture.
FAQs
-
Can I use regular milk instead of buttermilk in this Black Magic Cake Recipe?
You can, but I recommend making a sour milk substitute by adding 1 tablespoon of vinegar or lemon juice to 1 cup of regular milk and letting it sit for 5 minutes. This mimics buttermilk’s acidity, which helps tenderize the cake and activate the baking soda for a better rise.
-
Does the coffee taste overpowering in the cake?
Not at all! The coffee is just there to intensify the chocolate flavor. If you’re worried about coffee flavor, use a mild brewed coffee or less instant coffee. The result should be a deeper chocolate taste without any strong coffee notes.
-
What frosting pairs best with Black Magic Cake?
Classic vanilla bean buttercream or cream cheese frosting are both fantastic options that complement the richness without overpowering it. You can also try chocolate ganache for a truly indulgent finish.
-
Can I make this recipe into cupcakes?
Absolutely! Just fill cupcake liners about two-thirds full with batter and bake at 350°F for about 18-22 minutes, checking for doneness with a toothpick.
Final Thoughts
This Black Magic Cake Recipe has become one of my go-to chocolate cakes because it never disappoints. It’s simple enough for weeknight baking but rich enough to impress at any party. The secret coffee addition really brought my chocolate baking up a notch, and I know you’ll love that touch as much as I do. I hope you enjoy making and sharing this cake as much as my family and I do—it’s a cake that feels like a little celebration every time.
Print
Black Magic Cake Recipe
- Prep Time: 15 minutes
- Cook Time: 55 minutes
- Total Time: 1 hour 10 minutes
- Yield: 12 servings (1 cake) 1x
- Category: Dessert
- Method: Baking
- Cuisine: American
Description
This Black Magic Cake recipe is a rich, moist chocolate cake flavored with HERSHEY’S Cocoa and enhanced by the deep notes of coffee. Perfect for chocolate lovers seeking a beginner-friendly baking project, this cake balances sweetness, moisture, and a touch of coffee to intensify the chocolate flavor. It’s versatile enough to be baked in multiple pan sizes and pairs beautifully with buttercream or vanilla bean frostings.
Ingredients
Dry Ingredients
- 2 cups sugar
- 1–3/4 cups all-purpose flour
- 3/4 cup HERSHEY’S Cocoa
- 2 teaspoons baking soda
- 1 teaspoon baking powder
- 1 teaspoon salt
Wet Ingredients
- 2 eggs
- 1 cup buttermilk or sour milk
- 1 cup strong black coffee (or 2 teaspoons powdered instant coffee plus 1 cup boiling water)
- 1/2 cup vegetable oil
- 1 teaspoon vanilla extract
Instructions
- Prepare the Pan: Preheat your oven to 350°F (177°C). Grease and flour a 12-cup fluted tube pan, two 9-inch round baking pans, or one 13x9x2-inch rectangular baking pan to prevent the cake from sticking.
- Mix Dry Ingredients: In a large bowl, combine the sugar, all-purpose flour, HERSHEY’S Cocoa, baking soda, baking powder, and salt. Stir thoroughly to ensure even distribution of all dry components.
- Add Wet Ingredients: Add the eggs, buttermilk, brewed coffee, vegetable oil, and vanilla extract to the dry mixture. Use an electric mixer on medium speed to beat the batter for 2 minutes. Note that the batter will be thin, which is normal for this recipe.
- Pour Batter into Pan: Evenly divide the batter into your prepared pan(s), smoothing the top for even baking.
- Bake the Cake: For a fluted tube pan, bake 50 to 55 minutes. For two 9-inch round pans, bake 30 to 35 minutes. For a 13x9x2-inch pan, bake 35 to 40 minutes. To check doneness, insert a wooden pick into the center; it should come out clean when the cake is fully baked.
- Cool the Cake: After baking, allow the cake to cool in the pan for 10 minutes. Then, gently loosen the sides with a knife and remove the cake onto wire racks. Let it cool completely before frosting.
- Frost and Serve: Once cooled, frost the cake as desired. Classic buttercream or vanilla bean frosting pair beautifully with this cake’s rich chocolate and coffee flavor.
Notes
- This recipe replaces boxed cake mixes with simple pantry ingredients, making it perfect for beginner bakers.
- Coffee is a secret ingredient that enhances the chocolate flavor without making the cake taste like coffee.
- You can customize the cake by using different pans or experimenting with various frostings such as buttercream or vanilla bean icing.
- For another coffee and chocolate treat, try the Espresso-Filled Mini Cakes recipe.
- Ensure the coffee is hot when adding to the batter to help dissolve the cocoa and deepen the flavor.
Nutrition
- Serving Size: 1 slice (87g)
- Calories: 260
- Sugar: 26 g
- Sodium: 500 mg
- Fat: 11 g
- Saturated Fat: 1.5 g
- Unsaturated Fat: 9.5 g
- Trans Fat: 0 g
- Carbohydrates: 41 g
- Fiber: 0 g
- Protein: 4 g
- Cholesterol: 35 mg

Your email address will not be published. Required fields are marked *