

If you’re looking to wow your guests this Halloween, grab your mixing bowls because this Jack-O-Lantern Cake Recipe is an absolute showstopper. Not only does it have that wow-factor with the adorable pumpkin face baked right into the cake, but it’s delightfully light and fluffy with a luscious whipped cream filling that my family can’t get enough of. Stick with me and I’ll walk you through every step so you nail it—no scary baking mishaps here!
Why You’ll Love This Recipe
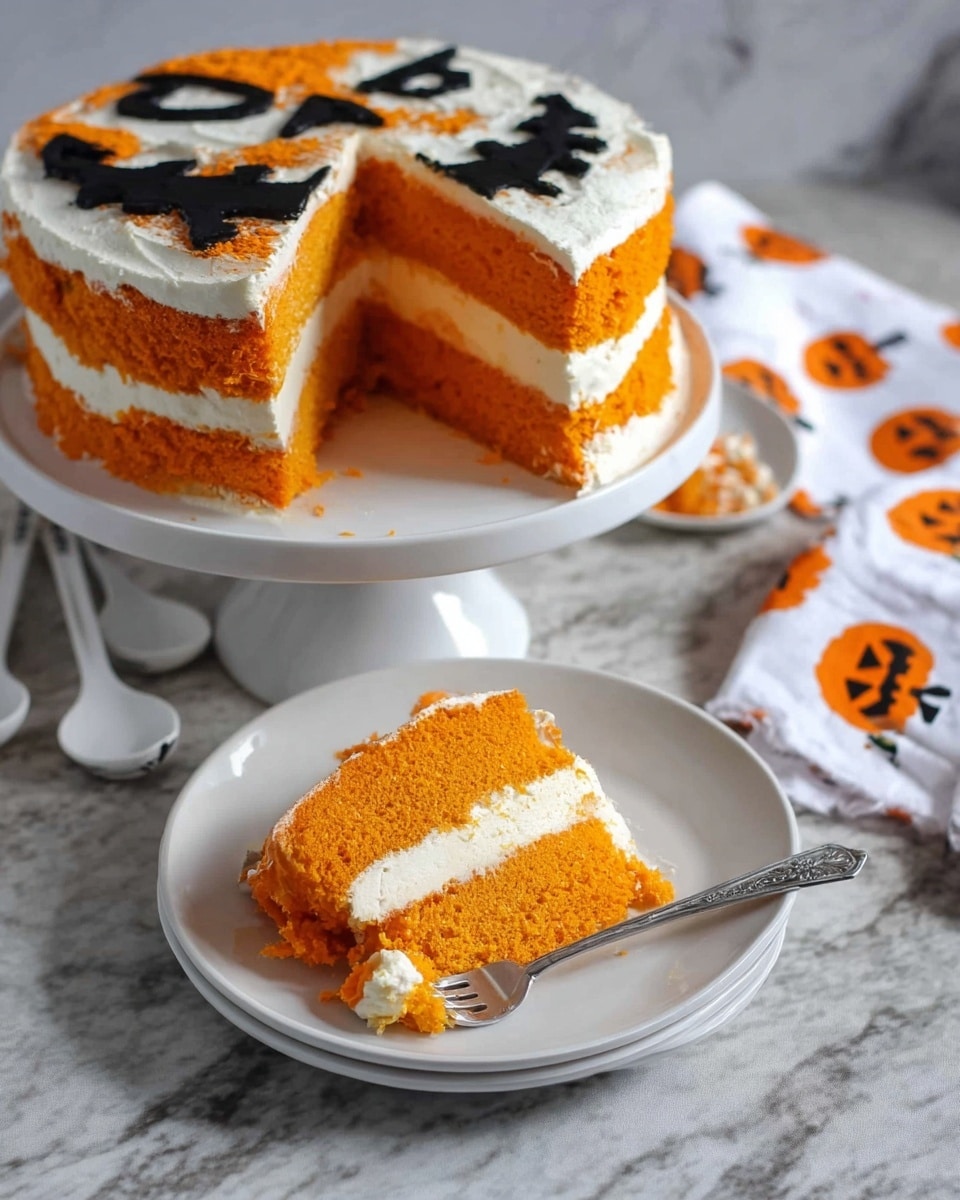
- Fun and Festive Design: The Jack-O-Lantern face bakes right into the cake, making it a stunning centerpiece.
- Light and Fluffy Texture: Thanks to whipped egg whites and whipped cream filling, it’s anything but heavy or dense.
- Perfect for Halloween Parties: Your guests will be talking about this cake long after the last slice is gone.
- Doable Even for Home Bakers: I’ll share tips on how to make the decorating surprisingly simple and stress-free.

Ingredients You’ll Need
These ingredients come together to create the perfect sponge cake with a rich, creamy filling, and the secret trick is whipping the egg whites for that light texture. Before you start, make sure you have fresh eggs and good quality vanilla extract—it really makes a difference in flavor!
- Egg yolks: You’ll separate these from the whites for a delicate, rich batter base.
- Sugar: Used in two parts here—some to sweeten the yolks and some for stabilizing the egg whites.
- Vegetable oil: Keeps the cake moist without weighing it down.
- Whole milk: Adds richness and helps with batter consistency.
- Vanilla extract: Adds a warm, classic flavor—don’t skip it!
- All-purpose flour: Sifted for a light cake crumb.
- Cornstarch: Adds tenderness to the cake.
- Egg whites: Whipped to stiff peaks for that perfect fluffy texture.
- Vinegar: Stabilizes the whipped egg whites for volume.
- Heavy whipping cream: Whipped with confectioners sugar and vanilla to make the dreamy filling.
- Confectioners sugar: Lightly sweetens the whipped cream without grittiness.
- Dash of salt: Balances flavors and enhances sweetness.
Variations
I love to switch things up depending on my mood or who I’m baking for. This Jack-O-Lantern Cake Recipe is surprisingly versatile, so playing with flavors or decoration styles can really make it your own!
- Spice it up: I once added a teaspoon of pumpkin pie spice to the batter and it added a cozy, autumn vibe that had everyone asking for seconds.
- Flavor twist: Swap vanilla extract for almond extract for a slightly nutty and unexpected flavor.
- Dietary adjustment: Use coconut cream instead of heavy whipping cream for a dairy-free whipped filling that’s still super creamy.
- Color variations: Feel free to use gel food colors to create different face colors or add a fun twist, like a glowy green or spooky purple pumpkin.
How to Make Jack-O-Lantern Cake Recipe
Step 1: Prep Your Pan and Design
Start by preheating your oven to 375°F (190°C) and greasing an 8-inch round pan with cooking spray. Line it with parchment paper, then draw or trace your Jack-O-Lantern face right onto the paper. I like to cut the parchment so it fits snugly inside the pan, so the design stays put and you don’t have to guess where you’re piping. This sets the stage for your spooky masterpiece!
Step 2: Whisk the Egg Yolks and Sugar
Using a whisk or an electric mixer, beat your egg yolks and sugar together until the mixture looks smooth and slightly thickened. It takes a couple of minutes, and I promise this step is key for a velvety batter. Don’t toss your egg whites—keep those handy because we’ll whip them up next.
Step 3: Add the Wet Ingredients to the Yolks
Slowly whisk in the vegetable oil, whole milk, and vanilla extract until your batter is silky smooth. This blend is the secret to that moist crumb that pairs beautifully with our creamy filling.
Step 4: Incorporate the Dry Ingredients and Orange Coloring
Sift the all-purpose flour and cornstarch into your wet mixture. Stir gently until everything is combined and the batter looks lovely and smooth with no lumps. Add 2-3 drops of orange gel food coloring here to get that perfect pumpkin hue. I always opt for gel because it tints beautifully without watering down the batter.
Step 5: Whip Egg Whites to Stiff Peaks
In a clean bowl with a whisk attachment, beat your egg whites until frothy. Then add the vinegar and sugar gradually while whipping until stiff peaks form—this means the peaks stand straight and don’t droop when you lift the whisk. Trust me, this is the game changer for a light, airy cake, so don’t rush it!
Step 6: Gently Fold in the Egg Whites
Carefully fold the whipped egg whites into your orange batter. The goal here is to combine without deflating the whites. I find folding with a spatula in gentle motions does the trick. Overmixing can ruin the texture, so be patient and stop once you see the batter evenly mixed.
Step 7: Create the Black Design Batter
Remove about 1/4 cup of your batter and place it into a small bowl. Mix in black gel food coloring until it’s dark and opaque—it’ll be the spooky Jack-O-Lantern face. Transfer this black batter into a piping bag for easy control.
Step 8: Pipe the Face and Chill
Carefully pipe the black batter onto your parchment-lined pan, tracing the Jack-O-Lantern face you drew earlier. Once finished, pop it into the freezer for 5 to 8 minutes to let that design set. This freezer trick keeps your cute pumpkin face from blending into the orange batter in the next step.
Step 9: Add Orange Batter and Bake
Pour the remaining orange batter gently over the frozen face design, covering it completely. Bake for about 8-9 minutes until the edges turn golden brown. Keep an eye on it because ovens vary—your cake is ready when it springs back lightly to the touch.
Step 10: Cool and Bake Additional Layers
When the cake’s finished, quickly flip it out of the pan and peel off the parchment while it’s still warm—that’s the best time so the delicate face doesn’t stick or tear. Use the leftover batter to bake two more plain cake layers for your filling. Let all layers cool completely before assembling.
Step 11: Whip Up the Creamy Filling
Whip heavy cream, confectioners sugar, vanilla, and a dash of salt in a cold bowl until you get stiff peaks. This whipped cream filling is my absolute favorite part—light, sweet, and cool enough to balance the pumpkin cake beautifully.
Step 12: Assemble Your Jack-O-Lantern Cake
Start with a plain cake layer on your serving plate, then generously pipe or spread a layer of whipped cream. Add another plain cake layer, more cream, and top it off with your stunning Jack-O-Lantern design cake as the final layer. Chill in the fridge until serving to let the flavors meld.
Pro Tips for Making Jack-O-Lantern Cake Recipe
- Use Gel Food Coloring: I learned that gel colors give a vibrant pumpkin orange and deep black without thinning the batter like liquid colors can.
- Freezer for the Win: Freezing the design batter first prevents colors from bleeding—I was skeptical until this trick saved my first attempt!
- Whip Egg Whites Properly: Don’t rush this—stiff peaks ensure your cake has the perfect fluff and rise every time.
- Peel Parchment Immediately: Removing the parchment while the cake is warm prevents tearing or breaking your Jack-O-Lantern design.
How to Serve Jack-O-Lantern Cake Recipe
Garnishes
I usually keep it simple with a sprinkle of edible gold glitter or a few orange and black sprinkles just around the edges for fun. Sometimes, I add a tiny dollop of whipped cream on each slice and a little fresh mint leaf to brighten things up—a lovely contrast to the rich cream inside.
Side Dishes
Since this cake is already rich, I love pairing it with a light cinnamon-spiced apple cider or a chilled glass of milk. For a party, simple sliced fresh fruit or some pumpkin-spiced cookies on the side complement the festive mood perfectly.
Creative Ways to Present
For a fun twist at Halloween parties, I’ve served this cake on a rustic wooden board surrounded by mini pumpkins and fairy lights—it really amps up the festive vibe. You can even get creative and use colored whipped cream to “carve” expressions on the pumpkin face slices for the kids.
Make Ahead and Storage
Storing Leftovers
Once the cake is assembled, cover it tightly with plastic wrap or place it in an airtight container. Store it in the fridge and it stays fresh for up to 3 days. I’ve found that letting it chill helps the whipped cream set beautifully and keeps the cake moist.
Freezing
If you want to make this cake ahead, you can freeze the baked but unfilled cake layers wrapped well in plastic wrap and foil for up to a month. I recommend freezing layers separately, then thawing in the fridge overnight before assembling to preserve texture.
Reheating
This cake is best enjoyed chilled, but if you want to revive a slice, I gently bring it to room temperature for about 15 minutes before serving. That keeps the whipped cream fresh and the cake soft without drying it out.
FAQs
-
Can I make the Jack-O-Lantern Cake Recipe without piping the design?
Absolutely! While the design is what makes this cake special, you can skip the piping step and bake plain layers for a simpler cake. Just use all the batter to make three even layers and assemble with whipped cream as described.
-
What if I don’t have gel food coloring—can I use regular liquid?
You can use liquid food coloring, but I find it waters down the batter and makes the colors less vibrant. If gel isn’t available, use liquid sparingly and consider adding a tiny bit more flour to keep the batter consistency right.
-
How do I know when the cake is done baking?
The edges should turn a golden brown, and the top will spring back lightly when touched. You can also use a toothpick inserted into the center (avoiding the face design) which should come out clean or with a few moist crumbs.
-
Can I use this cake recipe for other holiday designs?
Definitely! Once you get the hang of the technique, you can pipe any silhouette or festive design onto the parchment and bake it right in. It’s a fun way to celebrate multiple occasions with custom looks.
Final Thoughts
I absolutely love how this Jack-O-Lantern Cake Recipe brings a little magic to my kitchen every fall. It’s impressive enough for guests but easy enough for me to make with my kids getting involved. I promise you’ll enjoy the process as much as the glorious pumpkin-themed result. Give it a try—you’ll be rewarded with smiles (and second helpings) all around!
Print
Jack-O-Lantern Cake Recipe
- Prep Time: 20 minutes
- Cook Time: 8-9 minutes per layer (approx. 25 minutes total for 3 layers)
- Total Time: 45 minutes
- Yield: 8–12 servings 1x
- Category: Dessert
- Method: Baking
- Cuisine: American
Description
This charming Jack-O-Lantern Cake is a festive dessert perfect for Halloween celebrations. Featuring a light and fluffy orange-tinted sponge cake decorated with a piped black Jack-O-Lantern face, it is layered with sweet whipped cream for a delightful balance of flavors. The cake layers are simple yet elegant, making it a fun and impressive centerpiece for any party.
Ingredients
Cake Batter
- 6 egg yolks
- 4 Tbsp. sugar
- 4 Tbsp. vegetable oil
- 4 Tbsp. whole milk
- 2 tsp. vanilla extract
- 1 cup all purpose flour
- 2 Tbsp. cornstarch
- 6 egg whites
- 1/2 tsp. vinegar
- 4 Tbsp. sugar
- 2–3 drops orange food gel coloring
- Black food gel coloring for face design (amount as needed)
Whipped Cream
- 2 cups heavy whipping cream
- 5–6 Tbsp. confectioners sugar
- Dash of salt
- 2 tsp. vanilla extract
Instructions
- Prepare Pan and Design: Preheat the oven to 375°F (190°C). Grease an 8″ circular pan with cooking spray and line it with parchment paper. Draw or trace a Jack-O-Lantern face onto the parchment paper, cutting the paper to fit the pan perfectly.
- Make Egg Yolk Batter: Whisk together the 6 egg yolks and 4 Tbsp. sugar until smooth and light. Add the vegetable oil, whole milk, and 2 tsp. vanilla extract, whisking until fully combined.
- Add Dry Ingredients: Sift the all-purpose flour and cornstarch into the wet ingredients. Whisk until the batter is smooth. Add 2-3 drops of orange food gel coloring and mix gently to incorporate color evenly.
- Whip Egg Whites: In a stand mixer bowl fitted with a whisk attachment, whisk the 6 egg whites until frothy. Slowly add the 1/2 tsp. vinegar and 4 Tbsp. sugar while continuing to whip until stiff peaks form.
- Fold Egg Whites into Batter: Gently fold the whipped egg whites into the batter until fully combined, taking care not to overmix to prevent deflating.
- Create Black Batter for Face: Remove about 1/4 cup of batter and dye it black with food gel coloring. Transfer it to a piping bag.
- Pipe the Design: Pipe the black batter onto the parchment paper in the pan to create the Jack-O-Lantern face. Freeze the design for 5-8 minutes to allow it to set.
- Cover with Orange Batter and Bake: Pour the remaining orange batter over the frozen design, spreading to cover the entire pan. Bake for 8-9 minutes or until the edges are golden brown and a toothpick inserted in the center comes out clean.
- Cool and Prepare Additional Layers: Remove the cake from the pan and carefully peel off the parchment paper to reveal the design. Use the remaining batter to bake two more plain layers of cake following the same baking time. Let all cakes cool completely.
- Make Whipped Cream: In a clean bowl with a whisk attachment, whip 2 cups heavy cream with 5-6 Tbsp. confectioners sugar, a dash of salt, and 2 tsp. vanilla until stiff peaks form.
- Assemble the Cake: Place one plain cake layer on a serving plate. Pipe or spread a layer of whipped cream on top. Add the second plain cake layer followed by more whipped cream. Top with the Jack-O-Lantern designed cake layer. Chill the assembled cake in the refrigerator until serving.
- Serve and Store: Serve the cake chilled. It can be made ahead by sealing tightly in plastic wrap to maintain freshness. Best enjoyed fresh.
Notes
- Ensure egg whites are whipped to stiff peaks for a light and fluffy texture.
- Be gentle when folding egg whites to avoid deflating the batter.
- Freezing the black piped design before adding orange batter helps keep the face distinct and vibrant.
- This cake is best served chilled and fresh, but can be stored wrapped in plastic wrap in the fridge for up to 2 days.
- Use gel food coloring for vibrant orange and black colors without affecting batter consistency.
Nutrition
- Serving Size: 1 slice (approx. 1/12th of cake)
- Calories: 280 kcal
- Sugar: 18 g
- Sodium: 80 mg
- Fat: 18 g
- Saturated Fat: 10 g
- Unsaturated Fat: 6 g
- Trans Fat: 0 g
- Carbohydrates: 25 g
- Fiber: 0.5 g
- Protein: 5 g
- Cholesterol: 130 mg

Your email address will not be published. Required fields are marked *