

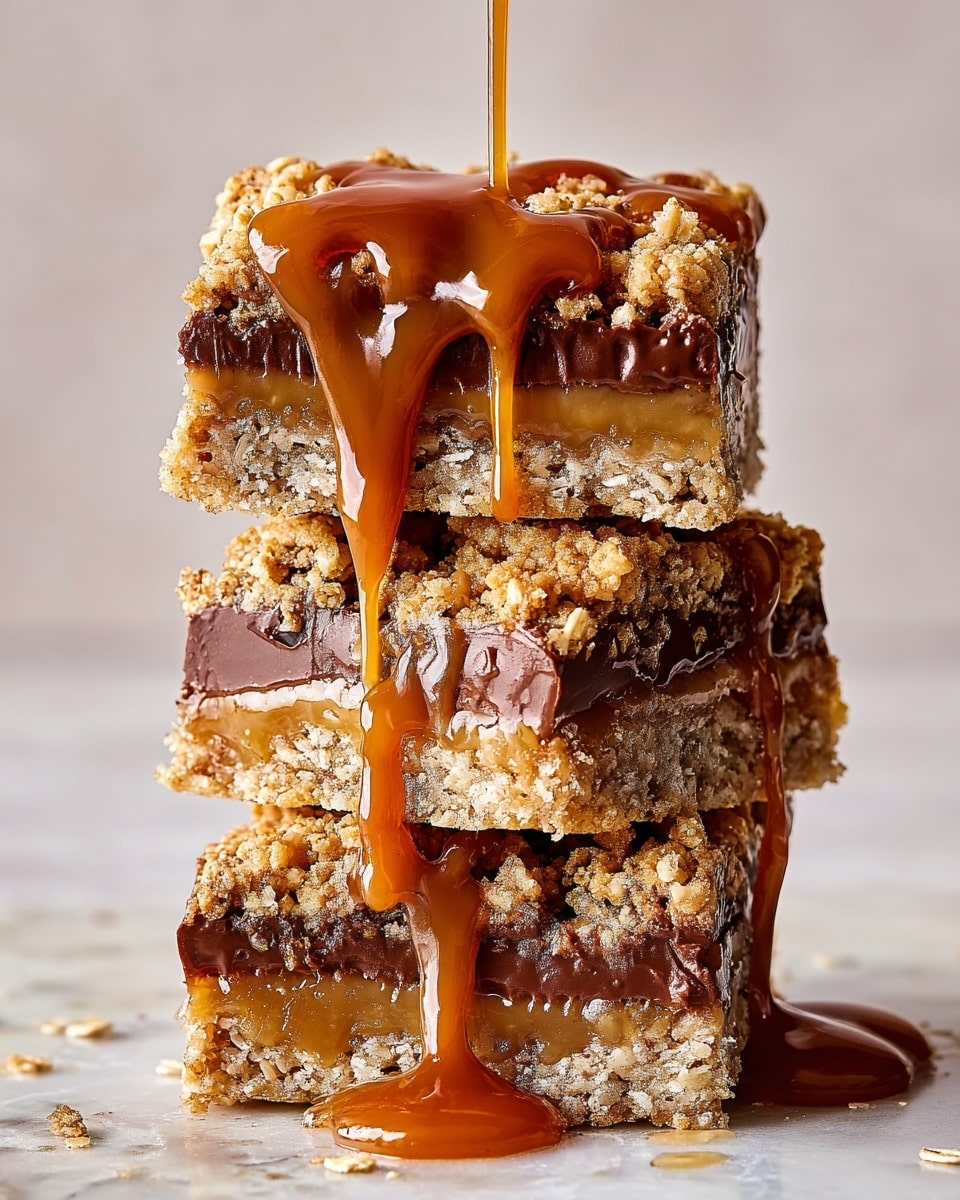
I absolutely love this Caramelitas Recipe because it’s that perfect combination of chewy, gooey, and crunchy all in one bite. When I first tried making caramelitas, I was amazed at how something so simple with oats, caramel, and chocolate chips could turn out to be such a crowd-pleaser. Whether you’re making these for a casual snack, a potluck, or just because you need a sweet pick-me-up, these bars always hit the spot.
You’ll find that the rich caramel and melty chocolate pair wonderfully with the oat crumble base and topping. This Caramelitas Recipe works really well when you want something homemade but not overly complicated — it’s all about layering those flavors and textures in one baking dish, so you get a bit of everything in each square.
Why You’ll Love This Recipe
- Easy to Make: The steps are straightforward and perfect even if you’re new to baking bars.
- Perfect Texture Blend: You get a chewy oat base, smooth caramel, and melty chocolate all in one bite.
- Customizable: You can swap nuts, add sea salt, or even try different chocolates for your own twist.
- Great for Any Occasion: Whether dessert, snack, or gift, caramelitas always impress friends and family.

Ingredients You’ll Need
I’ve found that each ingredient in this Caramelitas Recipe plays an essential role — from the oats for hearty crunch to the soft caramel that oozes golden sweetness. When shopping, look for good-quality caramels and chocolate chips to really elevate the flavor.
- All-purpose flour: This gives the oat base structure so it holds up well after baking.
- Old-fashioned oats: Use these for texture; quick oats can make the bars too mushy.
- Unsalted butter: Softened butter blends better and controls the saltiness in the bars.
- Light brown sugar: Adds moisture and subtle molasses flavor that complements caramel perfectly.
- Pure vanilla extract: Just a splash enhances the overall sweetness without overpowering.
- Kosher salt: Balances the sweetness and intensifies flavors without being too sharp.
- Soft caramels: These melt down to form that classic gooey layer — don’t skip this step!
- Whole milk: Helps smooth out the caramel and thin it slightly for easy spreading.
- Flaky sea salt: Sprinkled in the caramel layer, it adds that irresistible sweet-salty pop.
- Semisweet chocolate chips: Scatter these over the crust for a rich chocolate surprise under the caramel.
Variations
I love how versatile this Caramelitas Recipe is — it’s easy to tweak based on your mood or dietary needs. Feel free to get creative because these bars make an excellent canvas for many flavors.
- Add chopped nuts: I often add toasted pecans or walnuts to the oat mixture for extra crunch and a nutty twist that my family loves.
- Swap chocolate types: Dark chocolate chips or white chocolate are tasty alternatives if you want to switch up sweetness levels.
- Make it gluten-free: Use gluten-free oats and flour blend to accommodate gluten intolerance without sacrificing texture.
- Add a sprinkle of cinnamon: A teaspoon of cinnamon in the oat base creates a warm, cozy flavor perfect for fall baking.
How to Make Caramelitas Recipe
Step 1: Prepare Your Pan and Preheat Oven
Start by preheating your oven to 350°F (175°C). Grab a 13″x9″ baking pan and lightly grease it with cooking spray. Then, line the pan with parchment paper—this little trick saves you from scrubbing and makes cutting squares much easier. Make sure the parchment hangs over the edges for easier lifting once the bars are done.
Step 2: Mix the Oat Crumble Base
In a large bowl, combine the flour, oats, softened butter, brown sugar, vanilla extract, and kosher salt. I like to use clean hands or a pastry cutter to mix until the blend turns crumbly but starts sticking together when squeezed. Don’t overwork the dough—it’s fine to have some loose crumbles. Then press half of this mixture firmly into the prepared pan to create the crust layer.
Step 3: Bake the Base
Bake the crust for about 12 minutes or until it just starts to turn golden around the edges. This step is key because it sets the foundation, so your caramelitas don’t end up soggy. Once baked, cool the crust for 10 minutes — this prevents the caramel from sliding off when you pour it later.
Step 4: Melt the Caramel
While the base cools, melt the soft caramels with whole milk in a small saucepan over low heat. Stir occasionally for about 12 minutes until everything is smooth and creamy. Adding that pinch of flaky sea salt here is what really “wakes up” the flavors — I discovered this little secret after trying the recipe a few times.
Step 5: Layer Chocolate, Caramel, and Topping
Scatter the semisweet chocolate chips evenly over the warm crust. Immediately pour the melted caramel over the chocolate and gently spread it out — the heat will soften the chips underneath, creating a luscious layer. Finally, sprinkle the remaining oat crumble mixture on top and gently press down to flatten as much as possible without packing it too tight.
Step 6: Final Bake and Cool
Bake the assembled caramelitas for about 25 minutes. You’ll know they’re ready when the oat topping is golden brown and you see caramel bubbling around the edges. Remove from oven and let the bars cool completely right in the pan — patience here rewards you with cleaner cuts and the perfect gooey texture.
Pro Tips for Making Caramelitas Recipe
- Use Parchment Paper: I always line the pan with parchment that overlaps the edges for easy removal — no crumbled bars here!
- Don’t Rush Cooling: Let the bars cool fully before slicing so the caramel firms up and slices cleanly.
- Low and Slow Caramel Melt: Melting the caramels slowly with milk prevents scorching and keeps the sauce silky smooth.
- Press Topping Gently: Flatten but don’t pack the oat topping to preserve that lovely crumbly texture on top.
How to Serve Caramelitas Recipe
Garnishes
I usually keep it simple and sprinkle a tiny pinch of flaky sea salt on top just before serving — it contrasts beautifully with the sweetness. Sometimes, I dust a little powdered sugar for a festive look when bringing these to parties.
Side Dishes
Caramelitas themselves are rich, so I like pairing them with a fresh fruit salad or a scoop of vanilla ice cream if serving as dessert. A hot cup of coffee or robust tea is also the perfect companion for these bars.
Creative Ways to Present
For special occasions, I slice the bars into small bite-sized squares and serve them on a tiered dessert stand or gift them wrapped in parchment tied with colorful twine. It always makes a lovely impression when giving as homemade treats.
Make Ahead and Storage
Storing Leftovers
I store leftover caramelitas in an airtight container at room temperature for up to 4 days. Keeping them covered prevents them from drying out, and they actually taste better after sitting a day or two as the flavors meld.
Freezing
If I want to keep them longer, I wrap individual bars tightly in plastic wrap and freeze in a zip-top bag. They freeze beautifully for up to 3 months — just thaw at room temp before serving.
Reheating
When reheating, I warm the bars in the microwave for about 10 seconds to soften the caramel and chocolate again — but be careful not to overheat, or the oat topping might get too soft.
FAQs
-
Can I use vegan butter or dairy-free alternatives in this Caramelitas Recipe?
Absolutely! You can substitute unsalted butter with vegan butter or a dairy-free margarine. Just make sure your caramels and chocolate chips are also dairy-free to keep the recipe fully vegan-friendly.
-
What’s the best way to cut caramelitas without them falling apart?
Let the bars cool completely before slicing, ideally chill them for an hour to firm up the caramel. Use a sharp knife and wipe it clean between cuts for neat squares that hold together well.
-
Can I make caramelitas ahead for a party?
Yes! Caramelitas hold up well and even taste better after a day or two. You can bake them a day ahead, store them covered at room temperature, and serve them fresh on the day of your party.
-
Is there a gluten-free version of this recipe?
You can make this recipe gluten-free by using certified gluten-free oats and swapping all-purpose flour for a gluten-free flour blend. Just make sure to check all your ingredients, especially caramel and chocolate chips, for gluten content.
Final Thoughts
Honestly, this Caramelitas Recipe has become a staple in my baking rotation because it’s both easy and so irresistibly delicious. I love sharing it with friends who always ask for the recipe afterward, and I think you’ll enjoy making and eating these bars just as much. Give it a try the next time you want something sweet but not fussy — I promise you’ll end up with a new favorite treat!
Print
Caramelitas Recipe
- Prep Time: 15 mins
- Cook Time: 37 mins
- Total Time: 1 hr 12 mins
- Yield: 12 servings 1x
- Category: Dessert
- Method: Baking
- Cuisine: American
Description
Deliciously chewy and gooey Carmelitas feature a buttery oat crust layered with rich melted caramel and semisweet chocolate chips, perfect for an indulgent dessert or snack.
Ingredients
Crust and Topping
- 2 cups (240 g) all-purpose flour
- 2 cups old-fashioned oats
- 1 1/2 cups (3 sticks) unsalted butter, softened
- 1 1/2 cups (320 g) packed light brown sugar
- 2 tsp pure vanilla extract
- 1/4 tsp kosher salt
- Cooking spray
- 2 cups semisweet chocolate chips
Carmel Layer
- 1 (11-oz.) bag soft caramels
- 1/4 cup whole milk
- Pinch of flaky sea salt
Instructions
- Preheat and Prepare Pan: Preheat your oven to 350°F (175°C). Grease a 13″ x 9″ baking pan with cooking spray, then line it with parchment paper for easy removal.
- Mix Crust and Topping: In a large bowl, combine the flour, oats, softened butter, brown sugar, vanilla extract, and kosher salt until the mixture becomes crumbly but holds together when pressed. Reserve half of this mixture for the topping.
- Form and Bake Crust: Press half of the oat mixture firmly into the prepared pan to form the crust. Bake in the preheated oven until the crust begins to turn golden brown, about 12 minutes. Remove and let it cool for 10 minutes.
- Melt Caramel: While the crust is baking, place the caramels and milk in a small saucepan over low heat. Stir occasionally until the caramels melt completely and the mixture is smooth, about 12 minutes. Stir in a pinch of flaky sea salt for flavor balance.
- Assemble Layers: Evenly scatter the semisweet chocolate chips over the cooled crust. Pour the warm caramel evenly over the chocolate chips and gently spread it out to cover them. Top the caramel layer with the reserved oat mixture, pressing it down gently to flatten.
- Bake Final Carmelitas: Return the pan to the oven and bake until the oat topping is golden and the caramel is bubbling around the edges, about 25 minutes. Remove from oven and allow to cool completely in the pan before slicing into 12 squares.
Notes
- Use parchment paper for easier removal and cleaner slices.
- Ensure the caramel and milk mixture is melted slowly on low heat to avoid burning.
- Allow the bar to cool completely for clean slicing and proper set.
- Store leftovers in an airtight container at room temperature for up to 4 days.
Nutrition
- Serving Size: 1 bar (approximately)
- Calories: 380
- Sugar: 22g
- Sodium: 150mg
- Fat: 22g
- Saturated Fat: 13g
- Unsaturated Fat: 8g
- Trans Fat: 0.2g
- Carbohydrates: 45g
- Fiber: 3g
- Protein: 4g
- Cholesterol: 55mg

Your email address will not be published. Required fields are marked *