
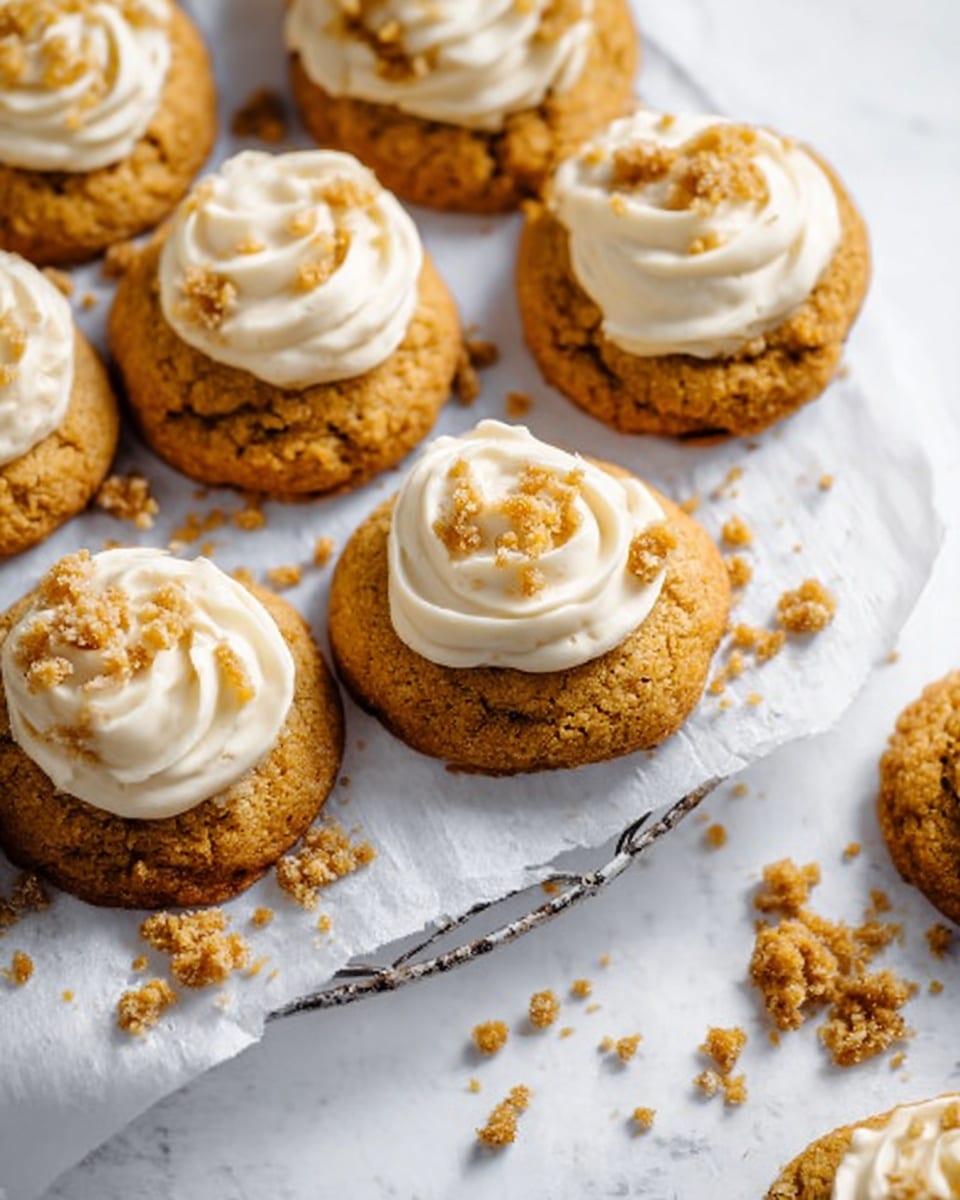
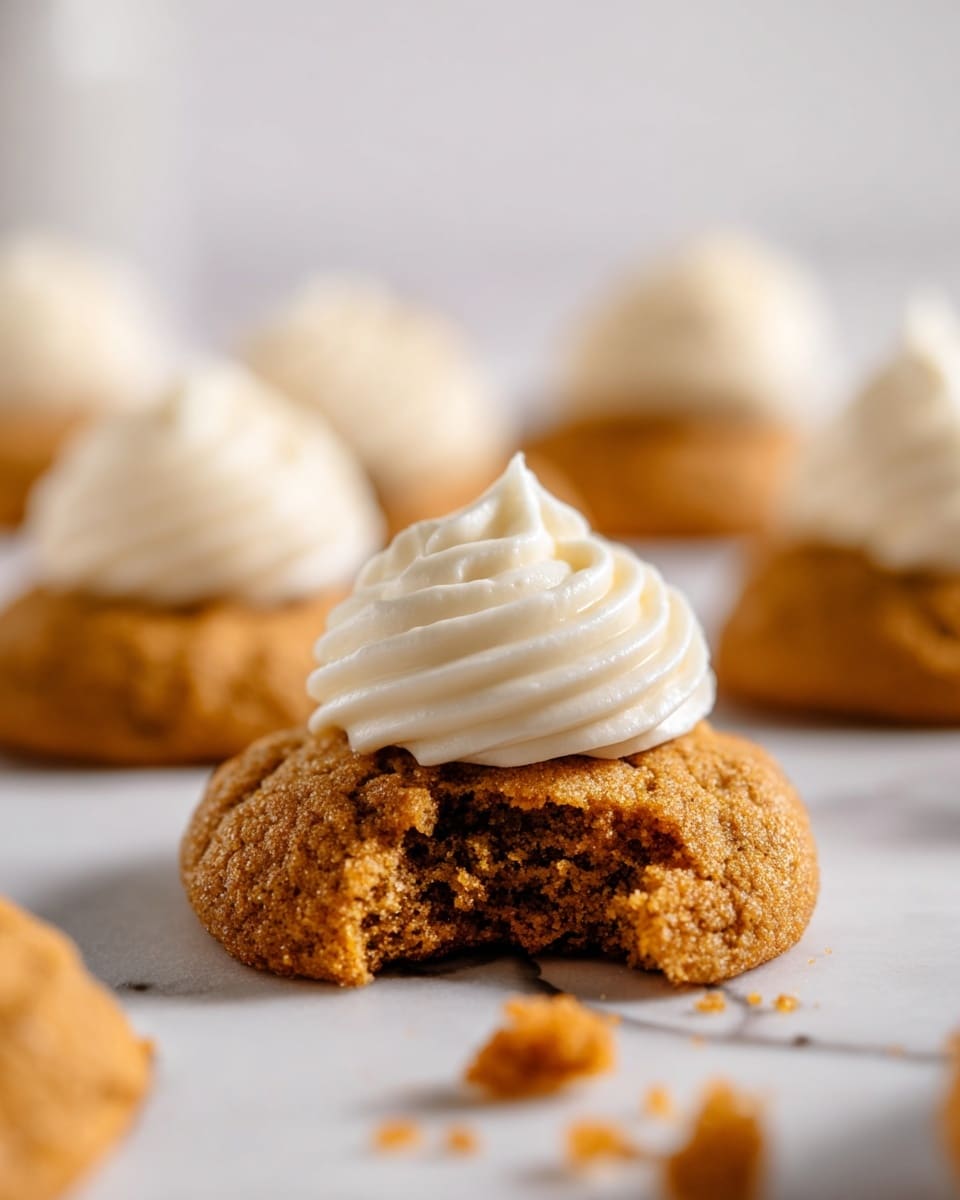
There’s something utterly delightful about combining the cozy flavors of pumpkin with creamy cheesecake, and that’s exactly why I’m so excited to share this Cheesecake-Filled Pumpkin Thumbprint Cookies Recipe with you. These cookies are soft, tender, and bursting with warm autumn spices, while the luscious cheesecake filling adds a tangy, sweet surprise in every bite—you’ll find they’re perfect for fall gatherings, holiday cookie trays, or just an excuse for a warm mug of coffee and a little treat.
When I first tried making these cookies, I was amazed at how simple they were to whip up yet how impressive they looked on the platter. Plus, the thumbprint technique invites a bit of fun and personalization—you can fill the centers however you like. This Cheesecake-Filled Pumpkin Thumbprint Cookies Recipe is a keeper because once your friends or family taste one, they’ll be coming back for more, and you’ll have a new favorite to make every season.
Why You’ll Love This Recipe
- Perfect Fall Flavor Blend: The mix of pumpkin and warm spices brings an irresistible autumn vibe to your cookie jar.
- Easy Yet Impressive: These cookies look fancy with minimal effort, great for any occasion or last-minute guests.
- Soft, Chewy Texture: You’ll find the cookies wonderfully tender, with a creamy cheesecake center that melts in your mouth.
- Customizable Filling: The cheesecake filling is a blank canvas for adding flavors or toppings to suit your taste.

Ingredients You’ll Need
These ingredients are simple pantry staples paired with fresh pumpkin puree and cream cheese, which together create that deliciously soft cookie base and the rich, smooth filling. Look for high-quality spices and fresh cream cheese to really make a difference in the flavor.
- All-purpose flour: Forms the soft cookie base, so be sure to measure accurately using a spoon and level method for the best texture.
- Cinnamon: Adds warmth and depth; fresh ground is ideal if you have it.
- Nutmeg: A subtle spice that complements the pumpkin beautifully.
- Ginger: Adds a bit of zing to balance the sweetness.
- Baking soda: Helps the cookies rise gently and stay tender.
- Salt: Enhances the spices and balances the flavors.
- Butter (softened): Use unsalted butter for full control over flavor and salt levels.
- Brown sugar: Adds moisture and that lovely caramel nuance.
- White sugar: Keeps the cookies crisp at the edges while tender inside.
- Large egg: Binds the dough together and enriches it.
- Vanilla extract: Rounds out the flavor wonderfully.
- Pumpkin puree: Gives body and that unmistakable autumn pumpkin flavor—don’t use pumpkin pie filling here!
- Butter (for filling): Softened to blend smoothly with cream cheese.
- Cream cheese (room temperature): Essential for a silky smooth cheesecake filling.
- Powdered sugar: Sweetens and thickens the filling perfectly.
Variations
I’ve found that while this Cheesecake-Filled Pumpkin Thumbprint Cookies Recipe is fantastic as is, it’s really fun to mix it up depending on what you have on hand or your flavor preferences. Don’t be afraid to experiment—this recipe holds up well to personal tweaks.
- Chocolate Drizzle: My family goes crazy for a simple drizzle of melted dark chocolate on top of the cheesecake filling—it adds a gorgeous finish and a little chocolatey richness.
- Spiced Filling: Add a pinch of cinnamon or pumpkin pie spice into the cream cheese filling for an extra burst of seasonal flavor.
- Nut Topping: Sprinkle crushed pecans or walnuts over the filling before it sets for a lovely crunch contrast.
- Gluten-Free Option: Substitute the all-purpose flour for a gluten-free baking mix, and watch how well this recipe adapts without sacrificing texture.
How to Make Cheesecake-Filled Pumpkin Thumbprint Cookies Recipe
Step 1: Prepare the Spice-Infused Dry Mix
Start by whisking together your flour, cinnamon, nutmeg, ginger, baking soda, and salt in a small bowl. This ensures the spices are evenly distributed and helps avoid pockets of flavor that might overpower the cookies. Trust me, taking this extra minute upfront leads to a perfectly balanced taste in every bite.
Step 2: Cream Butter and Sugars
In a large mixing bowl, beat the softened butter with both brown and white sugars until the mixture is fluffy and light. I like to use a hand mixer here, but a sturdy wooden spoon works too if you don’t mind the workout! This step is key to getting that tender crumb texture inside the cookies.
Step 3: Add Egg, Vanilla, and Pumpkin
Beat in the egg first and then add vanilla extract followed by pumpkin puree, mixing well after each addition. The pumpkin adds moisture and flavor, but it’s important to fully incorporate it for an even dough consistency. I’ve learned that if your pumpkin is too wet, it can affect the dough, so use one that’s thick and fresh.
Step 4: Combine Dry and Wet Ingredients
Gradually stir in the combined dry ingredients until everything comes together into a soft dough. Don’t overmix here—you want the dough just combined to keep the cookies tender and soft once baked.
Step 5: Shape and Bake the Cookies
Drop the dough by tablespoonfuls onto a parchment-lined baking sheet, spacing them a couple of inches apart. Bake in a preheated 350ºF oven for about 10 minutes. Look for firm edges but no browning—that’s the sweet spot. I discovered pressing the “thumbprint” right after baking with the back of a small spoon (or your thumb, if you prefer!) works best before the cookies cool and harden.
Step 6: Make the Cream Cheese Filling
While the cookies cool completely, beat the softened butter, cream cheese, powdered sugar, and vanilla extract together until smooth and creamy. The filling should be light and easy to pipe or spoon into the cookie indentations.
Step 7: Fill and Decorate
Fill each cooled cookie thumbprint with the cream cheese filling using a piping bag fitted with a star tip for a pretty swirl, or simply use a small spoon if that’s easier. My favorite tip is to use a small zip-top bag if you don’t have a piping bag—just cut the corner and pipe gently! You can sprinkle a little cinnamon, chopped nuts, or festive sprinkles on top while the filling is still soft.
Pro Tips for Making Cheesecake-Filled Pumpkin Thumbprint Cookies Recipe
- Use Room Temperature Ingredients: I’ve found that having butter and cream cheese at room temp makes mixing much smoother and helps the filling get perfectly creamy.
- Don’t Overbake Your Cookies: A few seconds too long and you’ll lose that soft, tender texture; watch closely and pull them at “just done.”
- Perfect Thumbprints Right Out of the Oven: Press the cookie centers immediately after baking—this prevents cracks or breaks later.
- Avoid Overfilling: Filling too much can cause the cheesecake to spill over during serving—less is more for a neat, beautiful look.
How to Serve Cheesecake-Filled Pumpkin Thumbprint Cookies Recipe
Garnishes
I usually go with a light dusting of ground cinnamon or a few festive sprinkles on the cream cheese filling just before it sets—it’s such a quick touch that adds charm and a hint of extra flavor. Sometimes I add a few finely chopped toasted pecans or walnuts to add crunch and texture that pairs so well with the soft cookie and creamy filling.
Side Dishes
These cookies are great alongside hot beverages—my go-to is a spiced chai latte or a rich cup of coffee. For holiday or brunch spreads, I like pairing them with orange slices or lightly whipped cream for a refreshing balance.
Creative Ways to Present
For special occasions, I’ve arranged these thumbprint cookies on tiered dessert trays alternating with mini pumpkins and colorful fall leaves for a seasonal vibe. Another fun idea is placing each cookie in a mini cupcake liner to keep things neat and easy to grab, which really delights guests at parties or potlucks.
Make Ahead and Storage
Storing Leftovers
I usually keep leftover cookies stored in an airtight container in the fridge since the cream cheese filling can soften quickly at room temperature. They stay fresh for about 3-4 days, though they’re honestly never around long enough to go stale in my house!
Freezing
If you want to freeze these cookies, I recommend freezing the baked cookies without the filling first. Once frozen solid, thaw and then pipe the cheesecake filling fresh before serving to keep the texture just right. From my experience, freezing with the filling already added can cause it to loosen or get watery upon thawing.
Reheating
Since these are best enjoyed soft and cool, I don’t usually warm them up after the filling is added. However, if freshly baked, you can let them cool slightly and enjoy them warm for an extra cozy experience. Otherwise, room temperature or chilled works perfectly and maintains that creamy filling consistency.
FAQs
-
Can I substitute canned pumpkin for homemade pumpkin puree in this recipe?
Yes! Canned pumpkin puree works perfectly in this Cheesecake-Filled Pumpkin Thumbprint Cookies Recipe, just make sure you use plain pumpkin puree and not pumpkin pie filling, which contains added sugars and spices that can alter the cookie flavor.
-
How do I prevent the cheesecake filling from melting or becoming runny?
The key is using cream cheese and butter at room temperature and beating them well with powdered sugar to create a firm filling. Also, keep the cookies refrigerated after filling and avoid leaving them out too long, especially in warm environments.
-
Can I make these cookies dairy-free?
While the cookie dough can be adapted using dairy-free butter substitutes, recreating the cheesecake filling without dairy is a bit trickier. You might try a vegan cream cheese alternative, but results may vary in texture and flavor.
-
What’s the best way to pipe the filling if I don’t have a piping bag?
Simply fill a small plastic sandwich bag with the cream cheese filling, twist the top to push out air, and cut a tiny corner off the bottom. Squeeze gently to pipe the filling into each thumbprint; you can even swirl the tip for a fancy look!
Final Thoughts
I absolutely love how these Cheesecake-Filled Pumpkin Thumbprint Cookies Recipe come together so effortlessly and how they bring that perfect cozy fall feel to any moment. Whether you’re baking for friends, family, or just yourself, these cookies never disappoint, blending soft spiced dough with a creamy, dreamy filling. I hope you enjoy making and sharing them as much as I do—they’re one of those little kitchen wins that always bring smiles around the table.
Print
Cheesecake-Filled Pumpkin Thumbprint Cookies Recipe
- Prep Time: 15 minutes
- Cook Time: 10 minutes
- Total Time: 25 minutes
- Yield: 21 cookies 1x
- Category: Dessert
- Method: Baking
- Cuisine: American
Description
These Easy Cheesecake Filled Pumpkin Thumbprint Cookies combine the warm flavors of pumpkin and spices in a soft cookie base with a creamy cheesecake filling. Perfect for fall, these cookies are simple to prepare and bake, featuring a delightful thumbprint filled with smooth cream cheese icing, making them an irresistible treat for gatherings or afternoon snacks.
Ingredients
For the Cookies:
- 1 1/4 cups all-purpose flour
- 1 teaspoon cinnamon
- 1/4 teaspoon nutmeg
- 1/4 teaspoon ginger
- 1/2 teaspoon baking soda
- 1/4 teaspoon salt
- 1/2 cup butter, softened
- 1/4 cup packed brown sugar
- 1/4 cup white sugar
- 1 large egg
- 1/2 teaspoon vanilla extract
- 1/2 cup pumpkin puree
For the Filling:
- 2 tablespoons butter, softened
- 4 tablespoons (2 oz) cream cheese, at room temperature
- 1 cup powdered sugar
- 1/2 teaspoon vanilla extract
Instructions
- Preheat Oven: Preheat your oven to 350ºF (177ºC) to ensure it reaches the proper baking temperature while you prepare the dough.
- Mix Dry Ingredients: In a small mixing bowl, combine the all-purpose flour, cinnamon, nutmeg, ginger, baking soda, and salt. Set this mixture aside for later.
- Cream Butter and Sugars: In a large mixing bowl, beat the softened butter along with the brown sugar and white sugar until the mixture turns light and fluffy, creating a smooth base for your cookies.
- Add Wet Ingredients: Beat in the egg, followed by the vanilla extract and pumpkin puree. Mix thoroughly after each addition until fully incorporated.
- Incorporate Dry Ingredients: Slowly stir in the flour spice mixture into the wet ingredients until the cookie dough is fully combined and uniform.
- Shape Cookies: Drop the cookie dough by tablespoons onto a parchment-lined baking sheet, spacing them adequately to allow for slight spreading during baking.
- Bake: Place the baking sheet in the oven’s center rack and bake for 10 minutes, or until the cookies are firm yet not browned, indicating they are just done.
- Create Thumbprints: Immediately after removing the cookies from the oven, press a thumbprint into the center of each cookie using the back of a spoon or similar utensil to create a well for the filling. Allow the cookies to cool completely on the baking sheet.
- Prepare Filling: While the cookies cool, combine the softened butter, cream cheese, powdered sugar, and vanilla extract in a bowl. Beat them together until the mixture is smooth and creamy.
- Fill Cookies: Once fully cooled, use a piping bag fitted with a star tip (or a small plastic bag with the corner cut off) to fill each thumbprint with the cream cheese icing, applying gently to create a swirl effect if desired.
- Add Toppings: Optionally, sprinkle any desired add-on toppings over the icing before it sets to enhance flavor and presentation.
Notes
- If you don’t have a piping bag, fill a small plastic bag with icing, twist the top to remove air, cut a tiny corner off the bottom, and gently squeeze to pipe and fill the cookies.
- Moving the piping bag in a quick circular motion while filling creates a pretty swirl effect on each cookie’s icing.
- For best results, ensure cookies are completely cooled before filling to prevent melting of the cream cheese icing.
Nutrition
- Serving Size: 1 cookie
- Calories: 92
- Sugar: 11g
- Sodium: 81mg
- Fat: 2g
- Saturated Fat: 1g
- Unsaturated Fat: 0.5g
- Trans Fat: 0.05g
- Carbohydrates: 17g
- Fiber: 0.4g
- Protein: 1g
- Cholesterol: 13mg

Your email address will not be published. Required fields are marked *