

Miniature Baked Cheesecakes are pure bliss in a bite-sized package. This recipe delivers all the decadence and velvety texture of a classic cheesecake but simplifies the process, making it absolutely perfect for hectic weeknights or when you crave something sweet without all the fuss. No fancy equipment is needed—just everyday ingredients, a muffin tin, and, most importantly, a few hungry dessert lovers. Imagine a buttery cookie crust topped with a silky, tangy cheesecake filling, finished off with clouds of whipped cream and fresh strawberries. Irresistible, uncomplicated, and ready in about 40 minutes!
Why You’ll Love This Recipe
- Effortless Elegance: These cheesecakes are as impressive as any bakery treat, but you’ll be amazed at how little effort it takes to make them.
- Speedy Preparation: From start to finish, you’re just 40 minutes away from dessert heaven. No need to wait hours for a large cheesecake to bake and set.
- Individual Portions: Mini cheesecakes mean less mess and easy serving—no slicing needed!
- Customizable: With endless topping possibilities, each person can make their cheesecake just the way they like.
- Perfect for Any Occasion: Whether hosting a dinner, packing a picnic, or simply treating yourself, these cheesecakes fit the bill.

Ingredients You’ll Need
A few well-chosen ingredients come together to create magic here:
- Butter Cookie Crumbs: For a rich, crumbly base that’s miles better than basic graham crackers. Crisp butter cookies add more flavor.
- Melted Butter: Holds the crust together and gives it that melt-in-your-mouth quality.
- Cream Cheese: The backbone of every good cheesecake—always use full-fat for the best texture and flavor. Make sure it’s softened for easier mixing.
- Granulated Sugar: Adds just enough sweetness to balance the tang of the cream cheese.
- Large Egg: Binds everything together, creating that classic, custardy cheesecake texture.
- Heavy Whipping Cream: For extra creaminess and a smooth, luscious filling.
- Lemon Juice: Don’t skip this! A splash brightens up all the flavors and gives the cheesecake a subtle tang.
- Whipped Cream: For the topping—homemade or store-bought both do the trick.
- Chopped Strawberries: Juicy, vibrant, and fresh, strawberries are the perfect finish for a mini cheesecake.
Tip: Always line your muffin tin with cupcake liners for easy removal and perfect presentation.
Variations
Looking to make this dessert your own? It’s incredibly easy to riff on this recipe:
- Swap the Crust: Try chocolate wafers, graham crackers, or even ginger snaps for a fun twist.
- Flavor the Filling: Add a teaspoon of vanilla extract or swap lemon juice for orange or lime zest to change things up.
- Toppings Galore: Think beyond strawberries—use blueberries, raspberries, a drizzle of caramel, chocolate shavings, or crushed nuts.
- Dairy-Free: Use plant-based cream cheese and coconut cream for a dairy-free version. The texture turns out surprisingly well!
- Mini Cheesecake Bars: Use a square baking dish lined with parchment and cut into bars for something a little different.
How to Make Miniature Baked Cheesecakes
Step 1: Prepare the Crust
Start by preheating your oven to 350°F (175°C). In a bowl, mix together the butter cookie crumbs and melted butter until the mixture looks like wet sand—this is what’s going to hold your crust together.
Line 8 sections of your muffin tin with cupcake liners. Spoon an even amount of the crumb mixture into each liner and use the back of a spoon to press it down firmly, creating a compact, even crust.
Step 2: Make the Filling
In a mixing bowl, beat the softened cream cheese and sugar together until it’s completely smooth and creamy—no lumps! Add the egg, heavy whipping cream, and lemon juice, beating just until everything is incorporated and the mixture looks silky.
Step 3: Assemble and Bake
Spoon the filling over the crust in each muffin cup, dividing it as evenly as you can. Smooth out the tops so they bake up nice and even.
Bake for 20 minutes. You’ll know they’re ready when the centers are just set but still have a slight wobble—that’s the secret to creamy cheesecake!
Step 4: Chill and Top
Let the mini cheesecakes cool to room temperature, then transfer the whole pan to the refrigerator for at least an hour. Chilling is important for the best flavor and texture.
Just before serving, top your mini cheesecakes with a dollop of whipped cream and a generous sprinkle of chopped strawberries. Perfection, plain and simple.
Pro Tips for Making the Recipe
- Use Room-Temperature Ingredients: This helps everything blend smoothly and prevents lumps in your filling.
- Don’t Overbake: Slightly jiggly centers are ideal—they’ll firm up as they cool.
- Press the Crust Firmly: A tightly packed crust makes removal easier and gives each cheesecake a sturdy base.
- Cool Gradually: Let cheesecakes cool at room temperature before refrigerating to prevent cracks.
- Go Fresh on Toppings: Fresh fruit keeps these cheesecakes light and lively.
How to Serve

Serve these delightful little cheesecakes chilled—straight from the fridge is best for that classic creamy texture. If you want to get fancy, add an extra swirl of whipped cream, extra berries, or even a drizzle of berry sauce. These pair beautifully with a hot cup of coffee or even a glass of sparkling wine. For a portable treat, they’re easy to pack into lunchboxes or picnic baskets. You can even set up a “mini cheesecake bar” with different toppings for a fun make-your-own dessert activity at gatherings.
Make Ahead and Storage
Storing Leftovers
Place leftovers in an airtight container and store them in the refrigerator. They’ll keep perfectly for up to 5 days, staying just as creamy and delicious.
Freezing
Mini cheesecakes freeze beautifully! Arrange them on a tray, freeze until solid, then wrap individually and store in a sealed container or freezer bag for up to 2 months. Thaw overnight in the fridge before serving.
Reheating
No reheating needed—these are meant to be enjoyed cold. If you do like them a little warmer, let them come to room temperature for 10–15 minutes before serving.
FAQs
Can I make these cheesecakes ahead of time?
Absolutely! In fact, making them ahead allows the flavors to develop and the texture to set perfectly. Prep a day or two in advance and keep them chilled until ready to serve.
What if I don’t have butter cookies for the crust?
No problem. Any crisp cookie will do—graham crackers, vanilla wafers, even Oreos (without the filling) for a chocolatey twist.
Do I have to use fresh strawberries?
Fresh strawberries are ideal, but you can certainly use other fruits or even a spoonful of jam or fruit compote if that’s what you have on hand.
How do I know when the cheesecakes are done baking?
Look for set edges and slightly jiggly centers. Overbaking leads to dry, crumbly cheesecakes, so be attentive—it’s better to err on the side of underbaked, as they’ll firm up once chilled.
Final Thoughts
Miniature Baked Cheesecakes are endlessly satisfying, straightforward to prepare, and destined to become a staple in your dessert lineup. With their creamy centers, dreamy crust, and vibrant toppers, you’ll find yourself making them for every occasion—or no occasion at all. Give this recipe a try; you won’t believe how easy it is to bring bakery-worthy cheesecakes to your own kitchen. Enjoy every bite and don’t be afraid to get creative with your toppings and crusts!
Print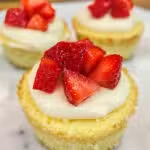
Miniature Baked Cheesecakes Recipe
- Prep Time: 20 minutes
- Cook Time: 20 minutes
- Total Time: 40 minutes
- Yield: 8 1x
- Category: Desserts
- Method: Baking
- Cuisine: American
- Diet: Vegetarian
Description
These miniature baked cheesecakes feature a buttery cookie crust, creamy lemon-scented filling, and a sweet strawberry and whipped cream topping. Easy to prepare and perfect for entertaining, these single-serve cheesecakes are an irresistible treat for any occasion.
Ingredients
For the Crust:
- 1 1/2 cups crushed butter cookie crumbs
- 4 tbsp melted butter
For the Filling:
- 8 oz cream cheese, softened
- 1/3 cup granulated sugar
- 1 large egg
- 1/3 cup heavy whipping cream
- 1 tbsp lemon juice
For the Topping:
- Whipped cream (as needed)
- Chopped strawberries (as needed)
Instructions
- Preheat the Oven: Preheat your oven to 350 degrees Fahrenheit to ensure the cheesecakes bake evenly and thoroughly.
- Prepare the Crust: In a mixing bowl, combine the crushed butter cookie crumbs with the melted butter. Stir until the crumbs are evenly coated and the mixture resembles wet sand.
- Assemble Crusts: Line 8 muffin tin sections with cupcake liners. Divide the cookie crumb mixture evenly among the liners and press down firmly to create compact crusts at the base of each.
- Mix the Filling: In another mixing bowl, beat together the softened cream cheese and sugar until smooth and creamy. Then add in the lemon juice, egg, and heavy whipping cream. Mix until all ingredients are fully combined and the mixture is silky.
- Fill Muffin Tins: Spoon the cream cheese filling over each prepared crust in the muffin tin, dividing the mixture evenly between the 8 sections.
- Bake: Place the muffin tin in the preheated oven and bake for 20 minutes, or until the centers are just set and the edges look slightly puffed.
- Cool and Chill: Remove from the oven and let the cheesecakes cool in the muffin tin. Once at room temperature, transfer to the refrigerator and chill for at least 1 hour to set the filling completely.
- Add Toppings and Serve: Just before serving, top each mini cheesecake with a dollop of whipped cream and a sprinkling of chopped strawberries. Enjoy your delicious treat!
Notes
- For best results, use room temperature cream cheese to avoid lumps in the filling.
- You can substitute butter cookies for graham crackers if preferred.
- Customize the topping with other fruits, chocolate shavings, or fruit sauce.
- Chill thoroughly for firmer cheesecakes.
Nutrition
- Serving Size: 1 mini cheesecake
- Calories: 240
- Sugar: 13g
- Sodium: 155mg
- Fat: 17g
- Saturated Fat: 10g
- Unsaturated Fat: 6g
- Trans Fat: 0g
- Carbohydrates: 19g
- Fiber: 0g
- Protein: 3g
- Cholesterol: 65mg
